
On this page
Start here
Quick answer
A Maytag dryer drum that scrapes should be stopped before the sound damages the drum or another component. With the dryer off and empty, inspect the visible front and rear edges where the drum meets the cabinet for a coin, paper clip, safety pin, screw, nail, button, or other small hardware. Check whether the sound is present only with clothing, comes from the bottom or back, or remains when the empty drum is gently turned by hand with power disconnected. A loose item or a load-related noise may be removable from an accessible area, but persistent grinding or scraping with an empty drum makes worn drum bearings, roller shafts, glides, belt, idler, or another internal fault more likely. Do not open panels or run the dryer with a panel removed; leave it unplugged and arrange qualified appliance service for persistent, worsening, or hazardous noise.
Before you begin
Safety first
- This article supports only ordinary-access sound classification, empty-load observation, visible seam inspection, pocket and load checks, and safe external installation observation. Internal access to the drum support, rollers, glides, belt, idler, blower, motor, wiring, or controls should be performed by a qualified appliance technician with power isolated.
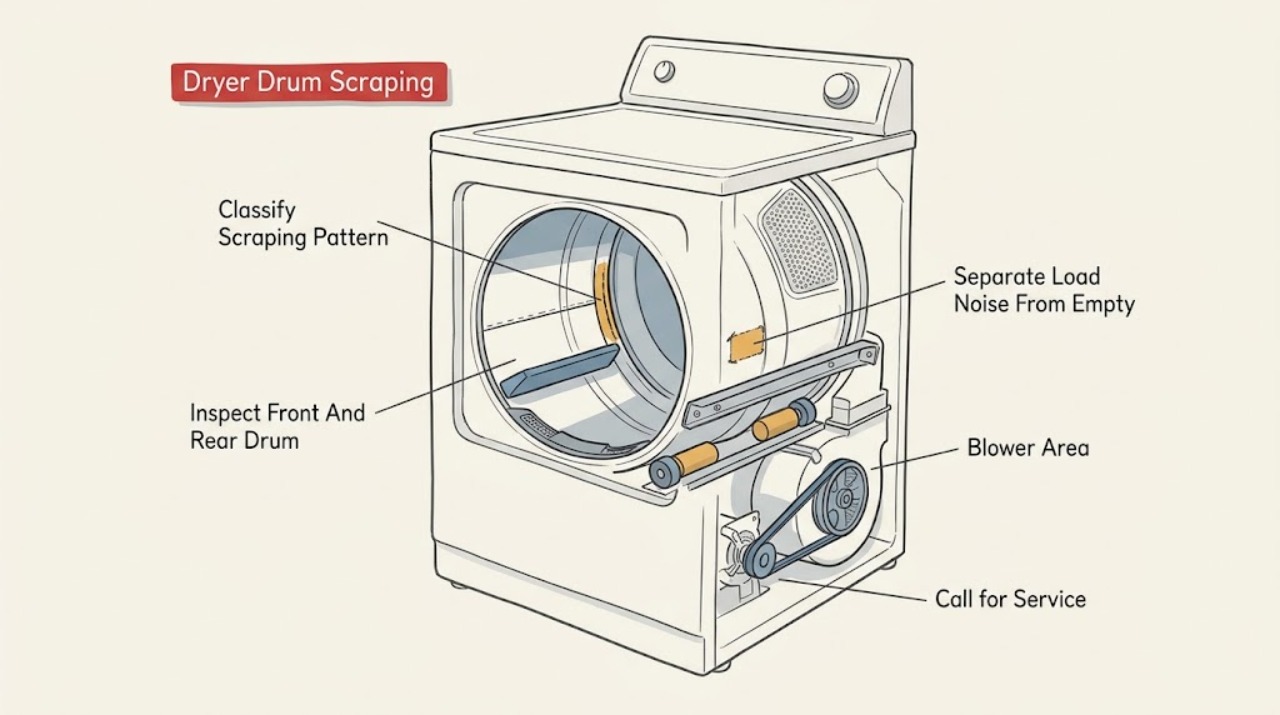
Work through in order
Diagnostic checks
Use only checks that match the exact appliance or system and its official guide.
-
Check 1
Stop the dryer and note the scraping pattern from outside: one scrape per revolution, a continuous grind, a rattle that follows clothing, a sound only at startup, or a noise that changes with heat or load. Record whether it comes from the front, rear, bottom, or blower area, and note any smoke, burning smell, sparks, or unusual heat.
Expected result: The sound is periodic at one drum position, follows a garment or load, remains with the drum empty, comes from the bottom or rear, or is accompanied by a hazard sign.
Next step: Keep the dryer off and use the corresponding empty-drum, load, and external-installation checks below. Do not keep running it to locate the sound by ear.
Stop if: Stop immediately for smoke, sparking, burning odor, a hot plug or cord, severe cabinet heat, or signs of a fire or electrical fault; disconnect power only if safe and arrange qualified service.
Why this matters
Why: A periodic empty-drum scrape points toward a seam obstruction or a rotating support issue; a load-dependent rattle points toward clothing hardware or a loose item; a persistent grind from the rear or bottom makes an internal bearing, roller, glide, belt, idler, or blower issue more likely. Smoke, odor, sparks, or severe heat is a stop condition.
-
Check 2
With the dryer off, unplugged when safe, and empty, use a light to inspect the visible front and rear edges of the drum where the drum meets the cabinet. Look for a coin, paper clip, safety pin, screw, nail, button, or other small hardware caught in the seam; do not insert a tool into the gap.
Expected result: A loose object is plainly visible, the seam is clear, the drum edge is damaged, or the scraping remains while the drum is empty.
Next step: Remove only a plainly accessible loose object, then keep the load out and listen for one brief model-approved test if the appliance has no hazard signs. If the item is trapped, the edge is damaged, or the noise remains, leave the dryer unplugged and arrange service.
Stop if: Do not reach deep into the seam, use a knife or metal tool, bend the drum, remove a cover, or run the dryer with a foreign object still trapped.
Why this matters
Why: A visible small object is a likely direct cause of a periodic scrape and may be removed only if it can be reached safely without dismantling anything. A clear seam with ongoing scraping makes a support, roller, glide, belt, idler, or other internal fault more likely.
-
Check 3
Check the removed clothes and pockets for zippers, buckles, buttons, rivets, coins, pens, or other hard items. Look only at the lint-screen opening and other ordinary-access areas for a loose item; do not remove the blower housing. With the dryer off, separate a balled-up load and exclude solid items such as shoes from the next test.
Expected result: The scraping or rattling occurred only with one garment or load, an item is visible at an ordinary-access opening, or the same sound remains with the drum empty.
Next step: Clear pockets and external loose items, use a normal loosely distributed load only once, and stop if the scrape returns. If the empty drum is still noisy, do not keep testing; arrange service.
Stop if: Do not reach into the lint chute or blower area, remove an item that is not plainly accessible, or dry shoes or other solid objects when they create impact or scraping.
Why this matters
Why: A load-specific sound is more consistent with garment hardware, a loose item, or a balled-up load than a failed drum support. Noise that remains empty is less likely to be caused by clothing and needs the internal-service boundary.
-
Check 4
With power disconnected and the drum empty, gently turn the drum by hand only if the model instructions and access make that safe. Note whether it turns smoothly, has a rough or tight spot, or makes the same scrape. Also inspect from outside whether all visible leveling legs contact the floor and whether the dryer, washer, pedestal, or a nearby object is touching or leaning against the cabinet.
Expected result: The drum turns smoothly and quietly, drags or grinds at one position, the dryer rocks, a leg is missing or loose, or an external object is contacting the cabinet.
Next step: Remove only an external object and correct only a clearly visible, model-approved leveling condition with the dryer stationary. If the drum is rough, hard to turn, or still scrapes, leave it unplugged and arrange qualified service.
Stop if: Do not crawl under the appliance, move a stacked unit, loosen structural hardware, force the drum, or open a panel to inspect supports or the belt.
Why this matters
Why: Smooth empty rotation with a load-dependent noise makes clothing or installation causes more likely. Dragging or grinding with the load removed makes a drum support, roller, glide, bearing, belt, idler, or foreign-object problem more likely. Rocking or contact can amplify noise but does not explain metal scraping inside the seam.
-
Check 5
Only if the seam is clear, the drum turns normally by hand, the installation is stable, and there is no odor, heat, smoke, or electrical concern, run one short model-approved cycle while staying nearby. Stop at the first scrape, grind, hard impact, or abnormal movement; do not repeat the cycle to reproduce it.
Expected result: The sound is gone, returns immediately with an empty drum, returns only with a particular load, or worsens as the drum runs.
Next step: Keep the dryer off and arrange qualified appliance service when scraping returns, persists empty, or comes from the rear or bottom. Provide the model, sound location, empty-drum result, load, and any external installation observations.
Stop if: Stop immediately for scraping that worsens, grinding, smoke, burning odor, sparks, unusual heat, drum instability, or a damaged cord or plug.
Why this matters
Why: A sound that disappears after a visible object or load issue is corrected supports that explanation, but recurrence with an empty drum keeps an internal fault likely. A worsening or continuous scrape may damage the drum, supports, belt, or other components.
-
Check 6
If the scraping persists after the safe checks, capture the exact Maytag model and serial information from an ordinary-access label without moving or opening the appliance. Record when the sound starts, whether it changes with load or drum position, and whether the dryer heats, tumbles, or stops normally.
Expected result: The drum scrapes while empty, is difficult to turn, the noise is continuous, a support area appears damaged, or the appliance has a repeated hazard symptom.
Next step: Leave the dryer unplugged and arrange qualified Maytag appliance service. Supply the model, timeline, sound location, empty-drum result, load result, and any odor, heat, code, or power observations.
Stop if: Do not remove the cabinet, run with a panel removed, reach toward the belt, motor, or blower, or order an internal part solely from the noise.
Why this matters
Why: These patterns make an internal drum support, roller, glide, bearing, belt, idler, blower, motor, or related assembly more likely; they do not identify a replacement part from sound alone.
Use your observations
Decision map
Find the observation that best matches what you see, then follow the next safe action.
-
PATH 01Safety boundary
What you see
Do this next
Turn the dryer off and remove only the plainly accessible object without tools or dismantling. Keep the dryer off and arrange service if it is trapped, the edge is damaged, or the sound continues empty.
Why this path and its safety boundary
Why it matters: The accessible object is the leading explanation for the scraping, although damage may remain if it has marked the drum or seam.
Safety stop: Do not reach into gaps, bend the drum, or operate with an object still caught.
-
PATH 02Safety boundary
What you see
Do this next
Clear pockets, separate the load, remove loose external items, and avoid drying solid items that cause impact. Stop and arrange service if the sound returns empty or becomes a continuous scrape.
Why this path and its safety boundary
Why it matters: Garment hardware, a loose item, a balled-up load, or a solid item is more likely than a failed drum support.
Safety stop: Do not keep using a load that creates hard scraping or impact, and do not reach into the blower area for a loose item.
-
PATH 03Safety boundary
What you see
Do this next
Clear contact and correct only an obvious leveling condition using the exact installation instructions with the dryer stationary. Arrange service if the drum still scrapes or the cabinet cannot be stabilized safely.
Why this path and its safety boundary
Why it matters: An external installation or contact condition may be amplifying noise, but it does not prove that an internal scrape is resolved.
Safety stop: Do not move a stacked dryer, crawl under it, or alter structural supports as a user check.
-
PATH 04Safety boundary
What you see
Do this next
Leave the dryer unplugged and arrange qualified service. Provide the noise location, empty-drum result, and whether the drum tumbles or heats before the sound occurs.
Why this path and its safety boundary
Why it matters: A drum roller, glide, bearing, roller shaft, belt, idler, blower, support, or other internal assembly is more likely than clothing or leveling.
Safety stop: Do not open panels, touch moving parts, or run the dryer to diagnose the internal assembly.
-
PATH 05Safety boundary
What you see
Do this next
Stop the cycle, keep clear, disconnect power only if it is safe without contacting a hazard, and obtain qualified appliance or electrical help.
Why this path and its safety boundary
Why it matters: This is an equipment, fire, or electrical hazard rather than a routine noise check.
Safety stop: Do not restart the dryer or attempt to remove a damaged internal part.
Helpful context
Understand the symptom
The sound pattern changes the next check
A sharp scrape or periodic tick at one point in each drum revolution makes a small object in the front or rear seam more likely. A scrape that follows the load can come from a zipper, buckle, button, coin, or other item. A continuous grind that remains with an empty drum shifts concern toward drum supports, rollers, glides, bearings, belt, idler, or blower components. Maytag's sound guidance helps narrow the area, but listening from outside cannot identify a failed internal part by itself.
Inspect only what is plainly accessible
Turn the dryer off before looking for objects at the front and rear edges of the drum. Remove a loose item only when it is plainly accessible without tools, reaching into a gap, or dismantling the dryer. Do not use a scraping sound as a reason to remove a cabinet panel, watch a moving belt, or reach near the motor or blower wheel.
Some noises are installation or load related
Maytag notes that a balled-up load, solid items such as shoes, loose or missing leveling legs, objects leaning on the dryer, a pedestal drawer, or a nearby washer can create noise or vibration. Correct only a clearly external condition with the dryer stationary. If the sound is metal-on-metal, persists empty, or is accompanied by heat or odor, use the service boundary rather than continuing to test.
Safety boundary
Stop conditions
- Stop immediately for smoke, sparking, burning odor, a hot plug or cord, severe cabinet heat, a stuck drum, visible damage, or scraping that rapidly worsens; disconnect power only when safe and keep the dryer unplugged.
- Do not run the dryer to locate a scrape, operate it with a cabinet panel removed, reach toward the belt, motor, blower, roller, or support, or bypass any safety device.
- Do not insert knives, screwdrivers, or other tools into the drum seam or lint chute, bend the drum, pull a trapped object, or move a stacked appliance as an ordinary user check.
- Stop repeated testing when the empty drum scrapes or grinds, is hard to turn, the sound comes from the rear or bottom, or the noise returns after a visible load or installation issue is corrected.
- Arrange qualified appliance service for persistent empty-drum scraping, suspected drum support, roller, glide, bearing, belt, idler, blower, motor, or control faults, and provide the model and symptom pattern.
Only after diagnosis
Potential parts
- dryer drum support roller, shaft, or glide
Consider this category only if service confirms persistent empty-drum scraping, grinding, rough rotation, or a worn support component after accessible objects and installation causes are ruled out.
Support rollers, shafts, glides, and mounting arrangements vary by exact Maytag model; confirm the model and manufacturer's fit information before ordering. - dryer drum bearing, drive belt, or idler
Consider this category only when a qualified technician identifies an internal rotating or tensioning component as the source of a persistent empty-drum scrape or grind.
These parts and repair procedures are model-specific; sound location alone is not proof of which component fits or has failed. - dryer blower wheel or motor assembly
Consider this category only when service confirms noise from the blower or motor area after the drum seam and load-related causes are excluded.
Blower and motor designs vary by model and may require internal electrical and mechanical access; use qualified diagnosis and exact model matching.
When checks do not resolve it
Need a professional?
Arrange qualified Maytag appliance service when scraping persists with an empty drum, the drum is hard or rough to turn, the sound comes from the rear or bottom, the noise returns after a visible object or load condition is corrected, or a support, roller, glide, belt, idler, blower, motor, or control fault is suspected. Seek urgent electrical help for smoke, sparking, burning odor, exposed wiring, a hot plug or outlet, severe overheating, or a repeated protective-device trip. Provide the exact model and serial information if safely visible, sound location and timing, empty-drum result, load and pocket check, leveling and contact observations, and any heat, odor, code, or power symptoms.
Safety scope: This article supports only ordinary-access sound classification, empty-load observation, visible seam inspection, pocket and load checks, and safe external installation observation. Internal access to the drum support, rollers, glides, belt, idler, blower, motor, wiring, or controls should be performed by a qualified appliance technician with power isolated.
Common questions
FAQ
What causes a scraping sound in a Maytag dryer drum?
Maytag says coins, paper clips, safety pins, screws, nails, and other small hardware can lodge where the drum meets the front or rear. Persistent scraping or grinding with an empty drum can instead involve a roller, glide, bearing, shaft, belt, idler, blower, or another internal assembly; sound alone cannot identify the failed part.
Can I remove an object from the dryer drum seam myself?
Turn the dryer off and inspect the visible front and rear drum edges. Remove an object only when it is plainly accessible without a tool, reaching into a gap, bending the drum, or removing a panel. If it is trapped or the scrape remains, leave the dryer unplugged and arrange qualified service.
Why does the scraping get louder when the Maytag dryer runs?
A rotating drum can make a seam obstruction, worn support, glide, bearing, belt, idler, or blower issue more apparent. Maytag uses sound location and whether the noise remains with an empty drum as clues, but a louder running noise is not a reason to remove the cabinet or keep testing.
Could an unlevel Maytag dryer sound like a scraping drum?
An unlevel dryer, missing leg, nearby contact, pedestal item, or washer vibration can create pounding or rattling and amplify other noise. Check only visible external conditions while the dryer is stationary. A metal scrape that persists with an empty drum still needs internal diagnosis.
When should I stop using a Maytag dryer that is scraping?
Stop for smoke, sparking, burning odor, severe heat, a damaged plug or cord, a stuck or hard-to-turn drum, grinding, visible damage, or a scrape that worsens. Also stop repeated tests when the empty drum remains noisy. Keep the dryer unplugged when safe and arrange qualified appliance service.
Read the exact guide
Official sources
- Sounds or Noises in a DryerMaytag Product Help · Manufacturer support page for Maytag dryer sounds; used for the front and rear seam inspection, small-object removal, load and leveling distinctions, and external noise checks.
- Possible Fixes for a Dryer That’s Making Loud NoisesMaytag · Manufacturer article for Maytag dryer loud noises; used for the distinction between loose items and load noise, sound-location clues, worn bearings, roller shafts, belts, glides, blower wheels, and service boundaries.
- Owner's ManualMaytag · Opened Maytag owner manual used as model-dependent reference for closed-door and Start behavior, power boundary, small objects at drum edges, leveling, and load-related noise; exact controls and procedures vary by model.
Community feedback
Share a repair observation
Share a plain-text repair observation. Accepted observations are published automatically; this page may take a moment to update.