
On this page
Start here
Quick answer
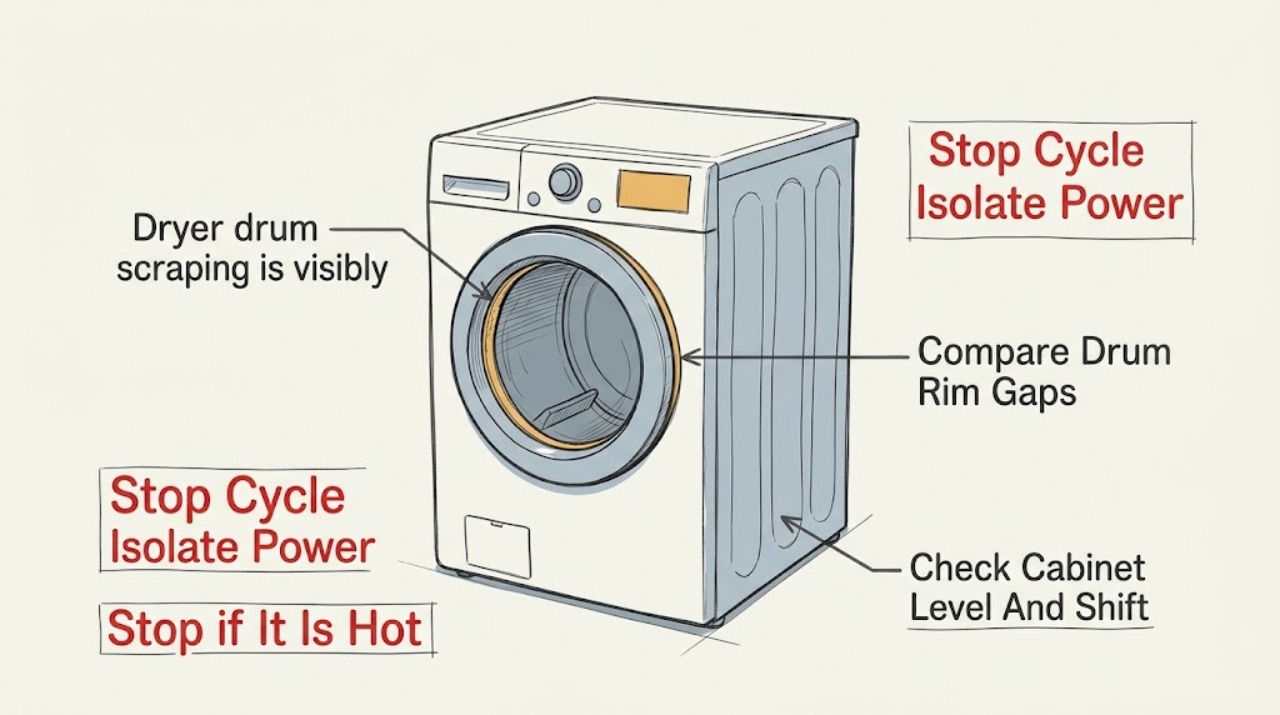
Stop the dryer, remove the load, and disconnect power before inspecting a drum that is visibly off-center or scraping. Do not run another cycle to see whether it settles. With the drum empty and the appliance safely disconnected, compare the gap around the front and rear rim, looking for a low side, a displaced drum glide or felt seal, a loose or damaged support roller, a foreign object in the seam, or a cabinet that rocks because it is not level. A minor loose object at the rim may be removed only if it is plainly accessible; a drum that rubs metal, sits low, binds, wobbles, has a damaged belt or support, or remains misaligned needs qualified appliance service. Do not open the cabinet, lift the drum, adjust the belt or pulley, or operate with a misaligned drum because continued scraping can damage the drum, seal, belt, and cabinet.
Before you begin
Safety first
- This article supports stopping the cycle, isolating power, removing the load from a stationary drum, taking external measurements or photos, clearing a plainly loose object, and checking cabinet stability when safe. A technician should handle cabinet access, drum removal, glides, seals, rollers, shafts, bearings, belts, idlers, motor work, gas connections, and final safety checks.
Work through in order
Diagnostic checks
Use only checks that match the exact appliance or system and its official guide.
-
Check 1
Stop the cycle, remove the clothing only if the drum is stationary, and disconnect the dryer from power at the plug or breaker. For a gas dryer, do not move the appliance or disturb the gas connection; leave gas isolation to a qualified person if access is unsafe.
Expected result: Record whether the drum stopped with a hard rub, whether there is a burning smell, smoke, exposed wiring, a damaged cord, heat at the cabinet, or a piece of clothing caught at the rim.
Next step: Keep the dryer out of service and move to the service branch for smoke, heat, wiring damage, a damaged cord, or a drum that cannot stop rubbing. Otherwise continue with the unplugged visual checks.
Stop if: Do not restart the dryer, reach into a moving drum, pull clothing from a rotating seam, or move a gas dryer through a tight or damaged connection.
Why this matters
Why: A hot smell, smoke, exposed wiring, or a hard metal scrape raises the risk of belt, motor, electrical, or rotating-part damage and makes further testing unsafe. A stationary, cool, empty drum permits visual inspection only.
-
Check 2
With the dryer empty and disconnected, use a flashlight to compare the visible gap between the drum rim and the front opening, then look at the rear edge if it is visible without removing a panel. Do not put fingers into the gap.
Expected result: Look for a gap that is smaller on one side, a drum rim sitting low, a tilted or oval-looking opening, a displaced felt seal or glide, bright rub marks, metal dust, or a foreign object at the front or rear seam.
Next step: Remove only a loose object that is fully visible and accessible without tools. For an uneven gap, visible wear, metal dust, or any part that is caught or displaced, photograph the area and arrange qualified service without rotating the drum.
Stop if: Do not pry the seal, pull a glide, lift the drum, push the rim back into place, or use a screwdriver in the drum seam.
Why this matters
Why: A small object at the seam can cause scraping, but an uneven gap, low rim, displaced seal, metal dust, or repeated contact indicates a support, bearing, glide, seal, or cabinet problem rather than a simple noise.
-
Check 3
From outside the appliance, check whether the dryer rocks, whether all visible feet contact a solid floor, and whether the cabinet has shifted against a wall, washer, vent, or pedestal. Use a level on the top only if the appliance can be checked without pulling a gas unit or stressing the vent.
Expected result: Record a stable level cabinet, a missing or loose foot, rocking, a soft or uneven floor, a cabinet leaning against another object, or a vent or cord pressing on the cabinet.
Next step: Clear external contact and have the appliance leveled only as the installation instructions permit. If the drum remains visibly misaligned, scraping, or low after the cabinet is stable, stop and arrange service for the drum supports and rotating path.
Stop if: Do not tilt or pull a gas dryer, place a hand under the cabinet, remove the vent to gain access, or use leveling to force a rubbing drum into position.
Why this matters
Why: An unlevel or rocking cabinet can change the apparent drum gap and add vibration, but leveling cannot correct a drum that remains visibly low or internally displaced. Contact with a wall or vent can add noise without causing the drum offset.
-
Check 4
Inspect the empty drum, door area, front and rear rim, and the lint-screen opening for a coin, paper clip, screw, pen, or other object. Use a flashlight and remove an object only when it is plainly loose and reachable without entering a sharp or enclosed path.
Expected result: Record an object at the drum seam, an object below the lint screen, a damaged or sharp lint-screen edge, clothing caught between the drum and seal, or no foreign object.
Next step: Remove a plainly loose object, close the lint screen, and recheck the gap without starting the dryer. For a sharp edge, caught fabric, displaced seal, or no object with visible misalignment, keep the dryer disconnected and request service.
Stop if: Do not reach past sharp edges, use a tool to fish through the lint chute, cut fabric from the seal, or test the dryer with an object still trapped.
Why this matters
Why: Foreign hardware at the seam or lint path can create scraping or rattling, while clothing catching at the drum edge can indicate a worn or displaced seal or glide. No object shifts the diagnosis toward support, alignment, or a drive component.
-
Check 5
Only if there is no hard metal contact, no loose seal, no caught fabric, and no smoke or heat, keep power disconnected and make one slow, gentle hand rotation from the drum opening. If the drum is visibly low enough to touch the opening, skip this check.
Expected result: Note smooth rotation, one scrape or tight spot per turn, a repeating noise at one position, wobble, a drum that stops under light hand pressure, or a belt-like slip without moving the drum squarely.
Next step: Stop at the first resistance or contact, leave the dryer disconnected, and give the technician the sound location and rotation position. A smooth empty rotation does not clear a visibly misaligned drum; it still needs model-specific inspection before use.
Stop if: Do not force the drum through a scrape, rotate it with the belt exposed, remove a panel, or reconnect power after a single smooth turn.
Why this matters
Why: A repeating contact point suggests a bent drum, displaced glide or seal, support roller, bearing, shaft, or foreign object. Wobble or a drum that will not turn smoothly is not corrected by a cycle and points to internal support or drive service.
-
Check 6
Collect the model number, a photo of the drum gap from the front, photos of any rub marks or debris, and the location and timing of the scrape. Do not remove the cabinet or order a part from the symptom alone.
Expected result: Record whether the offset is front, rear, or both; whether it changes by drum position; whether the sound is metal-on-metal, rubbing, squealing, or thumping; and whether it began after moving the dryer, overloading, or an object entering the drum.
Next step: Keep the dryer disconnected and arrange a qualified appliance inspection for a visibly misaligned drum, recurring scrape, wobble, caught clothing, metal dust, or any support or drive symptom. Use the exact model manual for any technician-approved repair procedure.
Stop if: Do not run an empty test cycle, bypass a door switch, change belt tension, loosen motor or bearing hardware, or continue use because the drum turns once by hand.
Why this matters
Why: A front-only gap change can involve glides or the front seal; a rear low drum can involve rollers, shafts, or bearings; a cabinet shift can be external; a belt or idler can make noise without being the cause of the visible offset. These are service-diagnostic patterns, not a safe basis for disassembly.
Use your observations
Decision map
Find the observation that best matches what you see, then follow the next safe action.
-
PATH 01Safety boundary
What you see
The drum is empty and stable, the front and rear gaps are even, and a coin, fastener, or other loose object is plainly visible at the drum seam or lint opening.
Do this next
Remove only the accessible loose object, close the lint screen, and recheck the drum gap without powering the dryer. Request service if the scrape, offset, or caught-clothing symptom remains.
Why this path and its safety boundary
Why it matters: A loose object is more likely than an internal support failure, although visible misalignment that remains after removal needs a separate inspection.
Safety stop: Stop if the item is wedged, the edge is sharp, the seal is displaced, or removal would require a tool or cabinet access.
-
PATH 02Safety boundary
What you see
The front rim sits low or has an uneven gap, clothing catches at the door edge, or a felt seal or drum glide looks displaced, worn, or marked by repeated contact.
Do this next
Keep power disconnected and request service to inspect the front support and seal assembly for the exact model. Provide photos of the gap and any marks; do not reseat the seal by hand.
Why this path and its safety boundary
Why it matters: A front glide, slide, felt seal, drum rim, or front support problem is more likely than a loose load or leveling issue. Continued operation can pull fabric into the gap and worsen the contact.
Safety stop: Do not pry the seal, replace a glide with a generic piece, sand the drum rim, or run a cycle to see whether the seal centers itself.
-
PATH 03Safety boundary
What you see
The rear of the drum is low or wobbles, the gap changes as the drum is turned, the empty drum binds, or scraping comes from the rear or lower cabinet.
Do this next
Leave the dryer disconnected and have a qualified technician inspect the drum support and drive path with the exact model information. Do not lift the drum or remove the cabinet to confirm the part.
Why this path and its safety boundary
Why it matters: A rear support roller, roller shaft, bearing, drum support, belt, idler, or related drive part is more likely. A visibly displaced drum is not a belt-tension adjustment problem for the user.
Safety stop: Stop immediately for hard binding, metal shavings, a loose drum shaft, a broken belt, smoke, or any exposed rotating or electrical part.
-
PATH 04Safety boundary
What you see
The dryer rocks or leans, a foot is missing or loose, the cabinet contacts another object, and the drum gap is otherwise even without internal rub marks.
Do this next
Clear external contact and correct leveling only as the installation instructions permit, without moving a gas dryer unsafely. Recheck the stationary gap; if the drum is still visibly misaligned or scraping, arrange service.
Why this path and its safety boundary
Why it matters: Installation movement or an uneven floor may be adding vibration and making the drum appear offset. This branch becomes less likely if the drum remains low or tilted after the cabinet is stable.
Safety stop: Do not use leveling feet to force drum clearance, pull the dryer by the gas line or vent, or operate while the cabinet rocks.
-
PATH 05Safety boundary
What you see
No loose object or external installation issue explains the symptom, or the drum remains visibly misaligned, scrapes metal, wobbles, catches clothing, or does not rotate smoothly while disconnected.
Do this next
Keep the dryer out of service and arrange qualified appliance repair. Supply the model, gas or electric type, exact sound location, drum-gap photos, rotation result, and any recent move, overload, or trapped object.
Why this path and its safety boundary
Why it matters: An internal drum support, seal, glide, bearing, shaft, belt, idler, or cabinet fault is more likely than a user-correctable obstruction. Running the appliance can spread wear to the drum, seal, belt, motor, or cabinet.
Safety stop: Do not bypass a safety switch, remove panels, energize the dryer with the drum exposed, or select a replacement part before the failed component and model fit are confirmed.
Helpful context
Understand the symptom
Visible offset changes the safe diagnosis
A scraping sound by itself can come from a coin or fastener caught at the front or rear drum seam. A drum that also looks low, tilted, or shifted is a different signal: the drum may no longer be supported squarely by its rollers, rear bearing, drum glides, or front seal, or the cabinet may have moved. Because the drum, belt, and seals share the same rotating path, continued operation can turn a small alignment problem into damage to several parts.
Use the exact model manual for any internal work
Dryer layouts vary by model and by gas or electric design. The checks below stay outside the cabinet except for a safe, manual rotation observation when the drum is empty, fully disconnected, and not making hard contact. Opening panels, removing the drum, testing a motor circuit, or changing a roller, belt, bearing, glide, or seal is service work; record the model and the observed offset for the technician instead of guessing at a part.
The sound location is useful but not conclusive
Scraping at the front rim points toward a foreign object, drum slide, glide, or felt seal; a low rear drum or movement that worsens under load points toward a rear bearing, roller, shaft, or support issue. Noise from the bottom can also be caused by loose or unlevel legs, while a belt or idler can create noise without moving the drum off center. These patterns narrow the next check but do not prove which part is failed without the exact model and a safe service inspection.
Safety boundary
Stop conditions
- Keep the dryer disconnected for a visibly low, tilted, wobbling, binding, or metal-rubbing drum, or when clothing is caught at the drum edge.
- Stop and seek service for smoke, burning smell, heat damage, exposed wiring, a damaged cord, metal dust, a broken belt, or a drum that cannot rotate smoothly by the permitted observation.
- Do not remove the cabinet, lift the drum, adjust a belt or idler, replace rollers or bearings, reseat a loaded seal, or test motor circuits unless the exact manual and a qualified technician make the procedure appropriate.
- Never reach into a moving drum, bypass a door switch, use tools in the drum seam or lint chute, or run repeated cycles to overcome scraping.
Only after diagnosis
Potential parts
- dryer drum glide, slide, or felt seal
Consider this category only when inspection confirms front-rim contact, caught fabric, a worn or displaced glide, or a damaged felt seal that explains the visible offset and scrape.
Confirm the exact dryer model, front bulkhead, drum-rim profile, seal position, and approved kit or material before selection; a similar-looking seal may not fit. - dryer drum support roller, shaft, or rear support
Consider this category only when the rear drum is low, wobbles, binds, or a technician confirms a worn roller, scored shaft, or failed support.
Match the model, roller diameter and width, shaft arrangement, bearing style, support bracket, and drum configuration; do not infer fit from the noise alone. - dryer drum bearing or bearing support
Consider this category only after service inspection confirms rear play, a worn bearing, or a support fault that causes the drum to sit off-center or scrape.
Verify the exact model and whether the design uses a bearing, bearing ring, rear support, or another assembly before ordering; these layouts are not interchangeable. - dryer drive belt or idler pulley
Consider this category only if the drum support is sound but service testing identifies belt slip, damage, pulley resistance, or a drive fault contributing to the scraping or wobble.
Confirm the exact model, belt length and rib pattern, pulley type, routing, and motor arrangement; a belt symptom does not by itself prove the drum alignment cause.
When checks do not resolve it
Need a professional?
Arrange qualified appliance service before using the dryer when the drum is visibly misaligned, remains low or tilted, scrapes metal, wobbles, binds, catches clothing, shows metal dust or seal damage, or stays off-center after loose debris and external cabinet contact have been ruled out. Service is also appropriate for a persistent scrape with no accessible cause, a belt or support symptom, smoke, heat, or electrical damage.
Safety scope: This article supports stopping the cycle, isolating power, removing the load from a stationary drum, taking external measurements or photos, clearing a plainly loose object, and checking cabinet stability when safe. A technician should handle cabinet access, drum removal, glides, seals, rollers, shafts, bearings, belts, idlers, motor work, gas connections, and final safety checks.
Common questions
FAQ
Why is my dryer drum scraping and visibly off-center?
A visible offset can come from a front glide or felt seal, rear roller, shaft, bearing, drum support, belt-related drive fault, cabinet movement, or a foreign object at the drum seam. Stop the dryer and disconnect power. Inspect the gap without touching loaded parts; an uneven gap, hard contact, wobble, or metal dust needs qualified service.
Can I keep running the dryer if the drum still turns?
No. A drum that still turns can continue wearing the seal, glide, belt, support, drum rim, or cabinet. GE advises discontinuing use when unusual noise remains, and a visibly misaligned drum should be inspected before another cycle.
What can cause scraping at the front of a dryer drum?
A coin or fastener at the front seam, a foreign object in the front seal, worn drum slides or glides, or a mispositioned felt seal can scrape. Remove only a plainly loose object with power disconnected; do not pry or reseat the seal, and arrange service for an uneven gap or caught clothing.
Can an unlevel dryer make the drum look misaligned?
A rocking or unlevel cabinet can change vibration and the apparent gap, and external contact with a wall or vent can add noise. Check stability from outside only when safe. Leveling does not fix a drum that remains low, tilted, wobbly, or in hard contact; that pattern needs service.
Which part should I order for a scraping, misaligned dryer drum?
Do not choose a part from the sound alone. A front glide or seal, rear roller or shaft, bearing, belt, idler, or support assembly can produce overlapping symptoms, and the exact model determines the fit. Give the technician the model, drum-gap photos, sound location, and safe rotation result before selecting a part.
Read the exact guide
Official sources
- Samsung dryer is too noisySamsung · Official Samsung dryer support guidance; use the installed model manual for layout-specific work.
- Dryer - NoisesGE Appliances · Official GE Appliances support guidance; component placement and access vary by model.
- Possible Fixes for a Dryer That’s Making Loud NoisesMaytag · Official Maytag brand guidance; part locations and repair procedures vary by exact model.
- Scraping Sound - DryerWhirlpool · Official Whirlpool dryer support guidance; exact drum and seal layout varies by model.
- [LG Dryer] Noise From the DryerLG Electronics · Official LG support guidance; actual dryer layouts and normal sounds vary by model.
- Why Is My Dryer Squeaking? 8 Possible CausesMaytag · Official Maytag brand educational guidance; it does not replace the exact service manual or identify a part from sound alone.
- Dryer - Black Marks on Collars and CuffsGE Appliances · Official GE Appliances support guidance; this symptom is a general diagnostic clue and is not a model-specific parts instruction.
Community feedback
Share a repair observation
Share a plain-text repair observation. Accepted observations are published automatically; this page may take a moment to update.