
On this page
Start here
Quick answer
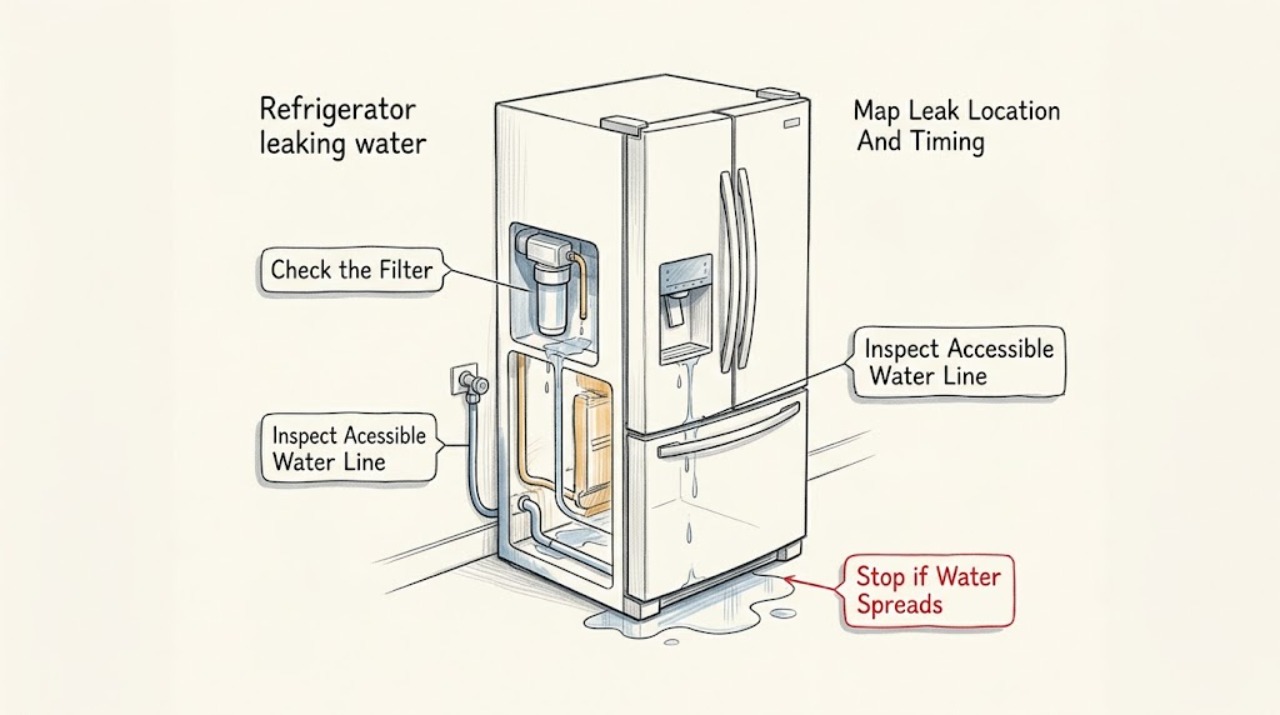
First locate where the water starts, because a Maytag refrigerator leak at the filter area, dispenser or door, rear supply connection, shelf, and floor can have different causes. Dry the accessible area and observe whether moisture returns after dispensing water, after the ice maker runs, during a refill, or without using the water system. If the filter was recently changed, check that it is seated straight and that its sealing surfaces and O-ring are not damaged, using the instructions for the exact model. If water is behind the refrigerator, inspect the accessible supply line and connections for cracks, kinks, or moisture without forcing fittings or moving the appliance into an unsafe position. Water on an interior shelf can be a leaking container or condensation; a rising bowl of water inside the cabinet, a continuous leak, water near electrical parts, damaged tubing, or a leak that persists after the visible checks needs qualified appliance service.
Before you begin
Safety first
- This article supports drying and ordinary visual inspection only, plus model-directed filter access when it can be done without force. Do not move the appliance, disconnect plumbing, open panels, remove doors, probe drains, or work near wet electrical components.
Work through in order
Diagnostic checks
Use only checks that match the exact appliance or system and its official guide.
-
Check 1
Dry only the accessible water and place a clean absorbent pad or shallow tray where it can be observed; note the first wet point without removing panels or pulling the refrigerator forward.
Expected result: Classify the return point as filter area, dispenser or door area, rear supply connection, interior shelf or wall, bottom front, or an unknown path. Record whether it returns after dispensing, after ice production, during refill, after door opening, or while the refrigerator is otherwise idle.
Next step: Use the location to choose the next check, take photographs of the wet point and model label, and keep the water or ice function unused if the leak is continuous or spreading.
Stop if: Stop if water reaches wiring or controls, the leak is heavy, the floor or cabinet is being damaged, or locating the source would require moving the refrigerator or opening a panel.
Why this matters
Why: A filter or door location focuses the water-system and dispenser checks; a rear location focuses the household supply line and fittings; an interior shelf can be condensation or a container leak; a bottom-front puddle may be water that traveled from another source or a drain-related issue. Timing narrows the source but does not prove a hidden component has failed.
-
Check 2
If moisture is around the filter area or began after a filter change, use the exact Maytag model instructions to access the filter and visually inspect the filter, filter head, housing, sealing surfaces, and visible O-ring; do not force the filter.
Expected result: Record whether the filter is seated straight, cross-threaded or displaced, cracked, missing an O-ring, wet at the head or housing, or impossible to inspect without tools or panel removal.
Next step: If the model instructions permit reinstalling it, align the filter as specified and make only the hand-tight, model-directed installation; if the housing, head, or O-ring is damaged or the fit is uncertain, stop and request model-specific service guidance.
Stop if: Do not force, cross-thread, overtighten, puncture, or substitute a filter or seal by appearance alone; stop if water continues to escape while the filter area is accessible.
Why this matters
Why: A displaced or damaged filter or seal can leak at the filter area and may also affect dispensing or ice production. A dry, correctly seated filter shifts attention toward the supply line, dispenser tubing, another connection, or a leak that has traveled from elsewhere.
-
Check 3
From the available front or side access, visually inspect the household water line, shutoff area, and visible refrigerator connection for cracks, kinks, moisture, or tubing that is not seated; do not loosen a wet fitting or pull the appliance by its line.
Expected result: Note whether the line is damaged, kinked against the wall, wet at the supply valve, wet at the refrigerator connection, or dry while water appears elsewhere.
Next step: Keep the refrigerator in its current safe position and arrange qualified service for a damaged line, wet fitting, inaccessible connection, or any work that requires moving the appliance or changing the household valve.
Stop if: Stop for a split line, active spray, a seized or leaking shutoff, water behind the cabinet, or any need to move the appliance near a wall outlet or disconnect plumbing.
Why this matters
Why: A damaged or kinked line and a wet connection support a supply-path leak or restriction. A dry accessible line makes a filter, dispenser tube, internal drain, or water that has migrated from another point more likely, but it does not rule out a concealed leak.
-
Check 4
If water appears under a door or at the dispenser, operate the dispenser only as normally intended while watching the accessible outlet and door-area tubing; hold the glass in place briefly after releasing the lever and do not remove hinge covers or door panels.
Expected result: Distinguish a few drops immediately after dispensing, a continuing drip, water under the door, or moisture at a door or hinge-area connection; note whether the filter was recently installed or the doors were recently removed.
Next step: If the drip is more than residual drops or returns without dispensing, stop using the dispenser and arrange service; provide the filter-change or door-installation history and photographs.
Stop if: Do not remove the door, hinge cover, tubing, or dispenser assembly, and stop if water can reach electrical controls or the leak is continuous.
Why this matters
Why: Maytag identifies a few residual dispenser drops as a normal possibility, while a continuing drip or water under the door can point to air after filter work, a dispenser line, or a connection disturbed during installation. A leak at a door or hinge area needs model-specific access rather than a generic tightening attempt.
-
Check 5
If water is inside the refrigerator, inspect containers and the accessible shelf or wall area for a crack, spill trail, frost melt, or condensation without removing interior panels or probing a drain.
Expected result: Record whether one container is wet or cracked, moisture is limited to a shelf, condensation is widespread, water is pooling on the cabinet floor, or water returns with no container or dispenser use.
Next step: Remove only the clearly leaking container if it can be handled safely; otherwise dry the area, keep food protected, and arrange service when water pools or returns without an obvious source.
Stop if: Do not scrape ice, probe a drain, remove sealed covers, or continue operation when water is near fans, lights, controls, or electrical connections.
Why this matters
Why: A wet or cracked container can explain a localized shelf drip, and Maytag notes that condensation can collect on a container. Pooling or recurring water without a container or water-system event makes an internal drain or concealed leak more likely and exceeds a safe visual check.
Use your observations
Decision map
Find the observation that best matches what you see, then follow the next safe action.
-
PATH 01Safety boundary
What you see
The leak starts at the filter area and the filter was recently changed, is not seated straight, or has a wet, damaged, or missing seal.
Do this next
Follow the exact model instructions for inspection or reinstalling the filter; stop and request service or model-specific replacement guidance for a cracked housing, head, or O-ring.
Why this path and its safety boundary
Why it matters: The filter-to-head or housing seal is more likely than a rear supply leak, but exact fit and the model's installation procedure are still unresolved.
Safety stop: Do not force, cross-thread, overtighten, or use a filter or seal selected only by appearance.
-
PATH 02Safety boundary
What you see
Water returns behind the refrigerator or at the household supply connection, and the accessible line is cracked, kinked, or wet at a fitting.
Do this next
Keep the appliance in a safe position, stop using the water and ice functions, and arrange qualified service for the line, valve, or connection.
Why this path and its safety boundary
Why it matters: A supply-line or connection leak is more likely; the filter and dispenser are not established as the source.
Safety stop: Do not pull the refrigerator by the tubing, loosen an active fitting, or work near wet electrical components.
-
PATH 03Safety boundary
What you see
Water appears under a door or continues dripping after dispensing, especially after filter replacement or door installation work.
Do this next
Stop using the dispenser and request model-specific service, providing the timing, filter history, door history, and leak location.
Why this path and its safety boundary
Why it matters: The dispenser tube, door-area connection, or air introduced during filter work is more likely than a shelf spill; a normal residual drop should not become a continuous leak.
Safety stop: Do not remove hinge covers, doors, or dispenser tubing, and stop if water reaches controls or wiring.
-
PATH 04Safety boundary
What you see
Water is limited to a shelf or container, and a cracked container, spill trail, warm item, or condensation pattern is visible without pooling on the cabinet floor.
Do this next
Remove or protect the clearly leaking container, dry the shelf, and monitor without probing panels or drains; arrange service if the moisture returns without an obvious cause.
Why this path and its safety boundary
Why it matters: A container or condensation explanation is more likely than a pressurized supply leak, but recurring pooling or water with no visible source needs service.
Safety stop: Stop if water pools, food safety is compromised, or moisture reaches fans, lights, controls, or electrical connections.
-
PATH 05Safety boundary
What you see
Water returns after drying, the source is not visible, the leak is continuous, the bottom is repeatedly wet, or the appliance or surrounding floor is being damaged.
Do this next
Stop the water and ice functions, protect the floor and food, and arrange qualified appliance service with photographs and the model number.
Why this path and its safety boundary
Why it matters: A concealed drain, internal tube, filter housing, valve, or migrated leak remains possible; repeated wiping does not identify the failed component.
Safety stop: Do not move the refrigerator, open sealed panels, disconnect plumbing, or continue operating near water and electrical components.
Helpful context
Understand the symptom
The leak location changes the diagnosis
Water at the front grille or floor can have traveled from a filter, dispenser line, door connection, supply line, or an internal drain path. Water behind the cabinet makes the household supply line and rear connections more relevant, while water on a shelf may come from a cracked container or condensation. Drying the area once and watching where moisture returns is more useful than replacing a part before the source is identified.
Treat the filter as a model-specific seal
A recently installed filter is a focused check, not proof that the filter itself is the only cause. Maytag guidance calls for correct seating and inspection of the filter, head, housing, and O-ring. Use the model instructions for removal and installation, keep the filter straight, and do not force or overtighten it. If the housing or head is cracked, or a seal is missing, stop and arrange service or obtain model-specific replacement guidance.
Keep water away from unsafe areas
Do not pull the refrigerator out by its tubing, loosen a wet connection, open sealed panels, or reach near wiring to find a hidden leak. If a leak is large, reaches electrical components, is damaging flooring or cabinetry, or cannot be isolated from ordinary access, stop using the water or ice functions and arrange qualified appliance service.
Safety boundary
Stop conditions
- Stop using the dispenser and ice maker when water is continuously leaking, spreading, or reaching controls, wiring, fans, or lights.
- Do not pull the refrigerator by the water tubing, loosen active fittings, open sealed panels, remove doors, or probe an internal drain.
- Stop for a cracked filter housing, damaged tubing, a wet or seized shutoff, water behind the cabinet, or water damaging flooring or cabinetry.
- Do not choose a filter, O-ring, tubing, valve, or drain component by appearance alone; identify the exact Maytag model and follow its instructions.
- Arrange qualified service when the leak source remains unknown after safe visual checks or returns after a model-directed filter inspection.
Only after diagnosis
Potential parts
- Maytag-compatible refrigerator water filter
Consider this category only if the exact model instructions and inspection show that the filter is cracked, damaged, incorrectly seated, or missing a required seal and the filter is confirmed as the leak source.
Confirm the exact Maytag model, filter design, installation direction, and manufacturer's fit information before ordering. - refrigerator water-filter O-ring or seal
Consider this category only if the exact filter assembly uses a replaceable seal and inspection confirms a missing, cut, flattened, or damaged O-ring at the leak point.
Confirm the exact filter head and seal specification with Maytag documentation or a qualified technician; do not substitute by appearance or compensate with overtightening. - refrigerator water supply tubing
Consider this category only if an accessible line is cracked or damaged and the model-specific connection and household plumbing diagnosis identify the line as the failed component.
Confirm the exact refrigerator connection, tubing specification, local plumbing requirements, and installation procedure before ordering or changing the line. - refrigerator dispenser or water inlet valve tubing assembly
Consider this category only when a qualified diagnosis identifies a leaking dispenser, door, or inlet-tube assembly after the filter and accessible supply path have been excluded.
Confirm the exact Maytag model, tube routing, connector style, and manufacturer's fit information; concealed or door-area work may require service.
When checks do not resolve it
Need a professional?
Arrange qualified appliance or plumbing service when the leak is continuous or heavy, water reaches electrical areas, the source is behind the cabinet or inside a sealed panel, a supply line or fitting is damaged, the filter housing or head is cracked, the dispenser or door tubing leaks, water pools inside the cabinet, the floor is being damaged, or the leak persists after the model-directed filter and accessible connection checks.
Safety scope: This article supports drying and ordinary visual inspection only, plus model-directed filter access when it can be done without force. Do not move the appliance, disconnect plumbing, open panels, remove doors, probe drains, or work near wet electrical components.
Common questions
FAQ
Why is my Maytag refrigerator leaking water onto the floor?
The source may be the filter area, a supply line or connection, dispenser or door tubing, an interior spill or condensation path, or a concealed drain. Dry the accessible area, identify the first wet point and timing, and use that pattern to choose the next safe visual check.
Can a recently changed refrigerator water filter cause a leak?
Yes. Maytag says a filter that is not seated correctly, is cross-threaded, or has a damaged or missing O-ring can leak at the filter area. Follow the exact model instructions and stop if the filter, head, housing, or seal is damaged or will not move without force.
Is a few drops from the Maytag water dispenser normal?
Maytag notes that a few drops after releasing the dispenser can occur. A continuing drip, water under the door, or moisture that returns without dispensing is not explained by that brief residual behavior; stop using the dispenser and arrange model-specific service.
What should I do if water is leaking behind the refrigerator?
From safe access, look for visible cracks, kinks, moisture, or an unseated tube at the household supply and refrigerator connections. Do not pull the refrigerator by its tubing or loosen a wet fitting. Arrange qualified service for an active or inaccessible leak.
When should I call for service on a leaking Maytag refrigerator?
Arrange service for a continuous or heavy leak, water near controls or wiring, a cracked filter housing or supply line, a door or dispenser tube leak, interior pooling without an obvious spill, floor damage, or any leak that persists after the model-directed filter and accessible connection checks.
Read the exact guide
Official sources
- What to Do if the Water Filter is Damaged or DrippingMaytag Product Help · Official Maytag Product Help guidance for a damaged or dripping refrigerator water filter; exact filter and model instructions control.
- What to Do if There is Water on the FloorMaytag Product Help · Official Maytag Product Help guidance for full-size refrigerators with water on the floor; exact model instructions control the installed appliance.
- Water Inside of RefrigeratorMaytag Product Help · Official Maytag Product Help guidance for side-by-side refrigerators with water inside; use the installed model's instructions when configuration differs.
- Leaking at the Bottom - Bottom Freezer RefrigeratorMaytag Product Help · Official Maytag Product Help guidance for bottom-freezer refrigerators; the location logic is useful for that configuration, while the installed model's manual controls.
- Leaking at the Top - Side by Side RefrigeratorMaytag Product Help · Official Maytag Product Help guidance for side-by-side refrigerators leaking at the top; configuration-specific tubing location must be confirmed from the installed model.
Community feedback
Share a repair observation
Share a plain-text repair observation. Accepted observations are published automatically; this page may take a moment to update.