
On this page
Start here
Quick answer
Stop using the oven until it is cool and the door can close without force. Look for a rack, pan, latch, hinge, or trim obstruction, then inspect the gasket from the side and bottom without rubbing, wetting, pulling, or trying to stretch it. Some oven gaskets intentionally have a gap at the bottom, but a gasket that is displaced, frayed, torn, or caught outside its channel can keep the door from seating. If the door was recently removed, the hinges may not be seated correctly. Do not force the door, bend a hinge, remove a heavy door, or run the oven or self-clean cycle with an unsafe seal; use the model manual or qualified appliance service for reseating or replacement.
Before you begin
Safety first
- Owner checks are limited to turning the oven off, waiting for it to cool, removing loose cookware or racks, visual inspection without disturbing the gasket, comparing the door gap, safely visible model identification, and documentation. A qualified technician should handle door removal, hinge springs or locks, latch repair, frame or glass damage, panel access, electrical work, and model-specific gasket replacement.
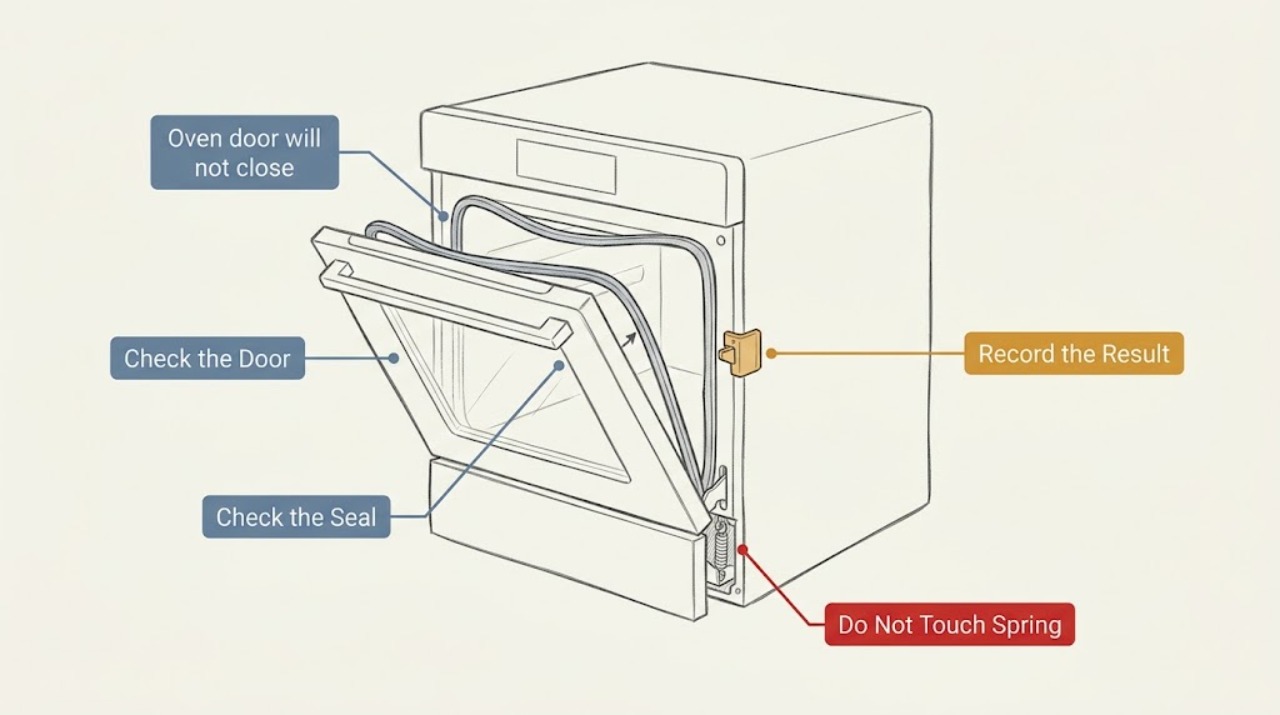
Work through in order
Diagnostic checks
Use only checks that match the exact appliance or system and its official guide.
-
Check 1
Turn the oven off and let the cavity, door, racks, and gasket cool completely. From the front, remove only loose cookware or a rack that slides out normally, and check that no foil, liner, pan, divider, or cleaning material projects into the door path.
Expected result: The door path is blocked by an item; the door remains obstructed after the item is removed; or the oven is still hot.
Next step: If a loose item was the only obstruction, close the cool door gently once. If the door still will not close, keep the oven out of use and continue with external inspection only after it is cool.
Stop if: Stop for a hot oven, a jammed rack, smoke, a damaged door, broken glass, or any need to force the door or reach into a hot cavity.
Why this matters
Why: An item in the frame can imitate a displaced gasket, but a persistent obstruction after cooling points toward the gasket, hinge, latch, frame, or physical damage. Heat makes seal and door inspection unsafe.
-
Check 2
With the oven cool, inspect the gasket around the door and frame from the side and bottom without rubbing, wetting, pulling, twisting, or stretching it. Look for a section outside its channel, folded over, pinched between the door and frame, frayed, torn, hardened, or missing; note whether the bottom has a deliberate opening.
Expected result: The gasket is evenly seated and intact; one section is displaced or folded; the material is torn or frayed; or the seal design includes a bottom opening.
Next step: If the seal is only visually displaced and the manual explicitly gives a safe reseating method, follow that model-specific method without force. For damage, uncertain construction, or no manual procedure, keep the oven unused and arrange appliance service for the correct gasket.
Stop if: Stop for exposed fibers, sharp edges, a seal that is glued or fixed in an unknown way, a torn section, or any need to use tools or force on the gasket.
Why this matters
Why: A displaced or damaged gasket can prevent the door from seating, while a designed bottom opening is not automatically a defect. Woven-fiberglass seals can be damaged by abrasion or cleaning, so a visual finding does not authorize pulling it back into place.
-
Check 3
From the side, bring the cool door toward the frame without pushing it shut and compare the gap at the left, right, top, and bottom. Look for a gasket bulge, a door edge contacting the frame early, or one side sitting higher; do not lift the door by its handle or force it against resistance.
Expected result: The gap is even but the gasket protrudes; one side is higher; the door stops at one corner; or the door closes gently but does not seal evenly.
Next step: Photograph the gap and keep the oven out of use. Use only the model manual for any permitted adjustment; otherwise have a technician inspect the hinge, frame, latch, and gasket together rather than ordering a seal based on appearance.
Stop if: Stop for a bent hinge, cracked glass, a loose door, a door that could fall, a sharp frame, or any need to remove or support the heavy door.
Why this matters
Why: An even door with a protruding seal keeps gasket displacement or incorrect seal fit in consideration. An uneven gap or corner stop makes hinge seating, a bent hinge, door distortion, latch interference, or frame damage more likely.
-
Check 4
With the oven cool and the door open, inspect only the visible latch area above the gasket and confirm that racks or dividers are fully seated and level. Do not press a latch, door switch, or lock arm into a different position and do not use self-clean to test closure.
Expected result: A latch or lock arm projects into the door path; a rack or divider is not seated; the visible latch is normal; or physical damage is present.
Next step: Remove only a loose rack or divider that slides normally and consult the model manual for a latch-specific procedure. If the latch remains out of position, is damaged, or the door still stops, leave the oven unused and call a qualified appliance technician.
Stop if: Stop for a stuck latch, exposed spring, broken lock, damaged switch, sharp metal, or any need to defeat a lock or force a mechanism.
Why this matters
Why: A projecting latch or incorrectly seated rack can stop closure even when the gasket is intact. A normal latch and rack path with a displaced seal keeps gasket or hinge alignment more likely; physical damage requires service.
-
Check 5
Determine whether the door was recently removed, reattached, installed, or serviced. Without lifting or removing it, compare the hinge arms and seating visually from both sides and look for a hinge that is extended, bent, or not aligned with its slot.
Expected result: The door was recently removed or installed; both hinges look evenly seated; one hinge is visibly different; or the history is unknown.
Next step: Follow the exact model manual for reattachment only if it can be done without lifting a heavy door or handling spring-loaded hinges; otherwise arrange service. Do not bend, release, or tension a hinge.
Stop if: Stop for a spring-loaded hinge, an unsecured heavy door, a bent hinge, missing hinge hardware, or any need to remove the door or manipulate hinge locks.
Why this matters
Why: Recent door work raises incorrect hinge seating or a latch position issue as a likely cause. A visibly different or bent hinge can hold the door out even when the gasket is correctly positioned; an unknown history does not justify removal as a diagnostic.
-
Check 6
Record the model and serial information from paperwork or a safely visible label, gasket location, seal material and damage, door-gap pattern, latch and hinge observations, recent door work, and photos taken while the oven is cool. Do not remove panels or the door to find identification.
Expected result: The gasket is intact but the door is misaligned; the gasket is damaged or displaced; the latch or hinge is abnormal; or the source remains uncertain.
Next step: Give the record to the manufacturer support route or a qualified appliance repair technician and request a model-specific gasket, hinge, latch, and frame assessment. Keep the oven out of service until the door closes and seals normally without force.
Stop if: Stop owner troubleshooting when the next step requires door removal, hinge or latch disassembly, electrical access, heat testing, or a replacement part not confirmed for the model.
Why this matters
Why: Model identity determines whether the seal is door-mounted or frame-mounted and whether a gasket can be replaced by an owner. Persistent misalignment, damaged parts, or an uncertain source require diagnosis of the door assembly, not a guessed gasket.
Use your observations
Decision map
Find the observation that best matches what you see, then follow the next safe action.
-
PATH 01Next step
What you see
A loose rack, pan, divider, foil, or cleaning item is visibly blocking the door path and the cool door closes normally after it is removed.
Do this next
Keep the gasket dry and undisturbed, confirm racks are seated, and use the oven only if the cool door closes evenly without force and the seal is intact.
Why this path and its safety boundary
Why it matters: The obstruction, not the gasket, was the immediate closure problem.
-
PATH 02Next step
What you see
The door gap is otherwise even, but the gasket protrudes, folds into the frame, is pulled out of its channel, frayed, torn, hardened, or missing.
Do this next
Do not rub, wet, pull, or stretch it. Use the exact model manual for any permitted reseating; arrange service for damage, uncertainty, or a seal that still prevents closure.
Why this path and its safety boundary
Why it matters: The gasket is a likely closure and sealing fault; its construction and attachment determine whether it can be reseated or must be replaced.
-
PATH 03Next step
What you see
One side of the door is higher, the gap is uneven, the door stops at one corner, or the problem began after door removal or installation while the gasket appears intact.
Do this next
Keep the oven unused and have the exact model procedure followed by a qualified person. Do not lift the door by its handle, bend hinge arms, or release spring tension.
Why this path and its safety boundary
Why it matters: Hinge seating, a bent hinge, door distortion, or frame alignment is more likely than a displaced gasket.
-
PATH 04Next step
What you see
The latch or lock arm projects into the path, a rack or divider is not seated, or the door stops before contacting the gasket.
Do this next
Remove only a loose rack or divider and follow model-specific latch guidance. If the latch is stuck or damaged, stop and call appliance service rather than forcing it.
Why this path and its safety boundary
Why it matters: A latch position or internal obstruction can prevent closure independently of the gasket.
-
PATH 05Next step
What you see
The oven is hot, glass or hinges are damaged, the door is loose or heavy, the gasket construction is unknown, or the source cannot be identified without disassembly.
Do this next
Turn the oven off, keep people away, and arrange qualified appliance repair. Do not run cooking or self-cleaning cycles to test the door.
Why this path and its safety boundary
Why it matters: Further owner handling risks burns, cuts, a falling door, spring release, or a damaged seal and does not provide a reliable diagnosis.
Helpful context
Understand the symptom
Cool and isolate the oven before touching the seal
Turn the oven off and wait until the cavity, door, racks, and gasket are cool. Remove only loose cookware or racks that can be lifted normally. A door that cannot close safely should not be used for cooking or self-cleaning; heat can escape, damage surrounding surfaces, and worsen a displaced seal.
A bottom gap may be intentional, but displacement is not
Some oven gaskets are designed with an opening at the bottom for airflow, and many woven-fiberglass gaskets should not be cleaned or wetted. Compare the seal's position with the model manual rather than trying to make it continuous around the door. A seal that is pulled out, frayed, torn, or folded over needs model-specific replacement or service.
Separate a gasket problem from a door problem
If the seal looks properly positioned but the door sits high on one side, stops before the frame, or was recently removed, hinge seating or alignment is more likely. Racks, dividers, a stuck latch, or physical damage can also block closure. Do not force the door or adjust hinges without the exact model procedure.
Use the manual for the actual gasket design
Door-mounted woven seals, cavity-frame seals, rubber seals, and latch arrangements do not share one universal reseating method. Record the model from a safely visible label or paperwork, and use its owner or installation instructions to decide whether the seal is serviceable or must be replaced. A generic photo or brand name is not enough to choose a gasket.
Safety boundary
Stop conditions
- Do not use the oven or self-clean cycle while the cool door cannot close and seat evenly without force.
- Do not rub, wet, pull, twist, stretch, glue, tape, or trim a woven or unknown gasket; do not assume a bottom opening is a missing section.
- Stop for hot surfaces, smoke, scorching, broken glass, sharp metal, a loose or falling door, bent or spring-loaded hinges, a stuck latch, or exposed fibers.
- Do not remove the door, release hinge locks or springs, bend hinges, open panels, or access wiring as a first homeowner check.
- Call qualified appliance service when the gasket is damaged or remains displaced, the door gap is uneven, the latch or hinge is abnormal, the door was recently removed, or the correct model-specific part or procedure is uncertain.
Only after diagnosis
Potential parts
- oven door gasket
Consider this only when the cool visual inspection confirms a torn, frayed, hardened, missing, or model-specific displaced seal and the door and hinges are otherwise aligned.
Confirm the exact oven model, gasket location, material, attachment method, and manufacturer procedure; do not choose a universal seal from appearance alone. - oven door hinge assembly
Consider this only when a qualified diagnosis finds a bent, damaged, or incorrectly seated hinge causing an uneven gap or corner interference.
Verify the exact model and hinge design; spring-loaded hinge handling and door support should be performed by qualified service. - oven door latch or lock mechanism
Consider this only when the latch or lock arm is confirmed to project into the door path, remain stuck, or fail to return after model-approved checks.
Confirm the exact model, latch type, and safety interlock arrangement; do not defeat, bend, or bypass a latch.
When checks do not resolve it
Need a professional?
Call a qualified appliance repair technician when a displaced gasket is torn, frayed, hardened, fixed in an unknown manner, or still prevents closure after a model-approved visual check; when the door gap is uneven; when a hinge, latch, frame, glass, or door is damaged; when the door was recently removed and will not reseat; or when the next step requires door removal, spring or hinge work, panel access, or a model-specific replacement. Keep the oven off and call urgently for smoke, scorching, broken glass, a falling door, or any burn or electrical hazard.
Safety scope: Owner checks are limited to turning the oven off, waiting for it to cool, removing loose cookware or racks, visual inspection without disturbing the gasket, comparing the door gap, safely visible model identification, and documentation. A qualified technician should handle door removal, hinge springs or locks, latch repair, frame or glass damage, panel access, electrical work, and model-specific gasket replacement.
Common questions
FAQ
Why will my oven door not close when the gasket is displaced?
A gasket pulled out, folded, frayed, or pinched can hold the door away from the frame. A rack, latch, hinge, frame, or door alignment problem can look similar, so inspect without forcing the cool door.
Can I push an oven gasket back into place?
Only if the exact model manual explicitly gives a safe reseating method and the seal is intact. Do not pull, stretch, rub, wet, glue, or trim an unknown or woven gasket.
Is a gap at the bottom of an oven gasket normal?
Some gaskets intentionally have a bottom opening for airflow. Compare the design with the model manual; do not assume a gap means the gasket is missing.
Can I use the oven if the door almost closes?
Keep it off until the cool door closes and seats evenly without force. Heat leakage, scorching, a displaced seal, or an unstable door can damage the appliance or nearby surfaces.
Could a rack keep the oven door from closing?
Yes. A rack, divider, pan, foil, or liner can project into the path. Remove only loose items that slide normally when the oven is cool, and stop if the door still resists.
Why is one side of the oven door higher than the other?
An uneven gap keeps hinge seating, a bent hinge, frame damage, door distortion, or a recent door-reinstallation problem in consideration. Do not bend or release the hinge; arrange model-specific service.
What if the oven door was recently removed?
The hinges may not be seated or locked correctly. Follow the exact manual only if the procedure is safe for that model; a heavy or spring-loaded door should be handled by a qualified technician.
Can I clean a woven oven door gasket?
Many woven-fiberglass gaskets should not be rubbed, wetted, or cleaned because they can be damaged. Follow the model manual and inspect rather than scrubbing the seal.
Should I run self-clean to reshape the gasket?
Do not run self-clean as a test or repair when the door does not close safely or the gasket is displaced. Keep the oven off and obtain model-specific guidance.
When does a displaced oven gasket need service?
Call when the gasket is damaged, remains displaced, the door gap is uneven, a hinge or latch is abnormal, the door was recently removed, or repair requires lifting the door, handling springs, accessing panels, or choosing a model-specific part.
Read the exact guide
Official sources
- Door will not close on Samsung ovenSamsung Electronics · Samsung official support guidance used as general oven-door diagnostic evidence for racks, recently removed doors, hinge position, latch obstruction, physical damage, and professional escalation; not brand-specific to another oven.
- 49-80163GE Appliances · GE owner manual used for general safety and model-specificity evidence: displaced gaskets should be replaced, doors are heavy, and hinge seating affects closure; it is not a universal owner procedure.
- Range - How to Replace the Oven Door GasketGE Appliances · GE official support page used to establish that replacement may be possible on some ranges but requires model-appropriate installation guidance or service.
- Range & Wall Oven - Cleaning Oven GasketGE Appliances · GE official support guidance used to explain woven-fiberglass gasket care, the risk of wet or abrasive cleaning, and the possibility of an intentional bottom opening; not a universal fitment claim.
- Range & Wall Oven - Oven Gasket Not Sealing ProperlyGE Appliances · GE official support guidance used for general oven-seal distinctions, intentional airflow, new-installation and hinge considerations, and damaged-gasket service boundaries; not a universal procedure for every oven.
Community feedback
Share a repair observation
Share a plain-text repair observation. Accepted observations are published automatically; this page may take a moment to update.