
On this page
Start here
Quick answer
An oven door that will not close because it is misaligned usually has an obstruction, a hinge that is not fully seated, a bent latch, a damaged gasket, or a door or frame that has shifted. Turn the oven off, let it cool completely, and do not use it while the door cannot seal. From ordinary safe access, check for debris around the frame and gasket, compare the door gap from side to side, and look for a latch arm or hinge that is visibly out of position. If the door was recently removed or installed, follow the exact model manual for reseating it; do not force spring-loaded hinges or bend hardware. A door that remains crooked, has cracked glass, scorched trim, a broken hinge, or requires removal or adjustment beyond the manual needs qualified appliance service.
Before you begin
Safety first
- This article is limited to cooling the oven, ordinary-access inspection, removing loose obstructions, and following an exact model manual for a clearly documented reseating check. A professional must handle spring-loaded hinge release, door removal, bent hardware, cracked glass, concealed wiring, latch faults, and frame repair.
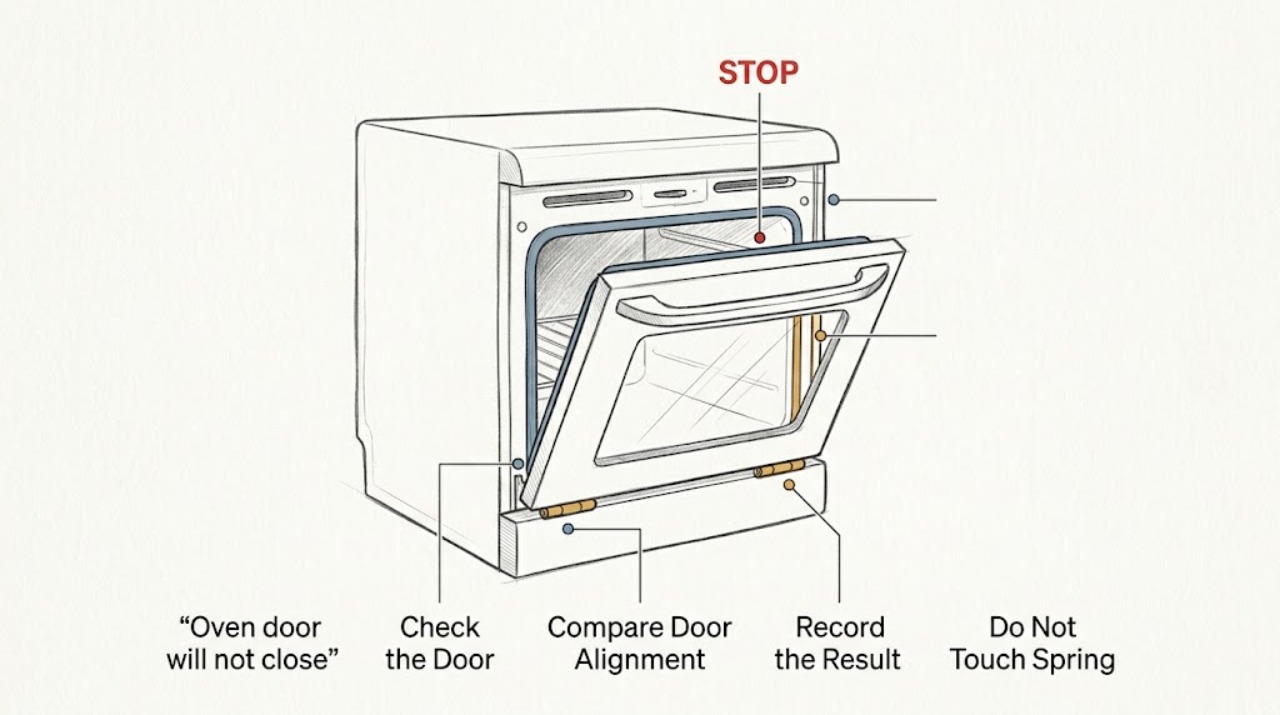
Work through in order
Diagnostic checks
Use only checks that match the exact appliance or system and its official guide.
-
Make the oven safe before inspecting the door
Turn the oven controls off, allow the cavity and door to cool completely, and remove cookware only when it can be handled safely. Keep the oven out of service while the door cannot close or its glass, frame, or gasket is damaged.
Expected result: The oven is cold and stable, or there is smoke, scorching, exposed glass, a broken hinge, a gas odor, or another active hazard.
Next step: For an active gas or fire hazard, leave the area as appropriate and contact the relevant emergency or gas service from a safe location. Otherwise keep the oven unused and arrange appliance service for damage or severe heat escape.
Stop if: Do not operate the oven, start self-clean, touch hot glass or metal, or continue near smoke, flame, gas odor, or exposed wiring.
Why this matters
Why: A cold, intact oven can be inspected from ordinary access. Smoke, a gas odor, broken glass, or severe heat escape is a stop-use condition rather than an alignment test.
-
Check the frame, gasket, and hinge area for interference
With the oven cold, inspect the door perimeter, gasket, hinge pockets, and front frame using a light. Remove only loose crumbs or residue that can be wiped away without prying, and check that no rack, liner, foil, cookware, cleaning cloth, or detached gasket section projects into the closing path.
Expected result: A loose obstruction or residue is present, the gasket is displaced or torn, the hinge pocket is obstructed, or the path looks clear.
Next step: Remove only the loose obstruction, reposition the gasket only if the model manual explicitly permits it, and close the door gently once. Request service for a torn gasket, bent metal, a hinge pocket obstruction that cannot be cleared, or an unchanged gap.
Stop if: Do not pull the gasket out, pry the hinge, scrape glass, bend the frame, or use the door as a lever.
Why this matters
Why: A foreign object or displaced gasket can stop the door before it reaches the frame. A clear path with a persistent uneven gap points more toward hinge seating, a bent hinge, latch, or shifted door structure.
-
Compare the door gap and inspect the latch
From in front of the cold oven, compare the left and right door gaps and the top edge with the control panel. Look at the latch or lock arm near the upper frame to see whether it is visibly bent, bowed, or protruding into the door path; do not force it or reach behind panels.
Expected result: One side sits lower or farther out, the top edge contacts first, the latch arm blocks the path, or the door and latch appear aligned.
Next step: Use the model manual to determine whether the latch has a user-accessible reset; otherwise leave the oven unused and arrange service for a bent latch, crooked door, or hidden hinge problem.
Stop if: Do not bend, pull, defeat, or lubricate the latch or hinge, and do not remove trim to reach it.
Why this matters
Why: An uneven gap or contact at one corner supports a hinge or door-assembly alignment problem. A latch arm that projects into the path can independently prevent closure. An aligned exterior with a persistent failure shifts attention to the gasket, lock mechanism, or hidden hinge condition.
-
Check whether the door was recently removed or installed
Ask whether the door was removed for cleaning, installation, transport, or repair. If yes, identify the model and read its owner or installation instructions for the door-replacement position; inspect from outside whether each hinge notch is fully seated in its slot, without lifting the door or releasing a hinge lock by guesswork.
Expected result: The door was recently removed and a hinge is visibly not seated, or the door has not been removed and the hinge seating is not safely visible.
Next step: Follow only the exact model's reseating procedure when it clearly controls the hinge safely. Otherwise keep the door supported and call a qualified appliance technician; do not attempt to release spring tension.
Stop if: Do not remove the door, release hinge locks, insert tools into hinge slots, or carry the door without the model procedure and safe support.
Why this matters
Why: An incompletely seated hinge can leave the door crooked and prevent sealing. If there was no recent removal, the same symptom is more likely to involve a bent hinge, worn hinge receiver, latch, gasket, or door structure.
-
Check the final seal and damage pattern
With the door closed only as far as it moves without force, observe whether the gasket contacts the frame evenly, whether the door springs back, and whether heat or light would escape at one corner during prior use. Inspect the outer glass, inner glass, handle mounts, frame, and hinges for cracks, looseness, scorching, or deformation.
Expected result: The gasket is evenly contacted and the door still will not latch, one corner remains open, the glass or frame is damaged, or the door closes normally after a permitted correction.
Next step: Keep the oven out of service for damage, an uneven seal, or a door that springs back. Provide the technician with the model, side-to-side gap pattern, recent removal history, and photos.
Stop if: Do not tape, clamp, weight, bend, glue, or otherwise restrain the door, and do not use the oven with cracked glass or a major heat leak.
Why this matters
Why: A damaged glass, hinge, frame, or gasket is not corrected by pushing harder. A door that closes but does not seal evenly can still lose heat and may require a gasket or hinge repair. A normal seal after a documented reseating suggests the issue was installation-related, but monitor for recurrence.
Use your observations
Decision map
Find the observation that best matches what you see, then follow the next safe action.
-
PATH 01Safety boundary
What you see
The door gap becomes even after a loose obstruction is removed, or the gasket was visibly folded or out of its channel.
Do this next
Use only the model-approved gasket placement or cleaning guidance, close the door gently, and stop for service if the gasket is torn, the gap returns, or heat has marked the frame.
Why this path and its safety boundary
Why it matters: A closing-path interference is more likely than a bent door assembly, provided the gasket and frame are not damaged.
Safety stop: Do not pull out a fixed gasket, use adhesive, or operate with an uneven seal.
-
PATH 02Safety boundary
What you see
The latch or lock arm visibly protrudes into the door path, is bent, or remains engaged when the oven is cold.
Do this next
Leave the latch untouched, consult the exact model manual for a documented reset, and request appliance service if it does not return without force.
Why this path and its safety boundary
Why it matters: The latch is mechanically blocking closure or may be out of alignment; forcing the door can damage the door or lock assembly.
Safety stop: Do not defeat the lock, start self-clean, bend the latch, or remove panels to reach the mechanism.
-
PATH 03Safety boundary
What you see
The door was recently removed or installed and one hinge notch is not fully seated, leaving one side lower or the top edge out of line.
Do this next
Use the exact model's door-replacement procedure only if it provides safe hinge control; otherwise arrange service and keep the door supported without operating the oven.
Why this path and its safety boundary
Why it matters: Improper hinge seating is a plausible cause of the misalignment, but hinge springs and locks make unplanned removal hazardous.
Safety stop: Do not release hinge locks, lift the door by one side, or use a tool to force a hinge into place.
-
PATH 04Safety boundary
What you see
The closing path is clear, the latch is not blocking, and the door remains low, crooked, springy, or open at one corner.
Do this next
Keep the oven out of service and request qualified appliance repair; provide side-to-side photos and do not attempt to straighten the hardware.
Why this path and its safety boundary
Why it matters: A bent hinge, hinge receiver, frame, handle mount, or door structure is more likely than a simple cleaning issue.
Safety stop: Do not bend metal, tighten hidden hardware, shim the hinge, or continue cooking with a door that cannot seal.
-
PATH 05Safety boundary
What you see
The door glass is cracked or shattered, the frame is scorched, smoke marks show a major leak, or the door cannot close after permitted checks.
Do this next
Do not use the oven and arrange qualified appliance service. If there is active smoke, flame, or a gas odor, leave the area as appropriate and contact emergency or gas service from a safe location.
Why this path and its safety boundary
Why it matters: This is a stop-use appliance fault with potential burn, cut, fire, or cooking-performance risk, not a harmless alignment variation.
Safety stop: Do not tape the glass, clamp the door, run self-clean, or test heat with the door misaligned.
Helpful context
Understand the symptom
A crooked door is a fit and hardware problem, not a cooking adjustment
Start with the oven cold and unused. A gap that is larger on one side, a door that sits low or high against the control panel, or a door that stops before the gasket contacts the frame points toward hinge seating, hinge damage, a shifted door assembly, or an obstruction. A uniform small amount of movement or airflow can be normal on some ovens, but a door that cannot close, leaves a major heat leak, or shows scorching is not a normal alignment condition.
Check the latch only from ordinary access
Some ovens have a self-clean latch or lock arm near the top of the opening. Whirlpool advises checking whether that arm is bent or positioned so it blocks the door. Do not push a latch into place with force, defeat the lock, or start a cleaning cycle while the door is not correctly seated. If the latch will not return or its surrounding metal is damaged, use the model manual and service path.
Reseating a removed door is model-specific
If the door was removed for cleaning, moving, or installation, the hinge arms may not be fully seated in their slots. Whirlpool's alignment guidance says an improperly installed door must be reinstalled so the hinge notch is fully inserted, while GE and Bosch direct owners to the model's manual for door removal or replacement. Spring-loaded hinges can move unexpectedly, so treat door removal as a service or manual-led task rather than a force-fit adjustment.
Safety boundary
Stop conditions
- Turn the oven off and do not use it while the door cannot close, the gasket does not seal, the glass is cracked, or heat escapes severely.
- Do not force the door, bend the latch or hinges, release spring-loaded hinge locks, remove trim, or pry the door into alignment.
- Do not start self-clean, test the oven with an open or crooked door, or use tape, clamps, weights, glue, or improvised shims as a repair.
- Stop for smoke, flame, gas odor, exposed wiring, scorching, shattered glass, or water or grease near electrical parts; seek appropriate emergency or qualified service help.
- Call a qualified appliance technician when the door was removed and will not reseat through the exact manual procedure, or when the latch, hinge, frame, gasket, or door structure remains misaligned.
Only after diagnosis
Potential parts
- oven door gasket
Consider this category only when the exact model instructions and inspection confirm that the gasket is torn, displaced, hardened, or unable to seal after the door is correctly aligned.
Confirm the oven model, gasket routing, material, and manufacturer's fit information; do not use a gasket to compensate for a bent hinge or frame. - oven door hinge or hinge receiver
Consider this category only when a qualified diagnosis confirms a bent, worn, or improperly seated hinge or hinge receiver is causing the uneven gap or failed closure.
Hinge tension and mounting vary by model; confirm the exact part and safe installation procedure before ordering or handling the door. - oven door latch or lock assembly
Consider this category only when the latch or lock arm remains engaged, is bent, or fails to release after the oven is cold and the model-specific check identifies it as the obstruction.
Confirm the oven model, latch type, self-clean function, and manufacturer's fit information; do not bypass a safety lock. - oven door glass or door frame component
Consider this category only when inspection confirms cracked glass, a deformed frame, or damaged mounting hardware that prevents a safe seal.
Door glass and frame parts require exact model confirmation and safe handling; a qualified technician should assess broken or stressed components.
When checks do not resolve it
Need a professional?
Arrange qualified appliance repair when the door remains crooked after loose obstructions are removed, a hinge or latch is bent, the gasket is torn or will not seal, the door was recently removed but cannot be safely reseated from the exact model instructions, glass or frame is damaged, or the oven cannot close without force. Keep the oven out of service until the door closes and seals correctly.
Safety scope: This article is limited to cooling the oven, ordinary-access inspection, removing loose obstructions, and following an exact model manual for a clearly documented reseating check. A professional must handle spring-loaded hinge release, door removal, bent hardware, cracked glass, concealed wiring, latch faults, and frame repair.
Common questions
FAQ
Why will my oven door not close evenly?
A loose obstruction, displaced gasket, latch in the closing path, hinge that is not fully seated, bent hinge, or shifted door or frame can create an uneven gap. Let the oven cool, inspect from ordinary access, and avoid bending or forcing hardware.
Can I keep using an oven door that is slightly crooked?
No if it cannot close or seal correctly, the glass or frame is damaged, heat escapes severely, or the door springs back. Keep the oven off and arrange service; a small amount of designed airflow on some models is different from a misaligned door.
What should I check if the oven door was recently removed?
Use the exact model manual to inspect whether each hinge is fully seated in its slot. Do not release spring-loaded hinge locks or lift the door by force. If the door remains crooked, have a technician reseat or repair it.
Can a dirty gasket prevent an oven door from closing?
Residue or an object at the gasket can interfere with closure, but a torn, displaced, hardened, or uneven gasket may need model-specific replacement. Wipe only loose residue from a cold oven and do not pull out or glue the gasket.
Why should I avoid forcing a misaligned oven door?
Oven hinges can be spring-loaded, and force can bend the hinge, latch, frame, or glass and create a worse seal or injury risk. Check only visible, ordinary-access conditions and call service for hardware alignment, door removal, or damaged glass.
Read the exact guide
Official sources
- Range & Wall Oven - Oven Gasket Not Sealing ProperlyGE Appliances · Official GE guidance used for general oven-door sealing interpretation; gasket and hinge behavior varies by model.
- Oven Door is Not Closing - Checking the LatchWhirlpool Product Help · Official Whirlpool guidance used for the generic latch-obstruction check; exact latch design and service procedure remain model-specific.
- Oven Door Not Aligned - RangeWhirlpool Product Help · Official Whirlpool guidance used to distinguish incorrect hinge seating from a general alignment fault; use the appliance's exact manual before any door reseating.
- Oven Troubleshooting: Oven door not closingBosch Home Appliances · Official Bosch guidance used as cross-manufacturer support for checking clean seals and hinges before service; it does not define another brand's door procedure.
Community feedback
Share a repair observation
Share a plain-text repair observation. Accepted observations are published automatically; this page may take a moment to update.