
On this page
Start here
Quick answer
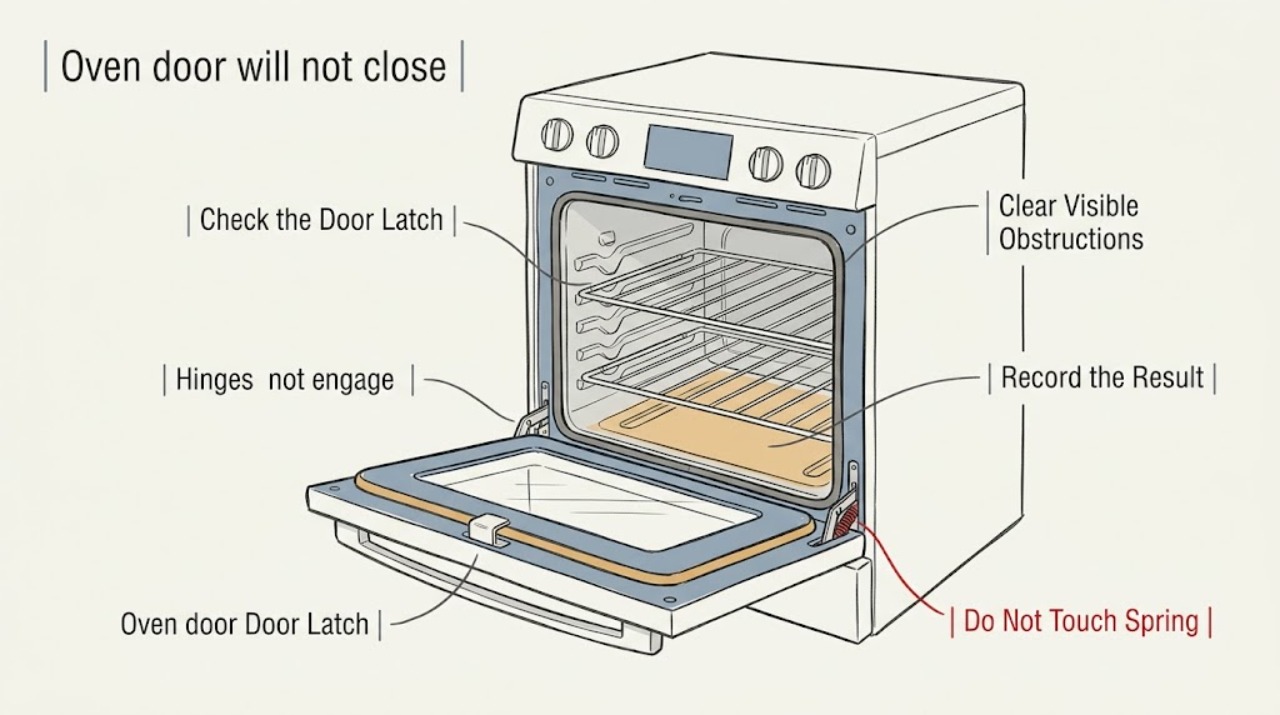
If an oven door will not close and the latch does not engage, first let the oven cool completely and remove any rack, pan, foil, or debris that could hold the door open. Check whether the latch arm is already extended or bent, inspect the gasket and frame for an obstruction, and compare the door alignment and hinge position from both sides. On many ranges the locking latch is intended for self-clean rather than ordinary baking, so do not force it during cooking. If the door remains crooked, a hinge spring or latch is damaged, the latch is stuck after self-clean, the glass or gasket is broken, or the next step requires removing the door or opening the control area, stop using the oven and arrange qualified appliance service.
Before you begin
Safety first
- The homeowner scope is limited to letting the oven cool, removing loose accessible obstructions, checking the visible gasket and latch path, comparing door alignment, and following explicit model instructions. Do not force or straighten the latch, release hinge springs, lift the door by its handle, bypass a door switch, access live wiring, or operate with damaged glass or an unsafe closure.
Work through in order
Diagnostic checks
Use only checks that match the exact appliance or system and its official guide.
-
Check 1
Turn the oven off and let it cool completely before inspecting the door. Confirm whether the door cannot physically meet the frame, or whether it closes but the self-clean latch does not engage. Do not start or cancel self-clean repeatedly to test the mechanism.
Expected result: The oven is still warm; the door stops before the frame; the door closes but a self-clean lock will not engage; or the door is closed but the control reports a door or lock problem.
Next step: Record the oven mode and any display message, then use the model manual to determine the intended latch position. Continue only with cool-oven visual checks.
Stop if: Stop for smoke, burning odor, damaged glass, an exposed spring, a door that drops suddenly, or a latch that moves unexpectedly under tension.
Why this matters
Why: Heat can affect self-clean lock behavior, while a physical closure gap points to an obstruction, hinge, gasket, frame, or latch-position issue. A display or lock problem may involve a switch or control rather than the door itself.
-
Check 2
Inspect the closing path with the oven cool: remove a front rack or pan if it is visibly blocking the door, check for foil or debris at the frame, and look for a gasket folded into the opening. If the model has a hidden bake element, check the oven floor for a shifted panel only as the manual directs.
Expected result: A rack, pan, foil, debris, folded gasket, or shifted floor obstructs the door; or the closing path is clear.
Next step: Remove only loose accessible obstructions and close the door gently. Do not force a rack, pull the gasket out of its retaining channel, or pry the oven floor.
Stop if: Stop for a torn or detached gasket, sharp metal, a stuck rack, a damaged cavity liner, or any obstruction that requires tools or force.
Why this matters
Why: An accessible obstruction can prevent the latch from reaching its receiver even when the latch itself is intact. A clear path makes hinge alignment, latch position, or a damaged mechanism more likely.
-
Check 3
With the door open and cool, visually inspect the latch arm at the top of the oven frame and the latch receiver on the door. Check whether the arm is bent, bowed, extended into the closing path, or not aligned with the receiver; do not push it or insert tools into the mechanism.
Expected result: The latch arm is aligned and retracted; it is bent or protruding; the receiver is damaged or blocked; or the latch is not present on this model.
Next step: If the latch is visibly bent, stuck, or damaged, leave the oven unused and arrange service. If it is clear and aligned, continue with the hinge and door-alignment check.
Stop if: Stop for spring tension, a latch that will not stay in position, exposed wiring, a loose metal fragment, or any need to straighten or disassemble the latch.
Why this matters
Why: A bent or protruding latch can stop the door before it reaches the frame. A damaged receiver or a model without a user latch requires model-specific service information rather than a generic adjustment.
-
Check 4
Compare the oven door from both sides without lifting it. Check for an even gap, a door that hangs low on one side, hinge arms that appear equally seated, and a gasket compressed evenly. Do not lift by the handle or touch a hinge spring.
Expected result: The door is square and evenly seated; one side is low; a hinge is visibly out of position; the gasket is damaged; or the door and hinges look normal.
Next step: Follow the exact owner manual only if it describes safe reseating; otherwise arrange service for a crooked door, damaged hinge, or persistent latch failure. Do not remove the door as a generic test.
Stop if: Stop for a loose or spring-loaded hinge, cracked glass, a door that cannot be supported safely, or a hinge that has moved out of its slot.
Why this matters
Why: An uneven door often indicates hinge seating or alignment rather than a latch adjustment. A damaged gasket can interfere with closure and heat retention. A normal visual alignment does not prove a hidden hinge or latch switch is good.
-
Check 5
After accessible checks, close the cool oven door gently and verify that it meets the frame evenly, the gasket is not pinched, and the latch behaves only as the model's normal cooking or self-clean instructions describe. Test a normal control operation only if the door is secure.
Expected result: The door closes and seals; it closes but the self-clean lock still does not engage; it remains open or crooked; or the control shows a door/latch fault.
Next step: Stop using self-clean and arrange qualified appliance service for persistent closure or latch faults. Provide the model, mode, visible latch position, door alignment, and any display message.
Stop if: Stop operating the oven for damaged glass or gasket, a door that can open during heating, an exposed latch or hinge, smoke, electrical odor, or any need to access live wiring.
Why this matters
Why: A successful closure after removing an obstruction supports a storage or gasket-path cause. Persistent latch failure, crooked closure, or a fault indication points to a latch, hinge, switch, wiring, or control diagnosis.
Use your observations
Decision map
Find the observation that best matches what you see, then follow the next safe action.
-
PATH 01Safety boundary
What you see
The oven is warm or the issue occurs only when trying to lock the door for self-clean.
Do this next
Allow the oven to cool completely and follow the model manual's self-clean latch instructions; do not force the latch during ordinary cooking.
Why this path and its safety boundary
Safety stop: Arrange service if the lock remains stuck or the control reports a latch fault after cooling.
-
PATH 02Safety boundary
What you see
A rack, pan, foil, debris, gasket, or shifted oven floor blocks the door from reaching the frame.
Do this next
Remove only the loose accessible obstruction or correct the manual-described floor position, then close the door gently and retest.
Why this path and its safety boundary
Safety stop: Do not force racks, pry the floor, or pull a damaged gasket into place.
-
PATH 03Safety boundary
What you see
The latch arm is bent, bowed, protruding, or not aligned with the receiver.
Do this next
Leave the oven out of service and arrange qualified appliance repair for the latch or its alignment; provide a photo and model number.
Why this path and its safety boundary
Safety stop: Do not straighten the arm, insert tools, bypass the latch, or disassemble the control area.
-
PATH 04Safety boundary
What you see
The door hangs low on one side, has an uneven gap, or a hinge is not fully seated after prior door work.
Do this next
Use only the exact model's reseating procedure if it explicitly covers the door; otherwise arrange service for hinge alignment.
Why this path and its safety boundary
Safety stop: Do not lift the door by its handle, release a hinge spring, or operate with a crooked door.
-
PATH 05Safety boundary
What you see
The door closes physically but a self-clean latch or door-status fault remains after the oven is cool and unobstructed.
Do this next
Stop self-clean and arrange service to diagnose the latch switch, actuator, wiring, or control using the model documentation.
Why this path and its safety boundary
Safety stop: Do not repeatedly cycle power or self-clean, jumper a door switch, or test live wiring.
-
PATH 06Safety boundary
What you see
Glass, gasket, frame, hinge, latch, or cavity is damaged, or the door can open during heating.
Do this next
Stop using the oven, keep people away from sharp or spring-loaded parts, and obtain qualified appliance service.
Why this path and its safety boundary
Safety stop: Do not tape, clamp, force, or heat the door into a temporary closed position.
Helpful context
Understand the symptom
Separate normal self-clean locking from a door that cannot close
Many ovens use a latch to lock the door only during self-clean, not as a catch required for normal baking. If the door physically meets the frame but a self-clean lock does not engage, first confirm the cycle and temperature state from the model manual. If the door cannot meet the frame at all, focus on racks, the gasket, hinges, alignment, and a latch arm protruding into the closing path.
Look for an obstruction before touching the mechanism
A rack in the wrong position, a pan or foil at the front, crumbs, a displaced gasket, or an oven floor that has shifted can stop the door short of the frame. Inspect with the oven off and cool. Remove only loose, accessible obstructions; do not force a rack or bend the gasket to make the door close.
Alignment and latch position matter
A door that hangs lower on one side or has an uneven gap may not be seated correctly on its hinges. A latch arm above the gasket can be bent or bowed into the door path. Compare both sides and inspect the latch visually, but do not force a latch, release a spring, or remove the door unless the exact model instructions cover the operation.
Retest only after the oven is safe and unobstructed
With the oven cool, empty of obstructions, and the latch in the model's normal position, close the door gently and check for an even seal. If it still will not close or the latch still will not move, stop using the oven. Repeated forcing can damage the latch, hinge, frame, or glass and can leave the door unsafe during heating or self-clean.
Only after diagnosis
Potential parts
- oven door latch or latch actuator
Consider this category only when the latch is visibly damaged, remains stuck after the oven cools and the path is clear, or model-specific testing confirms a latch fault.
Confirm the exact oven model, manual or motorized latch type, mounting location, and wiring before selecting a part. - oven door hinge or hinge assembly
Consider this category only when the door hangs low, has an uneven gap, or professional inspection finds a bent, broken, or improperly seated hinge.
Hinges can be spring-loaded; match the exact model and door side, and use the model procedure or qualified service for installation. - oven door gasket
Consider a gasket only when it is torn, detached, folded, or confirmed to be the obstruction after the latch and hinge path are inspected.
Match the exact model and gasket routing; a gasket alone does not correct a bent latch, crooked door, or damaged frame.
When checks do not resolve it
Need a professional?
Escalate for a bent or stuck latch, crooked or dropped door, damaged hinge, broken gasket or glass, persistent self-clean lock fault, display error, or any spring-loaded, electrical, or hidden-panel repair.
Safety scope: The homeowner scope is limited to letting the oven cool, removing loose accessible obstructions, checking the visible gasket and latch path, comparing door alignment, and following explicit model instructions. Do not force or straighten the latch, release hinge springs, lift the door by its handle, bypass a door switch, access live wiring, or operate with damaged glass or an unsafe closure.
Have this ready
- Provide the oven model, range or wall-oven type, whether the door physically closes, operating mode, latch position, obstruction and gasket observations, door alignment, recent cleaning or door work, and any control message.
Common questions
FAQ
Why will my oven door not close when the latch does not engage?
A rack, pan, gasket, oven floor, hinge, or latch arm may block closure. First let the oven cool, inspect the closing path, and determine whether the door cannot physically reach the frame or only fails to lock for self-clean.
Does an oven door latch need to engage during baking?
On many ranges, the latch is intended for self-clean rather than ordinary cooking. The exact behavior varies by model, so use the owner's manual and do not force the latch during baking.
Can a bent latch keep an oven door from closing?
Yes. A latch arm that is bent or protrudes into the door path can stop the door above the gasket. Inspect it visually with the oven cool, but do not straighten, pry, or disassemble the mechanism.
Could an oven hinge make the door look like the latch is failing?
Yes. A door that hangs low on one side or has an uneven gap may not be seated correctly on its hinges, so the latch and receiver cannot align. Do not lift by the handle or release a hinge spring; follow the exact model procedure or arrange service.
When should I call appliance repair for an oven door that will not close?
Call when the latch is bent or stuck, the door is crooked, the hinge, gasket, glass, or frame is damaged, a control fault remains after cooling, or the next step requires door removal or electrical access. Stop using the oven if the door cannot remain safely closed.
Read the exact guide
Official sources
- Range - Oven Door Will Not LatchGE Appliances · GE range guidance used for general distinction between cooking closure and self-clean locking; the installed oven's manual controls.
- Range & Wall Oven - Removing or Reseating Oven DoorGE Appliances · GE support guidance used for general door-alignment safety; American Standard-style or other brand model manuals control.
- Removing and Replacing the Oven DoorWhirlpool · Whirlpool door guidance used for general hinge and alignment safety; do not apply its removal steps to another model without that model's instructions.
- New Range or Wall Oven Door Doesn’t Seal ProperlyGE Appliances · GE support guidance used for general gasket and closure observations; exact oven model instructions control.
- Oven Door is Not Closing - Checking the LatchWhirlpool · Whirlpool product-help guidance used for general oven latch-path inspection; the installed oven manual controls model-specific procedures.
Community feedback
Share a repair observation
Share a plain-text repair observation. Accepted observations are published automatically; this page may take a moment to update.