
On this page
Start here
Quick answer
An independent oven thermometer reading that differs from the display does not by itself prove that the oven is faulty. Ovens normally cycle their heating elements, and the reading changes with thermometer quality, rack position, air movement, and whether the door was opened. First confirm the cooking mode, rack position, cookware, door closure, and complete preheat. Then compare the result with a repeatable food test and, if you still see a consistent hot or cold pattern, use the exact model manual to find its calibration setting. Do not turn a knob, open a control panel, replace a sensor, or continue using the oven if there is smoke, a gas odor, arcing, a damaged cord, a door that will not close, or a visibly failed element.
Before you begin
Safety first
- This article supports recording settings, following a recipe or standardized food test, checking rack and cookware placement, observing a cool visible element or gasket, and using a model-documented user calibration menu. A qualified professional should handle panels, live electrical tests, gas controls, wiring, sensors, elements, and repairs requiring disassembly.
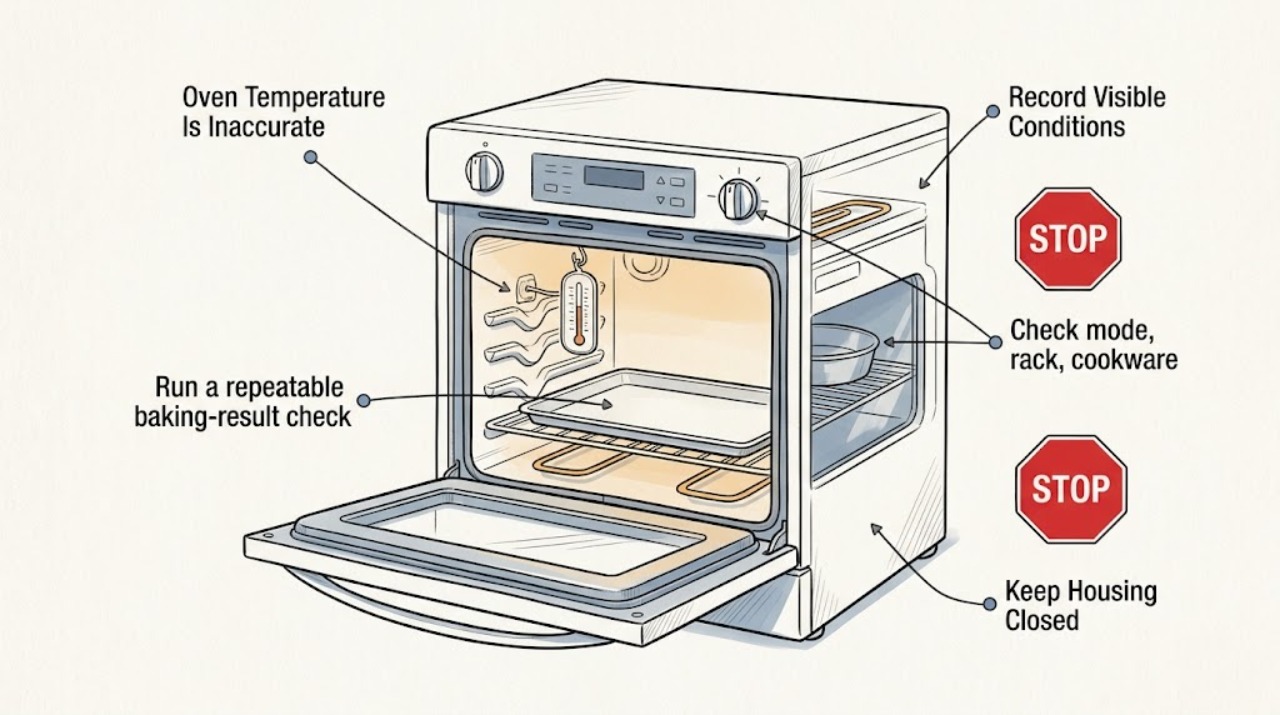
Work through in order
Diagnostic checks
Use only checks that match the exact appliance or system and its official guide.
-
Record the discrepancy without chasing a cycling oven
Write down the selected mode, target temperature, rack position, thermometer location, preheat indication, and whether the door was opened. If you use the thermometer as a secondary check, place it where the manufacturer's method and your oven manual allow, keep the door closed during preheat, and observe the trend rather than one instant. Let the oven cool before repositioning anything.
Expected result: The thermometer swings high and low while the elements cycle; its reading changes substantially when moved; the door was opened before the reading; or the difference is steady across a fully preheated run.
Next step: Do not calibrate from a single snapshot. Repeat the observation under the same conditions and continue to the standardized food test and settings checks.
Stop if: Do not leave a thermometer where it can touch an element, open the door repeatedly during preheat, or use a probe that is not rated for oven use.
Why this matters
Why: A changing reading or position-sensitive result is consistent with cavity cycling and measurement conditions. A repeatable difference is stronger evidence of a calibration, sensor, heating, or door-seal issue, but still needs a cooking-result check and the model procedure.
-
Run a repeatable baking-result check
Use one consistent recipe or the biscuit test described by the manufacturer, following the package or recipe temperature, time, pan, and rack instructions. Use the same type of pan for a comparison and avoid opening the door before the minimum cooking time. Compare the result with the expected browning and doneness rather than relying only on the thermometer.
Expected result: The food cooks evenly and as expected; it is consistently underdone or overdone across comparable tests; only the edges, top, or bottom differ; or results change when the rack, pan, or mode changes.
Next step: If results are normal, leave the calibration unchanged. If results are consistently wrong, continue to the settings, door, and calibration checks; if only one area is wrong, correct the cooking setup before calling for a sensor.
Stop if: Do not use spoiled or unsafe food for a test, keep cooking after smoke or gas odor, or make a calibration change solely because one recipe behaved differently.
Why this matters
Why: Normal, repeatable results make an inaccurate thermometer or normal cavity cycling more likely. Consistently hot or cold results support checking calibration. Location-dependent browning points more toward rack position, cookware, airflow, convection conversion, or a door-seal issue.
-
Check mode, rack, cookware, and preheat behavior
Verify that the selected mode matches the recipe, including whether convection conversion or a divided-oven mode changes the target. Confirm the rack is in the position specified by the cooking guide, pans are not crowded, and the oven has finished its full preheat. Check that the door closes fully and no rack is installed backward or blocking the gasket.
Expected result: The oven was in convection or another mode; a conversion feature changed the target; pans or racks block circulation; preheat had not completed; or the door does not close or seal normally.
Next step: Correct the cooking setup and repeat one comparable food test. If the door or gasket is damaged, stop using the oven until a qualified technician inspects it.
Stop if: Do not prop the door open, place foil across the cavity floor or vents, force a rack, or continue if heat escapes through a damaged door seal.
Why this matters
Why: Mode conversion, rack and pan placement, incomplete preheat, or heat escaping at the door can create uneven or apparently inaccurate cooking without a bad sensor. A door that cannot close or a torn gasket is a repair condition.
-
Inspect visible heating and power symptoms only when cool
After the oven is fully cool, inspect the visible bake or broil element and the door gasket without removing panels. During a normal bake cycle, observe from a safe distance whether the expected element heats as described by the model manual. Check the external breaker once if the display or oven has lost power; do not remove a hardwired cover or touch wiring.
Expected result: An element has a crack or break; the oven never produces heat; the door gasket is torn; the display is dead; the breaker trips again; or the visible components appear normal.
Next step: Stop use and request qualified appliance or electrical service for a damaged element, door seal, dead display, or repeated breaker trip. If the visible checks are normal, use the model's calibration guidance only after the cooking-result evidence is consistent.
Stop if: Do not touch an element while hot, perform live voltage tests, remove panels, or repeatedly reset a breaker.
Why this matters
Why: A visibly failed element, heat loss at the gasket, unstable power, or no heat can explain inaccurate cooking and needs service. Normal visible operation does not rule out a sensor, control, or calibration issue, but it makes an immediate element replacement less justified.
-
Apply only the exact model calibration procedure
Find the full model number and read the owner's manual for a temperature calibration or thermostat-offset function. Record the current setting, make only one documented adjustment if the controls support it, and repeat the same food test across several comparable uses before changing it again. If the oven has a mechanical or gas control with no documented user adjustment, leave it unchanged and request service.
Expected result: The manual provides a calibration setting and the oven consistently cooks hot or cold; the manual provides no user calibration; one adjustment improves results; or the discrepancy remains or changes unpredictably.
Next step: Keep the model-documented setting that produces repeatable results, or restore the original setting and arrange qualified service when calibration is unavailable, ineffective, or requires access beyond normal controls.
Stop if: Do not turn screws, remove the control panel, replace a sensor, or make repeated large adjustments without the exact manual and a verified cooking pattern.
Why this matters
Why: A documented offset can correct a consistent preference or drift, but it cannot repair a sensor, element, control, wiring, or door problem. An unstable or unresolved discrepancy needs diagnosis rather than a larger offset.
-
Escalate persistent or hazardous temperature behavior
Stop testing and record the model, mode, target, rack, pan, thermometer method, food-test results, preheat behavior, visible element or gasket condition, and any error or power event when the oven remains inaccurate after the safe checks.
Expected result: The oven is far from the target, preheats abnormally slowly, burns or leaves food unsafe despite correct setup, shows an error, emits smoke or gas odor, trips power, or has damaged wiring, elements, or door parts.
Next step: Turn the oven off and arrange qualified appliance service; use an electrician or gas professional for the corresponding electrical or combustion hazard. Give the technician the recorded comparison instead of ordering a part from the thermometer reading.
Stop if: Do not continue operating with smoke, gas odor, arcing, exposed wiring, repeated breaker trips, a cracked element, or a door that will not close securely.
Why this matters
Why: These patterns exceed a simple thermometer disagreement and may involve a sensor, control, element, gas system, door seal, or power fault. A large error can make continued cooking unsafe or damage food and the appliance.
Use your observations
Decision map
Find the observation that best matches what you see, then follow the next safe action.
-
PATH 01Next step
What you see
The independent thermometer moves as the elements cycle or changes with rack position and door opening, while a repeatable recipe or biscuit test cooks evenly and as expected.
Do this next
Leave the calibration unchanged and follow the model cooking guide. Treat the thermometer as a secondary trend check rather than a single-value pass/fail test.
Why this path and its safety boundary
Why it matters: Normal oven cycling, thermometer response, or measurement placement is more likely than a failed thermostat.
-
PATH 02Next step
What you see
Food is unevenly browned or cooks differently by rack or pan, and the oven was not fully preheated, is using a mode conversion, has crowded cookware, or has blocked circulation.
Do this next
Correct mode, preheat, rack, pan, and spacing according to the manual or recipe, then repeat one comparable test before changing the thermostat setting.
Why this path and its safety boundary
Why it matters: Cooking setup, heat circulation, or mode selection is more likely than a cavity-wide temperature calibration fault.
-
PATH 03Next step
What you see
Comparable foods repeatedly cook hot or cold after correct mode, preheat, rack, cookware, and door checks, and the thermometer shows the same directional pattern under repeatable conditions.
Do this next
Use only the exact model manual to make one documented calibration adjustment if available, then retest several comparable uses. If no adjustment exists or results remain inconsistent, arrange service.
Why this path and its safety boundary
Why it matters: A model-supported calibration offset or a sensor, control, or heating problem is more likely than random thermometer variation.
-
PATH 04Next step
What you see
The door does not seal, the gasket or element is visibly damaged, the oven does not heat normally, the display is dead, or the breaker trips again.
Do this next
Stop using the oven and request qualified appliance or electrical service. Do not open panels or attempt live testing.
Why this path and its safety boundary
Why it matters: A heating, heat-loss, or power fault is more likely than a thermometer disagreement.
-
PATH 05Safety boundary
What you see
Smoke, gas odor, arcing, exposed wiring, repeated power trips, a very large temperature error, unsafe food results, or a recurring failure remains after setup and calibration checks.
Do this next
Turn the oven off, leave the area for active smoke or suspected gas, and obtain qualified appliance, electrical, or gas service from a safe location as appropriate.
Why this path and its safety boundary
Why it matters: The oven may have a serious electrical, combustion, control, element, sensor, or heat-loss fault and should not be operated as a test appliance.
Safety stop: Do not restart, repeatedly reset power, bypass a safety device, or continue cooking to gather more readings.
Helpful context
Understand the symptom
Why the thermometer and display can disagree
The displayed setpoint is not a promise that every point in the cavity will hold that number continuously. Heating elements switch on and off to maintain an average, and a portable thermometer may react slowly or sit in a warmer or cooler location. Opening the door also changes the air temperature. GE says a thermometer is not always the best first check, while Samsung warns that a portable thermometer can differ from the oven's actual temperature without indicating a product fault. Treat a single snapshot as a clue, not a calibration command.
Use cooking performance to confirm a real pattern
Before changing an offset, repeat the same recipe or a standardized biscuit test with the recommended rack and pan. Uneven browning, a dark pan, crowded racks, convection conversion, a door that leaks heat, or an incompletely preheated cavity can look like incorrect temperature. A repeatable hot or cold result across suitable foods is more useful than one thermometer reading, especially when the oven's manual specifies how calibration is evaluated.
Calibration is model-specific
Some ovens provide a temperature-offset menu, some use a control knob, and some require service. Do not transfer a calibration sequence from another brand or model. GE says to use the owner's manual for the thermostat adjustment, and Whirlpool notes that digital and gas controls have different procedures. Record the original setting, make only a documented small adjustment when the manual permits it, and retest before making another change.
Recognize a heating or safety fault
A slow preheat, no heat, severe temperature error, failed door seal, repeated breaker trip, smoke, gas odor, or a cracked heating element is a different branch from a thermometer disagreement. Turn the oven off and arrange qualified appliance service for those symptoms. Do not probe energized wiring, remove panels, or attempt to repair a gas system while trying to validate the temperature.
Safety boundary
Stop conditions
- Stop using the oven for smoke, gas odor, arcing, exposed wiring, a hot or damaged connection, repeated breaker trips, or a door that will not close securely.
- Do not touch heating elements while hot, perform live electrical tests, remove panels, repair gas components, or replace a sensor or control from a thermometer reading alone.
- Do not calibrate from a single thermometer snapshot, a door-open reading, or one unusual recipe; confirm a repeatable cooking pattern first.
- Do not continue cooking when the oven has a cracked element, severe uncontrolled heat, recurring error, or food that cannot be cooked safely despite correct settings.
- Arrange qualified appliance service when model-documented calibration is unavailable or does not correct consistent results, or when a sensor, element, control, seal, wiring, or power fault is suspected.
Only after diagnosis
Potential parts
- oven temperature sensor
Consider this category only when repeatable cooking evidence and qualified testing identify a sensor fault after mode, preheat, setup, and calibration checks.
Confirm the exact oven model and diagnosis; sensor appearance and resistance characteristics vary, and replacement requires safe power isolation and model instructions. - oven bake or broil heating element
Consider this category only when a qualified diagnosis or a permitted cool visual inspection confirms a damaged element or a related heating fault.
Confirm the exact model, cavity, and element position; do not infer an element failure from a thermometer difference alone. - oven door gasket
Consider this category only when the gasket is visibly torn, the door cannot seal, or qualified testing confirms heat loss at the door.
Confirm the exact model and gasket design; a door or hinge issue may require professional service rather than a gasket alone.
When checks do not resolve it
Need a professional?
Arrange qualified appliance service when comparable foods remain consistently too hot or cold after correct mode, full preheat, rack, cookware, door, and safe power checks; when the model has no user calibration procedure; when calibration does not hold; or when an element, sensor, control, gasket, wiring, or power fault is possible. Stop immediately for smoke, gas odor, arcing, exposed wiring, repeated breaker trips, a cracked element, or a door that will not close.
Safety scope: This article supports recording settings, following a recipe or standardized food test, checking rack and cookware placement, observing a cool visible element or gasket, and using a model-documented user calibration menu. A qualified professional should handle panels, live electrical tests, gas controls, wiring, sensors, elements, and repairs requiring disassembly.
Common questions
FAQ
Why does my oven thermometer disagree with the oven display?
Ovens cycle their heating elements, and a portable thermometer responds to its own location and speed. Door openings and rack position also change the reading. Compare repeatable cooking results and the model manual's procedure before deciding that calibration is needed.
How can I check whether my oven is really too hot or too cold?
Use the same recipe or a manufacturer-described biscuit test with the correct rack, pan, mode, and complete preheat. If you also use a thermometer, keep the placement and reading method consistent and interpret a trend rather than one instant. Consistently wrong cooking results are stronger evidence than one portable reading.
Should I calibrate my oven when an independent thermometer differs?
Not from one difference alone. First rule out cycling, thermometer placement, incomplete preheat, mode conversion, rack position, cookware, and door heat loss. If comparable foods are consistently hot or cold, use only the exact model manual's calibration or thermostat-offset procedure; some ovens require service.
Can a bad door gasket make the oven temperature seem inaccurate?
Yes. A door that does not close or a torn gasket can let heat escape and prevent the cavity from reaching or holding the expected condition. Stop using the oven if the door cannot seal safely and arrange qualified service for the gasket, hinge, or door issue.
What if the oven takes too long to preheat or never reaches temperature?
Check the mode, door closure, rack and cookware setup, and external power state without opening panels. A visibly damaged element, no heat, repeated breaker trip, or persistent slow preheat needs qualified appliance service rather than a larger calibration offset.
When should I stop using an oven with an inaccurate temperature?
Stop for smoke, gas odor, arcing, exposed wiring, repeated breaker trips, a cracked element, a door that will not close, uncontrolled heat, or food that cannot be cooked safely. Arrange qualified appliance, electrical, or gas service as appropriate and do not perform live testing or internal repairs.
Read the exact guide
Official sources
- How to calibrate an ovenWhirlpool · Official Whirlpool guidance; its thermometer and calibration procedure is brand-contextual and must not replace the exact oven owner's manual.
- Troubleshooting guide for Samsung built-in ovenSamsung UK · Official Samsung UK troubleshooting guidance for built-in ovens; it notes that portable thermometer readings can differ and exact controls vary by model.
- Range & Wall Oven - Oven Cooking Too Slow or Too FastGE Appliances · Official GE Appliances support guidance for range and wall-oven thermostat adjustment; use the exact model manual for the available calibration method.
- Range & Wall Oven - Oven Temperature Is Not CorrectGE Appliances · Official GE Appliances support guidance for range and wall ovens; other brands and exact models control their own calibration and service procedures.
Community feedback
Share a repair observation
Share a plain-text repair observation. Accepted observations are published automatically; this page may take a moment to update.