
On this page
Start here
Quick answer
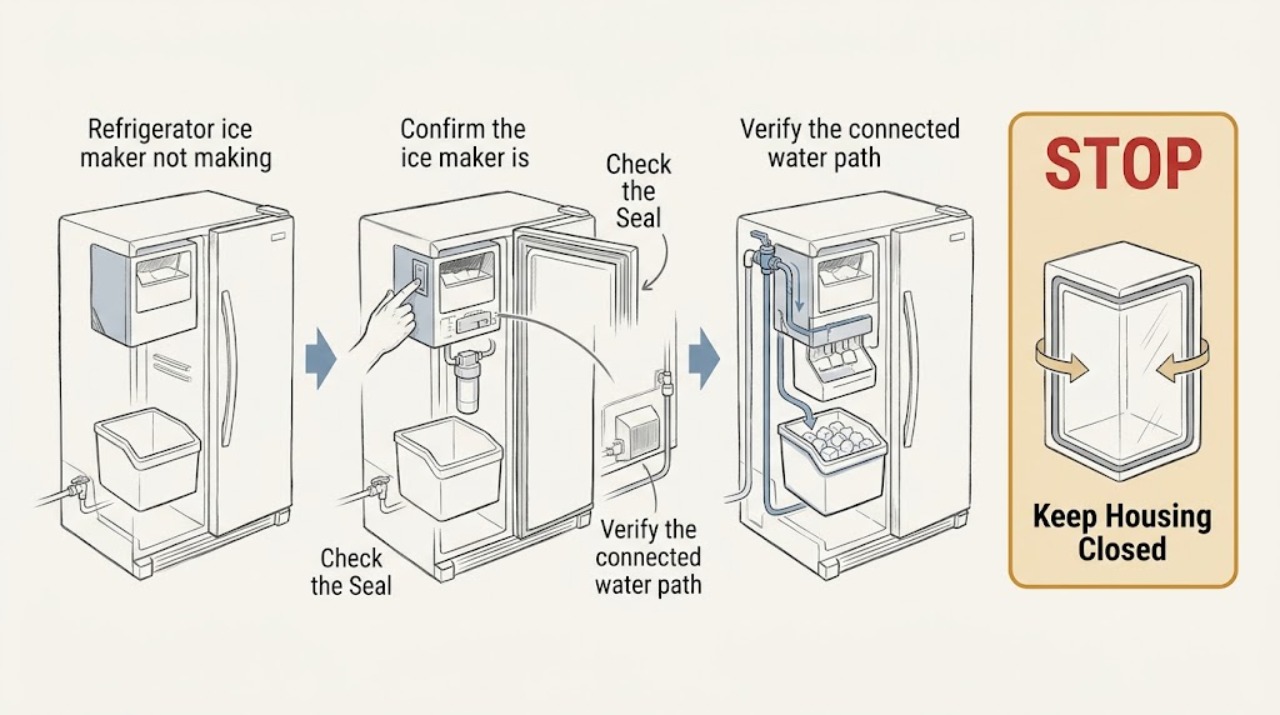
A connected water line does not prove that the ice maker is receiving usable water or reaching an ice-making temperature. First confirm the ice maker is On, the freezer or ice-maker compartment is cold enough according to the owner's manual, the ice bucket is seated and not full or jammed, the line is not kinked, and the water filter is not restricting flow. Use the dispenser as an observation when the model has one: water flow there can help separate a supply or filter problem from an ice-maker fill or motor problem, but it does not prove the small fill tube is clear. If the model's documented test shows motor movement but no water, service may involve the inlet valve, fill tube, wiring, or pressure; if the test does not move, the ice maker or its control may be at fault. Do not force a frozen bucket, probe moving parts, thaw with a heat gun or hair dryer, bypass the door or bin sensor, or open the rear electrical area.
Before you begin
Safety first
- This article covers normal controls, external observation, model-documented user tests, and accessible filter or line checks only. Electrical, moving, heated, sealed, refrigerant, water-valve, fill-tube, and ice-maker assembly work belongs to a qualified appliance professional.
Work through in order
Diagnostic checks
Use only checks that match the exact appliance or system and its official guide.
-
Confirm the ice maker is enabled
From the normal control panel or ice-maker switch, verify the ice maker is On and that a control lock, vacation mode, or bin-full indicator is not disabling it. Do not reach into the ejector mechanism or remove a cover to operate a switch.
Expected result: The ice maker is Off or locked, the bucket-full indicator is active, or the ice maker is On with no full-bin indication.
Next step: Enable the ice maker using the exact model instructions, reseat an accessible bucket only if it releases normally, and allow the appliance's normal production period. If it remains idle, continue with the temperature and water-path checks.
Stop if: Do not force the bucket, defeat an arm or optical sensor, insert fingers or tools into the mechanism, or bypass a lock or safety interlock.
Why this matters
Why: An Off, locked, or full-bin state can stop production even when the water supply is connected. An enabled ice maker with an empty or correctly seated bin makes a water, temperature, fill, motor, or control check more useful.
-
Check freezing conditions and door or bucket sealing
Read the displayed freezer temperature if available and confirm the freezer door, ice-room door, and ice bucket close and seat as shown in the owner's manual. Look for heavy frost, a warm compartment, or food blocking the door, without removing panels or defrosting with a heat source.
Expected result: The compartment is warmer than the manual's ice-making guidance, frost is present, the door or bucket does not seal, or the compartment is cold and properly sealed.
Next step: Clear only an obvious door obstruction and reseat the accessible bucket according to the manual. If temperature, frost, or sealing remains abnormal, troubleshoot the refrigerator cooling or door issue first and arrange service if it persists.
Stop if: Do not chip ice, use a hair dryer or heat gun, remove evaporator covers, or continue using a door that cannot close and seal.
Why this matters
Why: A warm or poorly sealed ice-making compartment can prevent water from freezing or melt existing ice, while frost can indicate a separate cooling or air-leak issue. Correct temperature and sealing make water delivery and ice-maker operation the next focus.
-
Verify the connected water path without changing plumbing
From behind or below the refrigerator only if the area is dry and accessible, look for a kinked or crushed supply line and confirm the clearly labeled refrigerator shutoff is open. If the model has a dispenser, observe whether its water flow is normal; do not disconnect the line or move a heavy refrigerator to reach a hidden valve.
Expected result: The line is kinked, the valve is not open, dispenser flow is weak or absent, or dispenser flow is normal while the ice maker remains dry.
Next step: Correct only an obvious external kink or clearly labeled valve position without force, then observe normal operation. If flow remains weak or the ice maker is dry despite normal dispenser flow, arrange service rather than changing plumbing fittings.
Stop if: Do not loosen compression fittings, cut tubing, force a valve, pull the refrigerator, handle wet electrical parts, or alter the household water line.
Why this matters
Why: A kinked line, closed valve, or weak dispenser can explain insufficient ice-maker fill despite a connected supply. Normal dispenser flow shifts suspicion toward the filter, ice-maker valve, fill tube, wiring, or ice-maker mechanism rather than the house connection alone.
-
Check for a filter or pressure restriction
Review the filter status and replacement instructions for the exact refrigerator model. If the manual provides a safe filter-bypass or filter-removal comparison, use only that documented method and do not operate the refrigerator with an unapproved open filter housing.
Expected result: The filter is overdue, visibly damaged, incorrectly seated, or flow improves only when the model-approved filter bypass is used; or the filter is current and flow does not change.
Next step: Install only the filter specified by the owner's manual and purge or reset it as documented. If the issue continues with a correct filter and adequate dispenser flow, request service; do not substitute a filter or bypass permanently.
Stop if: Do not force the filter, run with a leaking housing, remove an internal screen, or use a bypass plug or cartridge that the model does not specify.
Why this matters
Why: A restricted or incorrectly installed filter can reduce water flow enough to prevent a proper ice-maker fill. If the filter is not implicated, a valve, inlet screen, fill tube, wiring, or ice-maker fault becomes more likely.
-
Use the model's documented ice-maker test only if user-accessible
If the owner's manual identifies a user-accessible test button or test mode, follow only that model-specific sequence and observe from outside the mechanism whether the motor cycles and whether the fill valve supplies water. Do not press unknown buttons, insert a wire or tool, or touch moving or heated parts.
Expected result: The ice maker cycles and fills, cycles without water, receives water but does not harvest, or does not react at all.
Next step: If the test fails any part or displays an error, record the result and arrange appliance service. If it succeeds, keep the ice maker On, the compartment sealed, and allow normal production before judging the result.
Stop if: Do not force an ice maker to move, manually heat or thaw it, bypass a sensor, remove wiring, or repeat a failed test while water is present.
Why this matters
Why: A successful cycle and fill point toward a normal delay, temperature, bucket, or sealing condition. Movement without water points toward water delivery or the fill tube; water without harvest points toward the mechanism or sensor; no reaction points toward power, control, motor, or a model-specific fault.
-
Document the result and set the service boundary
Record the refrigerator model, ice-maker location and type, control state, freezer temperature or frost observation, dispenser flow, filter status, bucket or door seal, test result, and when ice production stopped. Keep the refrigerator operating normally only when there is no leak, exposed wiring, damaged ice maker, or unsafe condition.
Expected result: The problem is limited to ice making with normal cooling and water dispensing, or there is a leak, visible damage, abnormal temperature, error indication, or a failed test.
Next step: Give the complete record to a qualified appliance technician and arrange service when the checks do not restore production. Keep water away from electrical parts and do not open the rear or freezer service areas.
Stop if: Stop immediately for water near electrical components, exposed wiring, a burning smell, repeated breaker trips, a cracked liner, a damaged heater, or a refrigerator that cannot maintain safe cooling.
Why this matters
Why: An isolated ice-maker failure can be diagnosed at the ice-maker, valve, fill tube, sensor, or wiring. A leak, cooling fault, error, or physical damage broadens the repair and should not be treated as a simple water-supply adjustment.
Use your observations
Decision map
Find the observation that best matches what you see, then follow the next safe action.
-
PATH 01Next step
What you see
The ice maker is Off, locked, the bin is not seated, or a full-bin sensor or arm is stopping production.
Do this next
Use the exact manual to enable the ice maker and seat the bin, then allow the normal production period. Do not force the bin or defeat its sensor.
Why this path and its safety boundary
Why it matters: The connected water supply is not yet the limiting evidence; the control or storage state is preventing a harvest cycle.
-
PATH 02Next step
What you see
The freezer or ice compartment is too warm, frosted, blocked, or not sealing at the door or bucket.
Do this next
Correct only an obvious external obstruction or bucket seating issue. Address cooling, frost, and door-seal problems before replacing the ice maker.
Why this path and its safety boundary
Why it matters: Water may be supplied but cannot freeze reliably, or existing ice may melt and make the ice maker appear inactive.
-
PATH 03Next step
What you see
The supply is connected but dispenser flow is weak or absent, the external line is kinked, or the filter is restricted or incorrectly seated.
Do this next
Correct only a clearly accessible kink or valve position and follow the model's filter procedure. If flow remains weak, have a plumber or appliance technician assess pressure and the supply path.
Why this path and its safety boundary
Why it matters: The refrigerator may not be receiving enough water for the ice-maker fill even though the line is connected.
-
PATH 04Next step
What you see
The documented ice-maker test moves the mechanism but no water enters the mold, while the dispenser has normal flow.
Do this next
Arrange appliance service to inspect the fill system. Do not remove the fill tube, energize a valve, or thaw a frozen tube with a heat source.
Why this path and its safety boundary
Why it matters: A fill valve, fill tube, inlet restriction, ice-maker wiring, or model-specific water path is more likely than a disconnected house supply.
-
PATH 05Next step
What you see
The documented test produces no movement, or water enters but the ice maker does not harvest and the temperature and water path are normal.
Do this next
Stop testing and arrange qualified appliance service with the model and test result. Do not force the ejector, bypass a sensor, or replace the assembly based only on appearance.
Why this path and its safety boundary
Why it matters: An ice-maker motor, control, sensor, wiring, or mechanism fault is more likely than the connected supply.
-
PATH 06Next step
What you see
Water leaks into the refrigerator or onto electrical parts, a fill tube or liner is visibly damaged, an error persists, or the unit cannot maintain proper cooling.
Do this next
Stop using the ice maker and keep water away from electrical components; arrange qualified appliance service. Seek urgent help for burning odor, exposed wiring, repeated breaker trips, or a serious leak.
Why this path and its safety boundary
Why it matters: This is a service and safety boundary, not a normal ice-production adjustment.
Helpful context
Understand the symptom
Connected is not the same as filling
The house valve can be open while the refrigerator still has low flow, a kinked line, a restricted filter, a blocked inlet screen, a frozen fill tube, or a valve that never opens. Compare the dispenser and ice-maker behavior only when the model has both. A working dispenser narrows the problem but does not prove that water reaches the ice tray because the two paths can diverge inside the refrigerator.
Cold temperature and bucket sensing control production
An ice maker pauses when its control is Off, when the bucket or shutoff sensor indicates full, or when the compartment is too warm to freeze water. A door that does not close or an ice bucket that is not seated can let warm air in or block the mechanism. Use the model manual for the correct control indicator and temperature guidance instead of copying settings from another refrigerator.
Use a documented test to separate fill from motor faults
Many refrigerators provide a model-specific ice-maker test. If the manual makes that test user-accessible, observe only whether the mechanism cycles and whether water enters the mold; do not reach into the mechanism or improvise a test with a tool. Motor movement without fill points toward water delivery, while no movement points toward control, motor, sensor, or power and needs service when basic settings are correct.
Safety boundary
Stop conditions
- Stop for water near electrical parts, exposed wiring, a burning smell, repeated breaker trips, a cracked liner, a damaged heater, an active leak, or a refrigerator that cannot maintain safe cooling.
- Do not insert fingers, wires, knives, or tools into the ejector or ice-maker mechanism, and do not force a stuck bucket or harvest cycle.
- Do not thaw a frozen ice maker or fill tube with a hair dryer, heat gun, open flame, or other improvised heat source.
- Do not remove covers, disconnect wiring, bypass a bin or door sensor, energize a water valve, or open a rear service area as an ordinary user check.
- Do not permanently bypass a filter, alter the water line, or judge the ice maker repaired merely because a single test cycle moves.
Only after diagnosis
Potential parts
- refrigerator water inlet valve
Consider this category only when dispenser flow and the connected supply are adequate but a qualified test confirms that the valve does not fill the ice maker correctly.
Confirm the exact refrigerator model, valve configuration, tubing connections, and manufacturer fit information before ordering. - ice-maker fill tube or inlet assembly
Consider this category only when service confirms a frozen, blocked, cracked, or misaligned fill path after temperature and water-flow checks.
Confirm exact model and fill-path design; do not thaw, drill, or modify the tube as a user test. - refrigerator ice-maker assembly
Consider this category only when the model-documented test shows no harvest, no motor response, or a failed sensor or control within the ice-maker assembly.
Confirm exact refrigerator and ice-maker model, connector, mounting, and manufacturer fit information before ordering. - refrigerator water filter
Consider this category only when the filter is overdue, damaged, incorrectly seated, or flow improves through the model-approved filter comparison.
Use only the filter or bypass method specified for the exact refrigerator; confirm fit and seal before use.
When checks do not resolve it
Need a professional?
Arrange qualified appliance service when the ice maker remains On, the compartment is cold and sealed, the connected line and filter have normal flow, and the model-specific test fails or produces no ice; when the motor cycles without water, water enters without harvest, an error persists, or the fill tube, valve, wiring, or ice maker may be frozen or damaged. Contact a plumber for weak household water pressure or a supply-line issue. Stop and seek urgent help for an active leak near electricity, burning odor, exposed wiring, repeated breaker trips, or unsafe cooling.
Safety scope: This article covers normal controls, external observation, model-documented user tests, and accessible filter or line checks only. Electrical, moving, heated, sealed, refrigerant, water-valve, fill-tube, and ice-maker assembly work belongs to a qualified appliance professional.
Common questions
FAQ
Why is my refrigerator ice maker not making ice if the water supply is connected?
A connected line can still have weak flow, a kink, restricted filter, frozen fill tube, failed inlet valve, disabled ice maker, warm compartment, full or mis-seated bucket, or a motor or control fault. Check the On state, temperature, sealing, filter, dispenser flow, and model-documented test in that order.
Does water from the refrigerator dispenser prove the ice maker should fill?
No. A working dispenser suggests the house supply and some part of the filter path are available, but the ice maker can have a separate valve, fill tube, wiring, or control problem. If the dispenser is normal but the ice-maker test moves without water, request service.
Should I reset or test the ice maker?
Only if the exact owner's manual identifies a user-accessible test or reset. Observe from outside whether the motor cycles and water enters, and stop if it fails. Do not insert tools, force the mechanism, bypass sensors, or open covers.
Can a water filter stop the ice maker even when the line is connected?
Yes. A restricted, damaged, or incorrectly seated filter can reduce flow enough to prevent a proper fill. Use only the model-approved filter or bypass comparison, then replace the filter with the exact specified type if the comparison identifies it as the restriction.
When does a no-ice problem require service?
Arrange service when the ice maker is On, the compartment is cold and sealed, water flow and filter checks are normal, but the model test fails, produces no water, or does not harvest. Stop immediately for leaks near electricity, exposed wiring, burning odor, repeated breaker trips, or a damaged or unsafe refrigerator.
Read the exact guide
Official sources
- Samsung ice maker is not workingSamsung US · Samsung model guidance used for general diagnostic branching; follow the installed refrigerator's manual for exact controls and thresholds.
- [LG Refrigerator] Troubleshooting water, ice related issuesLG USA Support · LG water and ice troubleshooting used for general evidence about connected supply, flow, and sealing; exact model instructions control.
- LG Refrigerator – Why is My Refrigerator Not Making Ice?LG USA Support · LG refrigerator guidance used for cross-brand diagnostic distinctions; model-specific manual and controls control the safe test.
- Refrigerator - Icemaker Doesn't Fill With WaterGE Appliances · General refrigerator ice-maker troubleshooting used for cross-brand diagnostic distinctions; the exact refrigerator manual controls the user procedure.
Community feedback
Share a repair observation
Share a plain-text repair observation. Accepted observations are published automatically; this page may take a moment to update.