
On this page
Start here
Quick answer
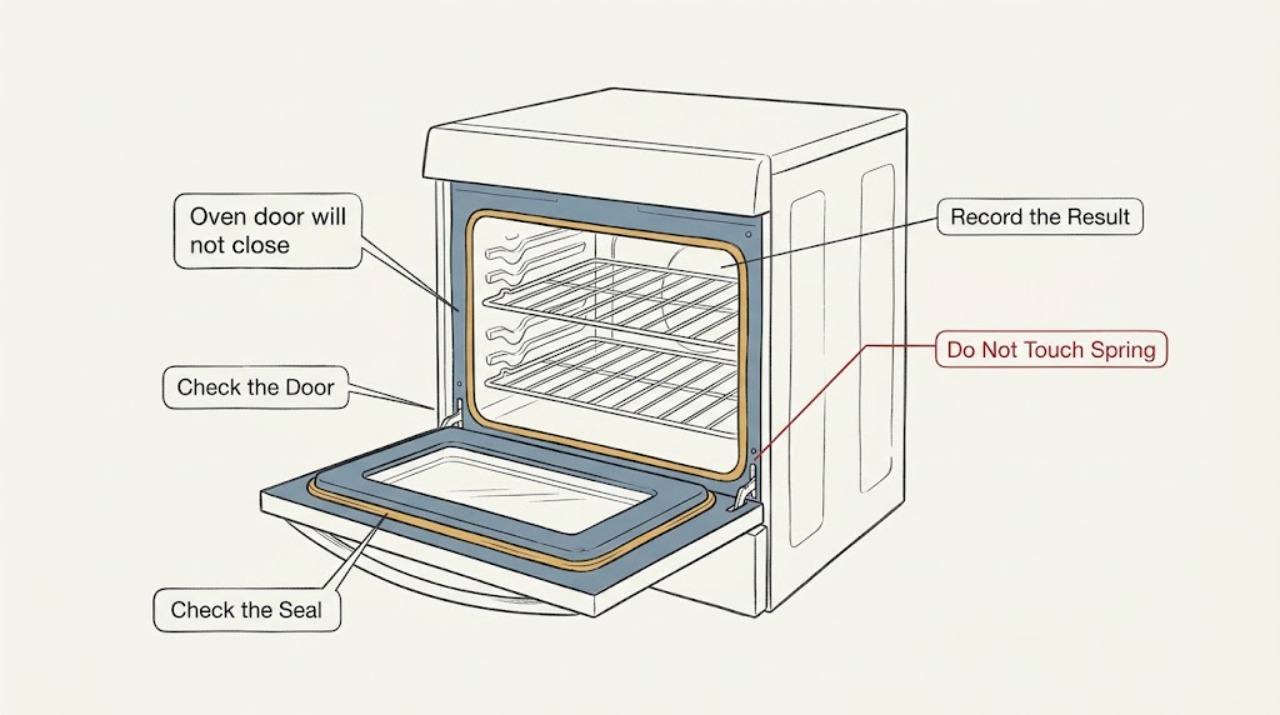
With the oven cool and off, remove anything that projects into the door path and push every rack or Smart Divider fully into its intended position. If the door was recently removed, use the exact Samsung manual to check that both hinges are seated and not extended or bent; do not force the door or hinge arms. If the oven was hot or the latch is locked, let it cool and follow the model-specific lock instructions, including only one permitted power cycle. A bent hinge, damaged frame, torn gasket, stuck latch, or door that still will not close needs qualified appliance service before cooking.
Before you begin
Safety first
- This article covers cool, external observation, rack or divider seating, model-manual lookup, and one model-permitted reset. A technician must handle door removal, hinge springs, latches, frame repair, panels, wiring, gas parts, and high-temperature safety diagnosis.
Work through in order
Diagnostic checks
Use only checks that match the exact appliance or system and its official guide.
-
Check 1
Turn the Samsung oven off, let the cavity and door cool fully, remove cookware, and pull each rack fully forward once so you can reseat it in the correct level position. If the model uses a Smart Divider or partition, remove and reinstall it only as the manual shows.
Expected result: The door path is clear and the racks or divider are fully inserted and level, or the door contacts a rack, divider, tray, or food residue before the seal reaches the frame.
Next step: Remove the obstruction or correct the seating once, then make one gentle closure check with no force. If the door still stops, continue to the alignment and lock checks.
Stop if: Do not reach into a hot cavity, wedge the door shut, or use the handle as a lever.
Why this matters
Why: Contact with a rack, divider, tray, or residue makes an ordinary obstruction or seating problem more likely. A clear path shifts attention to hinge, latch, seal, frame, or temperature-lock branches.
-
Check 2
With the oven cool, inspect the visible door gasket, the inner door edge, the catch area, and the frame from outside. Look for a seal folded out of its channel, a loose piece of debris, a hinge-side gap, a bent edge, or a door that sits visibly higher on one side.
Expected result: The gasket is displaced or torn, the frame or door edge is visibly bent, the door sits crooked, or no visible damage or displacement is present.
Next step: Remove only loose surface debris without removing covers. Leave the oven unused and arrange service for a torn seal, bent metal, a crooked door, or a persistent gap; otherwise continue to the recent-removal branch.
Stop if: Do not straighten metal, pull out hinge springs, remove the door, or use adhesive on the gasket as a trial repair.
Why this matters
Why: A displaced seal or visible bend can physically prevent a seal and latch from meeting; physical damage or misalignment is not a safe adjustment problem. No visible change keeps reassembly or latch-state causes open.
-
Check 3
If the symptom started after the door was removed or cleaned, identify the exact Samsung model and compare the hinge position and attachment points with its owner manual. Check only from the outside that both hinge arms are in the documented position and neither is extended, bent, or uneven.
Expected result: The door was recently removed and one hinge is not in the manual's position, or the door was not recently removed and both hinges look even with no visible damage.
Next step: For a recent removal, follow the exact manual's reattachment procedure once; if the hinge cannot be placed without force or the door remains crooked, stop and request service. If there was no recent removal, continue to the lock-state check.
Stop if: Do not push, bend, tie back, or manually spring-load a hinge arm, and do not attempt reattachment while the oven is hot.
Why this matters
Why: A recent removal plus an uneven or unlocked hinge makes incorrect reattachment more likely. Even hinges without a removal event make a hidden latch, seal, frame, or internal hinge fault more likely.
-
Check 4
From outside the appliance, note whether a lock icon or lock message is shown, whether a Self Clean or other high-heat cycle just ran, and whether the oven is still warm. Keep the oven off and let it cool; once cool, use only the lock or Child Lock procedure in the exact Samsung model guide.
Expected result: The oven was hot or recently in a high-heat cycle, a lock indicator is shown, the range is powered off with the door locked, or none of those conditions applies.
Next step: After the documented cool-down or lock step, make one gentle closure check. If the door remains locked or the lock state returns, arrange service rather than forcing the catch.
Stop if: Do not defeat a lock, hold a plunger while manipulating the latch, or reach into the latch area unless the exact model guide expressly makes that a safe owner step.
Why this matters
Why: Samsung says heat can keep the door locked, and some models can lock when powered off; a cool oven with no lock state makes a mechanical closure fault more likely. The correct button names and sequence vary by model.
-
Check 5
If the oven is cool, has no smoke, gas odor, sparks, damaged wiring, or uncontrolled heat, and the Samsung model guide permits a reset for the lock state, turn the circuit breaker supplying the oven off for the interval specified by that guide, then restore power once.
Expected result: The lock indicator clears and the door operates normally, the door remains locked after power returns, the breaker trips, or the controls behave abnormally.
Next step: If the door remains locked, the breaker trips, or controls are abnormal, leave the oven off and arrange qualified appliance service. If it clears, do one cool, gentle closure check and monitor rather than repeating resets.
Stop if: Do not guess the reset interval, repeatedly cycle the breaker, or restore power when a safety symptom is present.
Why this matters
Why: A single permitted reset may clear a temporary control or lock state, but it cannot correct a bent hinge, blocked path, damaged seal, stuck latch, or frame problem. A recurring lock or breaker event is unresolved.
-
Check 6
After the relevant ordinary correction, close the cool, empty door gently and check from outside that it meets the frame evenly, the latch engages without force, and no edge or seal remains pinched. Do not run a cooking or cleaning cycle solely to test a door that was previously misaligned.
Expected result: The door closes evenly and stays closed, it needs force or springs open, a gap remains, or the door becomes hot or unsafe during a later normal use.
Next step: Use the oven only if the door closes and latches normally. Otherwise leave it off and give the technician the model, symptom timing, photos of any safe visible damage, and the checks already performed.
Stop if: Stop immediately for smoke, gas odor, sparks, exposed wiring, unusual heat at the door, or loss of control.
Why this matters
Why: A smooth even closure supports that the obstruction or temporary lock state was the cause; force, a gap, spring-back, or renewed heat leakage supports a mechanical or sealing fault that is not verified by a visual check alone.
Use your observations
Decision map
Find the observation that best matches what you see, then follow the next safe action.
-
PATH 01Safety boundary
What you see
A rack, tray, divider, or residue contacts the door before it reaches the frame, and the issue improves when that item is correctly seated or removed.
Do this next
Correct the item once according to the manual and verify one gentle closure; stop and request service if contact remains with a clear path.
Why this path and its safety boundary
Why it matters: An ordinary obstruction or seating error is more likely than a failed part.
Safety stop: Do not force the door or alter rack stops, divider switches, or the frame.
-
PATH 02Safety boundary
What you see
The problem began after door removal or cleaning and one hinge is extended, bent, uneven, or not seated as shown in the model manual.
Do this next
Follow the exact manual once if the hinge position can be corrected without force; otherwise leave the oven unused and arrange appliance service.
Why this path and its safety boundary
Why it matters: Incorrect door reattachment or hinge position is more likely; forcing the door could add damage.
Safety stop: Do not bend hinge arms, pull springs, or disassemble the door.
-
PATH 03Safety boundary
What you see
The oven was recently hot or in a high-heat cycle, a lock indicator is present, or the door is locked while the range is powered off, with no visible mechanical damage.
Do this next
Allow full cool-down and follow the model's lock instructions; use one permitted power cycle only, then request service if the lock remains or returns.
Why this path and its safety boundary
Why it matters: A temperature-protection or model-specific lock state is more likely than an obstruction.
Safety stop: Do not defeat the lock, force the catch, or keep restoring power.
-
PATH 04Safety boundary
What you see
The door remains crooked or gapped after the path is clear, the gasket or frame is damaged, the latch will not engage, or the symptom returns after a documented correction.
Do this next
Leave the oven off and arrange qualified Samsung appliance service with the model and symptom history; do not select a part from the symptom alone.
Why this path and its safety boundary
Why it matters: A hinge, latch, seal, frame, or related internal fault is more likely than a user-correctable condition.
Safety stop: Do not straighten metal, replace a latch, remove panels, or operate with a door that cannot close and seal evenly.
Helpful context
Understand the symptom
Start with a cool, empty door path
Do not diagnose this by leaning on the handle. Turn the oven off, wait until the cavity and door are cool, and remove cookware before checking the opening. Samsung specifically calls out racks and a divider or partition that are not fully seated or level as causes of interference. A door that stops at the same point each time is more consistent with an obstruction or alignment issue than with a control setting.
Separate reassembly, lock, and damage branches
The timing of the symptom changes the next check. A problem that began after door removal points toward hinge position or reattachment. A lock icon, recent high-heat cycle, or an oven that is still hot points toward a safety lock state. A visible bend, torn seal, shifted frame, or a door that sits crooked points toward damage or misalignment. These branches should not be treated as interchangeable adjustments.
Use the model manual before touching a removable door
Samsung oven and range doors are removable, but hinge positions and the reattachment method vary by model. Use the model's manual for identification and reattachment guidance. If the door does not sit squarely after the documented check, or if a hinge arm is bent, stop; forcing the door can worsen the frame or hinge fault.
Safety boundary
Stop conditions
- Stop using the oven immediately for smoke, gas odor, sparks, exposed wiring, a damaged cord, uncontrolled heat, a tripped breaker, or unusual heat escaping at the door.
- Do not force the handle or latch, wedge the door shut, bend hinge arms, straighten the frame, remove covers, or bypass a door, latch, divider, or temperature safety device.
- Do not run Self Clean or a cooking cycle while the door is crooked, gapped, unable to latch, or known to have a damaged gasket or frame.
- Stop after one model-directed ordinary correction and one permitted power cycle if the door still will not close, the lock returns, or controls behave abnormally.
- If the exact model manual does not support a safe owner step, leave the appliance off and arrange qualified service rather than borrowing instructions from another Samsung model.
Only after diagnosis
Potential parts
- Samsung oven door gasket
Consider this category only if inspection and a qualified diagnosis confirm a torn, displaced, or heat-damaged seal that prevents an even closure.
Confirm the exact Samsung model, oven position, seal profile, mounting method, and manufacturer fit information before ordering. - Samsung oven door hinge or hinge bracket
Consider this category only if the technician confirms a bent, worn, or incorrectly seated hinge or bracket after checking the door and frame.
Confirm the exact Samsung model, left or right position, hinge design, and manufacturer fit information before ordering. - Samsung oven door latch or lock assembly
Consider this category only when the model guide and technician testing identify a stuck or failed latch or lock assembly rather than a hot state, obstruction, hinge, or frame fault.
Confirm the exact Samsung model, lock type, connectors, mounting, and manufacturer fit information before ordering.
When checks do not resolve it
Need a professional?
Arrange qualified Samsung appliance service when the door remains open or gapped after the racks and divider are correctly seated, when a hinge, latch, gasket, frame, or door is damaged or misaligned, when a lock remains after cool-down and the model-directed step, or when the symptom returns. A technician should handle door removal, hinge and latch repair, frame work, panel access, live electrical diagnosis, and any gas or high-temperature safety issue.
Safety scope: This article covers cool, external observation, rack or divider seating, model-manual lookup, and one model-permitted reset. A technician must handle door removal, hinge springs, latches, frame repair, panels, wiring, gas parts, and high-temperature safety diagnosis.
Common questions
FAQ
Why will my Samsung oven door not close all the way?
Samsung lists a rack or divider that is not fully seated, a door that was removed and reattached incorrectly, a latch stuck in the locked position, and physical damage or misalignment. Check only with the oven cool and follow the exact model manual.
What should I check first on a Samsung oven door that will not close?
Turn the oven off and let it cool. Remove cookware, push racks fully in, and seat any divider or partition correctly. If the path is clear, look for a displaced gasket, crooked door, bent edge, or visible latch or hinge problem without forcing anything.
Can a Samsung oven door stay open because it is locked?
Yes. Samsung says the door can lock when the oven is too hot, and some models can lock while powered off. Allow full cool-down and use only the model-specific lock instructions; request service if it remains locked.
What if the Samsung oven door was recently removed?
Use the exact Samsung owner manual to check reattachment. The hinge arms must be in the documented position and not extended or bent. If the door sits crooked or the hinge cannot be placed without force, leave the oven unused and arrange service.
Should I use my Samsung oven if the door has a gap?
No. Do not cook or run Self Clean with a door that cannot close and latch evenly, or with a damaged gasket, hinge, or frame. Stop for smoke, gas odor, sparks, unusual escaping heat, or loss of control and arrange qualified service.
Read the exact guide
Official sources
- Samsung Wall Oven FAQs | Samsung USSamsung · Official Samsung US FAQ; the cited closure guidance is for Samsung wall ovens and model details may differ.
- Ranges | Samsung Support USSamsung Support · Official Samsung US support hub used to locate the exact model manual; it does not replace model-specific door instructions.
- Door will not close on Samsung ovenSamsung Support · Direct Samsung US troubleshooting page; hinge, latch, rack, divider, and service details can vary by model.
- Samsung oven door is lockedSamsung Support · Direct Samsung US lock troubleshooting page; button labels and lock behavior vary by model.
Community feedback
Share a repair observation
Share a plain-text repair observation. Accepted observations are published automatically; this page may take a moment to update.