
On this page
Start here
Quick answer
If one stove burner remains on high while the other burners adjust normally, first turn that burner off and confirm whether the flame actually goes out and whether it responds at all to the low setting. A knob that is set low but produces a full flame can have a binding or damaged control, while a flame that changes with the knob but looks too large or uneven can involve a mis-seated cap, moisture, clogged ports, or a model-specific low-flame adjustment. If the range was recently converted between natural gas and LP, an incorrect conversion can make a burner or all burners too high. Let the burner cool, keep the correct cap on the correct base, and use only the owner's manual's cleaning or adjustment procedure. Do not adjust gas pressure, enlarge ports, defeat a valve, or keep using a burner that will not turn down or off. A gas odor, yellow or unstable flame, soot, roaring, or a flame touching the grate requires stopping use and qualified service.
Before you begin
Safety first
- This article supports external control observation and cool, ordinary-access cap/port inspection only. Qualified service handles gas valves, regulators, orifices, pressure, fuel conversion, combustion adjustment, and internal controls.
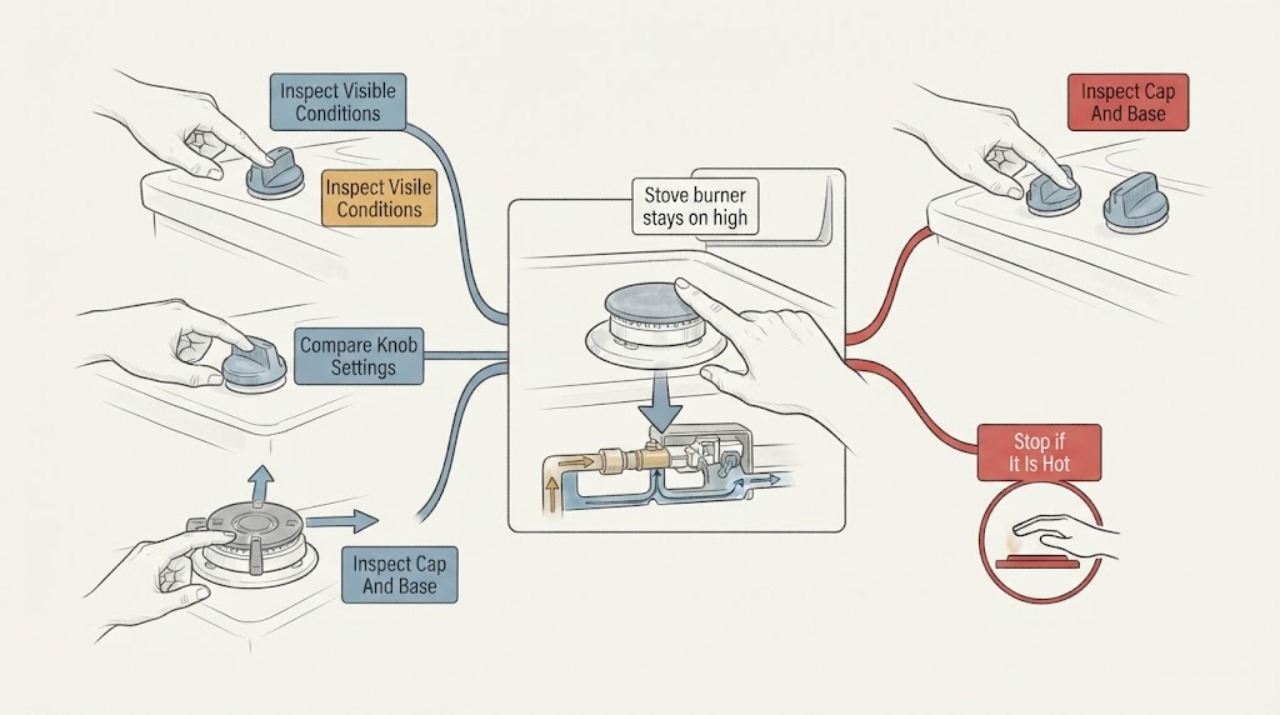
Work through in order
Diagnostic checks
Use only checks that match the exact appliance or system and its official guide.
-
Check 1
Turn the affected surface control to OFF from a standing, well-ventilated position and observe the burner without reaching over it or touching the grate.
Expected result: Record whether the flame extinguishes promptly, drops but remains lit, stays at full height, makes a roaring or hissing sound, or produces a gas odor.
Next step: Leave the affected burner unused and arrange qualified service for any failure to extinguish, persistent full flame, abnormal noise, or gas odor; do not repeatedly cycle the knob.
Stop if: If gas is smelled or the flame cannot be shut off, leave the area, avoid switches or ignition sources, and contact the gas utility or emergency service from a safe location.
Why this matters
Why: A flame that does not go out or does not respond to OFF suggests a control or gas-valve fault and is unsafe to keep testing. A flame that goes out but will not turn down points toward low-setting control, cap/port, fuel, or conversion issues.
-
Check 2
With the burner lit only when it can be monitored safely, move the affected knob through the normal high-to-low range once and compare its response with a working burner; do not force the knob or operate a burner that failed to turn off.
Expected result: Record whether the affected flame changes smoothly, changes only near the end of travel, remains high at low, the knob feels loose or binds, or other burners respond normally.
Next step: Keep the burner off if its low setting is not controllable and give the response comparison to a technician; do not remove the valve or attempt a gas adjustment.
Stop if: Stop immediately for a flame that will not extinguish, gas odor, unstable flame, or a knob that must be forced.
Why this matters
Why: A smooth but oversized flame suggests cap, port, fuel, or model-specific adjustment. A knob that binds, slips, or produces no change points more toward the knob/shaft or valve. Normal response from other burners supports a localized fault rather than a general supply change.
-
Check 3
After turning the control OFF and allowing the surface to cool completely, inspect the affected burner cap and base from ordinary access; remove the cap only if the owner's manual permits it and keep each cap with its matching burner.
Expected result: Record a cap that is centered and flush, a wrong or shifted cap, visible moisture after cleaning, food debris, a warped or cracked cap, or damage that cannot be judged without disassembly.
Next step: Dry and reseat only as the manual directs, then perform one supervised comparison; arrange service if the cap is damaged, cannot sit flush, or the high flame remains.
Stop if: Do not swap caps between burners, operate with a missing cap, use a cracked part, or force a cap or base off the cooktop.
Why this matters
Why: A wet, wrong, or poorly seated cap can create an uneven or apparently high flame. A damaged cap or base can alter flame distribution and needs the exact model's replacement guidance. A correctly seated, dry cap makes a control, port, fuel, or adjustment issue more likely.
-
Check 4
With the burner cool and the gas control OFF, inspect visible burner ports and slots for food, grease, or cleaning residue and clean only with the method and tool specified by the installed manual; do not enlarge or distort any port.
Expected result: Record clean, evenly open ports; localized blockage; moisture or residue; a damaged/warped burner; or ports that cannot be accessed without removing gas components.
Next step: Dry and reinstall the burner exactly as directed, then check whether the flame becomes even and responds to low; call service if the condition persists or the port requires disassembly.
Stop if: Do not drill, ream, scrape aggressively, use a wooden fragment, use a dishwasher unless the manual explicitly permits it, or adjust the gas orifice.
Why this matters
Why: A localized blockage or residue can make flames uneven or redirect flame, while a damaged burner or inaccessible port requires model-specific service. Cleaning will not correct a knob or valve that does not regulate gas flow.
-
Check 5
Read the range rating label and manual to identify natural gas or LP operation, and record any recent installation, fuel conversion, regulator work, or burner-part replacement without opening the regulator or gas manifold.
Expected result: Record no recent change, a recent natural-gas-to-LP or LP-to-natural-gas conversion, unknown fuel type, a mismatch between the label and supply, or a high flame on more than one burner.
Next step: Stop using the range if fuel type or conversion is uncertain and have the installer, gas utility, or qualified appliance technician verify the conversion and settings against the exact model.
Stop if: Do not change orifices, regulator settings, fuel connections, or air shutters yourself, and never operate a range with an unresolved fuel mismatch.
Why this matters
Why: A recent or uncertain conversion can cause flames to be too high if the appliance was not converted correctly. High flames across several burners point more toward fuel, regulator, or conversion than a single cap; a one-burner problem with unchanged fuel points toward local parts or control.
-
Check 6
From a safe distance during one supervised operation, observe the flame color, shape, sound, and contact with the grate or pan; use the vent hood and do not use the range as a room heater.
Expected result: Record a stable mostly blue flame appropriate to the fuel, persistent yellow or orange flame, lazy or wavering flame, flame lifting from the ports, soot, roaring, or flame contacting the grate.
Next step: Turn the burner off and obtain qualified service for abnormal color, soot, noise, lifting, or flame contact; do not tune combustion by guesswork.
Stop if: Stop immediately for gas odor, smoke, headache/dizziness, a roaring or flashback-like sound, or any flame that cannot be controlled.
Why this matters
Why: Persistent abnormal color, instability, soot, or noise can indicate poor combustion, blocked or damaged burner parts, incorrect fuel-air adjustment, or pressure/conversion trouble. A flame that remains high even when blue still needs control or adjustment diagnosis if the low setting is ineffective.
Use your observations
Decision map
Find the observation that best matches what you see, then follow the next safe action.
-
PATH 01Safety boundary
What you see
Only one burner remains full-size at low or does not respond normally to the knob, while other burners adjust and the correct cap is seated.
Do this next
Stop using that burner and arrange model-specific appliance service; keep the other burners under normal supervision rather than using them to compensate.
Why this path and its safety boundary
Why it matters: A localized knob/shaft, valve, burner-orifice, or low-setting adjustment fault is more likely than a whole-range supply problem.
Safety stop: Do not remove the valve, turn a low-flame screw, alter an orifice, or continue operating a burner that will not turn down or off.
-
PATH 02Safety boundary
What you see
Only one burner looks high or uneven, the knob does change flame height, and inspection finds a wet, shifted, wrong, dirty, or damaged cap or blocked port.
Do this next
Cool, clean, dry, and reseat the correct parts only as the manual directs, then perform one supervised check; replace a damaged part only after exact model confirmation.
Why this path and its safety boundary
Why it matters: The local burner assembly can be redirecting or disturbing the flame; the control itself may still be working.
Safety stop: Do not run the burner with missing or cracked parts, swap caps, enlarge ports, or keep using it if the flame remains unstable.
-
PATH 03Safety boundary
What you see
Several burners are too high or show the same change after installation, fuel conversion, regulator work, or supply change.
Do this next
Stop using the range and have the installer, gas utility, or qualified technician verify fuel conversion and appliance settings for the exact model.
Why this path and its safety boundary
Why it matters: Fuel type, conversion, regulator, or supply pressure is more likely than a single cap or knob.
Safety stop: Do not adjust the regulator, gas pressure, or orifices and do not operate through a suspected fuel mismatch.
-
PATH 04Safety boundary
What you see
The high or uneven flame began immediately after cleaning, and moisture or residue is visible around the affected burner.
Do this next
Leave the control OFF, allow the burner to cool and dry fully, reinstall parts per the manual, and stop for service if the flame remains abnormal.
Why this path and its safety boundary
Why it matters: Moisture or displaced residue can interfere with burner ports and cap seating, but it should not be used to explain a knob that cannot shut off gas.
Safety stop: Do not ignite a wet burner, use compressed air into gas passages, or scrape ports with improvised objects.
-
PATH 05Safety boundary
What you see
The flame is persistently yellow or orange, lazy, wavering, lifting, noisy, sooty, or contacting the grate even after the cap is correctly seated.
Do this next
Turn the appliance off, ventilate without operating ignition sources, and obtain qualified gas-appliance service; use emergency procedures for gas odor or suspected carbon monoxide exposure.
Why this path and its safety boundary
Why it matters: Combustion, fuel-air mixture, blocked/damaged burner parts, pressure, or conversion is unresolved and may increase indoor combustion pollutants or fire risk.
Safety stop: Do not tune the air shutter, regulator, or orifice yourself, and do not continue cooking to see whether the flame improves.
-
PATH 06Safety boundary
What you see
The affected burner stays lit or full-size when the knob is turned to OFF, or the knob binds, slips, or feels disconnected.
Do this next
Leave the burner and range unused, avoid repeated operation, and obtain urgent qualified service; isolate the appliance supply only if its location and operation are known and safe.
Why this path and its safety boundary
Why it matters: The surface control or gas valve may not be closing correctly; this is a gas-safety fault, not a cleaning issue.
Safety stop: If there is gas odor, leave immediately and contact the gas utility or emergency services from outside or another safe location; do not use switches or flames.
-
PATH 07Safety boundary
What you see
The flame changes smoothly with the knob, remains stable and fuel-appropriate, and matches the model manual's low setting, but appears larger than another burner because the burner design differs.
Do this next
Use the exact manual's flame guidance and keep the correct cap on the correct base; request service if cookware overheats, the flame touches the grate, or the low setting is not usable.
Why this path and its safety boundary
Why it matters: Some burners have intentionally different patterns or output, so visual comparison alone does not prove a fault.
Safety stop: Do not change the orifice, remove a regulator, or alter a normal design to match another burner.
Helpful context
Understand the symptom
First prove whether the control is failing or the flame is merely uneven
There are two different complaints hidden in “stays on high.” If turning the knob toward low changes flame height but the flame is still too tall or uneven, the cap, ports, moisture, fuel type, or a model-specific adjustment is more likely. If the flame does not respond to the knob or remains full-size at the off position, treat the control or gas valve as a safety fault and stop using that burner. The fact that other burners work makes a whole-home gas outage less likely, but it does not make a single burner safe to operate.
Use the installed fuel and manual, not a universal adjustment
Natural-gas and LP flames do not have identical appearance, and a range converted from one fuel to the other must have the correct conversion parts and settings. Manufacturer guidance says the owner's or installation manual controls flame-height adjustment. Do not turn an air shutter, regulator, low-flame screw, or gas valve based on a generic diagram, and do not enlarge a burner port to force a different flame.
Cleaning can help only when the burner is cool and reassembled correctly
After the gas control is off and the surface is cool, ordinary-access inspection can find a wet burner, food debris in ports, or a cap that is not centered on its matching base. Clean and dry only as the installed manual allows. A persistent high flame after correct cleaning, or any flame color or noise concern, needs a qualified appliance technician rather than more probing or adjustment.
Safety boundary
Stop conditions
- Do not operate the affected burner if its flame will not turn down or off, the knob binds or slips, or gas odor is present.
- Do not adjust gas pressure, a regulator, air shutter, low-flame screw, or burner orifice without exact manufacturer instructions and qualified service.
- Do not drill, ream, enlarge, distort, or improvise tools in burner ports; do not swap caps or run a burner with missing, wet, cracked, or mis-seated parts.
- Stop for persistent yellow or orange flames, soot, lifting, roaring, flashback-like noise, smoke, flame contact with the grate, headache, dizziness, or suspected carbon monoxide exposure.
- If gas is smelled or a burner cannot be shut off, leave the area and contact the gas utility or emergency service from a safe location; do not operate electrical switches or ignition sources.
Only after diagnosis
Potential parts
- surface-burner cap or burner base
Consider this category only when the correct cap or base is cracked, warped, damaged, or cannot seat flush after cool inspection and the exact model is confirmed.
Match the exact stove model, burner position, fuel type, and manufacturer's part information; do not swap caps between positions or use a generic part by appearance. - surface-burner control valve or knob
Consider this category only when a qualified technician confirms the affected knob/shaft or valve does not regulate or shut off gas while other burners operate normally.
Confirm the exact model, burner position, valve configuration, and gas-safety procedure; valve replacement is not a homeowner adjustment. - burner orifice or fuel-conversion components
Consider this category only when qualified service confirms an incorrect or incomplete fuel conversion or damaged calibrated component.
Match the exact model and fuel, certified conversion instructions, regulator setting, and local requirements; never enlarge an orifice or change fuel parts by guesswork. - surface-burner assembly
Consider this category only when the burner head/base is warped, damaged, or cannot produce a stable flame after correct cap seating and approved cleaning.
Confirm exact burner position, model, fuel, ignition arrangement, and manufacturer's fit information before ordering.
When checks do not resolve it
Need a professional?
Arrange qualified appliance or gas service when one burner remains high at low, does not respond smoothly, will not shut off, has a binding or slipping knob, or remains abnormal after the correct cap is dry, seated, and cleaned per the manual. Have the fuel type and any recent conversion, installation, regulator, or burner work checked when several burners are high. Seek urgent help for gas odor, persistent yellow or unstable flames, soot, smoke, roaring or lifting, a flame touching the grate, suspected carbon monoxide exposure, or any burner that cannot be controlled.
Safety scope: This article supports external control observation and cool, ordinary-access cap/port inspection only. Qualified service handles gas valves, regulators, orifices, pressure, fuel conversion, combustion adjustment, and internal controls.
Common questions
FAQ
Why does one stove burner stay on high while the others work?
A localized knob or gas-valve problem is possible when the flame does not respond to low, while a cap, port, moisture, fuel-conversion, or model-specific adjustment issue is more likely when the flame changes but remains too tall or uneven. Other burners working does not make the affected burner safe to use.
What should I do if the burner will not turn off?
Stop using the range and avoid repeated knob cycling. If gas is smelled, leave the area and contact the gas utility or emergency service from a safe location without operating switches or ignition sources. If there is no odor but the burner cannot be controlled, arrange urgent qualified appliance service.
Can a burner cap make the flame too high?
Yes. A wrong, wet, shifted, dirty, cracked, or poorly seated cap can make the flame uneven or appear too high. Turn the control off, let the surface cool, and inspect and reseat only as the installed manual directs; do not swap caps between burners.
Should I adjust the air shutter or gas pressure?
Not as a general homeowner fix. Flame adjustment and fuel settings are model-specific, and gas pressure, regulator, or orifice work requires qualified service. Do not enlarge ports or change conversion parts by guesswork.
Why is the burner flame yellow or noisy?
Persistent yellow or orange color, soot, lifting, wavering, or roaring can indicate poor combustion, blocked or damaged burner parts, pressure, or fuel-conversion trouble. Turn the appliance off and arrange qualified gas-appliance service rather than continuing to cook.
Could a recent LP conversion cause a high flame?
Yes. GE notes that flames touching or rising above the grate can indicate an improper natural-gas-to-LP conversion. Stop using the range if the fuel type or conversion is uncertain and have the installer, gas utility, or qualified technician verify the exact model's conversion.
Read the exact guide
Official sources
- What should I do if my gas flames are uneven or too high?Frigidaire · Official Frigidaire support guidance used for general gas-surface-burner symptom differentiation; the installed appliance manual controls a particular stove.
- Surface Burner Flames Too High - Natural Gas - CooktopWhirlpool Product Help · Official Whirlpool natural-gas cooktop guidance; exact flame settings, fuel conversion, and cleaning procedures vary by model and fuel.
- Sources of Combustion ProductsU.S. Environmental Protection Agency · Official EPA indoor-air guidance for gas cooking and combustion products; it does not diagnose a particular stove or authorize owner gas adjustments.
- Gas Range & Cooktop - Burner or Oven Flame Too High or UnevenGE Appliances · Official GE appliance support guidance used for general fuel-conversion and burner-assembly distinctions; exact model documentation controls.
Community feedback
Share a repair observation
Share a plain-text repair observation. Accepted observations are published automatically; this page may take a moment to update.