
On this page
Start here
Quick answer
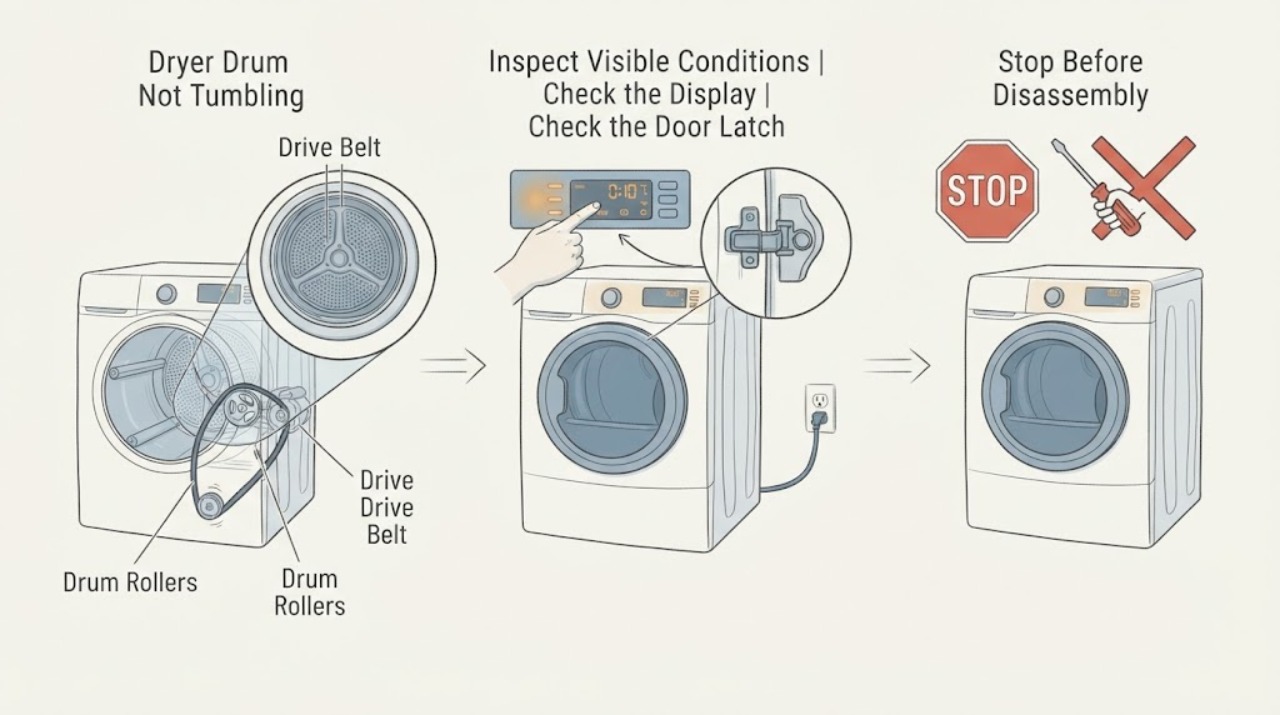
If a Whirlpool dryer drum is not tumbling, stop the cycle and first determine whether the controls or drum light respond. Confirm that the Start command registered, the door is fully latched, the latch is not blocked by clothing or packing material, the control lock is not active, and the selected cycle is a normal drying cycle. Check only the plug and household breaker from a dry, safe position; have a qualified electrician assess uncertain supply or cord wiring. Do not open the cabinet, bypass the door switch, or keep running a dryer that hums, scrapes, smells hot, sparks, or trips power. If the controls and door are normal but the drum remains still, a belt, motor, roller, drum-support, wiring, or control fault needs model-specific professional diagnosis rather than a guessed part.
Before you begin
Safety first
- This article supports dry, ordinary-access observation and model-documented control use only. It does not authorize cabinet or console access, door-safety bypass, motor, belt, roller, or wiring work, terminal inspection, live electrical testing, or operation after a hazard appears.
Work through in order
Diagnostic checks
Use only checks that match the exact appliance or system and its official guide.
-
Check 1
With the dryer stopped, observe whether the display, control lights, or drum light respond and whether the selected cycle remains visible. From a dry position, check that the plug appears seated and that the household breaker has not tripped; do not touch wiring, terminals, or a damaged cord.
Expected result: The controls and drum light are dark, the controls respond but the drum remains still, a breaker has tripped, or power status is uncertain.
Next step: Use the model manual for the no-power path and have a qualified electrician assess uncertain supply or cord wiring; if the controls respond, continue with the non-invasive door and cycle checks.
Stop if: Do not reset a breaker repeatedly, open a terminal cover, handle wiring, or continue if there is smoke, arcing, a burning odor, or a hot or damaged cord.
Why this matters
Why: Dark controls point toward a power or start path rather than a confirmed drum-drive fault. Responsive controls with a stationary drum make door recognition, cycle selection, or the drive system more likely. A recurring breaker event needs electrical assessment.
-
Check 2
With hands and the control panel dry, select a model-appropriate drying cycle and use the Start, Push to Start, or Hold to Start control exactly as the owner's manual describes. Check whether a Control Lock indicator is active; use only the model-documented unlock procedure.
Expected result: The Start command registers and the dryer begins, the panel remains unresponsive, a control-lock indicator remains on, or the display responds but the drum does not move.
Next step: Document the display and selected cycle, follow the manual's control-lock procedure when safe, and arrange service if the panel is unresponsive or the dryer accepts the command without tumbling.
Stop if: Do not remove the console, bypass the control lock, use a sharp object on the panel, or defeat a safety control.
Why this matters
Why: Damp controls or a locked control can prevent a start request from reaching the motor. If the command registers while the drum stays still, the next checks are door recognition and the drive system rather than more button presses.
-
Check 3
Open and close the door normally, inspecting the visible latch area for clothing, packing or shipping material, debris, or a latch that does not engage. Confirm that the door sits flush without force and that all clothing is inside the drum.
Expected result: The latch engages and the door sits evenly, clothing or material blocks the latch, the door is not flush, or the latch or door is visibly damaged or misaligned.
Next step: Remove only a loose visible obstruction and close the door normally; if the latch remains uncertain or damaged, leave the dryer off and request service.
Stop if: Do not bend the door, pry the latch, tape or hold the switch, or run the dryer with a damaged door or latch.
Why this matters
Why: Whirlpool notes that a door can look closed without being latched and that clothing or packing material can block it. A damaged or misaligned latch needs model-specific service even when the door appears shut.
-
Check 4
With the dryer off, verify that the cycle selector is on a normal drying cycle supported by the model rather than a wrinkle-reduction or other option that does not start expected tumbling. Remove or redistribute items only enough to confirm that the load is not tightly packed or holding the door out of position.
Expected result: A non-running option was selected, the load is tightly packed or obstructing the door, or the cycle and load are appropriate but the drum remains still.
Next step: Choose the model-documented drying cycle and redistribute the load so it can move freely; if the drum remains stationary, stop normal-use troubleshooting and request service.
Stop if: Do not force the drum, operate with an obstructed door, or insert tools between the drum and cabinet.
Why this matters
Why: A cycle-selection or load-position issue can look like a mechanical failure, while a suitable cycle and freely moving load with a stationary drum make a drive or motor fault more likely.
-
Check 5
From outside the appliance, note whether all four feet appear firmly supported and whether a safe start command produces no sound, a hum, a click, scraping, or grinding. Do not tip, move, or open the dryer to inspect the belt, rollers, drum support, or motor.
Expected result: The dryer rocks or is visibly unsupported, the motor is silent, the motor hums without drum movement, or scraping, grinding, burning odor, or a repeated electrical trip occurs.
Next step: Document the sound and stability and give them to a technician; arrange service rather than attempting a cabinet-level drive check.
Stop if: Stop immediately for burning odor, smoke, sparks, grinding, a hot cord, or a breaker that trips again.
Why this matters
Why: Whirlpool links firm foot contact and level installation with correct sensor-cycle operation and tumbling, but a stationary drum with normal exterior setup can indicate a belt, motor, roller, drum-support, wiring, or control issue. Abnormal sound or electrical behavior is a stop condition.
-
Check 6
Only when the door, power, controls, cycle, and load are normal and no hazard has appeared, make one model-approved start with a small, freely moving load while remaining nearby. Observe whether the drum begins tumbling and stop the cycle if the symptom returns.
Expected result: The drum tumbles normally, starts and stops with an abnormal sound, remains still despite a registered start, or the dryer trips power or develops a hot or burning smell.
Next step: Stop at the first recurrence and arrange qualified appliance service with the exact start behavior, sound, model, and previous check results; do not repeat cycles to force the drum to turn.
Stop if: Do not perform this test after sparks, smoke, burning odor, a hot cord, repeated breaker trips, or a damaged door, drum, or cabinet.
Why this matters
Why: Normal tumbling after a corrected latch, control, cycle, or load issue supports that visible cause. A persistent stationary drum or abnormal sound points toward an internal drive, motor, wiring, or control fault that cannot be confirmed safely from outside.
Use your observations
Decision map
Find the observation that best matches what you see, then follow the next safe action.
-
PATH 01Safety boundary
What you see
The control panel and drum light remain dark, or the breaker trips again after a safe basic check.
Do this next
Leave the dryer off and have a qualified electrician or appliance technician assess the supply and cord installation; provide the breaker behavior and model information.
Why this path and its safety boundary
Why it matters: The symptom is not yet established as a drum-drive fault; power supply, cord installation, or a control path is more likely.
Safety stop: Do not open the terminal area, handle wiring, or repeatedly reset a tripping breaker.
-
PATH 02Safety boundary
What you see
The panel is lit but does not accept the Start command, a control-lock state is visible, or the panel or hands are damp.
Do this next
Dry the hands and panel, follow the model manual's control-lock and Start procedure, and arrange service if the controls remain unresponsive.
Why this path and its safety boundary
Why it matters: A user-interface state or moisture-sensitive touch control may be preventing the start request from reaching the motor.
Safety stop: Do not open the console, bypass the control lock, or use a pointed object on the panel.
-
PATH 03Safety boundary
What you see
The Start command registers but the door is not flush or latched, clothing or packing material blocks the latch, or the load is so tight that the door cannot close normally.
Do this next
Remove only a visible obstruction, reduce or redistribute the load, and close the door normally. Request service for a damaged latch, door, or alignment.
Why this path and its safety boundary
Why it matters: Door recognition or load position is more likely than a failed motor when the machine cannot establish a secure operating door.
Safety stop: Do not tape, hold, or bypass the door switch and do not force the door shut.
-
PATH 04Safety boundary
What you see
The selected option is not a normal drying cycle, or the dryer rocks and its feet are not all firmly supported; drum behavior changes with the load or sensor cycle.
Do this next
Use the model manual to select the correct drying cycle and have the installation leveled safely; stop and request service if the drum remains still on an appropriate cycle.
Why this path and its safety boundary
Why it matters: Cycle selection or installation stability may be affecting operation and tumbling, rather than proving a drive-part failure.
Safety stop: Do not tip or move a connected dryer, adjust hidden feet by force, or keep testing an unstable machine.
-
PATH 05Safety boundary
What you see
The controls respond, the door latches, the selected cycle and load are appropriate, and the drum remains still or the motor hums, scrapes, or stops.
Do this next
Leave the dryer off and arrange qualified appliance service. Report whether the motor sounded active, whether the drum ever moved, and whether heat or the display continued.
Why this path and its safety boundary
Why it matters: A belt, motor, drum roller, drum support, wiring, or control fault is more likely than a user-setting issue; the sound alone cannot identify the failed part.
Safety stop: Do not open the cabinet, remove the drum, release a belt, or perform live electrical testing.
-
PATH 06Safety boundary
What you see
The dryer produces smoke, sparks, burning odor, grinding, a hot cord, a damaged cabinet, or repeated breaker trips while the drum will not tumble.
Do this next
Stop using the dryer, keep clear, and isolate power only from a dry safe position if that can be done without touching damaged equipment; arrange urgent qualified service.
Why this path and its safety boundary
Why it matters: The immediate concern is an electrical, thermal, or mechanical hazard, not further drum troubleshooting.
Safety stop: Do not restart the dryer, open panels, touch hot or damaged parts, or attempt a belt, motor, or wiring repair.
Helpful context
Understand the symptom
Separate a no-start symptom from a drive symptom
A dark display and a lit display with a stationary drum are different observations. Whirlpool's support guidance starts with power, the Start control, and cord installation, while its no-operation guide adds control lock, door-latch engagement, latch obstructions, and cycle selection. A damp touch panel or damp hands can also prevent the command from registering. Observe the dryer from outside and record the controls, sound, and cycle before considering any part.
Check the door, load, and cycle without defeating a safety
A dryer will not operate if it does not recognize a secure door. Check the visible latch area for clothing or packing material and make sure the door closes normally. A tightly packed load can keep the door from latching and limit free movement. Select a cycle that is intended to dry and follow the exact model manual for the Start or control-lock procedure. Never tape, hold, or bypass the door switch.
A stationary drum can point to the drive system
Whirlpool explains that its dryer troubleshooting can involve a worn belt, motor, seized drum, drum rollers, or electronic control board. A motor sound with no drum movement makes a drive issue more plausible, but the sound alone cannot identify the failed part. Do not remove panels or reach around the drum to confirm a belt or roller; those checks require a technician who can isolate the model-specific fault safely.
Stop using the dryer when the symptom is unsafe or persistent
If the controls, door, cycle, load, and safe power observations are normal but the drum remains still, repeated starts can add heat or mechanical stress without solving the cause. Whirlpool recommends professional help for a dryer that will not spin. Record whether the motor hums, the drum ever moved, the dryer heats, and whether a breaker or fuse changes state, then arrange service rather than cabinet-level testing.
Safety boundary
Stop conditions
- Stop immediately for smoke, sparks, burning odor, grinding, a hot or damaged cord, a damaged cabinet, or repeated breaker trips.
- Do not open the cabinet or console, remove the drum, release a belt, inspect motor terminals, or perform live electrical testing.
- Do not bypass, tape, or hold the door latch or another safety switch closed.
- Do not force the drum, insert tools between the drum and cabinet, or tip or move a connected dryer.
- Stop normal-use troubleshooting and arrange qualified appliance service when the controls and door are normal but the drum remains still or an abnormal sound returns.
Only after diagnosis
Potential parts
- dryer drive belt or idler assembly
Consider this category only when qualified diagnosis confirms a drive-belt or idler fault after the dryer has power, the door latches, and the drum remains still or slips.
Confirm the complete Whirlpool model and exact drive design before ordering; cabinet and moving-part work should be performed by a qualified technician. - dryer drive motor
Consider this category only when a technician isolates the no-tumble symptom to the motor rather than the controls, power, belt, rollers, drum support, or wiring.
Verify exact model, motor configuration, and fit information with Whirlpool or the technician; do not infer motor failure from a hum alone. - dryer drum roller or support assembly
Consider this category only when professional diagnosis links the stationary or noisy drum to a worn roller, seized support, or related model-specific drum-support fault.
Confirm exact model and support arrangement and use qualified installation; do not force or hand-test a drum that binds or makes an unsafe sound.
When checks do not resolve it
Need a professional?
Arrange qualified appliance service when the drum remains stationary after the control, door, cycle, load, and safe power checks; when it hums, scrapes, starts and stops, or a belt, motor, roller, drum support, wiring, or control is suspected; or when the dryer has an unresponsive control, damaged latch, unstable cabinet, or recurring symptom. Use a qualified electrician for uncertain household supply or power-cord wiring. Seek urgent help for smoke, sparks, burning odor, a hot or damaged cord, repeated breaker trips, or other electrical or mechanical danger.
Safety scope: This article supports dry, ordinary-access observation and model-documented control use only. It does not authorize cabinet or console access, door-safety bypass, motor, belt, roller, or wiring work, terminal inspection, live electrical testing, or operation after a hazard appears.
Common questions
FAQ
Why is my Whirlpool dryer drum not tumbling?
Start by separating a no-start condition from a drive condition: check power and control response, the Start command, the door latch, latch obstructions, the selected cycle, and whether the load is tightly packed. If those checks are normal but the drum stays still or hums, qualified service is needed to diagnose the belt, motor, rollers, drum support, wiring, or control.
Can a dryer still have power if the drum does not turn?
Yes. A lit display or drum light with a stationary drum makes a door-recognition, cycle, control, or drive-system issue possible. Do not infer a failed belt or motor without model-specific diagnosis, and do not open the cabinet to test it.
Can the door latch stop a Whirlpool dryer from tumbling?
Yes. Whirlpool says the dryer may not operate if the door is not fully latched or the latch is blocked. Check only visible clothing, packing material, and latch alignment; never hold or bypass the door switch.
Can an overloaded or unlevel dryer stop tumbling?
A tightly packed load can limit free movement, and Whirlpool links firm foot contact and level installation with correct sensor-cycle operation and tumbling. Redistribute a load only when the door closes normally; have an unstable installation checked safely.
Should I replace the belt when the Whirlpool dryer drum will not turn?
Not based on the symptom alone. A belt, idler, motor, drum roller, drum support, wiring, or control can produce similar behavior. A qualified technician should identify the failed part and confirm the exact model before any cabinet-level repair.
When should I stop troubleshooting a dryer that will not tumble?
Stop for smoke, sparks, burning odor, grinding, a hot or damaged cord, repeated breaker trips, or a damaged door or cabinet. Also stop when power, controls, door, cycle, and load checks are normal but the drum remains stationary; leave the dryer off and arrange qualified service.
Read the exact guide
Official sources
- 10 Reasons Your Dryer Won't Spin & How to Fix ItWhirlpool · Official Whirlpool manufacturer article for general dryer no-spin troubleshooting; it is not a model-specific part diagnosis.
- Not Tumbling or Spinning - DryerWhirlpool Product Help · Official Whirlpool Product Help article for dryers that do not tumble or spin; exact model manuals and qualified electrical service control installation details.
- Door Not Closing - DryerWhirlpool Product Help · Official Whirlpool Product Help article for dryer door-closing and related tumbling conditions; exact model installation instructions control adjustments.
- Dryer Not Starting or No OperationWhirlpool Product Help · Official Whirlpool Product Help article for dryer start and operation issues; model-specific controls and cycle names vary.
Community feedback
Share a repair observation
Share a plain-text repair observation. Accepted observations are published automatically; this page may take a moment to update.