
On this page
Start here
Quick answer
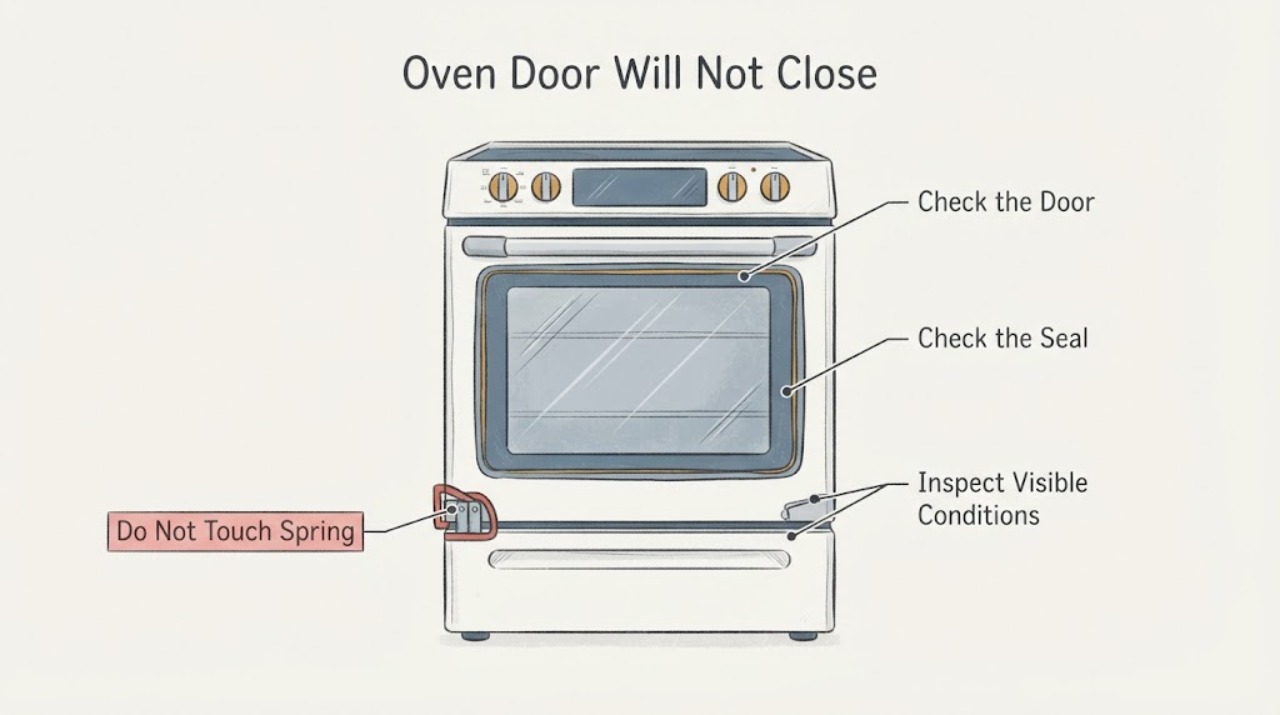
If a Whirlpool oven door will not close, turn the oven off and let it cool, then remove any pan, rack, shipping material, or food debris that is blocking the opening. Check that racks are fully inserted, the door gasket is not folded or displaced, and the latch arm above the gasket is not bent into the closing path. If the door was recently removed, a hinge may not be fully seated; Whirlpool says a correctly installed door should sit level with an even gap. Some wall-oven models use a soft-close hinge and need a gentle nudge after resistance, but do not force the door. Do not scrub, move, or damage the gasket, bend the latch, or work on a spring-loaded hinge. If the door remains crooked, a hinge or latch is damaged, or the oven cannot be made safe to close, stop using it and arrange qualified appliance service.
Before you begin
Safety first
- Do not operate an oven that cannot latch, force a door over a latch, bend a hinge or frame, lift a heavy door by its handle, or move a gasket or spring-loaded hinge without the exact model procedure and appropriate training.
Work through in order
Diagnostic checks
Use only checks that match the exact appliance or system and its official guide.
-
Check 1
Turn the oven off, wait until it is fully cool, and remove cookware, foil, pans, and any loose items from the cavity. With the door open, look along the bottom, sides, and top of the opening for packing material, food, or baked-on soil that could sit in the closing path.
Expected result: The door path is clear, or an item or buildup is visibly contacting the door, latch, rack, or frame.
Next step: Remove only loose items and wipe accessible adjacent surfaces with a damp cloth while the oven is cool. Do not scrape, pull, or relocate the gasket; retest the door gently after the obstruction is gone.
Why this matters
Why: An item in the latch or frame path can stop the door before the hinges are fully closed. A clear path means the next checks should focus on rack seating, latch position, gasket condition, and hinge alignment.
-
Check 2
Check every oven rack with the door open. Push standard racks fully onto their guides and, if the oven has a roll-out rack, make sure the sliding shelf is closed and engaged before pushing it to the rear. Test the door with the racks and bakeware positioned as the model manual shows.
Expected result: A rack is tilted, not fully inserted, a roll-out shelf is not engaged, or a pan projects toward the door; otherwise the rack and bakeware clear the door.
Next step: Correct the rack position or remove the oversized pan and close the door slowly. If the door still stops with an empty cavity and correctly seated racks, continue to the latch and alignment checks.
Why this matters
Why: A rack out of position or oversized bakeware can physically hold the door open even when the hinges and latch are sound. Whirlpool notes that some models use roll-out racks whose sliding shelf must be seated correctly.
-
Check 3
Inspect the gasket and the surfaces immediately beside it with the oven cool. Look for a folded section, a strand pulled out, a gap, or soil on the door edge or frame; clean only the adjacent hard surface with a damp cloth and leave the gasket in its installed position.
Expected result: The gasket is flat and intact, the gasket is displaced or damaged, or debris is present on the door edge or frame.
Next step: Remove loose soil from the adjacent hard surface only and retest gently. Do not tuck, stretch, remove, or scrub the gasket; arrange appliance service for a displaced or damaged gasket.
Why this matters
Why: Debris on the mating surface can prevent the last part of closing. A gasket that is moved, torn, or protruding can interfere with the door and may also compromise the heat seal; Whirlpool identifies the gasket as essential to sealing and says not to rub, damage, or move it.
-
Check 4
With the door open and the oven cool, look at the latch or lock arm at the top front of the oven frame above the gasket. Compare its position with the model's normal closed-door position and check whether it is visibly bent, bowed, or sitting in the path where the door should pass.
Expected result: The latch arm appears aligned and clear, or it is bent, bowed, loose, or extended into the closing path.
Next step: Do not bend the latch by hand or force the door over it. Stop and arrange qualified appliance service if the arm is damaged, loose, or remains in the way after the oven is reset according to the model instructions.
Why this matters
Why: Whirlpool identifies a bent or bowed lock latch arm as a reason the door cannot close. A clear, aligned arm makes an obstruction or hinge-seating problem more likely than the latch itself.
-
Check 5
Ask whether the door was removed, cleaned, or reinstalled recently. Without taking the door apart, observe whether it hangs level, whether one side sits lower, whether the hinge area has an obvious gap, and whether the door meets the control panel with an even gap when gently closed.
Expected result: The door is level with an even gap, or one side hangs lower, the door looks crooked, a hinge is visibly not seated, or the door was recently reinstalled.
Next step: Use the exact model manual's door-seating procedure only if the door is cool and the steps are clear; do not lift or remove a heavy door as a generic repair. Arrange service for an unseated, bent, noisy, or spring-loaded hinge or for any door that remains crooked.
Why this matters
Why: Whirlpool says an uneven gap or a lower side indicates that a hinge is not properly installed, and its replacement guidance requires the hinge slots to be fully engaged before closing. A door that was never removed but suddenly sits crooked may have a bent hinge or frame.
-
Check 6
If the model advertises a soft-close or smooth-close feature, close the cool, empty door until the documented resistance point and give it only the gentle nudge described by Whirlpool. Otherwise, close it with normal hand pressure and observe whether it latches without a gap, scraping, or rebound.
Expected result: The door completes its travel with a gentle nudge, closes normally, rebounds or stops, scrapes on one side, or will not latch even though the path is clear.
Next step: Use the oven only when the door closes and latches fully with an even seal. Stop using it and arrange appliance service for scraping, a visible gap, a door that cannot latch, or any need to force the handle or hinge.
Why this matters
Why: Some Whirlpool wall-oven models use a specialized soft-close hinge, so a small final nudge can be normal. Rebound, scraping, a persistent gap, or a failed latch indicates an alignment, hinge, latch, or frame issue rather than a feature that should be overcome with force.
Use your observations
Decision map
Find the observation that best matches what you see, then follow the next safe action.
-
PATH 01Next step
What you see
The door closes after a pan, rack, shipping piece, or soil is removed, and the door sits level.
Do this next
Keep racks fully seated and use bakeware that clears the door. Do not alter the gasket or latch to compensate for an oversized pan.
Why this path and its safety boundary
Why it matters: The closing path was blocked, not necessarily that a hinge or latch failed.
-
PATH 02Next step
What you see
The oven is empty, but a bent or bowed latch arm is visible above the gasket.
Do this next
Do not bend it back or force the door over it. Stop using the oven and arrange qualified appliance service for latch inspection and adjustment.
Why this path and its safety boundary
Why it matters: The latch is a direct mechanical obstruction and may be damaged or out of position.
-
PATH 03Next step
What you see
The door was recently removed and now one side hangs lower, the door is crooked, or the gap to the control panel is uneven.
Do this next
Follow the exact model's replacement instructions only when they are clear and the door is cool; otherwise arrange service. Do not keep operating a crooked door because it can stress the hinge and gasket.
Why this path and its safety boundary
Why it matters: A hinge is likely not fully seated or reset, although a bent hinge or frame is also possible.
-
PATH 04Next step
What you see
The gasket is displaced, torn, pulled out, or protrudes into the closing path.
Do this next
Do not tuck or remove the gasket as a generic fix. Stop and arrange model-specific appliance service for inspection or replacement.
Why this path and its safety boundary
Why it matters: The gasket can prevent closure and may no longer provide a safe heat seal; rubbing or moving it can worsen the problem.
-
PATH 05Next step
What you see
A soft-close wall-oven door closes only after the documented gentle nudge, with no scrape, gap, or latch problem.
Do this next
Use the model's normal closing method and confirm the door latches fully. Do not push harder than the documented behavior or treat a damaged hinge as soft close.
Why this path and its safety boundary
Why it matters: That final movement may be normal for a model with a specialized soft-close hinge.
-
PATH 06Next step
What you see
The path is clear, the latch is aligned, and the door remains crooked, scrapes, will not latch, or requires force.
Do this next
Stop using the oven and arrange qualified appliance service. Do not remove a heavy door, handle a spring-loaded hinge, bend the frame, or defeat the latch without the exact model procedure and appropriate training.
Why this path and its safety boundary
Why it matters: A hinge, hinge seat, door frame, latch assembly, or door panel may be damaged; the fault is beyond a safe visual adjustment.
Helpful context
Understand the symptom
Begin with a cool, empty oven
A door that stops at the last inch is often meeting an obstruction rather than failing at the hinge. With the oven off and cool, remove cookware and check the rack position, latch path, frame, and gasket. This separates a blocked closing path from a door that is physically out of alignment.
Treat hinges and the gasket as safety parts
Oven doors are heavy, and their hinges can be spring-loaded. A gasket that is rubbed, moved, or torn may no longer seal heat correctly. Limit home checks to a cool oven, visible obstructions, gentle closing behavior, and model-specific visual alignment. If a hinge or latch is bent, loose, or under tension, stop rather than forcing it.
Safety boundary
Stop conditions
- Do not force the door over a latch, bend a latch arm or hinge, lift a heavy door by its handle, or remove a door with an unknown hinge procedure.
- Do not scrub, pull, tuck, relocate, or remove the oven door gasket. Stop immediately for a torn or displaced gasket, a damaged frame, a spring-loaded or loose hinge, an active crack, or a door that cannot be safely held or latched.
- Do not use the oven while the door remains open, crooked, scraping, unable to latch, or visibly gapped. Arrange qualified appliance service when the empty-door and model-specific checks do not restore safe closure.
Only after diagnosis
Potential parts
- Whirlpool oven door gasket
Consider only when inspection confirms the gasket is torn, pulled out, displaced beyond a model-approved reseating step, or no longer seals after the closing obstruction is removed.
Gasket shape and installation vary by Whirlpool oven model. Confirm the exact model and manual before selecting a replacement, and do not operate with a damaged seal. - oven door hinge
Consider only after a level and empty door still hangs low, scrapes, or fails to latch and a qualified diagnosis identifies a bent, loose, or improperly seated hinge.
Whirlpool doors use different hinge-latch designs. Confirm the exact model and the correct hinge procedure before selecting or installing a hinge. - oven door latch or lock arm
Consider only when the latch arm is visibly bent, loose, or damaged and an appliance diagnosis confirms that the latch is preventing closure.
Latch and lock components are model-specific and may be part of a spring-loaded mechanism. Confirm the exact model and safe service procedure before selecting a component.
When checks do not resolve it
Need a professional?
Arrange qualified appliance service when the latch arm is bent or loose, the gasket is damaged or displaced, the door hangs crooked, a hinge is not seated or is under spring tension, the frame or glass is damaged, the door will not latch, or closing requires force. Do not operate the oven with an open or unevenly sealed door; provide the model number and whether the door was recently removed.
Safety scope: Do not operate an oven that cannot latch, force a door over a latch, bend a hinge or frame, lift a heavy door by its handle, or move a gasket or spring-loaded hinge without the exact model procedure and appropriate training.
Common questions
FAQ
Why will my Whirlpool oven door not close all the way?
First look for a pan, rack, shipping material, food, or soil in the closing path. Then check the gasket, latch arm, and hinge alignment. Whirlpool also notes that some wall ovens have soft-close hinges that need only a gentle final nudge; force, scraping, a crooked door, or an uneven gap indicates a service issue.
Can an oven rack keep a Whirlpool door from closing?
Yes. A rack that is tilted or not fully inserted, a roll-out shelf that is not engaged, or oversized bakeware can hold the door open. With the oven cool, seat the rack as the model manual shows and retest without a projecting pan.
Should I clean or push the Whirlpool oven door gasket back into place?
Do not scrub, pull, tuck, or move the gasket as a generic fix. Whirlpool says it is essential for a good seal and warns against rubbing, damaging, or moving it. Clean the adjacent hard surface only with the cool-oven procedure in the model manual, and arrange service for a torn or displaced gasket.
What if my Whirlpool oven door was removed and will not close afterward?
A hinge may not be fully seated or reset. Look for a crooked door, one side hanging lower, or an uneven gap, then use the exact model's replacement instructions if they are clear. Do not lift a heavy door by its handle or handle a spring-loaded hinge without the proper procedure.
When should I call for Whirlpool oven door repair?
Arrange service for a bent latch, damaged or displaced gasket, crooked or scraping door, visible hinge or frame damage, a door that will not latch, or any closure that requires force. Do not operate the oven while the door is open or unevenly sealed.
Read the exact guide
Official sources
- Oven Door Not Aligned - RangeWhirlpool Product Help · Whirlpool range alignment article; the exact hinge and reinstallation steps vary by model.
- Door Not Closing - RangeWhirlpool Product Help · Whirlpool ranges; exact hinge and leveling procedures vary by range model.
- High Temperature Self-Clean Cycle InformationWhirlpool Product Help · Whirlpool high-temperature self-cleaning oven guidance; gasket care is subject to the exact owner manual.
- Oven Door is Not Closing - Checking the LatchWhirlpool Product Help · Whirlpool product-assistance article for ovens and ranges; the latch location and appearance should be confirmed against the exact model.
- How to Determine if the Rack is Keeping the Oven Door OpenWhirlpool Product Help · Whirlpool oven and range rack guidance; roll-out rack details apply only to models equipped with that rack.
- Removing and Replacing the Oven DoorWhirlpool Product Help · Whirlpool oven door replacement article; it distinguishes doors with and without hinge latches, so the exact model procedure controls.
- Owner's ManualWhirlpool · Whirlpool model-specific owner manual example; the exact manual should be used for the appliance model.
- Oven Door Won't Close - Wall OvenWhirlpool Product Help · Whirlpool wall ovens; soft-close behavior and rack arrangement are model-specific.
Community feedback
Share a repair observation
Share a plain-text repair observation. Accepted observations are published automatically; this page may take a moment to update.