
On this page
Start here
Quick answer
If a Whirlpool washer leaves water behind, first note whether it stops during drain, spin, or another phase and record any code. Keep hands out of the basket, do not force a locked door, and disconnect power only from a dry, safe location before model-approved maintenance. From outside the machine, check for a kinked or displaced drain hose, a backed-up standpipe or sink, and—only if the exact model provides one—its drain-pump filter. Whirlpool says some front-load models need occasional pump-filter cleaning; its front-load guidance also calls out hose depth, an unsealed air gap, and standpipe height as installation factors. If water is near electrical parts, the washer leaks, trips a breaker, smells hot or burnt, or still will not drain after safe checks, stop using it and arrange qualified appliance service.
Before you begin
Safety first
- This article supports ordinary-access observation and only the exact model's documented filter procedure. Do not reach into moving parts, force a door or filter, tip or slide the washer, disconnect pressurized hoses, open panels, bypass a safety lock, or test live electrical components.
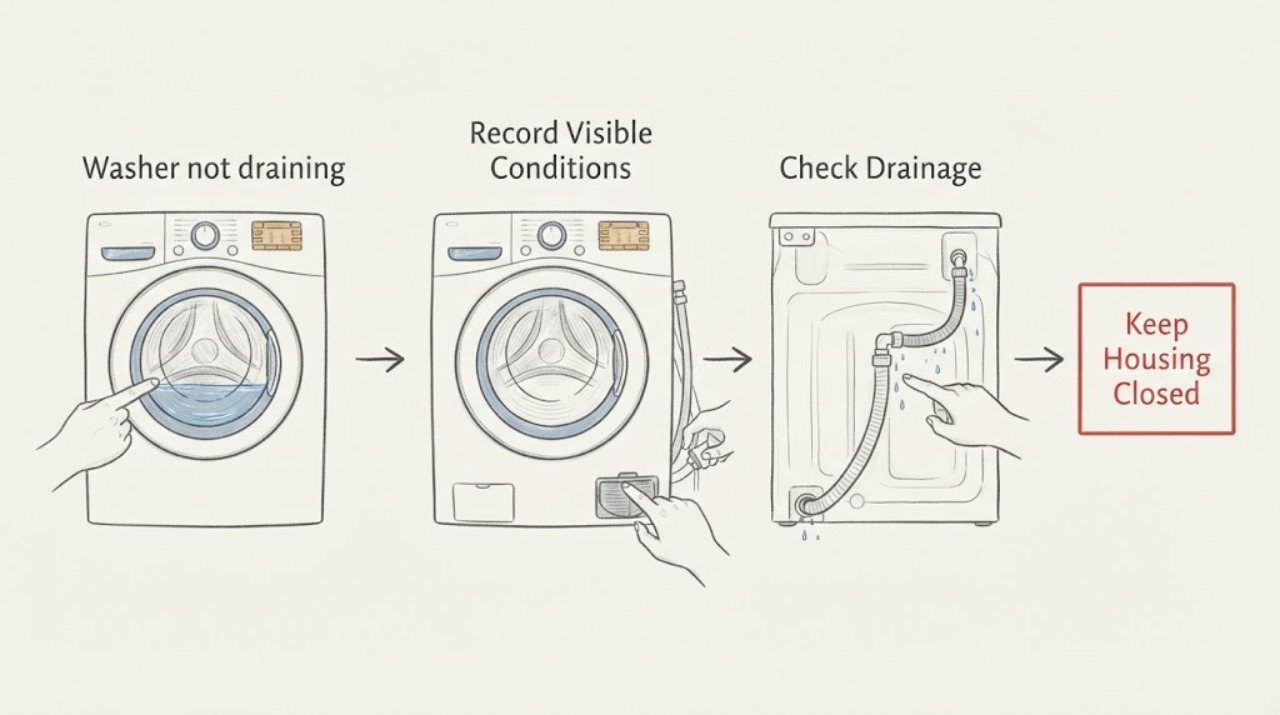
Work through in order
Diagnostic checks
Use only checks that match the exact appliance or system and its official guide.
-
Check 1
From outside the Whirlpool washer, record the model number, water level, lid or door state, exact phase where the cycle stopped, any code, and whether the machine was draining, spinning, or both.
Expected result: Note pump hum or gurgle versus silence, water entering or backing up, a locked door, unusual heat or odor, and whether the symptom happens on every cycle or one load.
Next step: Photograph the label and display and continue only if the washer is stable, dry, and free of an electrical or thermal warning.
Stop if: Stop for smoke, burning or electrical odor, sparking, abnormal heat, a hot plug, water near electrical parts, violent movement, or a door that will not safely release.
Why this matters
Why: This separates a drain-path symptom from a spin or control symptom and keeps model-specific codes from being guessed. A long-drain code such as F9E1, when actually displayed on a front-load model, points to checks rather than identifying one failed part.
-
Check 2
With the washer stopped, inspect the visible drain hose, its U-shaped support, and the standpipe or laundry sink opening without pulling the washer into a wet area.
Expected result: Look for a kink or crush, a hose that has fallen out of its support, a blockage, a hose pushed too far into the drain, airtight tape, or water that rises in the standpipe or sink.
Next step: Use the exact model installation instructions to restore a loose-but-secure hose and correct support; use a plumber for a blocked household drain. Do not disconnect a pressurized fill hose.
Stop if: Stop if the hose is split, water is near the outlet or cord, the drain connection is inaccessible without moving the appliance, or correcting it would require tipping or sliding the washer.
Why this matters
Why: A restricted hose or backed-up household drain can prevent or slow drainage; an incorrect hose depth or sealed opening can create siphoning and abnormal water behavior. Whirlpool lists more than 4.5 inches (113 mm) of insertion, taped sealing, and a standpipe below 30 inches as front-load installation issues.
-
Check 3
If the drain hose empties into a standpipe or laundry sink, observe that receptacle during one safe drain attempt only when there is no leak or electrical hazard.
Expected result: Record whether water exits freely, rises and backs up, spills, or never reaches the receptacle; note whether other fixtures drain slowly too.
Next step: Stop the cycle if the receptacle backs up, contain water without touching wet electrical equipment, and arrange plumbing service for the household obstruction. Continue appliance checks only when the drain is open and dry.
Stop if: Do not repeatedly run cycles into a backing-up drain, use chemical drain cleaner in the washer hose, or enter standing water near electrical equipment.
Why this matters
Why: Free flow at the receptacle makes an appliance-side hose, filter, pump, or control issue more likely; rising or shared slow drainage points toward a household drain restriction.
-
Check 4
After the external path is safe and clear, select the exact Whirlpool model's drain or drain-and-spin test described in its manual; supervise one attempt from outside.
Expected result: Listen for a pump hum and observe whether water leaves promptly, moves only slowly, or remains still; record whether an error returns and whether the washer advances to spin.
Next step: Stop after one safe attempt if drainage fails or the code returns; provide the phase, sound, water movement, and code to a technician.
Stop if: Stop immediately for leak, smoke, burning odor, hot electrical parts, a breaker trip, violent movement, or a door/lid-lock problem.
Why this matters
Why: A hum with little movement suggests a restriction or pump problem, silence can involve control, wiring, or a pump that is not operating, and successful draining with no spin shifts the issue away from the drain path. These observations do not identify a part.
-
Check 5
Only if the exact owner's manual confirms an accessible pump filter for this Whirlpool model, disconnect power from a dry location and prepare towels and a shallow container before opening that documented access.
Expected result: Drain residual water through the model's documented small drain hose or filter opening, then check the filter for lint, coins, or other debris; observe whether the filter is damaged, missing, cross-threaded, or cannot be removed normally.
Next step: Clean only the accessible filter, reinstall it fully and correctly, dry the area, restore power, and make one supervised model-approved verification. Arrange service if the filter will not reseat, is damaged, or drainage still fails.
Stop if: Do not force the filter, remove cabinet panels, reach into a pump, work with hot water, or continue if water reaches electrical parts.
Why this matters
Why: Whirlpool says a clogged drain-pump filter can cause poor or no draining on some front-load models. Filter access, order, and residual-water volume vary; a clean filter does not rule out a blocked internal hose, pump, or control.
-
Check 6
For a front-load Whirlpool washer, with power disconnected and the door safely open, visually inspect the accessible folds and drain holes of the door seal for lint or an object; do not probe deeply.
Expected result: Record visible debris, standing water trapped in the seal, a torn or displaced bellow, or a clean seal with the drain problem unchanged.
Next step: Remove only loose, visible debris as the model manual permits; arrange service for a torn seal, hidden obstruction, or continued standing water.
Stop if: Do not force the door, bypass the lock, cut or remove the seal, or insert tools into hidden passages.
Why this matters
Why: Whirlpool's F9E1 guidance says clogged door-seal or bellow drain holes can contribute to poor draining on front-load models. This check does not apply to a top-load washer and does not clear a pump or hose fault.
-
Check 7
After one documented, low-risk correction, perform one supervised verification using the exact model cycle and keep the appliance attended.
Expected result: Record whether the washer drains completely, whether the pump sound and flow are normal for that model, whether the code returns, and whether any leak, odor, heat, or electrical symptom appears.
Next step: Keep the model, code, phase, sound, water movement, filter findings, and corrections for a qualified appliance technician; use plumbing service when the household drain backs up.
Stop if: Stop further testing for repeat no-drain, a leak, safety symptom, abnormal noise, or any need to open panels or test live components.
Why this matters
Why: A successful drain supports the corrected external condition but does not prove internal parts are healthy; a repeat failure after a clear hose and correctly reinstalled filter needs diagnosis.
Use your observations
Decision map
Find the observation that best matches what you see, then follow the next safe action.
-
PATH 01Safety boundary
What you see
Water backs up in the standpipe or sink, or the visible hose is kinked, crushed, unsupported, or blocked.
Do this next
Stop the cycle, correct only the accessible hose routing using the model instructions, and arrange plumbing service for a backing-up receptacle; arrange appliance service for a damaged hose or persistent failure.
Why this path and its safety boundary
Why it matters: A household drain restriction or external hose problem is more likely than an internal pump diagnosis.
Safety stop: Do not run repeated cycles into a backup or enter standing water near electrical equipment.
-
PATH 02Safety boundary
What you see
The washer drains oddly or refills while draining and the hose is inserted more than 4.5 inches, taped airtight, or attached to a standpipe below the stated minimum.
Do this next
Restore the model's loose-but-secure air-gap arrangement, hose depth, U-shaped support, and standpipe conditions; verify once under supervision.
Why this path and its safety boundary
Why it matters: Siphoning or drain installation is more likely than a failed drain pump.
Safety stop: Do not seal the hose, alter plumbing beyond ordinary accessible routing, or move a heavy washer into a wet area.
-
PATH 03Safety boundary
What you see
The household drain is open, the visible hose is clear, and the pump hums but water moves slowly or not at all; a model-accessible filter contains debris or the filter will not reseat.
Do this next
Follow the exact model filter procedure once; if flow does not return or the filter is damaged, keep the washer off and arrange appliance service.
Why this path and its safety boundary
Why it matters: A filter, internal hose, or drain-pump restriction is more likely, but the debris does not prove which component failed.
Safety stop: Do not reach into the pump, force a filter, remove panels, or probe wiring.
-
PATH 04Safety boundary
What you see
The drain path is open but the pump is silent on a model-approved test, or the machine repeatedly stops with water remaining and no accessible obstruction.
Do this next
Stop testing and provide the model, code, phase, and sound result to qualified appliance service.
Why this path and its safety boundary
Why it matters: A pump, wiring, control, or related safety interlock may need diagnosis; the observation is not enough to condemn a part.
Safety stop: Do not test live voltage, bypass a lid or door lock, or operate with exposed wiring.
-
PATH 05Safety boundary
What you see
A front-load model has standing water and visible debris in the door-seal drain holes, or the bellow is torn or displaced.
Do this next
Remove only loose accessible debris under the model instructions; keep the washer off and arrange service for a torn seal or continued no-drain.
Why this path and its safety boundary
Why it matters: A clogged seal path may contribute; a damaged seal also creates a leak risk and can coexist with a pump or hose issue.
Safety stop: Do not cut, pull, or replace the bellow without the exact procedure, and never force a locked door.
-
PATH 06Safety boundary
What you see
The washer still leaves water after the external hose, household drain, and model-approved filter checks, or it leaks, trips a breaker, overheats, smells burnt, or has water near electrical parts.
Do this next
Keep the washer off, isolate water or power only from a dry safe location when appropriate, and arrange qualified appliance service; use a plumber for a building drain problem.
Why this path and its safety boundary
Why it matters: The problem has crossed the safe user-check boundary and may involve an internal pump, hose, control, lock, or electrical fault.
Safety stop: Do not continue cycles, touch wet electrical equipment, open panels, or attempt live diagnosis.
Helpful context
Understand the symptom
Confirm what stopped and capture the model
A washer that leaves a full tub after the drain phase is different from one that drains but will not spin. Note the water level, whether the door or lid is locked, the exact phase when the cycle stopped, any displayed code, and whether you hear a pump hum, gurgle, or silence. Record the model number before choosing a filter or drain procedure; Whirlpool's online guidance is divided by washer design and says some models have a pump filter.
Check the accessible drain path first
With the washer stopped, inspect the visible drain hose and the standpipe or laundry sink from a dry, safe position. Look for a kink, crushing, blockage, a hose pulled out of its U-shaped support, or household water backing up. For the front-load installation conditions Whirlpool lists, the hose should not be pushed more than 4.5 inches (113 mm) into the drainpipe or tub, should not be taped airtight, and the standpipe should be at least 30 inches high; use the exact installation instructions for the model.
Treat a pump filter as model-specific
Some Whirlpool front-load washers have an accessible drain-pump filter; top-load and other designs may use a different path. If the owner's manual confirms a user-accessible filter, unplug from a dry location, let hot water cool, place a shallow container and towels, and drain residual water only through the documented hose or filter access. Clean and reinstall the filter securely exactly as instructed. Never remove a panel or force a filter because an online picture looks similar.
Use the result to set the service boundary
A clear hose and open household drain do not prove that the pump, internal hose, control, or door-seal drain holes are sound. A front-load F9E1 code is a long-drain indication, not a part diagnosis. After one safe, model-appropriate verification, repeated standing water, a failed pump sound, a leak, or a safety symptom calls for qualified service rather than repeated cycles or live electrical testing.
Safety boundary
Stop conditions
- Stop for smoke, burning or electrical odor, sparking, a hot plug or outlet, repeated breaker trips, water near electrical parts, or a damaged cord.
- Do not reach into a moving basket or drum, bypass a lid or door lock, open panels, probe live wiring, or use a tool to force an obstruction.
- Do not force a locked door or tip, slide, or disconnect hoses from a wet or unstable position; hot residual water must cool before documented draining.
- Do not clean a pump filter unless the exact Whirlpool manual confirms the access and procedure for this model; do not use a similar model's panel layout.
- Stop a test if the standpipe or sink backs up, the washer leaks, walks, or produces abnormal heat or mechanical noise.
- After one safe, model-approved correction and verification, arrange service for repeated standing water, a recurring code, a silent or ineffective pump, or an unexplained no-drain condition.
Only after diagnosis
Potential parts
- drain pump filter
Consider this category only when the exact model has an accessible filter and inspection finds a damaged or missing filter or a persistent restriction after the documented cleaning procedure.
Confirm the complete Whirlpool model and the filter design, seal, and access procedure; do not infer fit from appearance or a different model. - drain pump
Consider this category only after the hose, household drain, and any model-accessible filter are clear and qualified diagnosis links the failed flow or pump sound to the pump.
Confirm the complete Whirlpool model, pump configuration, electrical specification, and service procedure before selecting a component. - washer drain hose
Consider this category only when the hose is cracked, crushed, or otherwise confirmed defective rather than merely routed incorrectly or obstructed by the household drain.
Confirm the complete Whirlpool model, hose length, ends, clamps, support, and installation requirements. - front-load door seal or bellow
Consider this category only for a front-load model with a torn or displaced bellow or a confirmed seal-related leak or blocked drain path.
Confirm the complete Whirlpool model and bellow configuration; top-load models use a different design.
When checks do not resolve it
Need a professional?
Arrange qualified Whirlpool appliance service when the hose and household drain are clear but the washer still will not drain, when a pump is silent or ineffective, a filter will not reseat, a door seal is damaged, a code returns, or any internal access would be required. Use plumbing service when the standpipe or laundry sink backs up independently of the washer.
Safety scope: This article supports ordinary-access observation and only the exact model's documented filter procedure. Do not reach into moving parts, force a door or filter, tip or slide the washer, disconnect pressurized hoses, open panels, bypass a safety lock, or test live electrical components.
Common questions
FAQ
Why is my Whirlpool washer leaving water in the tub?
Start by distinguishing a blocked household drain or kinked hose from an appliance-side restriction. Check the visible drain path, then consult the exact model manual for any accessible pump filter. A clear hose does not prove the pump or control is good; repeated standing water needs service.
Does every Whirlpool washer have a drain-pump filter I can clean?
No. Whirlpool's front-load guidance qualifies the filter as present on some models, and access varies by model. Use the complete model number and owner manual; do not remove a panel or force a filter based on a generic video or another washer.
How far should a Whirlpool washer drain hose go into the standpipe?
For the front-load guidance cited here, Whirlpool says not more than 4.5 inches (113 mm) into the drainpipe or laundry tub, with a loose-but-secure air gap rather than airtight tape. Installation requirements vary, so the exact manual controls.
What does F9E1 mean on a Whirlpool washer?
Whirlpool describes F9E1 on front-load models as a long-drain condition—an inability to drain correctly. It prompts checks of hose installation, a pump filter on some models, and door-seal drain holes; it does not identify one failed part.
Can I open a Whirlpool washer door when water remains?
Do not force a locked door. Keep the washer off and follow only the exact model's documented drain or emergency-release procedure from a dry, safe position; arrange service if the door will not release or water is hot, leaking, or near electrical parts.
When should I stop troubleshooting a Whirlpool washer that will not drain?
Stop for water near electrical parts, smoke, burning odor, sparking, heat, a breaker trip, a leak, violent movement, a backing-up drain, or any need to open panels or test live wiring. Also stop after one safe model-approved correction fails and arrange qualified appliance service.
Read the exact guide
Official sources
- Not Draining - Front Load Washer - Product Help | WhirlpoolWhirlpool Corporation · Official Whirlpool guidance for front-load models; hose and pump-filter details must be matched to the exact model.
- F9 E1 - Front Load Washer - Product Help | WhirlpoolWhirlpool Corporation · Only applicable when a Whirlpool front-load washer actually displays F9E1; its component checks are not a universal diagnosis.
- Cleaning the Pump Filter - Front Load Washer - Product Help | WhirlpoolWhirlpool Corporation · Official Whirlpool page whose access and steps are model-specific; it does not establish that every Whirlpool washer has a user-accessible filter.
Community feedback
Share a repair observation
Share a plain-text repair observation. Accepted observations are published automatically; this page may take a moment to update.