
On this page
Start here
Quick answer
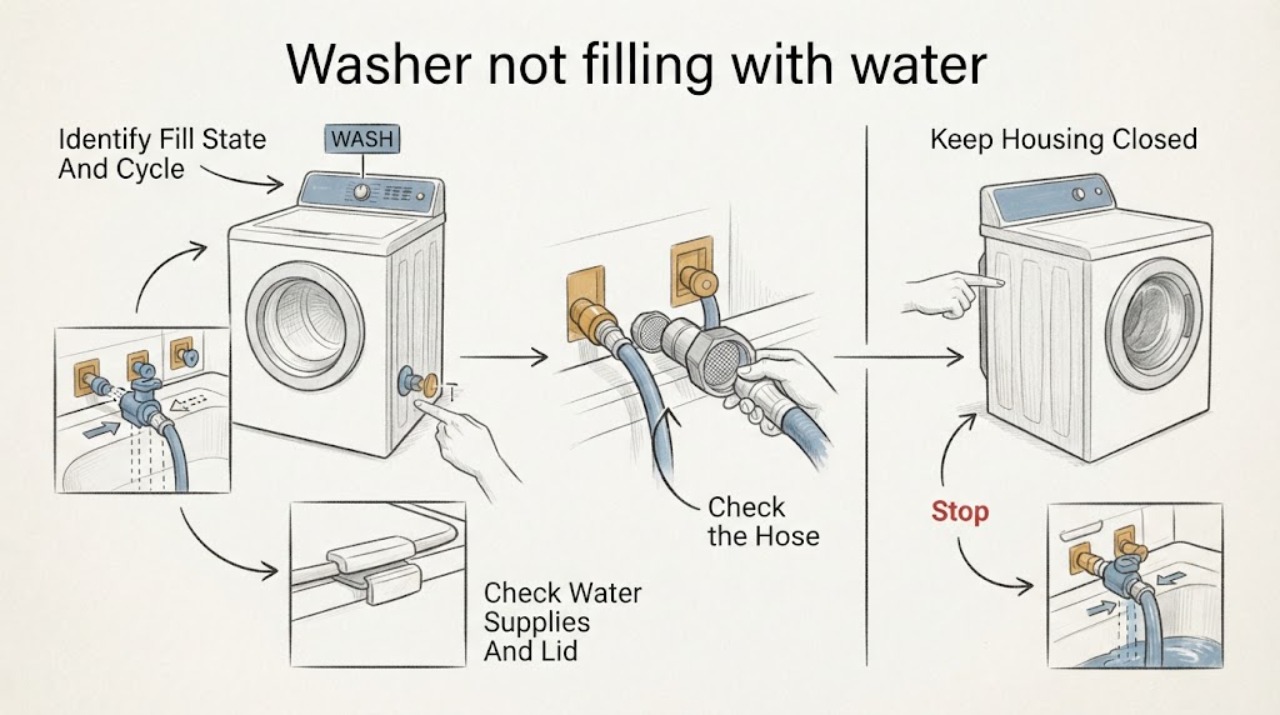
First record the exact Whirlpool model, top-load or front-load type, selected cycle, display or lights, and whether the washer is completely dry, filling slowly, or filling and draining at the same time. Confirm both household hot and cold water valves are open, both inlet hoses are connected to the correct sides, and the hoses are not kinked; Whirlpool says many models need pressure from both supplies even for a cold wash. Check that the lid or door is fully closed and latched, then inspect the visible inlet screens only with the water supplies off and a bucket ready, following the model manual. A drain hose inserted too far or sealed to the standpipe can siphon water away as it enters. Do not force a lock or remove pressurized hoses while running. Arrange service for a returning LF or F8 E1 alert, a damaged hose, blocked inlet that will not clear, a valve or control problem, or no fill after the external checks.
Before you begin
Safety first
- This article supports identifying the fill state, checking external valves, lock closure, visible hoses, model-approved inlet screens, and drain-hose installation. It does not authorize lock bypass, cabinet disassembly, live electrical testing, pressurized plumbing work, removal of inlet screens, or operation after overflow, uncontrolled fill, leak, smoke, or electrical symptoms.
Work through in order
Diagnostic checks
Use only checks that match the exact appliance or system and its official guide.
-
Check 1
Record the Whirlpool model and washer type, selected cycle and options, display or blinking lights, whether the lid or door locks, and what happens after Start: no water, slow water, staged sensing, or water entering and draining away.
Expected result: The tub stays dry, the level rises slowly, the washer pauses and agitates or spins while sensing, the display shows LF or F8 E1, or water enters but never accumulates.
Next step: Compare the behavior with the exact owner's manual, then continue to the supply and lock checks. Do not add water manually or force the lid or door to observe the fill.
Stop if: Stop for an active leak, spraying connection, smoke, sparks, a hot cord, or a lock that requires bypassing; keep the washer off and arrange qualified help.
Why this matters
Why: A top-load sensing pause or a low-water cycle may be normal, while a dry tub or fill alert points toward supply, lock, inlet, pressure, or siphoning conditions. Water entering and disappearing makes drain-hose installation important.
-
Check 2
With the washer stopped, confirm the household hot and cold valves are fully open, both inlet hoses are connected to the correct washer inlets, the hoses are not kinked, and the lid or front door is fully closed and latched as the model requires.
Expected result: A valve is closed, a hose is kinked or cross-connected, a supply is absent, an anti-flood device is installed, the lid or door will not latch, or all external supply and lock conditions are correct.
Next step: Open both valves, correct an obvious hose kink or connection using the model instructions, remove no device by guesswork, and close the lid or door. Retry once; if the lock, supply, or fill alert remains, continue to the screen and service checks.
Stop if: Do not bypass the lid or door lock, loosen water connections while pressurized, pull the machine through a wet area, or continue with uncontrolled water flow.
Why this matters
Why: Whirlpool says both supplies and a proper lid or door condition are required on many washers; a kink, restricted device, or lock condition can prevent filling without proving an internal valve failure.
-
Check 3
If the supply valves and lock are correct and the washer still will not fill, turn both water supplies off. Only if the exact model procedure allows it, place the hose ends in a bucket, disconnect the inlet hoses with suitable hand tools, and inspect the washer inlet screens and hose passages for mineral or debris buildup without removing or disturbing a screen.
Expected result: An inlet screen is visibly restricted, a hose does not pass water freely when checked away from the washer, an O-ring or hose is damaged, or the screens and hoses appear clear.
Next step: Clean a visibly dirty screen gently with mild soap, water, and a soft brush only as the model instructions permit; replace a damaged hose through the correct model process. Reconnect securely, reopen both supplies, and test once. Arrange service if flow remains absent or a connection leaks.
Stop if: Do not remove inlet screens, use a sharp tool, force a seized hose, reconnect a damaged fitting, or work without shutting off both supplies and containing residual water.
Why this matters
Why: Whirlpool links mineral or debris buildup at inlet screens and restricted or kinked hoses to low or absent flow. A damaged hose or clear screens with no fill shifts concern toward the internal water valve, pressure sensing, control, or household supply.
-
Check 4
If water enters but the washer never reaches the expected level or an LF/F8 E1 alert appears, inspect the visible drain hose and standpipe or laundry-tub connection. Compare insertion depth, standpipe height, hose form, and the presence of an air gap with the exact Whirlpool installation instructions; do not tape or seal the drain opening.
Expected result: The hose is inserted too far, the standpipe is too low, the hose is kinked or clogged, the drain opening is taped or airtight, or water is visibly leaving as the washer fills; alternatively, the drain path appears correctly installed.
Next step: Restore only an obvious external hose arrangement using the model installation guide and secure the hose without sealing the opening. Test once; if the washer still cannot fill or the standpipe backs up, arrange appliance or plumbing service.
Stop if: Do not disconnect a water-filled drain line, dismantle the standpipe, seal the opening, add an extension by guesswork, or operate with an overflow or wet electrical area.
Why this matters
Why: Whirlpool says an incorrectly installed drain hose can siphon, so the washer fills and drains at the same time and never reaches its expected level. A correctly installed drain path makes inlet flow, lock, screen, valve, and pressure causes more likely.
-
Check 5
After the external supply, lock, inlet-screen, hose, and drain-path checks are complete, perform one model-approved fill test or cycle while staying nearby. Record whether both valves open, water enters from each side, the level rises, the cycle advances, and the same code or symptom returns.
Expected result: The washer fills and advances normally, fills slowly, remains dry despite open supplies, fills and drains at once, shows LF/F8 E1 again, or leaks or locks without responding.
Next step: Leave the washer off and arrange qualified Whirlpool appliance service for persistent no-fill, a returning code, a damaged fitting, or an internal diagnosis. Provide the model, cycle, code, supply observations, screen result, drain-hose setup, and test behavior.
Stop if: Do not repeat fill tests continuously, remove the cabinet, bypass a safety lock, test live wiring, or keep operating with a leak, smoke, sparks, hot cord, or uncontrolled fill.
Why this matters
Why: A successful test supports an external supply, hose, screen, lock, or siphoning cause. Persistent no-fill after clear external checks suggests an inlet valve, pressure sensor, wiring, control, or household supply fault; a returning alert is unresolved.
Use your observations
Decision map
Find the observation that best matches what you see, then follow the next safe action.
-
PATH 01Safety boundary
What you see
A top-load washer pauses, gently moves or spins while sensing, adds water in stages, or leaves clothing partly above the water on a cycle known to use a low-water level, with no code or leak.
Do this next
Allow the sensing and fill sequence to finish, use the cycle recommended for the load, and compare the result with the model guide. Arrange service if the washer remains dry, stops with an alert, or behaves differently across ordinary loads.
Why this path and its safety boundary
Why it matters: Whirlpool says load sensing and cycle-specific water levels can make filling look slow or incomplete; partial submersion can be normal on a wash-plate design.
Safety stop: Do not add extra water, open the lid repeatedly, or treat a leak, overflow, or error as normal sensing.
-
PATH 02Safety boundary
What you see
Both hot and cold valves are not fully open, one hose is kinked or disconnected, the hot and cold connections do not match the labels, or an anti-flood device is restricting pressure.
Do this next
Open both valves and correct only an obvious hose connection or kink according to the manual. If the device, supply, or fitting is damaged or flow remains low, arrange plumbing or appliance service.
Why this path and its safety boundary
Why it matters: The washer may not detect enough incoming pressure or flow; this is more likely than a failed water valve until the external supply is restored.
Safety stop: Do not loosen a pressurized hose, force a damaged fitting, or remove an anti-flood device without the model and installation instructions.
-
PATH 03Safety boundary
What you see
The lid or front door is open, will not latch, shows a lock-related light or code, or the cycle will not advance after Start even though water supplies are available.
Do this next
Remove only visible lint, clothing, or detergent buildup that prevents closure, close the lid or door, and follow the model's cancel or reset procedure once. Arrange service for a returning lock fault or damaged latch.
Why this path and its safety boundary
Why it matters: Whirlpool requires a closed or latched lid or door for the applicable fill and cycle operations; a lock or visible obstruction can prevent filling.
Safety stop: Do not bypass the lock, insert tools into it, pry the door or lid, or reach into a moving tub.
-
PATH 04Safety boundary
What you see
The valves are open and the lock is correct, but an inlet screen or hose passage is visibly restricted by mineral buildup, debris, a kink, or damage.
Do this next
With both supplies off, clean only the accessible screen as the model permits and replace or service a damaged hose. Reconnect and test once; stop for a leak or persistent no-fill.
Why this path and its safety boundary
Why it matters: Restricted flow can produce a slow or absent fill without proving that the internal inlet valve or control has failed.
Safety stop: Do not remove screens, puncture debris, force a seized hose, or restore water to a damaged connection.
-
PATH 05Safety boundary
What you see
Water enters but the level never rises, the washer appears to fill and drain simultaneously, or LF/F8 E1 is present with an over-inserted, low, kinked, taped, or otherwise incorrect drain hose.
Do this next
Use the exact Whirlpool installation guide to restore hose insertion, height, support, and air gap; do not seal the drain. Test once and use plumbing service for a blocked standpipe or appliance service if the washer still cannot fill.
Why this path and its safety boundary
Why it matters: The washer may be losing water through siphoning or an installation restriction rather than failing to open its inlet valve.
Safety stop: Do not tape the drain opening, disconnect a water-filled line, or continue with an overflow, backup, or wet floor.
-
PATH 06Safety boundary
What you see
Both supplies are open, hoses and screens are clear, the lid or door locks, drain routing is correct, yet the washer remains dry or repeatedly shows a fill alert.
Do this next
Leave the washer off and arrange qualified Whirlpool appliance service. Give the technician the exact model, code, water-supply observations, screen and hose results, lock behavior, and one-test outcome.
Why this path and its safety boundary
Why it matters: An internal water inlet valve, pressure-sensing system, wiring, control, or household pressure problem is more likely than a simple hose issue.
Safety stop: Do not open the cabinet, jump the valve or lock, perform live voltage tests, or continue operating a washer that leaks or cannot control its fill.
Helpful context
Understand the symptom
Not much water is not always no water
A Whirlpool washer may pause while sensing the load, add water in stages, use a spray rinse, or deliberately keep clothing only partly submerged on a low-water top-load cycle. Compare the observed water level with the selected cycle and the owner's manual before adding water yourself. A genuinely dry tub, a long-fill alert, or water that enters and immediately leaves points to a different check than a normal low-water cycle.
Check supply and lock conditions before parts
Both hot and cold supply valves and inlet hoses matter on many Whirlpool models. A kink, mineral buildup at an inlet screen, anti-flood device, wrong hose connection, or closed valve can reduce flow. The lid or front door must also be closed and latched as the model requires. These are external or model-directed checks; a valve, pressure sensor, or control should not be diagnosed by bypassing the lock or testing live wiring.
A fill alert can be caused by the drain hose
If water enters but the level never rises, inspect the visible drain hose installation. Whirlpool says an over-inserted, taped, low, or otherwise incorrectly installed hose can siphon, so the washer fills and drains at once. The allowed insertion and standpipe height vary by washer family; use the exact installation instructions rather than sealing the connection or changing plumbing by guesswork.
Stop before internal water-valve or electrical work
Turn off the water supplies before loosening any inlet hose, catch residual water in a container, and stop if a connection is seized, damaged, or spraying. Do not remove the cabinet, bypass a lid or door lock, or test an energized valve. A no-fill condition that remains after the supply, lock, screens, and drain-hose checks needs qualified appliance service.
Safety boundary
Stop conditions
- Stop for uncontrolled filling, overflow, a spraying or damaged hose, water near an outlet or cord, smoke, sparks, a hot cord, or a major leak; isolate water or power only from a dry, safe location and arrange qualified help.
- Do not bypass a lid or door lock, force the lid or door, open the cabinet, perform live electrical testing, or reach into a moving or water-filled tub.
- Turn both water supplies off before loosening an inlet hose, contain residual water, and stop if a fitting is seized, damaged, or cannot be reconnected securely.
- Do not remove inlet screens, remove the rear drain-hose holder, tape or seal a drain opening, add a hose extension by guesswork, or dismantle household plumbing.
- Arrange qualified Whirlpool appliance service for a returning LF or F8 E1 alert, no fill after supply, lock, screen, hose, and drain checks, a suspected valve or pressure-sensor fault, or any internal repair need; use plumbing service for a blocked household supply or standpipe.
Only after diagnosis
Potential parts
- Whirlpool washer inlet hose or hose connection hardware
Consider this category only when a hose is visibly damaged, restricted, leaking, or cannot be safely restored to the model-required connection and the no-fill symptom follows that finding.
Confirm the complete model, hot/cold connection, length, and fitting requirements; do not substitute or reconnect a damaged hose. - Whirlpool washer water inlet valve or inlet-screen assembly
Consider this category only when both household supplies, hoses, screens, lock, and drain routing are clear but the washer remains dry or a fill alert returns and a technician identifies the valve or screen assembly.
Valve configuration and electrical connections vary by model; verify the exact model and diagnosis before ordering or opening the cabinet. - Whirlpool washer lid or door lock assembly
Consider this category only when the lid or door cannot latch or a lock-related symptom persists after visible obstruction and closure checks and the model-specific diagnosis identifies the assembly.
Top-load lid locks and front-load door locks are different systems; confirm the exact washer type and model before any service work.
When checks do not resolve it
Need a professional?
Arrange qualified Whirlpool appliance service when both supplies are open, the lid or door locks, the inlet hoses and screens are clear, and drain-hose routing is correct but the washer remains dry or a fill alert returns. Service is also appropriate for a damaged hose or fitting, missing drain-hose holder, intermittent inlet valve, pressure-sensor, wiring, or control concern. Use plumbing service for no household water pressure, a blocked supply, or a standpipe that backs up. Keep the washer off for overflow, uncontrolled fill, leaks near electricity, smoke, sparks, or a hot cord.
Safety scope: This article supports identifying the fill state, checking external valves, lock closure, visible hoses, model-approved inlet screens, and drain-hose installation. It does not authorize lock bypass, cabinet disassembly, live electrical testing, pressurized plumbing work, removal of inlet screens, or operation after overflow, uncontrolled fill, leak, smoke, or electrical symptoms.
Common questions
FAQ
Why is my Whirlpool washer not filling with water?
Check that both hot and cold valves are open, both inlet hoses are connected and unkinked, the lid or door latches, and the inlet screens are clear using the model procedure. If water enters and immediately leaves, check drain-hose routing for siphoning. A washer that remains dry after these checks needs service for the supply, valve, sensor, wiring, or control.
Does a Whirlpool top-load washer always fill the tub completely?
No. Whirlpool says top-load HE cycles sense the load and use different water levels; some cycles intentionally leave clothing partly above the water and may pause or move the load while adding water. Compare the behavior with the selected cycle and your model manual before treating it as a failure.
Can a drain hose cause a Whirlpool washer to seem like it is not filling?
Yes. An over-inserted, taped, low, kinked, or otherwise incorrect drain hose can siphon or let water leave as it enters, so the washer never reaches its expected level. Restore routing only from the exact installation guide and do not seal the drain opening.
What do LF and F8 E1 mean on a Whirlpool washer?
Whirlpool uses LF or F8 E1 for long-fill or low-flow conditions on applicable models. Check the exact code in the owner's manual, confirm both supplies and hoses, and inspect the drain hose for siphoning. If the alert returns after safe external checks, arrange service.
Read the exact guide
Official sources
- Not Filling or Filling Slowly - Front Load WasherWhirlpool Product Help · Whirlpool front-load washer fill valves, hoses, screens, anti-flood devices, and drain-hose installation
- LF - Error CodeWhirlpool Product Help · Whirlpool top-load LF/F8 E1 long-fill alerts, water-supply requirements, siphoning, and drain-hose installation
- Water Levels by Cycle - WasherWhirlpool Product Help · Whirlpool top-load HE sensing, cycle-specific water levels, staged filling, and low-water behavior
- Lid Locking on a Top Load High Efficiency WasherWhirlpool Product Help · Whirlpool top-load washer lid-lock requirements, visible obstruction checks, and model-specific reset boundary
- Error Codes in Front Load WashersWhirlpool Product Help · Whirlpool front-load F8 E1/LO FL low-flow, drain, door-lock, suds, and model-dependent error guidance
- Checking the Fill Hoses if the Washer is not FillingWhirlpool Product Help · Whirlpool washer water-supply, inlet-hose, inlet-screen, and no-fill checks
Community feedback
Share a repair observation
Share a plain-text repair observation. Accepted observations are published automatically; this page may take a moment to update.