
On this page
Start here
Quick answer
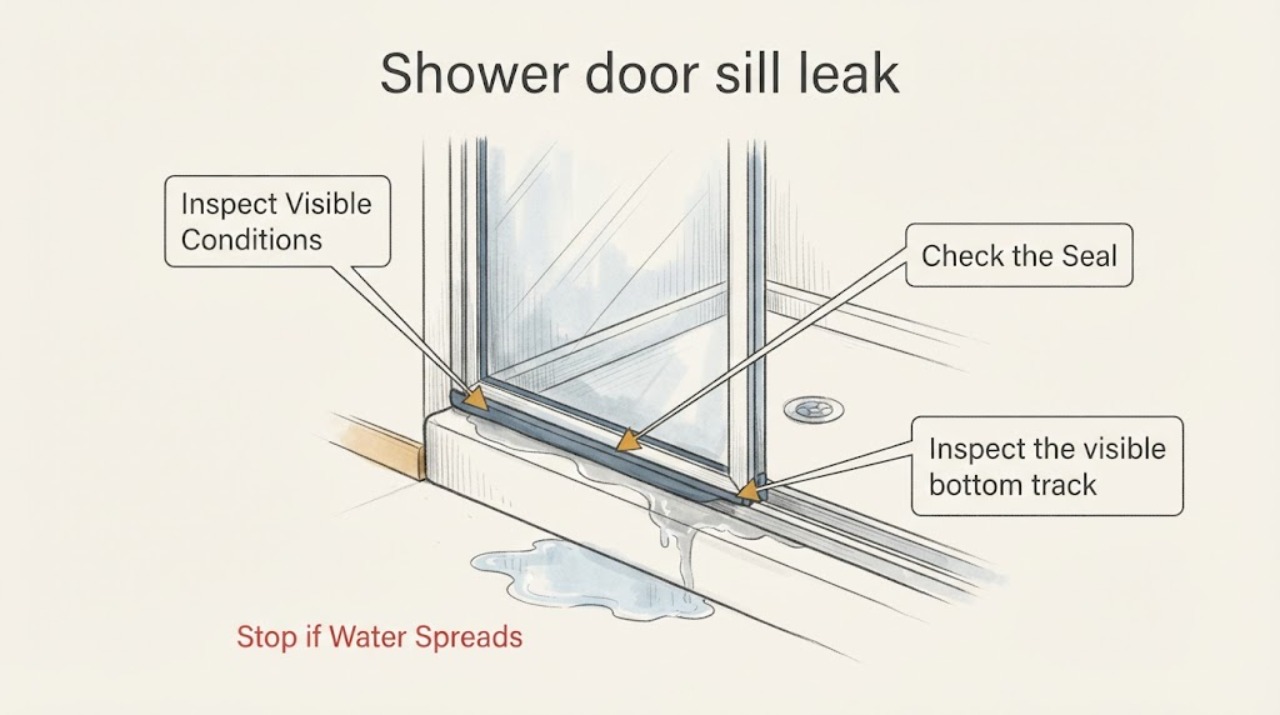
First identify where water crosses the shower door sill: under the bottom sweep, at a corner or jamb, around the track, or beyond the shower base. From outside the enclosure, inspect the visible seal, track, door alignment, caulk, and nearby floor or wall for damage; do not remove glass, drill, scrape waterproofing, or open a wall. Manufacturer guidance shows that seal orientation, a level and undamaged track, correct panel alignment, and sealant at specified frame joints all affect containment, but the exact arrangement is installation-specific. Keep the shower out of use if water reaches finished surfaces or the door/glass is loose, then have a qualified shower-door or bathroom-repair professional diagnose the leak before resealing or replacing parts.
Work through in order
Diagnostic checks
Use only checks that match the exact appliance or system and its official guide.
-
Check 1
After the shower is dry, inspect the sill, bottom track, and floor from outside the enclosure; if a normal shower is still being used, observe only from a dry, stable position and do not direct spray at the door.
Expected result: Record the first place that becomes wet: under the door, at a hinge or strike corner, between a wall jamb and panel, along the track, or beyond the shower base; note whether water reaches the room floor.
Next step: Photograph the first wet point and the complete sill from both sides without moving the glass, then give the path to the repair professional.
Stop if: Stop using the shower if water spreads toward a doorway, ceiling below, electrical fixture, soft flooring, or any area where someone could slip.
Why this matters
Why: The first wet location narrows the path to a sweep/seal, jamb, track, alignment, or base/room water-management issue. Water beyond the base raises the risk of concealed damage and makes continued use unwise.
-
Check 2
Visually inspect the bottom sweep or threshold seal without pulling it off, trimming it, or loosening door hardware.
Expected result: Note a missing, split, curled, hardened, displaced, or visibly gapped seal, and record which side its lip or water dam faces; if orientation cannot be determined, mark it unknown.
Next step: Photograph the seal profile and door model information if safely visible, and have the professional confirm the correct replacement and orientation.
Stop if: Do not yank, cut, glue, or force a seal, and do not use an unverified strip that changes the door's closure or glass clearance.
Why this matters
Why: A damaged or misoriented seal can allow water under the door, but a replacement is not automatically correct because seal profiles and tracks vary. A seal that pushes the door open can create a gap rather than improve containment.
-
Check 3
Inspect the visible bottom track, sill, and shower ledge for level-looking seating, dents, gaps, movement, or debris without removing the track or panel.
Expected result: Record whether the track appears to sit flat, whether water could collect on its outward side, and whether the panel or track shifts when the door is operated normally; do not test by pushing on glass.
Next step: Include close photographs of track-to-ledge and panel-to-track joints in the service request and ask for the enclosure to be checked as an assembly.
Stop if: Do not lift glass, loosen track screws, wedge the door, or apply force to a moving or cracked enclosure.
Why this matters
Why: An imperfect or poorly seated track can keep water from returning to the receptor or drain and may also prevent proper door closure. A level-looking surface does not confirm hidden fasteners, substrate, or waterproofing.
-
Check 4
Inspect visible sealant joints and wall-jamb edges from outside and inside only where they are readily visible, without scraping, probing, or opening the wall.
Expected result: Note separated, shrunken, cracked, mold-stained, soft, or missing sealant, and distinguish a surface gap from water that appears to originate behind the jamb or base.
Next step: Photograph each gap and ask the professional whether the joint needs cleaning and resealing, part alignment, or controlled removal and waterproofing repair.
Stop if: Do not scrape into the shower base, cut wall finishes, or apply a new bead over an active leak without confirming the source and required cure conditions.
Why this matters
Why: A failed visible joint may contribute to the leak, but resealing over wet, contaminated, moving, or incorrectly installed parts can trap water and hide a larger failure. The exact inside/outside seal locations depend on the enclosure instructions.
-
Check 5
Check door operation and water direction by observing the closed door, latch or seal contact, hinge side, and showerhead direction without adjusting the hinges or spraying the enclosure.
Expected result: Record whether the door closes squarely, contacts the jamb seal, leaves a bottom or corner gap, rubs the sill, or sits with its pivot or opening direction toward the spray.
Next step: Provide the closure and spray-direction observations to the repair professional and request an alignment and hardware safety check.
Stop if: Stop operating the door if glass is cracked, chipped, loose, scraping, unstable, or difficult to control.
Why this matters
Why: Misalignment or spray aimed toward a door gap can overcome a good seal. Adjustment requires knowing the enclosure's hardware and glass support; a rubbing or loose door can be a safety issue as well as a leak path.
Use your observations
Decision map
Find the observation that best matches what you see, then follow the next safe action.
-
PATH 01Safety boundary
What you see
Water first appears directly under the bottom edge or at a visible corner seal.
Do this next
Document the seal profile, gap, closure, and water direction, then have the professional confirm the enclosure-specific seal and alignment.
Why this path and its safety boundary
Why it matters: The bottom sweep, threshold seal, door gap, or panel alignment is a plausible path, but the track and base still need to be checked together.
Safety stop: Do not trim, glue, or force the seal.
-
PATH 02Safety boundary
What you see
The track is visibly uneven, damaged, loose-looking, or holds water outward from the shower.
Do this next
Keep use limited and request a track, panel, receptor, and waterproofing assessment.
Why this path and its safety boundary
Why it matters: The sill may not return water to the receptor or drain, and a replacement seal alone may not address the substrate or track condition.
Safety stop: Do not lift glass or loosen the track.
-
PATH 03Safety boundary
What you see
Water appears at the wall jamb or behind the frame rather than at the door gap.
Do this next
Photograph the first wet joint and have a professional identify whether a controlled reseal or deeper repair is needed.
Why this path and its safety boundary
Why it matters: A jamb seal, frame joint, movement, or concealed waterproofing path may be involved.
Safety stop: Do not cut the wall, remove tile, or seal over an unexplained active leak.
-
PATH 04Safety boundary
What you see
The door does not close squarely, rubs the sill, or leaves a visible gap.
Do this next
Stop forcing the door and request an enclosure alignment and hardware inspection.
Why this path and its safety boundary
Why it matters: Alignment, hardware, panel seating, or seal interference may be directing water outward and could also make the glass unsafe.
Safety stop: Do not loosen hinges, lift panels, or operate cracked or unstable glass.
-
PATH 05Safety boundary
What you see
Water reaches the room floor, wall, ceiling below, or a soft/stained finish.
Do this next
Stop shower use, dry visible water from a safe position, document the damage, and arrange prompt professional service.
Why this path and its safety boundary
Why it matters: The leak has a property-damage or slip consequence beyond a cosmetic seal issue.
Safety stop: Do not cover the leak with a towel or new caulk and continue normal use.
-
PATH 06Safety boundary
What you see
The seal, track, source, or enclosure construction is unknown.
Do this next
Provide photographs, dimensions if safely obtained, model information, and the leak pattern for an on-site assessment.
Why this path and its safety boundary
Why it matters: A generic sweep or sealant may be incompatible and could obscure the actual leak path or damage the enclosure.
Safety stop: Do not drill, scrape waterproofing, dismantle the door, or perform wall demolition to investigate.
Helpful context
Understand the symptom
A sill leak is a path problem, not automatically a bad seal
Water can pass under a worn bottom sweep, cross a misoriented threshold seal, collect on an imperfect or out-of-level track, escape at a wall jamb, or be directed outward by a door that does not close squarely. A visible bead of caulk is not proof that the underlying track, panel, receptor, or waterproofing is sound. Follow the water path from the first wet point to the floor rather than sealing the first spot that looks suspicious.
Keep glass and waterproofing intact
Shower-door glass and its hardware can be heavy and fragile, and the shower base or wall may be part of the water-management system. Do not remove a panel, loosen hinges, drill new holes, scrape a seal aggressively, or open a wall to search for the leak. A professional can identify the enclosure design, preserve the glass, and decide whether a seal, alignment, track, caulk joint, or concealed waterproofing repair is actually appropriate.
Contain the damage while you investigate
Stop normal shower use if water is reaching a wood floor, ceiling below, electrical fixture, or a soft or stained wall. Dry visible water from a safe position and document the leak location, but do not use a towel or bead of caulk as a permanent fix. A recurring leak can remain behind the trim even when the floor looks dry after cleanup.
Only after diagnosis
Potential parts
- shower-door-seal
Consider this only after the enclosure profile, door thickness, track, and leak path are identified and a professional confirms that the seal—not alignment, track, receptor, or waterproofing—is the failed part.
Match the actual enclosure design and seal orientation; do not infer fit from appearance or use a seal that pushes the door open. - silicone-caulk
Consider this only when the enclosure instructions or repair professional identify a specific visible joint that needs resealing after the surfaces and source are properly assessed.
Confirm the sealant type, joint location, surface preparation, and cure requirements for the actual shower materials; caulk is not a substitute for a failed track or concealed waterproofing. - drain-hair-catcher
Consider this only if a separate drain slowdown is documented and the catcher will not reduce flow or create a raised edge; it does not repair a door-sill leak.
Verify the drain opening and cleaning access for the actual shower, and keep this separate from the enclosure leak diagnosis.
When checks do not resolve it
Need a professional?
Call a qualified shower-door or bathroom-repair professional promptly when water reaches the room floor or concealed finishes, the leak recurs, the track or jamb is loose or uneven, the door is misaligned, the glass is damaged, the source is hidden, or the enclosure is no longer safe to operate. Keep the shower out of use for active spreading water or unstable glass.
Have this ready
- Provide the first wet location, photos from inside and outside, seal and track condition, door closure and spray direction, visible caulk gaps, water-damage locations, enclosure model information if safely visible, and anything already applied to the sill.
Common questions
FAQ
Why is water leaking under my shower door sill?
Common possibilities include a worn or misoriented bottom seal, a door that is not closing squarely, an uneven or damaged track, a jamb or frame joint, or water being directed toward the gap. The first wet point helps narrow the path, but it does not identify the correct replacement part by itself.
Can I replace the shower-door bottom seal myself?
Only after the enclosure profile, seal orientation, track, and leak source are confirmed. A generic sweep may not fit and can push the door open or leave a gap. If the seal is stuck, the glass is heavy or unstable, or the leak may be behind the frame, have a professional handle it.
Should I caulk the inside of the shower door track?
Do not add caulk by guesswork. Manufacturer instructions differ by enclosure and specify where sealant belongs; sealing the wrong side can trap water or block intended drainage. Have the leak path and the enclosure instructions checked before resealing.
When is a shower-door sill leak urgent?
Stop using the shower and arrange prompt help when water reaches finished floors, a ceiling below, a wall that is soft or stained, an electrical fixture, or a doorway, or when the door or glass is loose, cracked, chipped, or unstable. A recurring leak also deserves professional diagnosis even if the floor dries between uses.
Read the exact guide
Official sources
- Unlevel or Imperfect Bottom Shower Door TrackKohler Assist · Manufacturer support guidance for Kohler/Sterling shower-door track installations; exact hardware and substrate vary by enclosure.
- SP2375 Series Neo-Angle Shower Doors Installation and Care InstructionsKohler Co. / Sterling · Model-family-specific manufacturer instructions; use them as an example of enclosure-dependent seal and track requirements, not as universal instructions for every shower door.
- Prevail Shower Door Seal OrientationKohler Assist · Specific to the referenced Prevail shower-door seal; use only to support the general point that seal orientation is enclosure-dependent.
Community feedback
Share a repair observation
Share a plain-text repair observation. Accepted observations are published automatically; this page may take a moment to update.