
On this page
Start here
Quick answer
A cracked, flattened, torn, or missing garage-door bottom seal can let in water, drafts, dirt, and pests, but a visible gap is not always a seal-only problem. First inspect the closed door and surrounding floor from a safe position, then document the seal profile, retainer, threshold, and any uneven closing. Do not adjust springs or cables, remove bottom brackets, put hands near a moving door, or force a door that binds. If the door is otherwise operating smoothly, a correctly matched bottom seal or retainer may be the repair path; if the door is crooked, heavy, off track, or unsafe, stop using it and call a trained garage-door technician.
Before you begin
Safety first
- Do not adjust or remove springs, cables, bottom brackets, rollers, tracks, opener limits, or door panels. Do not place hands near a moving door, force a binding door, or test a suspected failure by holding or restraining it.
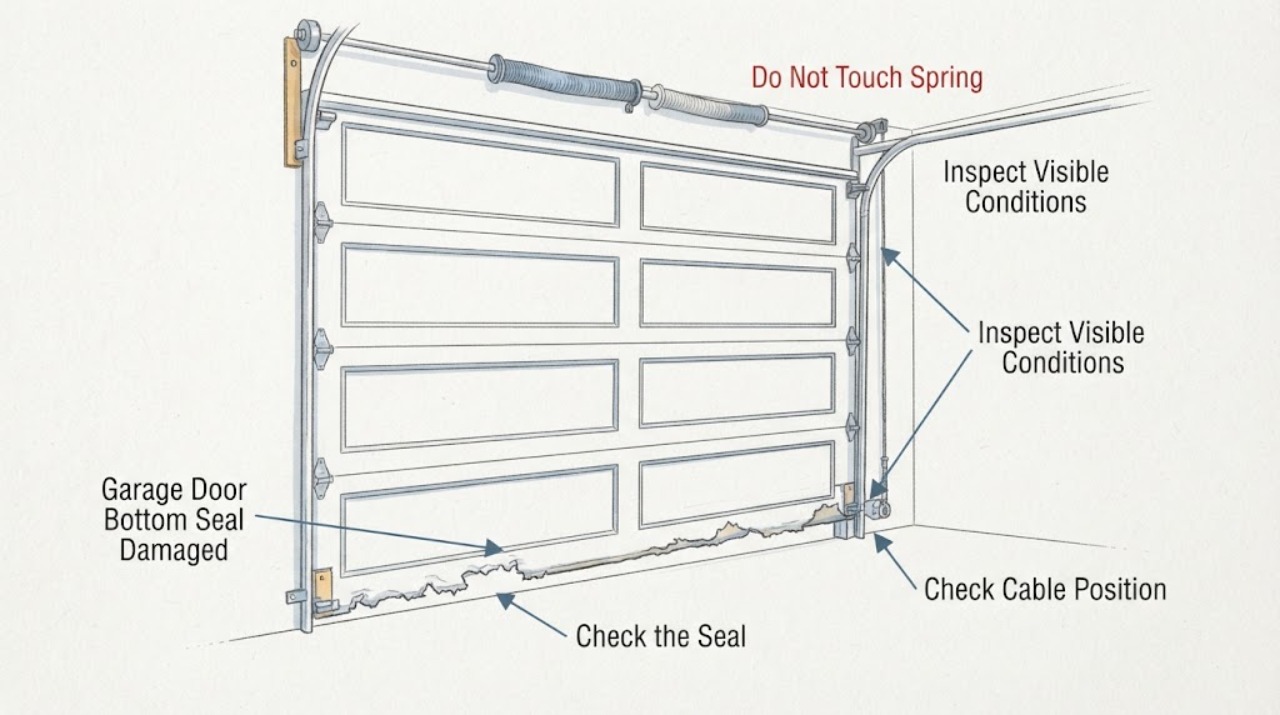
Work through in order
Diagnostic checks
Use only checks that match the exact appliance or system and its official guide.
-
Check 1
Close the garage door using its normal control only if it moves smoothly, then stand inside the garage away from the door's travel and pinch points. Look across the bottom edge for daylight, a continuous gap, a torn or cracked strip, flattened sections, missing pieces, or areas where the seal does not meet the floor.
Expected result: A split, brittle, crushed, or missing seal with an otherwise even closed door supports a weather-seal replacement question. A gap that changes from one end to the other can also reflect an uneven floor, a misaligned door, or a damaged retainer.
Next step: Photograph the full bottom edge and both corners, and note where light, air, water, or debris enters. Keep hands and tools away from the seal while the door is moving.
Stop if: Stop using the opener and keep clear if the door jerks, drops, binds, closes unevenly, reverses unexpectedly, or fails to stay in its normal position.
Why this matters
Why: The visible pattern helps separate a worn seal from a door or floor alignment concern; it does not justify adjusting the door mechanism.
-
Check 2
With the door stationary and fully open only when it reached that position normally, visually inspect the exposed bottom edge, retainer or groove, and the seal's end profile from the side. Do not remove the seal, door panels, brackets, rollers, cables, or springs, and do not reach into the track or between sections.
Expected result: A seal that is pulled out of its channel, split at an end, or visibly detached from its retainer may need a matching seal or retainer. A bent, loose, corroded, or damaged retainer can make a new strip fail to seat correctly.
Next step: Use the door label, owner manual, existing photos, and the visible seal profile to identify the door family. Ask a parts supplier or technician to confirm the part and installation method before ordering.
Stop if: Do not continue if the door cannot be left securely stationary, if any spring or cable appears damaged, or if inspection would require removing a panel, bracket, roller, or seal under tension.
Why this matters
Why: The retainer style and seal profile matter as much as the door width; a generic-looking strip is not enough to establish fit.
-
Check 3
Inspect the garage floor and threshold line from standing height, without kneeling under the door or moving it repeatedly. Look for a low spot, raised edge, standing water, a worn threshold, or debris that explains why the bottom seal contacts unevenly; also check the side and top perimeter seals for visible gaps.
Expected result: If the seal looks intact but a gap follows a low or raised floor area, a threshold or floor-drainage issue may be contributing. If water enters at a side or top corner, replacing only the bottom strip may not address the path.
Next step: Photograph the floor line, threshold, corners, and any water trail after the area is dry. Do not add adhesive, raise the threshold, or alter the door limits as a diagnostic experiment.
Stop if: Stop if water is accumulating around electrical equipment, the floor is slippery or unstable, or the door must be moved to inspect the area safely.
Why this matters
Why: The entry path determines whether the next assessment belongs with a seal installer, garage-door technician, or a professional addressing the threshold or surrounding water path.
-
Check 4
From a clear position outside the travel path, observe one normal open-and-close cycle only if the door and opener have been operating normally. Note scraping, shaking, a crooked bottom edge, a seal that catches, a door that stops short, or a door that reverses; do not hold, push, pull, or restrain the door.
Expected result: Smooth travel with a consistent bottom gap keeps the seal or threshold in focus. Jerking, scraping, crooked travel, abnormal weight, or a failed safety reversal points to a broader door-system issue rather than a simple weather-strip symptom.
Next step: Record the exact behavior and stop operating the door when any abnormal motion or safety symptom appears. Give the technician the photos and the observation sequence.
Stop if: Do not run another cycle if the door binds, comes off a track, falls, hangs unevenly, or fails to reverse safely; keep people and vehicles clear and call a technician.
Why this matters
Why: Operation results set the safety boundary: a seal can be documented for replacement, while a mechanical or safety symptom requires the door to be taken out of service pending professional inspection.
-
Check 5
Record the door type, approximate width, manufacturer or model label if visible from a safe position, seal profile or retainer shape, and the exact locations of cracks or gaps. Compare these notes with the owner's manual without dismantling the assembly.
Expected result: A clear label and matching profile can narrow the part category; an unreadable label, unusual retainer, or mixed replacement history leaves compatibility uncertain.
Next step: Send the photos and identification notes to a qualified garage-door parts source or technician and ask which seal, retainer, or threshold is appropriate for the exact door.
Stop if: Stop the parts search if the proposed item requires removing high-tension components or if fit cannot be confirmed from the door documentation and measurements.
Why this matters
Why: The information is enough to request a fitment check, but not enough to justify changing springs, cables, limits, balance, tracks, or bottom brackets.
Use your observations
Decision map
Find the observation that best matches what you see, then follow the next safe action.
-
PATH 01Next step
What you see
The seal is visibly cracked, brittle, flattened, torn, or missing, while the door closes evenly and moves normally.
Do this next
Request a correctly matched bottom seal and, if needed, retainer assessment. Keep the door mechanism untouched and use professional installation if the seal cannot be replaced without moving or unloading the door system.
-
PATH 02Next step
What you see
The seal appears intact but the gap follows an uneven floor, damaged threshold, or a side or top perimeter opening.
Do this next
Have the threshold, floor line, and full perimeter weather barrier assessed; replacing the bottom strip alone may not stop water or drafts.
-
PATH 03Next step
What you see
The door is crooked, jerky, unusually heavy, off track, scraping, or not reversing as expected.
Do this next
Stop operating the door, keep people and vehicles out of the opening, and call a trained garage-door technician. Do not adjust springs, cables, tracks, limits, balance, or bottom brackets.
-
PATH 04Next step
What you see
The retainer is bent, detached, corroded, or incompatible with the visible replacement profile.
Do this next
Pause the parts order and ask a technician or the door manufacturer for a model- and retainer-specific match. Do not force a strip into a channel or modify the retainer.
-
PATH 05Next step
What you see
Water continues to enter after the seal looks serviceable, or water reaches electrical equipment or creates a slippery floor.
Do this next
Keep the area clear, avoid operating nearby equipment when unsafe, document the water path, and arrange the appropriate garage-door, drainage, or building professional assessment.
Helpful context
Understand the symptom
What the bottom seal does
The flexible strip along the bottom edge is part of the garage door's weather barrier. Manufacturer guidance describes it as helping keep out water, dirt, pests, and drafts. Its condition can be checked visually, but the seal must be matched to the door's retainer or groove and to the actual source of the gap. A worn seal cannot correct a door that is out of alignment or a floor that is uneven.
Keep high-tension hardware out of scope
Garage doors are heavy systems, and springs, lift cables, bottom brackets, and some rollers can store or transmit dangerous force. This guide is limited to safe observation and documenting a weather-seal issue. Leave spring, cable, track, bracket, balance, and door-removal work to a trained technician.
Only after diagnosis
Potential parts
- garage door bottom seal
Only consider this part when the existing strip is visibly damaged and the door and retainer are otherwise sound; confirm the seal profile, door width, and retainer or groove before ordering.
Bottom-seal shapes and insertion methods vary by door and retainer. Match the door documentation, visible profile, and manufacturer fit information rather than relying on appearance alone. - garage door threshold seal
Only consider a threshold seal when the bottom strip is intact but the floor line or threshold leaves a consistent gap or water path; it cannot correct a crooked, unsafe, or mechanically damaged door.
Confirm the threshold's floor surface, door travel, drainage direction, and installation method with a professional when the floor is uneven or the door does not close uniformly. - garage door retainer
Only consider a retainer when the existing channel is visibly bent, detached, or incompatible with the confirmed seal profile; do not order it as a substitute for spring, cable, track, or panel repair.
Retainer geometry and attachment vary by door construction. Confirm the manufacturer, model, seal profile, and safe installation scope before selecting a retainer.
When checks do not resolve it
Need a professional?
Call a trained garage-door technician when the door is crooked, heavy, jerky, off track, scraping, unsafe to operate, or affected by springs, cables, bottom brackets, rollers, balance, tracks, or opener limits. Call for seal installation when the correct profile or retainer cannot be confirmed or the work would require moving the door system under tension.
Safety scope: Do not adjust or remove springs, cables, bottom brackets, rollers, tracks, opener limits, or door panels. Do not place hands near a moving door, force a binding door, or test a suspected failure by holding or restraining it.
Have this ready
- Provide the door label or model information, full-width and close-up seal photos, retainer or groove photos when safely visible, approximate door width, location of gaps or water, floor and threshold photos, and the exact behavior observed during one normal cycle.
Common questions
FAQ
How do I know whether the bottom seal or the door is the problem?
If the strip is visibly cracked, brittle, flattened, or missing while the door closes evenly, a seal replacement assessment is reasonable. If the gap changes across the width, the door is crooked, or the floor or threshold is uneven, the seal may only be showing a broader alignment or water-path problem.
Can I adjust the garage-door springs or cables to make the seal touch the floor?
No. Springs and lift cables store significant force. A seal gap is not a reason to adjust or remove them; have a trained garage-door technician assess balance, alignment, and the seal together.
Do I need a threshold seal if the bottom weather strip is damaged?
Not automatically. A threshold can help with a consistent floor-line gap when the door and bottom strip are otherwise sound, but it cannot correct a damaged retainer, crooked door, unsafe operation, or a water path at the sides or top.
Can I order any garage-door rubber seal that looks similar?
No. Seal profiles and retainers vary. Confirm the door model or label, seal profile, retainer or groove, and the safe installation method before ordering; ask a technician when the fit is uncertain.
What should I do if the door is stuck or closes unevenly?
Stop operating it, keep people and vehicles away from the opening, and call a trained technician. Do not force the door or adjust tracks, springs, cables, bottom brackets, rollers, or opener limits to make a seal fit.
Read the exact guide
Official sources
- Maintaining Your Garage DoorOverhead Door Corporation · Used for the safe closed-door visual inspection and for distinguishing weather-seal symptoms from abnormal door operation; detailed replacement procedures are intentionally not reproduced here.
- Garage Door GlossaryWayne Dalton · Used only as a cross-manufacturer terminology reference for the role of a bottom weather seal and the visible clue of drafts or tears; it does not establish fit for another door brand.
- Garage Door Replacement Parts GuideClopay · Used for general visual triage of a bottom weather seal and for the warning that springs, cables, and related hardware should not be adjusted by an untrained homeowner; the reader's door brand and construction may differ.
- Garage Door Parts for Clopay DoorsClopay · Used to support conditional part selection and model/retainer matching; the page is manufacturer-specific, so its fit guidance is not treated as universal compatibility for other brands.
Community feedback
Share a repair observation
Share a plain-text repair observation. Accepted observations are published automatically; this page may take a moment to update.