
On this page
Start here
Quick answer
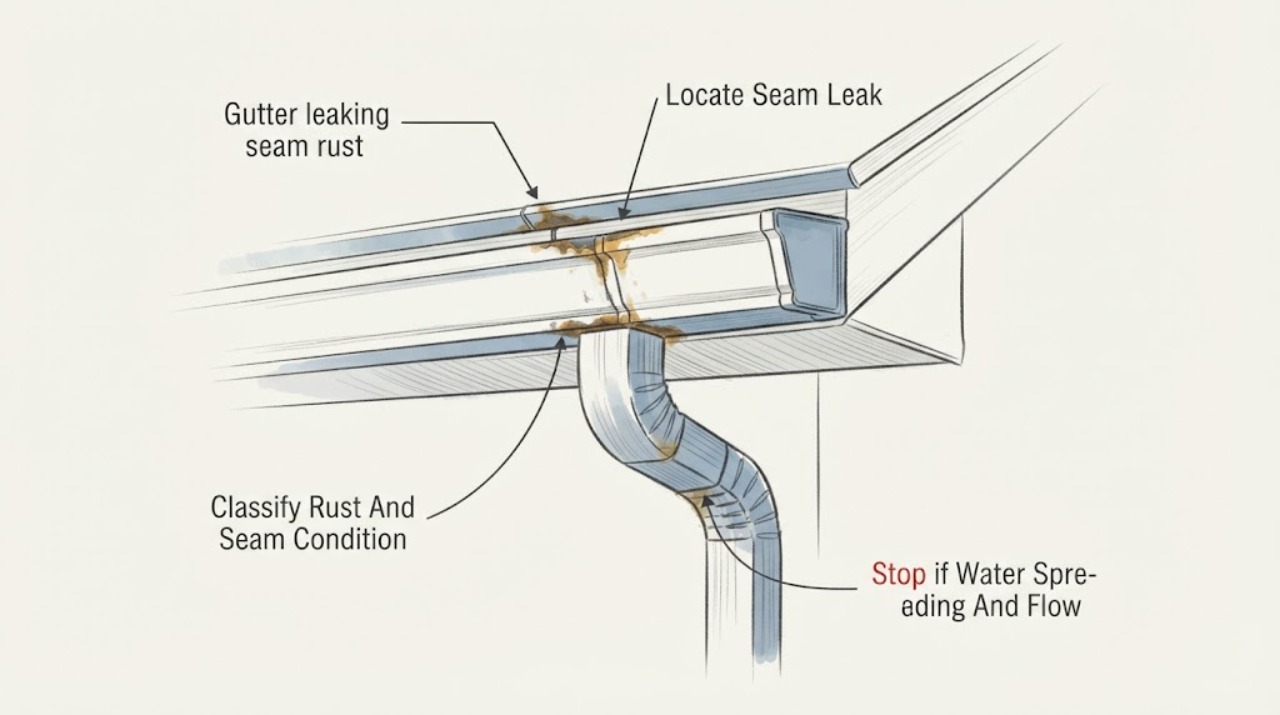
A rusty gutter seam can be a surface-coating problem, a joint that has opened, or a hole where corrosion has perforated the metal. First observe the leak during rain or a cautious ground-level water test and mark the exact point: seam, end cap, downspout outlet, or gutter bottom. Then inspect for ponding, debris, sagging, loose supports, and rust that extends beyond the joint. A clean, dry seam with only light surface rust may be eligible for a material-specific maintenance treatment, but a seam that has separated, rust-through, a sagging run, or damaged fascia needs a qualified gutter or roofing professional to choose between a compatible repair and section or run replacement. Do not rely on a smear of generic caulk over wet, rusty, dirty metal, and do not climb an unsafe roof or ladder to reach the leak.
Before you begin
Safety first
- This article supports ordinary safe visual observation and documentation only. Do not climb unsafe roofs or ladders, remove gutter sections or supports, disturb buried drains, or scrape and coat corroded metal as a substitute for assessment.
Work through in order
Diagnostic checks
Use only checks that match the exact appliance or system and its official guide.
-
Check 1
From the ground or another stable, ordinary-access position, watch the gutter during rain or use a gentle water test only where the hose and footing are safe; trace the flow from the high end toward the downspout without climbing onto the roof.
Expected result: Record whether water escapes at a straight seam, inside or outside corner, end cap, downspout outlet, gutter bottom, back edge, or an upstream overflow; note whether the leak appears only during heavy flow or also with a small amount of water.
Next step: Photograph and mark the first escape point, then inspect rust depth, debris, ponding, and supports before choosing a patch or replacement; stop the test if water reaches an unsafe area.
Stop if: Do not climb a ladder or roof for this test, direct water behind siding or flashing, or continue when the gutter is loose, sagging, or near electrical equipment.
Why this matters
Why: A leak at the joint points toward seam seal or movement, while a leak at an end cap, outlet, bottom hole, or back edge may need a different repair. A leak that appears only when water backs up makes debris, downspout restriction, slope, or capacity part of the diagnosis.
-
Check 2
From safe access, inspect the dry seam and nearby gutter surface visually for coating failure, orange or dark corrosion, a split joint, pinholes, flaking metal, or a gap between sections; do not scrape aggressively or enlarge a suspected hole.
Expected result: Classify the area as surface discoloration with intact metal, rust along an opened seam, a small perforation, multiple holes or broad corrosion, or a condition that cannot be seen safely.
Next step: Keep the area dry and documented; ask a gutter professional to select a compatible repair or section replacement when a seam is open, metal is perforated, or the rust extends beyond a small accessible area.
Stop if: Do not wire-brush, drill, cut, sand, or coat a wet or rust-weakened gutter from a ladder, and do not handle sharp perforated metal without appropriate professional controls.
Why this matters
Why: Intact metal with limited surface rust may support a material-specific maintenance treatment. A separated seam needs joint assessment, while rust-through or broad corrosion reduces the chance that a surface coating will restore the gutter's water-holding function.
-
Check 3
From safe ground-level or stable low access, inspect the gutter channel, leaf screen, corners, high end, and downspout entry for leaves, sediment, organic growth, ice residue, or other restrictions; observe the run before and after rainfall without disassembling the outlet.
Expected result: Record a clear channel with free discharge, debris at the leaking seam or outlet, standing water or a low spot, overflow over the front edge, or water backing up at a corner or downspout.
Next step: Have the gutter cleaned and flow path assessed safely, then retest only if the run is secure; do not seal a joint while water is still ponding or the outlet remains blocked.
Stop if: Do not reach from an unstable ladder, pressure-wash the roof from the ground, or remove a guard or downspout connection when the gutter could shift.
Why this matters
Why: Debris and ponding can keep a seam wet and increase the load on a joint, while overflow can make a sound seam appear to leak. A clear channel with a persistent joint leak makes seam condition or corrosion more likely; a low or overloaded run may need re-hanging or capacity review.
-
Check 4
Inspect the gutter's visible front and back edges, hangers, fasteners, corners, fascia, soffit, and siding from a safe position, looking for movement or water damage without loosening hardware.
Expected result: Record a straight, firmly supported run with dry fascia, or a gutter that sags, pulls away, twists, has loose or missing supports, stains the fascia or soffit, or directs water behind the gutter.
Next step: Arrange a qualified gutter or roofing assessment for sagging, loose supports, damaged fascia, or water behind the run; keep runoff away from the wall without covering a drainage path.
Stop if: Do not re-hang a loaded gutter, remove fasteners above shoulder height, work beneath unstable sections, or cover rotten fascia with sealant.
Why this matters
Why: A sound seam can leak again when the run moves, loses slope, or pulls away from the fascia. Stained, soft, or deteriorated wood indicates that the visible seam is part of a wider water-management problem and may require substrate repair before the gutter is reattached.
-
Check 5
Record the gutter material if known, whether it is sectional or continuous, the seam and end-cap style, the affected run length, and any available installation or manufacturer information; compare the visible finish with an unaffected section.
Expected result: Classify the system as known material and seam design, partially identified, or unknown; note whether corrosion is isolated to one joint or appears across several runs and whether the finish has changed over time.
Next step: Give the identification, dimensions, photos, leak map, rust classification, and support findings to a qualified gutter professional before ordering sealant, a section, or replacement hardware.
Stop if: Do not assume a product marked for one gutter material fits another, mix metals or coatings at a joint, or order by appearance alone.
Why this matters
Why: Material and joint design affect the compatible cleaning, coating, seal, patch, and replacement decision. Isolated damage may support a section-level evaluation, while broad corrosion, repeated seam failure, or an unknown system makes a generic repair less reliable.
-
Check 6
Follow the downspout from the leaking run to its outlet and inspect the ground, splash area, extension, or underground connection from a safe position; do not dig around the foundation or enter a buried drain.
Expected result: Record discharge that flows away from the building, a downspout that releases beside the foundation, standing water or erosion, a disconnected extension, or an outlet that backs up during rain.
Next step: Correct the discharge layout through a qualified drainage or gutter professional when the outlet is blocked, buried, eroding soil, or sending water toward the building; retain the seam repair evidence for that assessment.
Stop if: Do not excavate near utility lines or the foundation, force a buried pipe open, or direct concentrated runoff onto a slope, septic area, or neighboring property.
Why this matters
Why: A seam repair cannot protect the building if runoff still saturates the foundation or returns to the wall. Poor discharge can also keep the gutter overloaded or hide an outlet restriction that contributes to overflow at the seam.
Use your observations
Decision map
Find the observation that best matches what you see, then follow the next safe action.
-
PATH 01Safety boundary
What you see
The seam remains closed, the gutter wall is intact, there are no pinholes, the run is supported, and the leak does not recur after debris and ponding are addressed.
Do this next
Follow the gutter material and finish instructions for cleaning, drying, and corrosion protection, then recheck the joint under normal flow; use a professional when the coating system is unknown.
Why this path and its safety boundary
Why it matters: Surface coating breakdown or residue is more likely than a failed structural joint. A material-specific cleaning and finish treatment may be sufficient if the manufacturer's guidance permits it.
Safety stop: Do not coat damp, dirty, perforated, or moving metal, and stop if the joint opens or water reaches the fascia.
-
PATH 02Safety boundary
What you see
Water escapes at a separated or cracked seam, but the nearby gutter metal is intact and the run is not sagging, overloaded, or broadly corroded.
Do this next
Have a qualified gutter professional clean, dry, align, and reseal or replace the joint using a compatible system, then verify that upstream flow and supports are correct.
Why this path and its safety boundary
Why it matters: A joint movement or seam-seal failure is plausible, but the repair must match the gutter material, joint design, and movement allowance. A generic bead over residue can fail again.
Safety stop: Do not force sections together, mix sealants or metals, or rely on a patch while the gutter remains under load or out of alignment.
-
PATH 03Safety boundary
What you see
Rust has created a pinhole or larger opening, the seam edge flakes or crumbles, or similar corrosion appears at several points along the run.
Do this next
Arrange a qualified gutter or roofing evaluation for compatible patch, section replacement, or complete-run replacement and inspect the fascia or soffit for hidden water damage.
Why this path and its safety boundary
Why it matters: The gutter's water-holding surface may be compromised beyond a durable surface treatment. A small accessible repair may be considered only after a professional confirms the surrounding metal is sound; broad corrosion favors section or run replacement.
Safety stop: Do not scrape through weakened metal, cut out a section from a ladder, or cover rust-through with paint or sealant without addressing the water path.
-
PATH 04Safety boundary
What you see
Water backs up or overflows, the channel has debris or a low spot, the downspout entry is restricted, or the gutter sags, twists, or pulls away from its supports.
Do this next
Have the system cleaned, re-sloped or re-supported, and the downspout and discharge assessed safely before a seam repair is selected.
Why this path and its safety boundary
Why it matters: The apparent seam leak may be downstream of a flow, slope, capacity, or support problem. Sealing the joint alone may leave the run overloaded and can send water behind the gutter.
Safety stop: Do not re-hang a loaded gutter, climb to clear a high run without professional fall controls, or block an overflow opening.
-
PATH 05Safety boundary
What you see
Water has stained or softened fascia, soffit, siding, or foundation soil, or the downspout discharges against the building, into erosion, or into an unknown buried connection.
Do this next
Arrange a qualified inspection of the gutter, roof edge, fascia, wall, and runoff path; keep the area protected from additional water without sealing over damaged material.
Why this path and its safety boundary
Why it matters: The leak has become a broader building water-management issue. Substrate damage or poor discharge can continue after a visible seam is repaired and may require coordinated gutter, roofing, drainage, or carpentry work.
Safety stop: Do not dig near the foundation or utilities, attach a downspout to an unknown drain, or conceal soft wood or structural damage.
Helpful context
Understand the symptom
Find the actual leak point before sealing anything
Water can appear at a seam even when the cause is upstream debris, ponding, a shifted gutter, or a downspout connection. During rain, follow the water from the high end toward the discharge and note whether it escapes through the joint, end cap, bottom, or behind the back edge. A dark stain below a seam is useful evidence, but it is not proof that the stain is the only opening.
Rust changes the repair decision
Light surface rust or coating discoloration is not the same as rust that has made a pinhole or weakened the gutter wall. If corrosion continues beyond the seam, the metal flexes, or the joint has separated, a patch may not restore a durable water path. The material, finish, seam design, and condition of the surrounding run determine whether a compatible joint repair or replacement section is appropriate.
Keep runoff from damaging the fascia and foundation
A leaking seam can wet the fascia, soffit, siding, or soil beside the foundation. Gutters and downspouts work as one drainage system: debris, blocked outlets, incorrect slope, loose hangers, and an unsafe discharge location can make a repaired seam leak again. Resolve the water-flow and support problem along with the rust rather than treating the visible drip alone.
Safety boundary
Stop conditions
- Do not climb an unsafe, wet, icy, steep, or damaged roof or use an unstable ladder to reach the leaking seam.
- Do not scrape, drill, cut, sand, or coat rust-weakened metal, and do not apply generic sealant over wet, dirty, moving, or perforated material.
- Stop for a sagging or detached gutter, unstable supports, water behind the gutter, soft fascia or soffit, or runoff near electrical equipment.
- Do not excavate near a foundation or utility, force open a buried drain, or direct concentrated water toward the building, septic area, slope, or neighboring property.
- Use a qualified gutter or roofing professional to handle high-access work, section removal, re-hanging, substrate repair, material compatibility, and widespread corrosion.
Only after diagnosis
Potential parts
- material-compatible gutter seam seal or patch system
Consider this category only when the leak is localized, the surrounding metal is sound, the seam can be safely cleaned and dried, and the compatible system is confirmed for the gutter material and joint design.
Confirm the gutter material, coating, seam movement, surface preparation, cure requirements, and manufacturer instructions; do not use a generic product on wet, perforated, or unstable metal. - replacement gutter section or corner
Consider this category when rust-through, a failed corner, or a separated seam cannot be repaired durably and the surrounding run and fascia can support a compatible replacement.
Confirm the profile, width, material, finish, section length, corner orientation, outlet position, and connection method before ordering; a visual match alone is not sufficient. - gutter hanger and compatible fastener
Consider this category only when inspection finds loose or missing support hardware contributing to sagging, ponding, or seam movement and the substrate is sound.
Confirm the gutter system, fascia condition, hanger design, fastener material, spacing, and local installation requirements; do not use new hardware to hide rotten or unstable substrate. - downspout extension or discharge component
Consider this category only when the downspout is functional but discharges too close to the building or creates erosion and standing water that can overload or undermine the gutter system.
Confirm the outlet, slope, ground conditions, buried utilities, foundation, and applicable drainage requirements before changing the discharge path.
When checks do not resolve it
Need a professional?
Arrange qualified gutter or roofing service when rust has perforated the metal, a seam has separated, the run sags or pulls away, debris or ponding returns, the downspout or discharge is blocked, or water has damaged the fascia, soffit, siding, or foundation area. Use professional help for roof or ladder access, section removal, re-hanging, unknown material or seal compatibility, widespread corrosion, or any repair near electrical equipment or utility lines.
Safety scope: This article supports ordinary safe visual observation and documentation only. Do not climb unsafe roofs or ladders, remove gutter sections or supports, disturb buried drains, or scrape and coat corroded metal as a substitute for assessment.
Common questions
FAQ
Can surface rust cause a gutter seam to leak?
It can, but rust near a seam may be only coating breakdown, an opened joint, or corrosion that has perforated the metal. Dry and inspect the seam, look for pinholes or flaking, and check ponding and support before choosing a coating, joint repair, or replacement.
Should I put caulk over a leaking rusty gutter seam?
Do not smear generic caulk over wet, dirty, moving, or perforated metal. The gutter must be identified, cleaned and dried appropriately, and checked for alignment and surrounding corrosion; a qualified professional should select a compatible seam system or replacement when the metal is weakened.
Why does a gutter seam leak only during heavy rain?
Heavy flow can expose an upstream clog, ponding, low spot, restricted downspout, overflow, or capacity problem that does not appear with a small amount of water. Trace the first escape point and inspect the channel and outlet before treating the seam alone.
When does a rusty gutter need replacement instead of a patch?
Rust-through, multiple holes, broad corrosion, a seam that has separated, repeated leaks, or a run that is sagging or pulling away can make a patch unreliable. Have the surrounding run, supports, fascia, and discharge assessed before selecting a section or complete-run replacement.
Can I inspect or repair a second-story gutter myself?
Keep the initial inspection at ground level or another stable ordinary-access position. Do not climb a wet, icy, steep, or damaged roof or use an unstable ladder; high-access work, section removal, re-hanging, and repairs near the roof edge belong with a qualified professional.
Where should a downspout discharge after a seam repair?
It should carry roof runoff to a safe outlet away from the building, foundation, septic area, and steep or erodible ground. The exact extension or drainage design depends on the site, slope, soil, and any buried connection, so do not redirect concentrated water without checking those conditions.
Read the exact guide
Official sources
- MAINTENANCE CONDITION SURVEY CHECKLISTU.S. Department of Agriculture, Forest Service · USDA Forest Service facility inspection checklist used for general inspection structure, condition documentation, and drainage observations.
- Dovetails and Broadaxes: Hands-on Log Cabin PreservationU.S. Department of Agriculture, Forest Service · USDA Forest Service roof-maintenance guidance in a log-cabin preservation context; the gutter-cleaning and roof-access principles are used without applying cabin-specific construction assumptions.
- Gutter Inspection & MaintenanceLYSAGHT, BlueScope · LYSAGHT and BlueScope maintenance guidance for metal gutter inspection and cleaning; material-specific instructions control any repair or coating.
- A Homeowner’s Guide to Sustainable Home DrainageU.S. Department of Agriculture, Natural Resources Conservation Service · USDA NRCS homeowner drainage guidance for sizing, maintaining, and routing roof runoff through gutters and downspouts.
Community feedback
Share a repair observation
Share a plain-text repair observation. Accepted observations are published automatically; this page may take a moment to update.