
On this page
Start here
Quick answer
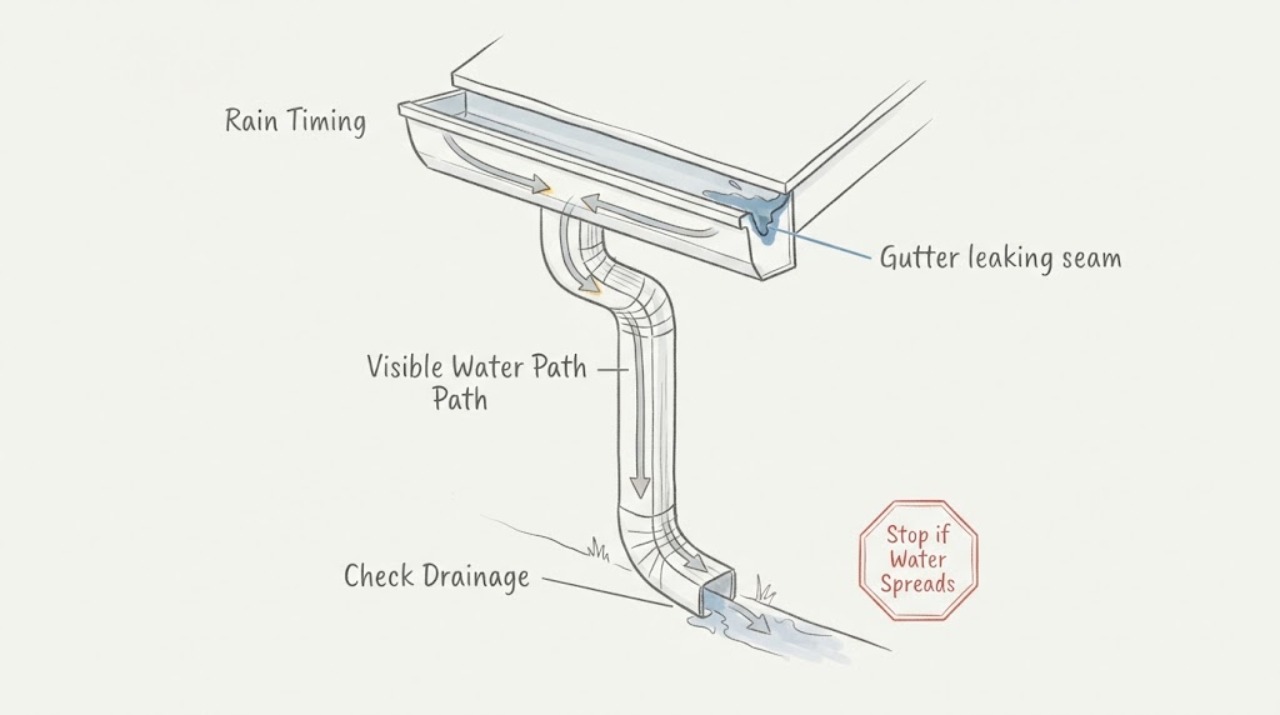
A leak that appears at a gutter seam may come from an open or failed joint, but water can also run from an overflow, a sag, a downspout restriction, roof flashing, or the end cap before it reaches the visible drip. From indoors, a safe window, or ground level, record exactly when the leak appears, where water lands, whether the gutter overflows, and whether the wall or foundation is getting wet. Do not use a ladder, climb onto the roof, inspect in wind or rain, open the gutter, or apply sealant yourself for this observation-only topic. Arrange a gutter professional when the leak repeats, access is unsafe, or moisture is reaching the building.
Work through in order
Diagnostic checks
Use only checks that match the exact appliance or system and its official guide.
-
Check 1
From indoors or a safe ground-level view, note whether the drip begins during light rain, heavy rain, or after rain has stopped, and record the building side and approximate seam location.
Expected result: Compare the timing with the visible water path: a drip at the joint, spillover over the front edge, or water emerging below the roof edge are different observations.
Next step: Keep the time and location record and give it to a gutter professional; do not approach the gutter for a closer view.
Stop if: Stop observing during lightning, high wind, unsafe rain, slippery conditions, or any need for ladder or roof access.
Why this matters
Why: A drip that starts only when flow increases may reflect overflow or drainage capacity rather than a failed seam; a drip that persists after the rain may point to retained water or a different source.
-
Check 2
From a safe window or from the ground, follow the visible water path without touching the gutter, siding, fascia, downspout, or nearby wiring.
Expected result: Record whether water exits at a section joint, end cap, downspout connection, front edge, roof-wall junction, or lower wall; note streaks, peeling finish, or a wet foundation area.
Next step: Photograph the overall location from a safe distance and request the appropriate gutter or roofing assessment.
Stop if: Stop if the view requires leaning out, climbing, moving wet debris, touching a conductor, or standing beneath unstable material.
Why this matters
Why: Water at a seam supports a joint inspection, while water below a roof-wall junction or at the wall can indicate flashing or concealed drainage involvement rather than a gutter-only repair.
-
Check 3
During a normal, safe rain event, watch from indoors or ground level for spillover, watermarks, or erosion below the gutter and downspout; do not create a test flow or work in the rain.
Expected result: Note whether the system spills over while the seam remains dry, whether water reaches the wall or foundation, and whether the downspout visibly carries water away.
Next step: Send the observation and weather context to the provider and keep people away from any slippery or eroded area.
Stop if: Stop for intense rain, flooding, lightning, fast-moving water, or any risk of falling debris or electrical contact.
Why this matters
Why: Spillover can make a seam appear to leak and may indicate obstruction, sag, sizing, or a downstream problem; erosion or foundation wetting raises the urgency of professional drainage review.
-
Check 4
From inside the home, look for new ceiling, wall, window, or basement/crawl-space staining on the same building side without opening a finish or touching damp material.
Expected result: Record the stain location, whether it grows after rain, any musty odor, and whether water is near outlets, fixtures, or stored belongings.
Next step: Request prompt professional assessment and protect people and belongings from the area only if this can be done without contact with water or electrical equipment.
Stop if: Stop and use urgent building or electrical assistance for ceiling bulging, active interior flow, sparking, a burning odor, or water near energized equipment.
Why this matters
Why: Interior moisture can indicate that the visible gutter drip is allowing water into a wall or foundation area; the seam may not be the only defect.
-
Check 5
Review recent weather and maintenance history from a safe location, noting whether the leak followed a storm, freeze, wind event, roof work, gutter replacement, or a long period without service.
Expected result: Separate a new isolated drip from a recurring leak, and note whether the same seam leaks on every rain or only under a particular wind direction.
Next step: Give the history to the provider so the inspection considers the entire roof-edge drainage path rather than automatically replacing a seam component.
Stop if: Stop if investigating would require removing a cover, opening a wall, accessing the roof, or working in unsafe weather.
Why this matters
Why: A recurring leak may need joint or system repair; a storm- or wind-specific pattern can involve attachment, roof-edge flashing, or water being driven behind the gutter.
Use your observations
Decision map
Find the observation that best matches what you see, then follow the next safe action.
-
PATH 01Next step
What you see
The drip is clearly at a joint or end cap and there is no interior moisture.
Do this next
Schedule a gutter professional for a seam and attachment inspection; do not apply a patch from a ladder or assume the visible drip is the only defect.
-
PATH 02Next step
What you see
The gutter spills over or the downspout does not visibly carry water during safe observation.
Do this next
Request a drainage-path assessment for obstruction, sag, outlet, or capacity issues; do not clear or dismantle the system yourself.
-
PATH 03Next step
What you see
Water appears below a roof-wall junction, travels behind siding, or reaches the foundation.
Do this next
Escalate to a gutter or roofing professional and provide photos from ground level; the visible seam may not be the source.
-
PATH 04Next step
What you see
New interior staining, active flow, or moisture near electrical equipment is present.
Do this next
Stop the observation and seek prompt building and, when relevant, electrical assistance; do not touch wet fixtures or equipment.
-
PATH 05Next step
What you see
The leak appears only during unsafe weather or cannot be seen without a ladder or roof access.
Do this next
Wait for safe conditions, keep the area clear, and arrange professional inspection rather than taking an elevated view.
Helpful context
Understand the symptom
A seam drip is a symptom, not a diagnosis
Water can travel along the gutter or the roof edge before it drips, so the lowest visible drip is not always the failed seam. A joint, end cap, sagging section, blocked outlet, undersized system, or roof-wall flashing detail can produce similar wetting. Official housing specifications describe watertight seams, secure attachment, and drainage toward downspouts as separate performance checks; the safe homeowner task here is to document the pattern and let a professional access the system.
Keep the inspection on the ground
Use only a normal interior view, a safe window, or ground-level observation. Do not use a ladder, stand on a roof, reach into a gutter, pull a downspout apart, scrape a seam, or apply tape, caulk, or chemicals. Do not inspect during wind, lightning, or active dangerous rain. Keep away from slippery surfaces and from water near electrical equipment.
What the contractor should know
Provide the building side, the apparent seam or end-cap location, the first and last time you saw water, whether it happens only in heavy rain, where the water lands, and any interior stain or foundation wetness. Photos or video taken from a safe distance can help, but do not delay service to obtain a close-up.
Only after diagnosis
Potential parts
- gutter sealant
Only consider a sealant after a professional confirms that the joint itself is the failed component and that the existing gutter material and joint design permit a compatible repair.
Confirm the gutter material, finish, joint type, weather conditions, and manufacturer's compatibility information before selecting any sealant. - gutter repair tape
Only consider repair tape if the provider identifies a suitable surface repair for a localized seam or small opening rather than a drainage, flashing, or replacement problem.
Check compatibility with the gutter substrate, existing coatings, temperature range, and the professional's repair method; do not treat tape as a universal fix. - gutter end cap
Only consider an end cap if the inspection confirms that the leak is at a damaged or missing end closure rather than at a nearby seam or roof-edge detail.
Match the gutter profile, material, handedness, and attachment method to the existing system before ordering.
When checks do not resolve it
Need a professional?
Call a gutter professional when a seam drip repeats, water reaches siding or the foundation, the leak cannot be safely viewed, or the diagnosis may involve the roof edge, downspout, or flashing.
Have this ready
- Share the building side, seam or end-cap location, rain intensity and timing, overflow or downspout observations, interior staining, ground erosion, weather history, and safe-distance photos.
Common questions
FAQ
How can I tell whether the seam or the gutter overflow is leaking?
From indoors, a safe window, or ground level, record whether water exits at the joint or spills over the front edge. A seam drip and overflow can occur together, so a professional should check the joint and the full drainage path.
Should I seal the gutter seam myself?
Not under this observation-only guidance. Reaching a gutter or applying a product can create fall and material-compatibility risks, and sealing the wrong location may conceal a roof-edge or drainage problem. Arrange professional repair.
What if the leak is only visible during a storm?
Do not go outside in dangerous weather to watch it. Record the weather, timing, visible water path from a safe location, and any indoor staining, then provide that history to a professional.
When is a gutter seam leak urgent?
Escalate promptly when water enters the home, reaches electrical equipment, causes ceiling bulging, erodes the foundation area, or the gutter appears detached or unstable. Keep clear and do not touch wet electrical equipment.
Read the exact guide
Official sources
- Gutters and Downspouts: Wetness or Erosion ProblemsNorthern Virginia Soil and Water Conservation District · Official local-government drainage guidance supporting observation of exterior watermarks, spillover, and drip-line erosion without elevated access.
- Step and Kick-Out Flashing at Roof-Wall IntersectionsU.S. Department of Energy Building America Solution Center at Pacific Northwest National Laboratory · Official building-science guidance used to explain why a visible gutter drip may be related to roof-wall flashing or concealed wall moisture.
- How to care for a rain garden or other stormwater facility on your propertyCity of Portland Bureau of Environmental Services · Municipal stormwater guidance used for the safe observation boundaries and for recognizing spillover, foundation wetting, and drainage-path concerns.
- GuttersNational Renewable Energy Laboratory · Official U.S. housing specification used to distinguish seam sealing from attachment and drainage-path conditions; it is not a homeowner repair instruction.
Community feedback
Share a repair observation
Share a plain-text repair observation. Accepted observations are published automatically; this page may take a moment to update.