
On this page
Start here
Quick answer
A leaking gutter corner can be a failed miter seal, but water at the corner can also be caused by a clog, overflow, incorrect fall, a shifted or poorly fitted miter, loose fasteners, or water arriving from the roof above. Observe the gutter and downspout from the ground during and after rain, keep off wet roofs and unsafe ladders, and have the joint repaired only after its fit, support, drainage path, and sealant compatibility are understood. New sealant is a conditional repair for a sound, correctly fitted, clean, dry joint; it is not a substitute for refitting a moving corner or correcting overflow.
Before you begin
Safety first
- The professional determines whether cleaning, outlet or downspout work, support or fall correction, miter refitting, compatible resealing, or component replacement is appropriate.
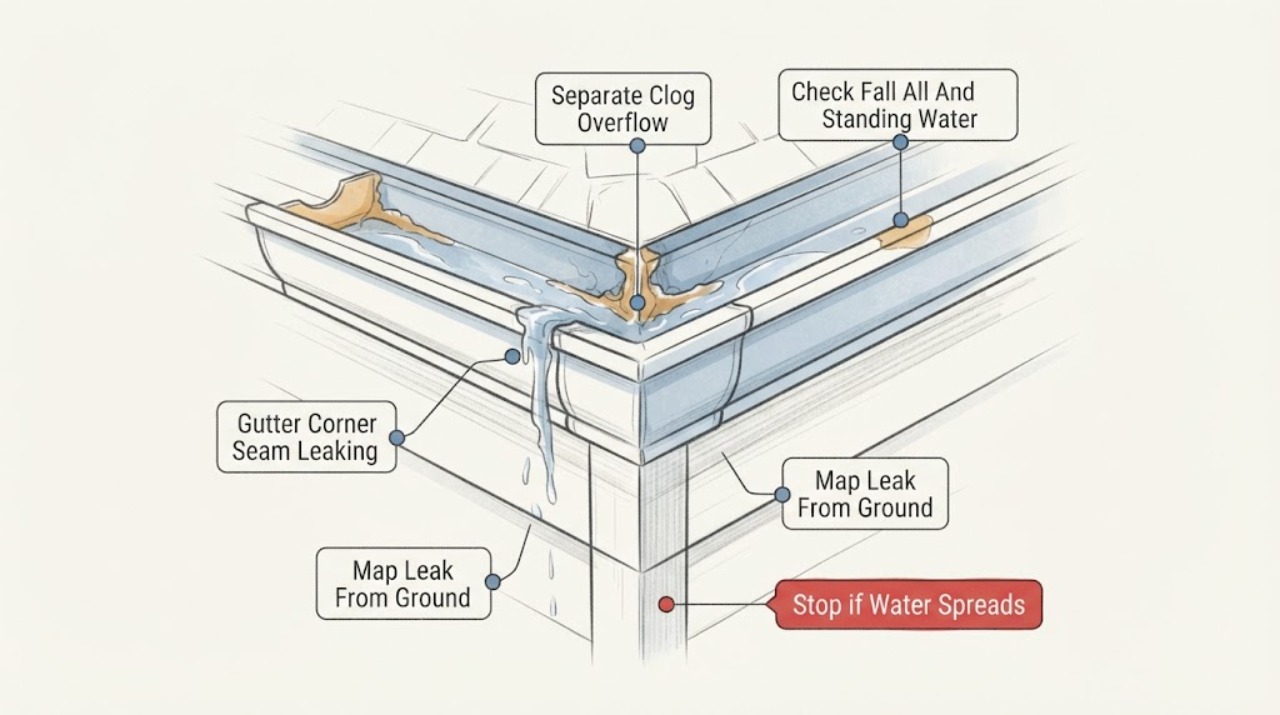
Work through in order
Diagnostic checks
Use only checks that match the exact appliance or system and its official guide.
-
Check 1
From a dry, stable ground-level position, photograph the corner, the adjoining gutter runs, the downspout outlet, the fascia below, and any water staining without touching the gutter or placing a ladder.
Expected result: Water appears at the miter seam, over the front or back edge, at a fastener, below the roof edge, or only on the wall and fascia; note whether the leak is a drip, a sheet of overflow, or a wet trail.
Next step: Keep the area below clear, save the photos, and continue only ground-level observations during safe weather before booking gutter service.
Stop if: Do not stand beneath falling water or loose material, touch a loose corner, climb, or lean a ladder against the gutter.
Why this matters
Why: A seam drip is compatible with a joint problem, while an edge sheet or broad wet trail may be overflow, roof runoff, or a support issue. The visible wet spot may be downstream from the actual opening.
-
Check 2
During a normal rain from a safe position, watch whether the downspout is discharging and whether water reaches the miter only after the gutter fills; do not insert hands or tools into the gutter.
Expected result: The downspout discharges steadily, discharges weakly or not at all, or the gutter spills over the front or back edge before water reaches the corner seam.
Next step: Report the discharge pattern to the gutter professional and ask for the outlet, downspout path, and corner to be assessed together; do not use a hose from a ladder to reproduce the leak.
Stop if: Stop for lightning, high wind, icy or slippery ground, fast runoff, or any need to reach into the gutter or work at height.
Why this matters
Why: Weak discharge or delayed overflow makes a blockage, restricted outlet, or capacity problem more likely than an isolated sealant failure. A steady discharge with a localized seam drip keeps the miter joint in focus, but does not prove that the joint is correctly fitted.
-
Check 3
After rain and only from the ground, compare the visible gutter line from end to end and note whether water remains near the corner, spills from a low section, or bypasses the front edge.
Expected result: The run appears consistently supported and drains toward an outlet, water ponds near the corner, the line is visibly low or twisted, or the apparent slope cannot be judged from below.
Next step: Send the photos and note whether the pattern repeats after rain; request a professional check of fall, hangers, fascia, outlet position, and corner alignment before selecting sealant.
Stop if: Do not push the gutter, lift it, remove hangers, pour water into it, or climb to check the slope.
Why this matters
Why: Standing water or a low, twisted run can overload the corner and mimic a sealant leak. A gutter that appears supported from below may still have a hidden bracket or fascia problem, so a ground view cannot certify the fall or support.
-
Check 4
From a safe viewpoint when the metal is dry, inspect the corner profile and seam for an open line, shifted edges, bowed metal, missing or loose visible fasteners, corrosion, or a miter that no longer follows both gutter runs.
Expected result: The corner is aligned with a narrow continuous seam, the edges have moved apart, the fitting is distorted or loose, the coating or metal is damaged, or the condition changes between dry and rainy weather.
Next step: Give the professional close and wide photos and identify the gutter material if known; ask them to verify the miter fit and required mechanical connection before any sealant is chosen.
Stop if: Do not pry the seam open, tighten or remove fasteners from a ladder, bend the metal, or scrape the joint while elevated.
Why this matters
Why: A stable, well-fitting joint may be a candidate for a compatible reseal after proper preparation. Movement, distortion, corrosion, or a large gap points to refitting, replacement, or support work; more sealant alone is unlikely to restore the joint geometry.
-
Check 5
If the joint is reachable without a ladder, roof access, or unsafe elevated position, visually assess the existing sealant for peeling, cracking, gaps, loss of adhesion, contamination, or sealant that covers an unresolved joint opening; do not apply a new bead during this check.
Expected result: The sealant is intact and bonded, is split or peeling from a sound-looking joint, is covered with dirt or moisture, is layered over failed material, or the underlying joint cannot be seen safely.
Next step: For a sound, dry, correctly fitted joint, have the professional follow the gutter and sealant manufacturer's preparation, product, fastening, and cure instructions; otherwise request refitting or replacement assessment.
Stop if: Do not seal wet or dirty metal, cover loose components, mix products, use indoor caulk, or attempt elevated work from an unsecured ladder.
Why this matters
Why: A split or detached bead may be a sealant failure only when the miter remains correctly fitted and supported. Dirt, moisture, old failed sealant, or an unseen joint prevents a reliable adhesion decision, and a hidden movement problem needs more than a surface patch.
-
Check 6
Use the overflow pattern, apparent fall, miter movement, metal condition, sealant condition, weather, and access limits to decide whether the next call is routine gutter repair or urgent assessment.
Expected result: Choose urgent assessment for water entering the building, a detached or falling gutter, active movement, severe corrosion, blocked access or drainage that threatens the structure, or any unsafe roof or ladder condition; choose prompt scheduled repair only when the gutter is stable, the leak is localized, and the area can remain safely isolated.
Next step: Provide the photos, rain timing, discharge pattern, visible corner condition, gutter material, prior repair history, and safe-access limits to a qualified gutter or exterior-water professional.
Stop if: Do not perform roof work, ladder work, cutting, drilling, riveting, soldering, or sealant application as a substitute for a safe joint assessment.
Why this matters
Why: The correct repair may be cleaning or outlet work, fall or support correction, miter refitting, compatible resealing, or replacement. The corner symptom alone cannot select a sealant or prove that a seam is the only defect.
Use your observations
Decision map
Find the observation that best matches what you see, then follow the next safe action.
-
PATH 01Safety boundary
What you see
The downspout is weak or blocked, or the gutter spills over an edge before a localized seam drip appears.
Do this next
Request gutter and downspout cleaning or outlet assessment and have the corner rechecked after drainage is restored; do not treat overflow as proof of sealant failure.
Why this path and its safety boundary
Safety stop: Do not climb or reach into the gutter to clear it.
-
PATH 02Safety boundary
What you see
Water stands near the corner, the run appears low or twisted, or the fascia, hanger, or outlet support looks compromised.
Do this next
Arrange professional evaluation of gutter fall, hangers, fascia, outlet, and corner before resealing. A sealant bead cannot correct a drainage or support defect.
Why this path and its safety boundary
Safety stop: Do not push, lift, rehang, or load-test the gutter.
-
PATH 03Safety boundary
What you see
The miter edges have shifted, the fitting is distorted, the gap is large, or the joint changes with weather or water load.
Do this next
Request miter refitting, compatible mechanical fastening, or replacement assessment. Keep the area below the corner clear until the joint is stable.
Why this path and its safety boundary
Safety stop: Do not bridge a moving or unsupported opening with sealant.
-
PATH 04Safety boundary
What you see
The miter is stable and correctly fitted, the metal is sound, and the visible failure is limited to a detached or cracked bead on an accessible dry joint.
Do this next
Have the repairer remove failed sealant, prepare the substrate, and use only a product approved or specified for the gutter material and joint, following the product cure and fastening instructions.
Why this path and its safety boundary
Safety stop: Do not apply over moisture, dirt, loose old material, or an unresolved gap.
-
PATH 05Safety boundary
What you see
The corner requires a ladder or roof access, or the roof, ground, weather, or gutter is wet, unstable, or near electrical hazards.
Do this next
Use ground-level photos and arrange a properly equipped professional visit; isolate the area below from falling water or debris.
Why this path and its safety boundary
Safety stop: Do not attempt the repair in wet weather or from an unsecured ladder.
Helpful context
Understand the symptom
Why a corner leak is not automatically a sealant problem
A miter is where gutter sections or a corner fitting meet. If the joint is misaligned, loose, distorted, or moving, water can escape even when some sealant remains visible. A blocked outlet can raise the water level until it spills at the corner, and a gutter with the wrong fall can hold water at the miter. Start by separating the water path from the condition of the seam; a visible bead of old sealant is not proof that the joint itself is sound.
Use ground-level observations first
The useful first evidence is where water spills, whether the downspout is discharging, whether the leak happens only in heavy rain, and whether the corner appears to move or separate. Take photos from the ground or another stable surface. Wet metal, wet roofing, unstable soil, and improvised ladder positions turn a small gutter repair into a fall hazard, so leave elevated inspection and repair to a properly equipped professional.
Sealant advice depends on the joint, not the tube
Manufacturer instructions differ by gutter material, coating, miter design, sealant, and mechanical fastening method. A compatible exterior gutter sealant may be appropriate only after failed material is removed, the joint fits and is supported, and the specified surfaces are clean and dry. Do not use generic indoor caulk, seal over dirt or loose old sealant, or use sealant to bridge a gap that needs refitting.
Only after diagnosis
Potential parts
- exterior gutter sealant
Consider this only after a professional confirms that the miter is sound, correctly fitted, supported, and suitable for resealing; the gutter and sealant manufacturer may require a specific product or system.
Confirm compatibility with the gutter metal or vinyl, factory coating, joint movement, application weather, preparation method, and any required mechanical fasteners. - corner miter fitting
Consider a replacement only when the existing miter is distorted, corroded, incorrectly fitted, or cannot hold a sealed joint; profile, material, corner direction, and gutter dimensions must be confirmed.
Do not order from appearance alone. The installer should verify the gutter profile, material, overlap, fastening method, and outlet or roof geometry.
When checks do not resolve it
Need a professional?
Arrange prompt gutter service for a recurring corner seam leak, weak downspout discharge, standing water, a shifted miter, loose or corroded metal, or failed sealant. Request urgent exterior-water assessment when water is entering the building, the gutter is detached or falling, the corner is moving, or safe access cannot be maintained.
Safety scope: The professional determines whether cleaning, outlet or downspout work, support or fall correction, miter refitting, compatible resealing, or component replacement is appropriate.
Common questions
FAQ
Can I just add more caulk to a leaking gutter corner?
Only after the joint is confirmed to be sound, correctly fitted, supported, and suitable for resealing. Failed material and contamination need proper preparation, and a moving, distorted, blocked, or overflowing corner needs a different repair.
How can I tell whether a gutter corner leak is actually a clog?
Watch from the ground during safe rain. Weak or absent downspout discharge and water spilling over an edge as the gutter fills point toward drainage restriction or overflow; a localized seam drip with steady discharge keeps the miter in focus.
Does standing water near the miter mean the sealant failed?
Not necessarily. A low or twisted run, poor support, blocked outlet, or incorrect drainage path can keep water at the corner and stress the joint. Have fall, support, outlet, and seam fit checked together.
What kind of sealant should be used on a gutter miter?
Use only a product approved or specified for the gutter material, coating, joint design, and exterior exposure, and follow the gutter and sealant manufacturer's preparation and cure instructions. Do not substitute indoor caulk or guess compatibility.
Should I climb a ladder to inspect or reseal the corner?
Do not use a ladder or roof access when the surface, weather, footing, or equipment is unsafe. Ground-level photos and a qualified gutter professional are safer than reaching, overextending, or working on wet metal.
Read the exact guide
Official sources
- Installation Guide: OG-5, OG-6, FB ProfilesDuragutter / Reinvent LLC · Supports test-fitting miter joints, using only approved glues and sealants, preparing clean and dry surfaces, and following the product-specific miter sealing sequence.
- GutterClad Ogee Guttering Installation GuideGutterClad / Northwest Aluminium · Supports checking gutter fall and support, aligning joints for movement, preparing clean and dry surfaces, selecting suitable sealant, and reworking failed joints instead of layering over old sealant.
- Sealing gutters and downspoutsLOCTITE / Henkel · Supports checking gutter manufacturer instructions, keeping sealant within the joint overlap, assembling and fastening promptly, and using a flexible exterior product only where suitable.
- Fall Prevention Fact SheetOccupational Safety and Health Administration / NIOSH · Supports not improvising elevated gutter access, using appropriate ladder and roof equipment, maintaining stable footing, and avoiding overreach or defective equipment.
Community feedback
Share a repair observation
Share a plain-text repair observation. Accepted observations are published automatically; this page may take a moment to update.