
On this page
Start here
Quick answer
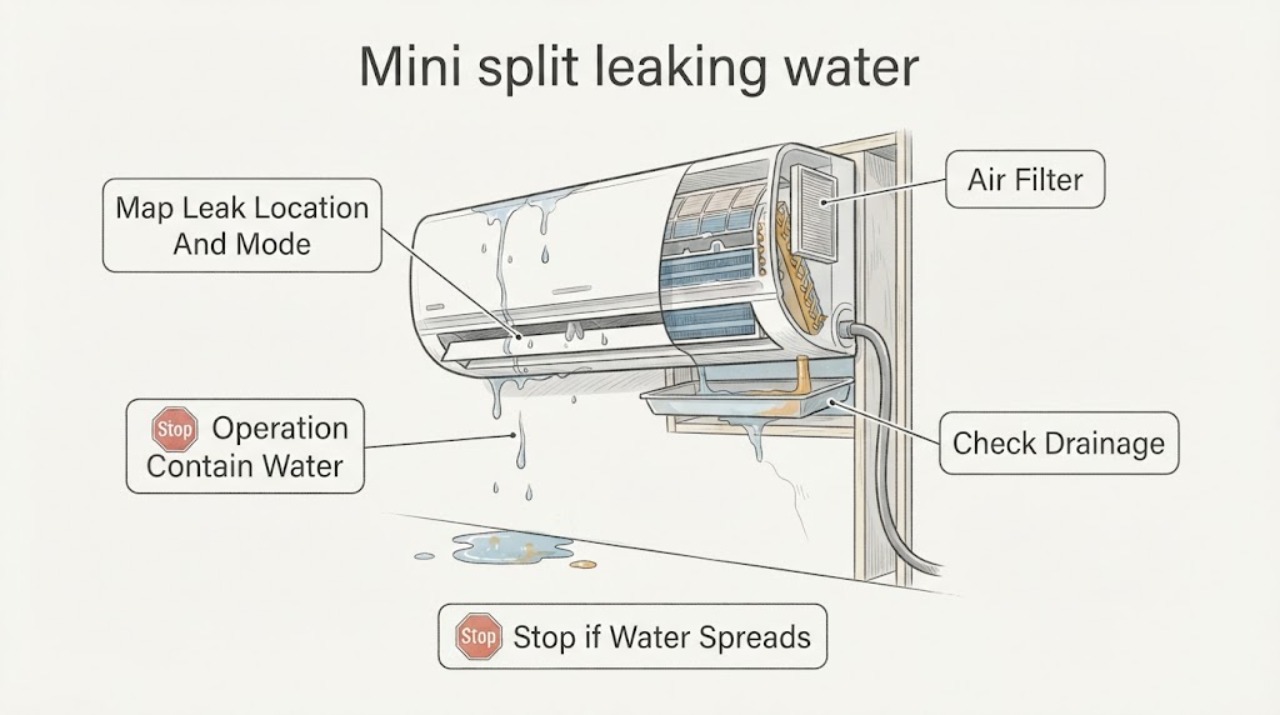
Water from a Daikin mini-split indoor unit is not something to ignore. Stop cooling or dry operation, collect the water, and keep it away from electrical equipment and finishes. From a safe position, check whether the outdoor end of the condensate drain hose is discharging and whether its visible routing is blocked, crushed, kinked, sagging, or forced uphill. Daikin says an obstruction or bend can prevent drainage; if the hose is draining, a dirty indoor filter can allow condensate to form and leak from the air outlet. A tilted indoor unit, poor drain slope, ice, a hidden drain blockage, or a fault may need a qualified Daikin installer or HVAC technician. Do not open the indoor unit, use a chemical coil cleaner, disturb refrigerant lines, or keep running it while water is reaching the wall, floor, or wiring.
Before you begin
Safety first
- This article supports stopping operation, containing water, cleaning the removable filter as directed by the exact manual, and safe visual inspection only. A qualified technician handles drain-pan tests, hidden drain work, mounting, electrical parts, refrigerant, internal cleaning, and any wall or ceiling access.
Work through in order
Diagnostic checks
Use only checks that match the exact appliance or system and its official guide.
-
Check 1
From a dry, stable position, identify where water first appears around the Daikin mini-split and note whether the unit was in cooling, dry, fan, or heating mode; keep hands and containers away from exposed electrical parts.
Expected result: Record whether water comes from the indoor air outlet or casing, wall penetration, line-cover area, floor below, or only from the outdoor unit; note whether it is a steady drip, intermittent after shutdown, or a one-time spill.
Next step: Photograph the first wet point and stop the affected operation before continuing with the safe visual checks below.
Stop if: Stop immediately for water near wiring, a breaker trip, burning odor, smoke, a falling panel, an electrical shock, or water entering the wall or ceiling.
Why this matters
Why: An indoor-head or wall leak is a condensate-containment or drainage concern. Water only at the outdoor unit can be normal condensate or heating defrost, while water from a line-cover or wall area may involve concealed drainage or insulation and cannot be diagnosed from the room side alone.
-
Check 2
Turn the mini-split off with the remote or unit control, collect the drip with a bucket or cloth, and isolate the affected area; if the manual or local installation provides a dedicated disconnect, use only that clearly identified disconnect and do not open the indoor unit.
Expected result: Confirm that the fan and cooling or dry operation have stopped and whether the leak slows; record any water damage without moving wet electrical equipment.
Next step: Leave the unit off while checking the external drain route and filter, and arrange service if water continues or the source is uncertain.
Stop if: Do not remove covers, pull on cables, pour water into the unit, reset a tripped breaker repeatedly, or place a container where it can contact energized equipment.
Why this matters
Why: Daikin advises refraining from using an indoor unit that leaks because water can damage floors, walls, furnishings, and other parts of the home. A slower drip after shutdown does not establish that the cause is fixed; residual water can remain in the pan or drainage path.
-
Check 3
From a safe location, inspect the outdoor end of the condensate drain hose and its visible run without disconnecting it or climbing to reach it; look for a blocked outlet, crushed tubing, kinks, sharp bends, sagging, an uphill section, or a hose end sitting in water.
Expected result: With the unit off, classify the outlet as visibly open and dry, obstructed, submerged, damaged, inaccessible, or not identifiable; do not poke into the hose and do not force it into a new route.
Next step: Remove only loose debris at the hose end if it can be done without touching the unit or hose connection; otherwise send the photos and route description to the installer or HVAC technician.
Stop if: Do not blow compressed air, inject drain chemicals, disconnect the hose, drill the drain, pull the line set, or work from an unsafe ladder or roof edge.
Why this matters
Why: A blocked, bent, crushed, sagging, or uphill visible route can stop condensate from leaving and is consistent with Daikin's warning that obstructions and bends can cause malfunction. An apparently open outlet does not rule out a hidden blockage, drain-pan problem, incorrect slope, or an installation defect.
-
Check 4
Once the unit is off and dry enough to handle safely, inspect the removable indoor air filter and visible intake for heavy dust, lint, or blockage, and clean the filter only by the exact Daikin operation manual for that model.
Expected result: Record whether the filter is visibly dirty, wet, iced, damaged, missing, or clean; also note weak airflow, frost, reduced cooling, or a recurring leak from the air outlet.
Next step: Clean and fully dry the removable filter as instructed, then leave the unit off and request service if the leak recurs or icing, poor cooling, or a damaged filter is present.
Stop if: Do not wash the indoor unit with excessive water, spray cleaner into the coil or electronics, scrape ice, or run the unit with a missing or wet filter.
Why this matters
Why: Daikin states that a dirty filter can allow condensate to form and leak from the air outlet. Ice, weak airflow, repeated leakage, or a clean filter with continued leakage can indicate an airflow, coil, refrigerant, sensor, drain-pan, or control issue that filter cleaning will not safely resolve.
-
Check 5
From the floor or another safe position, observe whether the indoor head appears visibly out of level and whether the accessible drain line has the downward slope and minimal bends shown in the exact installation documentation; do not remove the cover to inspect the pan.
Expected result: Record a clear apparent tilt, a sagging or uphill visible drain run, water marks at the wall penetration, recent installation or remodeling, or an installation that cannot be judged from ordinary access.
Next step: Send the installation date, photos, model information, and observations to the installing contractor or qualified Daikin technician; let them perform any manufacturer-specified drain-pan flow test.
Stop if: Do not loosen mounting hardware, lift the indoor head, open the casing, disconnect refrigerant or electrical lines, or pour water into the drain pan unless a qualified technician is performing the procedure.
Why this matters
Why: Daikin installation instructions warn that incorrect level or drainage slope can allow water to pool or cause a leak. A recent-installation leak or visible slope problem is an installer-correction branch; an inaccessible pan or hidden line requires service rather than a homeowner drain-flow experiment.
-
Check 6
Create a short service record after the unit is safely off: model and serial information if readable without opening the unit, mode and timing, first wet point, drain-outlet result, filter condition, visible routing, error lamps, icing, odor, and cooling performance.
Expected result: State whether the leak stopped, recurs at startup or shutdown, appears only in a particular mode, follows filter cleaning, or occurs with an error indication, ice, poor cooling, or electrical symptom.
Next step: Arrange qualified Daikin installer or HVAC service for any continuing, recurrent, unexplained, or damage-causing indoor leak and provide the record without attempting internal repair.
Stop if: Keep the unit off for active leakage, electrical symptoms, severe icing, burning odor, error indications, or water damage; do not continue testing to reproduce a hazardous leak.
Why this matters
Why: A repeatable pattern helps the technician distinguish a drainage-path issue from airflow or icing, installation slope, hidden water entry, or a component fault. Recurrence means the leak is not cleared merely because the floor is temporarily dry.
Use your observations
Decision map
Find the observation that best matches what you see, then follow the next safe action.
-
PATH 01Safety boundary
What you see
Water is coming from the indoor head and the visible outdoor drain end is blocked, dry during a recent leak, crushed, sharply bent, sagging, uphill, or inaccessible.
Do this next
Keep the unit off, remove only loose debris at the exposed hose outlet if safe, and request service from the installer or a qualified HVAC technician; do not force water or air through the hose.
Why this path and its safety boundary
Why it matters: A blocked or incorrectly routed condensate path is more likely than normal outdoor condensation, but the hidden hose, drain pan, and connection still need professional confirmation.
Safety stop: Do not disconnect, cut, drill, chemically flush, or reroute the hose yourself, and do not operate while water reaches the wall, floor, or electrical equipment.
-
PATH 02Safety boundary
What you see
The indoor unit leaks but water is visibly leaving the outdoor drain hose; the filter is dirty, airflow is weak, or frost or ice is present.
Do this next
Clean and dry the removable filter only as the exact Daikin manual allows, leave the unit off if icing or recurrent leakage remains, and arrange HVAC service.
Why this path and its safety boundary
Why it matters: A dirty filter or airflow/icing problem can make condensate form or overflow even when some water reaches the hose. A clean filter does not rule out coil, refrigerant, drain-pan, or control faults.
Safety stop: Do not scrape ice, add refrigerant, open panels, spray coil cleaner, or keep running a leaking or iced unit to see if it clears.
-
PATH 03Safety boundary
What you see
Leakage began after installation or remodeling, or the indoor head looks tilted and the visible drain route lacks a continuous downward slope or has a sag or uphill section.
Do this next
Document the route and installation date and have the installing contractor or qualified Daikin technician correct and test the drainage arrangement.
Why this path and its safety boundary
Why it matters: The pattern makes level, slope, drain-pipe arrangement, insulation, or a disturbed wall penetration more likely than a simple filter issue.
Safety stop: Do not loosen the mounting plate, lift the head, open the wall, or alter line-set, refrigerant, electrical, or drain connections.
-
PATH 04Safety boundary
What you see
Water or steam appears only at the outdoor unit during heating defrost, or as condensation around cold outdoor piping during cooling, while the indoor head and wall remain dry.
Do this next
Keep the outdoor discharge path clear of obstructions and monitor for an indoor leak, abnormal operation, or damage; use the model manual if the amount or location is unusual.
Why this path and its safety boundary
Why it matters: Daikin identifies these outdoor discharge patterns as potentially normal operation rather than the indoor-leak problem covered here.
Safety stop: Do not block the outdoor discharge, open refrigerant panels, or assume outdoor water is normal when it is entering the building or accompanied by an electrical, odor, or error symptom.
-
PATH 05Safety boundary
What you see
The indoor leak coincides with frost or ice, poor cooling, weak airflow after a clean filter, an error indication, repeated breaker trips, burning odor, or unusual noise.
Do this next
Stop operation and arrange qualified Daikin or HVAC service; provide photos and the timing of icing, error indications, breaker behavior, and leak recurrence.
Why this path and its safety boundary
Why it matters: The combined pattern is not established as a drain-end obstruction and may involve airflow, refrigerant, sensor, control, electrical, or other service-only conditions.
Safety stop: Do not reset a tripped breaker repeatedly, thaw ice with heat or tools, open electrical covers, handle refrigerant, or run the unit to reproduce the symptom.
-
PATH 06Safety boundary
What you see
Water appears at the line-cover or wall penetration, continues after the unit is off, the drain route is hidden, or the apparent leak source cannot be identified from ordinary access.
Do this next
Keep the area dry and the unit off, protect furnishings without covering electrical equipment, and request an HVAC installer or appropriate building-water professional to trace the source.
Why this path and its safety boundary
Why it matters: A concealed drain, insulation, connection, building-water, or wall/ceiling source is possible; the indoor filter and outdoor hose observations cannot safely locate it.
Safety stop: Do not open the wall, pull the line cover, remove trim, drill for inspection, or use the unit while water may be entering concealed construction.
Helpful context
Understand the symptom
First separate an indoor leak from normal outdoor condensate
A wall-mounted indoor head can produce condensate while cooling, so that water must reach the drain pan and hose rather than the room. Daikin also explains that outdoor water or steam can be normal during heating defrost, and outdoor condensation can occur during cooling. The urgent symptom here is water from the indoor head, wall, or nearby trim: stop the affected operation, protect the area, and record whether the drip appears at the air outlet, a corner, the wall penetration, or the floor below. That location changes the next check, but it does not justify removing the cover.
Use the drain-hose result to narrow the fault
If the visible outdoor drain end is dry while the indoor unit leaks, an obstruction, bend, crushed section, upward run, sag, or other drainage-path problem is more plausible. Daikin's public guidance specifically calls out obstructions and bends and directs the owner to the installer or Daikin for service. If water is visibly leaving the hose but the indoor unit still leaks, look at the filter and airflow history, icing, the unit's level, and where the water is actually emerging; a flowing hose does not prove that the drain pan or hidden section is clear.
Keep cleaning and installation checks within safe limits
Clean only the removable filter and other surfaces named in the exact Daikin operation manual, using the manual's method. Daikin warns against washing the indoor unit with excessive water and against using ordinary commercial cleaning agents inside the air conditioner because they can damage internal parts and cause leaks. Drain-pipe slope, a level indoor unit, insulation, and a drain-flow test are installation or service checks; a homeowner should not open the casing, disconnect refrigerant piping, or alter electrical components to reach them.
Safety boundary
Stop conditions
- Stop using the mini-split for an indoor leak and collect water so it cannot damage flooring, walls, furnishings, or electrical equipment.
- Do not open panels, loosen mounting hardware, disconnect drain or refrigerant lines, handle refrigerant, or alter electrical components.
- Do not inject drain chemicals, compressed air, wire, water, or other tools into the hose or indoor unit, and do not scrape ice or use unapproved internal cleaning products.
- Stop and obtain urgent qualified service for water near wiring, a breaker trip, burning odor, smoke, shock, severe icing, error indications, or water entering a wall or ceiling.
- Do not treat a dry accessible drain outlet as proof that the hidden drainage path is clear, or an outdoor heating discharge as an indoor leak; use the distinct branches above.
Only after diagnosis
Potential parts
- condensate drain hose or drain connection
Consider this category only if inspection finds a crushed, split, incorrectly sloped, or incompatible drain hose or connection and a qualified technician confirms the repair path.
Confirm the exact Daikin model, hose dimensions, routing, slope, insulation, connection method, and manufacturer installation requirements before ordering; do not substitute a generic hose by appearance. - Daikin indoor air filter
Consider this category only if the exact manual identifies the removable filter as damaged, missing, or no longer cleanable after the leak and airflow diagnosis.
Confirm the exact indoor-unit model and filter frame or media specification; a filter replacement does not resolve a blocked drain, icing, refrigerant, or electrical fault. - condensate drain pan or pump
Consider this category only after a qualified technician confirms that the drain route is clear and the pan, float, or pump is damaged or failing.
Confirm the exact indoor-unit configuration and manufacturer-approved part information; do not open the unit or select a pump from general appearance.
When checks do not resolve it
Need a professional?
Arrange qualified Daikin installer or HVAC service for any continuing or recurrent indoor leak, a drain hose that does not discharge, a crushed or uphill visible route, recent-installation leakage, a tilted indoor head, inaccessible or hidden drainage, icing, poor cooling, error indications, electrical symptoms, or water damage. Keep the unit off for hazardous symptoms and do not open the unit or disturb refrigerant, electrical, mounting, or concealed wall components.
Safety scope: This article supports stopping operation, containing water, cleaning the removable filter as directed by the exact manual, and safe visual inspection only. A qualified technician handles drain-pan tests, hidden drain work, mounting, electrical parts, refrigerant, internal cleaning, and any wall or ceiling access.
Common questions
FAQ
Why is my Daikin mini split leaking water indoors?
Common diagnostic paths include a blocked, bent, crushed, sagging, or uphill condensate drain, a dirty filter or airflow/icing problem, an installation-level or slope problem, a hidden drain or wall source, or a fault that needs service. Daikin says to stop using an indoor unit that leaks, collect the water, check the drain-hose outlet, and arrange service when water is not draining.
Should I keep running a Daikin mini split that is dripping?
No. Stop the affected operation and collect the water, especially when the leak reaches the wall, floor, furniture, or nearby electrical equipment. A leak that slows after shutdown may leave residual water in the pan or drain path and is not proof that the problem is fixed.
What can I safely check without opening the indoor unit?
Record the first wet point and operating mode, inspect the outdoor drain-hose outlet and visible routing for obstruction or bends, and inspect the removable air filter using the exact model manual. Do not disconnect the hose, pour water into the unit, inject chemicals or compressed air, remove panels, or disturb refrigerant or electrical parts.
What if water is coming from the outdoor Daikin unit?
Water or steam during heating can be defrost discharge, and condensation can drip from cold outdoor piping during cooling. Keep the discharge area clear and watch for a distinct indoor or wall leak, water entering the building, error indications, or other abnormal symptoms that require service.
Can a dirty filter cause a Daikin mini split to leak water?
Yes, Daikin's troubleshooting guidance says a dirty indoor filter can allow condensate to form and leak from the air outlet. Clean only the removable filter using the exact operation manual; persistent leakage, ice, weak airflow, poor cooling, or a clean filter with continued leakage needs qualified diagnosis.
When should I call a Daikin installer or HVAC technician?
Call for any continuing or recurrent indoor leak, a drain hose that does not discharge, a crushed or uphill route, recent-installation leakage, a visibly tilted head, hidden drainage, icing, poor cooling, error indications, breaker trips, odor, smoke, or water damage. Keep the unit off for hazardous symptoms and provide photos and the timing record.
Read the exact guide
Official sources
- TroubleshootingDaikin Global · Official Daikin troubleshooting guidance for residential split and multi-split systems; model-specific operation and installation manuals control where they differ.
- 00_CV_3P741458-13H.inddDaikin Comfort · Official Daikin installation manual for a specified Oterra wall-mount family; it supports installation principles and technician boundaries, not universal fitment or a homeowner repair procedure.
- EDUS042211ADaikin Comfort · Official Daikin manual for a ceiling cassette family; used only for the general safety boundary that a crushed or clogged drain hose can cause indoor leakage and requires service, not for wall-unit component identity.
- Operation ManualDaikin Comfort · Daikin Comfort wall-mount manual for the model family identified in the document; use it as a safety and mechanism reference, not as a claim that every Daikin mini-split has identical parts or controls.
- Installation ManualDaikin Comfort · Official Daikin installation manual for a specified indoor-unit family; installation details are model-dependent and should be applied by the installer or qualified technician.
Community feedback
Share a repair observation
Share a plain-text repair observation. Accepted observations are published automatically; this page may take a moment to update.