
On this page
Start here
Quick answer
Turn a leaking GREE mini split off and protect the wall, floor, and nearby electronics before diagnosing it. In cooling mode, indoor water should travel through the condensate pan and drain line to an approved outlet; water from the indoor head usually means restricted drainage, a dirty or iced coil, a filter or airflow problem, an unlevel installation, or a condensate-pump issue. Check only the visible leak location, filter, airflow obstructions, drain outlet, and door-like panels from safe access. Do not pull the indoor head loose, disconnect the drain line, open the refrigerant circuit, or use live electrical tests. If the leak returns after the model-approved filter or defrost step, the outlet is blocked or inaccessible, cooling is poor, or water reaches electrical equipment, leave the system off and arrange qualified HVAC service.
Before you begin
Safety first
- This article covers turning the system off, protecting the area, and ordinary-access observations of the filter, visible outlet, loading, and operating mode only. Do not open panels, pull the head loose, disconnect or blow through tubing, use heat or pressure, test live parts, or handle refrigerant.
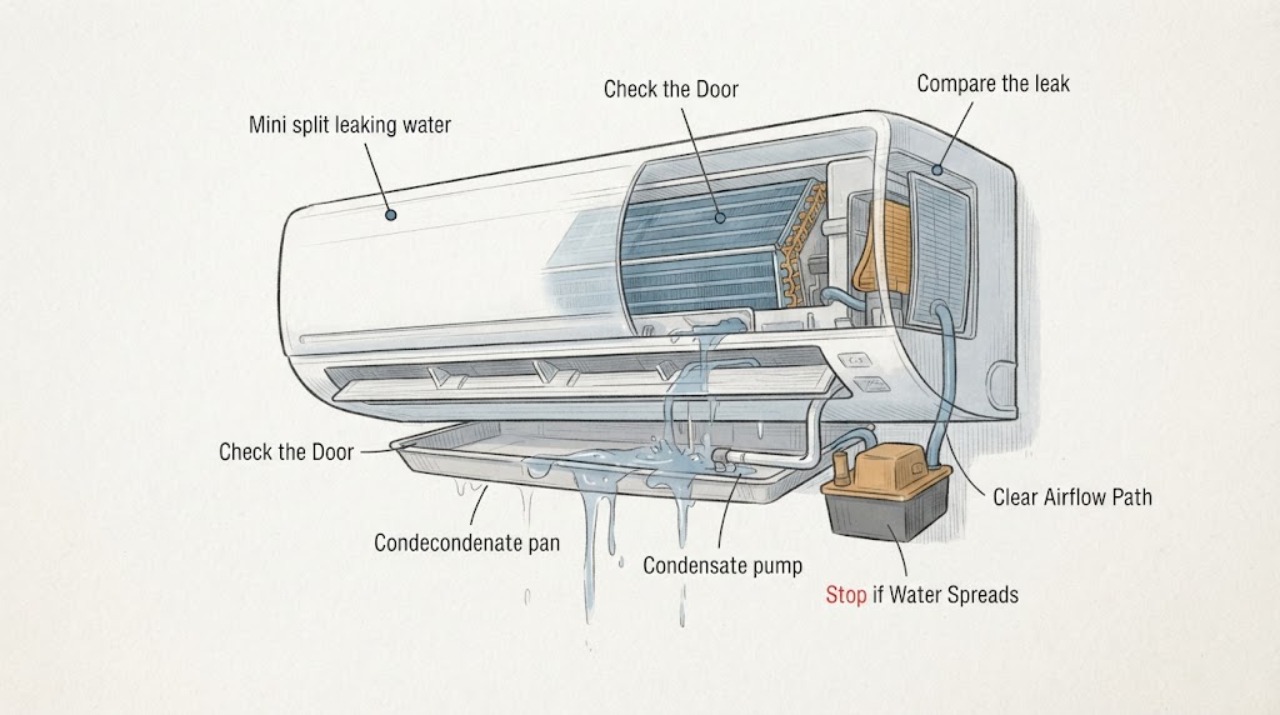
Work through in order
Diagnostic checks
Use only checks that match the exact appliance or system and its official guide.
-
Stop the indoor unit and locate the water
Turn the mini split off with its normal remote or control, place towels or a container where they cannot block airflow, and inspect from a dry, stable position without opening the cabinet. Record whether water is coming from the indoor head, wall penetration, drain-line joint, outdoor drain outlet, outdoor unit, or a water stain below the unit.
Expected result: Water is dripping from the indoor head or wall, appears at a drain-line joint, exits only at the outdoor drain outlet, or is near an outlet, cord, or electronic equipment.
Next step: Keep the system off and dry the accessible area. If the source is indoor, at a joint, continuous, or near electricity, arrange service; continue only with non-invasive filter and outlet observations when the area is safe.
Stop if: Do not touch wet electrical parts, pull the indoor unit from its bracket, move the appliance or wiring, or restart the system while water can reach an outlet or damaged surface.
Why this matters
Why: Indoor-head or joint leakage points toward condensate drainage, pan, level, coil, or installation problems; water at the outdoor drain outlet can be normal condensate in cooling mode. Water near electricity is an immediate stop-use hazard.
-
Compare the leak with the operating mode
From a safe location, note whether the system was cooling, heating, dry, or idle when water appeared, and inspect the end of the visible outdoor condensate hose without inserting anything into it or moving the unit.
Expected result: Water appears only at the outdoor condensate outlet during cooling, appears from the indoor unit during cooling, appears outdoors during heating or defrost, or appears while the system is off.
Next step: Treat only contained outdoor outlet water as potentially normal; keep the system off for indoor or joint leakage and arrange service when the source is uncertain or recurring.
Stop if: Do not redirect the outlet, insert a wire or hose, open the drain, or use the outdoor water pattern to justify running an indoor-leaking unit.
Why this matters
Why: GREE explains that outdoor condensate in cooling and outdoor water from heat-pump defrost can be normal, while indoor-head water or water at drain-line joints points to a clog or another problem. Water while idle may be stored condensate, a line leak, or an unrelated source.
-
Inspect the accessible filter and room airflow
With the unit off, use only the normal user access described in the GREE manual to inspect and clean or replace the indoor air filter. Look for furniture, curtains, or other loose objects blocking the indoor intake or outlet; do not reach into the blower, coil, or cabinet.
Expected result: The filter is visibly loaded, airflow is blocked, the coil appears iced behind the filter area, or the filter and room airflow are clear.
Next step: Restore the exact filter after the manual-approved cleaning step and leave the system off until any visible ice has thawed naturally. If the leak or ice returns, arrange qualified HVAC service rather than deep-cleaning the coil yourself.
Stop if: Do not use a sharp tool, heat source, pressure washer, solvent, or compressed air inside the unit, and do not run it with the filter removed or airflow blocked.
Why this matters
Why: GREE identifies a dirty filter as an airflow restriction that can freeze the coil; ice can then melt and leak. A clear filter does not rule out a dirty coil or blower, drain restriction, low refrigerant, level, or pump problem.
-
Inspect the visible condensate drain outlet
From ground level or another stable position, inspect the visible end of the condensate drain hose or pipe and its discharge area. Look for a kink, crushed section, standing water, sag, disconnected-looking joint, or an outlet blocked by debris; do not pull, disconnect, or blow through the line.
Expected result: The outlet is open and discharging, the hose is visibly kinked or displaced, water is backing up or absent during a leak, or the drain path disappears into a wall or ceiling.
Next step: Remove only loose debris around the outlet without touching the hose, then keep the unit off and request service if water backs up, the hose is damaged, the outlet is inaccessible, or the leak continues.
Stop if: Do not disconnect the drain line, insert a tool, blow into tubing, alter slope, drill a wall, or pull the indoor unit loose to reach the drain.
Why this matters
Why: A restricted or poorly routed drain can allow condensate to back up into the indoor unit. GREE states that gravity drainage, secure watertight connections, slope, and unobstructed routing are important, but a visible outlet check cannot prove a concealed line is clear.
-
Check for an installed pump or visible level issue
Look only for an externally accessible condensate pump, float alarm, or visibly tilted indoor head; do not open the pump, lift the unit, or adjust the mounting bracket. Record whether the leak begins when the pump should operate or whether water pools on one side of the indoor unit.
Expected result: A pump is installed and silent or alarming, the indoor unit visibly slopes, water pools at one side, or no pump or level issue is visible.
Next step: Keep the system off and provide the pump or level observation to a qualified HVAC technician. Do not correct the mounting or pump internally as an experiment.
Stop if: Do not open the pump, handle float-switch wiring, lift or rehang the indoor head, or touch refrigerant tubing or electrical terminals.
Why this matters
Why: GREE lists a faulty condensate pump and an unlevel unit as possible causes of backup or poor drainage. A pump that appears normal and a level-looking unit do not rule out an internal blockage, coil icing, refrigerant problem, or concealed drain issue.
-
Record what happens after a natural thaw or service reset
After visible ice has thawed naturally and the area is dry, follow only the GREE manual's normal restart guidance if no hazard remains; otherwise leave the system off. Record whether the leak returns immediately, only after cooling runs, only after defrost, or not at all.
Expected result: The leak does not return, returns with cooling, returns after ice forms, appears at the same wall or drain joint, or the unit has poor cooling or unusual odor.
Next step: Keep a photo and timeline for service. Arrange qualified HVAC diagnosis for recurrence, icing, poor cooling, odor, or any leak from the indoor unit; do not repeatedly restart to reproduce it.
Stop if: Stop immediately for water near electricity, burning smell, smoke, unusual noise, refrigerant odor or suspected release, or visible damage to the unit or wall.
Why this matters
Why: A leak that returns during cooling or after icing supports a drainage, airflow, coil, refrigerant, level, or pump fault. A leak at the same joint suggests connection or installation failure. No recurrence after a one-time spill or transient condensation is not proof that a concealed fault is absent.
Use your observations
Decision map
Find the observation that best matches what you see, then follow the next safe action.
-
PATH 01Safety boundary
What you see
Water is seen only at the end of the outdoor condensate outlet while cooling, with no indoor drip, wall stain, or joint leak.
Do this next
Keep the outlet unobstructed and direct water away from the structure, windows, and walkways as the installation permits. Monitor for indoor water or a change in cooling.
Why this path and its safety boundary
Why it matters: GREE describes outdoor condensate discharge in cooling mode as normal for a working drain path.
Safety stop: Do not block, cap, redirect, or insert anything into the drain outlet.
-
PATH 02Safety boundary
What you see
Water drips from the indoor head or wall during cooling, the visible drain outlet is absent or blocked, or water backs up at a joint.
Do this next
Keep the unit off, inspect only the visible outlet and area, and arrange qualified HVAC service for the concealed drain, pan, and installation path.
Why this path and its safety boundary
Why it matters: A restricted or poorly routed condensate drain, pan issue, level issue, or connection leak is more likely than normal outdoor condensate.
Safety stop: Do not pull the head loose, disconnect or blow out tubing, open the pan, or run the unit to force water through.
-
PATH 03Safety boundary
What you see
The filter is dirty, airflow is blocked, ice is visible behind the filter area, or water appears as the ice melts.
Do this next
Use only the manual-approved filter step and allow ice to thaw naturally with the unit off. Request service if icing, poor cooling, or leaking returns.
Why this path and its safety boundary
Why it matters: GREE links dirty filters and restricted airflow with coil freezing and leak water during thawing, but the same appearance can involve coil dirt, low refrigerant, or another fault.
Safety stop: Do not use a heat source, pressure washer, sharp tool, refrigerant adjustment, or internal coil cleaning as a user test.
-
PATH 04Safety boundary
What you see
A condensate pump is installed and alarms or fails to move water, or the indoor head visibly slopes and water pools at one side.
Do this next
Keep the system off and arrange qualified HVAC assessment of the pump, float protection, mounting, pan, and drain routing.
Why this path and its safety boundary
Why it matters: A pump or installation-level condition can prevent condensate from leaving the pan even when the drain outlet is clear.
Safety stop: Do not open the pump, adjust the bracket, lift the indoor unit, or handle wiring or refrigerant lines.
-
PATH 05Safety boundary
What you see
Water appears only around the outdoor unit while the system is heating or defrosting, with no indoor leak and normal operation.
Do this next
Keep the outdoor discharge area clear and monitor for indoor water, unusual operation, or water at a pipe joint. Request service if the pattern changes or the unit does not recover normally.
Why this path and its safety boundary
Why it matters: GREE notes that outdoor units can shed water when frost melts during a heat-pump defrost cycle; that pattern is different from an indoor condensate leak.
Safety stop: Do not cover the outdoor unit, block the discharge area, or handle refrigerant piping to change the water flow.
-
PATH 06Safety boundary
What you see
The leak returns after safe filter or manual-defrost steps, cooling is poor, the wall or floor is damaged, there is an odor or smoke, or water reaches electrical equipment.
Do this next
Leave the mini split off, isolate the wet area, protect the structure and electronics from a safe location, and arrange urgent qualified HVAC service.
Why this path and its safety boundary
Why it matters: A recurring drain, coil, refrigerant, pump, installation, electrical, or property-damage issue needs professional diagnosis; a temporary thaw is not a repair.
Safety stop: Do not restart repeatedly, open panels, use heat or pressure, test live parts, or handle refrigerant or electrical connections.
Helpful context
Understand the symptom
Indoor and outdoor water mean different things
A GREE ductless system normally makes condensate while cooling. Indoor condensate is intended to leave through the drain line, while outdoor water can be normal in cooling or during heat-pump defrost. Water dripping from the indoor head, from a drain-line joint, or onto the wall or floor is not the same as steady water at an outdoor drain outlet. Identify the location and operating mode before deciding whether this is a drainage fault, a defrost event, or a water-line problem.
Stop operation before the leak damages the room
GREE advises turning a leaking mini split off until its cause is found and fixed because continuing to run it can damage drywall, ceilings, flooring, and the unit. Place a container or towels beneath a safe drip point, keep water away from outlets and electronics, and do not repeatedly restart the system to see whether the leak comes back.
Drain and refrigerant work are service boundaries
A filter or visible airflow obstruction may be an ordinary maintenance check, but a drain pan, concealed drain hose, condensate pump, coil, level adjustment, refrigerant charge, or electrical control requires model-specific access and skill. GREE's drain guidance is written for installation and professional maintenance; it does not make pulling the indoor head loose or disconnecting a drain line a safe homeowner test.
Safety boundary
Stop conditions
- Turn a leaking indoor mini split off; do not keep running it to see whether the leak stops or to force a drain cycle.
- Do not pull the indoor head loose, disconnect or blow through the drain line, open the drain pan or cabinet, alter the unit level, or handle refrigerant tubing.
- Do not use a hair dryer, heat gun, flame, pressure washer, sharp tool, compressed air, or unapproved chemical to melt ice or clear an internal path.
- Stop for water near electrical equipment, smoke, burning or unusual odor, refrigerant-system damage, ceiling or wall damage, or a continuous leak.
- Arrange qualified HVAC service when the indoor leak recurs, the visible drain does not discharge, icing or poor cooling appears, a pump is involved, or the cause is uncertain.
Only after diagnosis
Potential parts
- mini-split condensate drain hose or fitting
Consider this category only when service confirms a cracked, displaced, or incompatible drain connection after the line route, pan, level, and outlet are evaluated.
Confirm the exact GREE model, drain-port size, routing, slope, insulation, and installation requirements; do not substitute a loose hose or alter a concealed line. - GREE condensate pump or float switch
Consider this category only when a qualified diagnosis confirms a failed pump or float-protection component on an installation that uses a pump.
Confirm the exact unit, pump configuration, lift and safety requirements, and manufacturer fit information; pump work is not an ordinary filter check. - GREE indoor air filter
Consider this category only when the exact manual identifies a damaged or missing user-accessible filter and airflow restriction is part of the diagnosed leak or icing cause.
Confirm the exact GREE model and filter dimensions or frame before ordering; do not run the unit without its specified filter. - GREE indoor coil or defrost-related component
Consider this category only after qualified testing links recurring ice or condensate overflow to an internal coil, sensor, or defrost-related fault rather than the filter or drain path.
Confirm the exact GREE model, refrigerant system, electrical requirements, and service procedure; do not open the sealed system or internal cabinet as a user test.
When checks do not resolve it
Need a professional?
Arrange qualified HVAC service when water drips from the indoor GREE head or a drain-line joint, a visible drain is restricted or inaccessible, the leak returns after a manual-approved filter or defrost step, ice or poor cooling appears, the unit is unlevel, a condensate pump is involved, or a water source is uncertain. Leave the system off and seek urgent help for water near electrical equipment, smoke or burning odor, refrigerant-system damage, ceiling or wall damage, a continuous leak, or unsafe access.
Safety scope: This article covers turning the system off, protecting the area, and ordinary-access observations of the filter, visible outlet, loading, and operating mode only. Do not open panels, pull the head loose, disconnect or blow through tubing, use heat or pressure, test live parts, or handle refrigerant.
Common questions
FAQ
Why is my GREE mini split leaking water inside?
Indoor water is usually condensate that is not leaving through the drain path. GREE lists a restricted drain, dirty coil or blower, filter-related icing, low refrigerant, an unlevel unit, and a faulty condensate pump as possible causes. Turn the unit off and arrange service if the leak continues or returns.
Is water dripping outside from a GREE mini split normal?
Often, yes. In cooling mode, condensate normally exits through the outdoor drain outlet, and in heating mode a heat-pump outdoor unit can shed water during defrost. Water from the indoor head, a drain-line joint, or onto the wall or floor is a different pattern and needs attention.
Can a dirty filter make a GREE mini split leak?
Yes. GREE explains that a dirty filter can restrict airflow, freeze the indoor coil, and then leak as the ice melts. Inspect and clean or replace the filter only as the exact manual allows, let ice thaw naturally with the unit off, and request service if icing or leaking returns.
Can I clear a GREE mini split drain line myself?
Do not pull the indoor head loose, disconnect or blow through the drain line, or insert tools as an ordinary user check. The drain can be concealed, improperly routed, or connected to a pump, and GREE's drain guidance is installation and professional guidance. Arrange qualified HVAC service when the visible outlet is blocked or inaccessible.
Should I keep running a GREE mini split that is leaking?
No. GREE advises turning a leaking mini split off until the cause is found and fixed because continued operation can damage the room and the unit. Stop immediately for water near electrical equipment, smoke, burning odor, visible refrigerant-system damage, or ceiling and wall damage.
Read the exact guide
Official sources
- Why Is My Mini Split Leaking Water?GREE Comfort · GREE manufacturer troubleshooting article used for the topic-specific leak mechanism and service boundary; exact model instructions and professional procedures control.
- HIGH-WALL DUCTLESSGREE Comfort · GREE owner manual used for model-family examples of indoor condensate drainage and safety boundaries; exact GREE model instructions supersede this archived manual.
- Mini-Split MaintenanceGREE Comfort · GREE maintenance page used for the accessible filter and leak-observation boundary and for escalation when performance or leakage does not normalize.
- How to Run a Drain Pipe for a Mini Split: A Guide for ContractorsGREE Comfort · GREE installation guidance used to explain why drain routing, watertight connections, slope, and pump behavior affect indoor leaks; it is not a homeowner instruction to disassemble a unit.
Community feedback
Share a repair observation
Share a plain-text repair observation. Accepted observations are published automatically; this page may take a moment to update.