
On this page
Start here
Quick answer
Water from a mini-split indoor unit is often condensate that should collect in the drain pan and leave through a condensate drain. A blocked or poorly routed drain can make water back up and spill from the indoor unit, but a dirty filter that causes coil ice, a damaged or tilted drain pan, incorrect installation, or a refrigerant problem can look similar. Turn the system off, protect the wall and floor, and clean the washable filter only as the model instructions permit. Do not open refrigerant circuits, probe inside the indoor unit, pour chemicals or improvised mixtures into a concealed drain, or work near wet electrical parts. If water persists after the filter is clean, the drain outlet is inaccessible, the coil is iced, the pan is damaged, the line is buried or poorly sloped, or cooling is abnormal, arrange qualified HVAC service.
Before you begin
Safety first
- Owner checks are limited to stopping the system, safe water containment, filter care, external drain-route observation, and model-approved power isolation. A qualified HVAC technician must handle concealed drain access, pumps, pan removal, electrical testing, refrigerant circuits, coil or fan access, mounting, tubing changes, and unsafe ladder work.
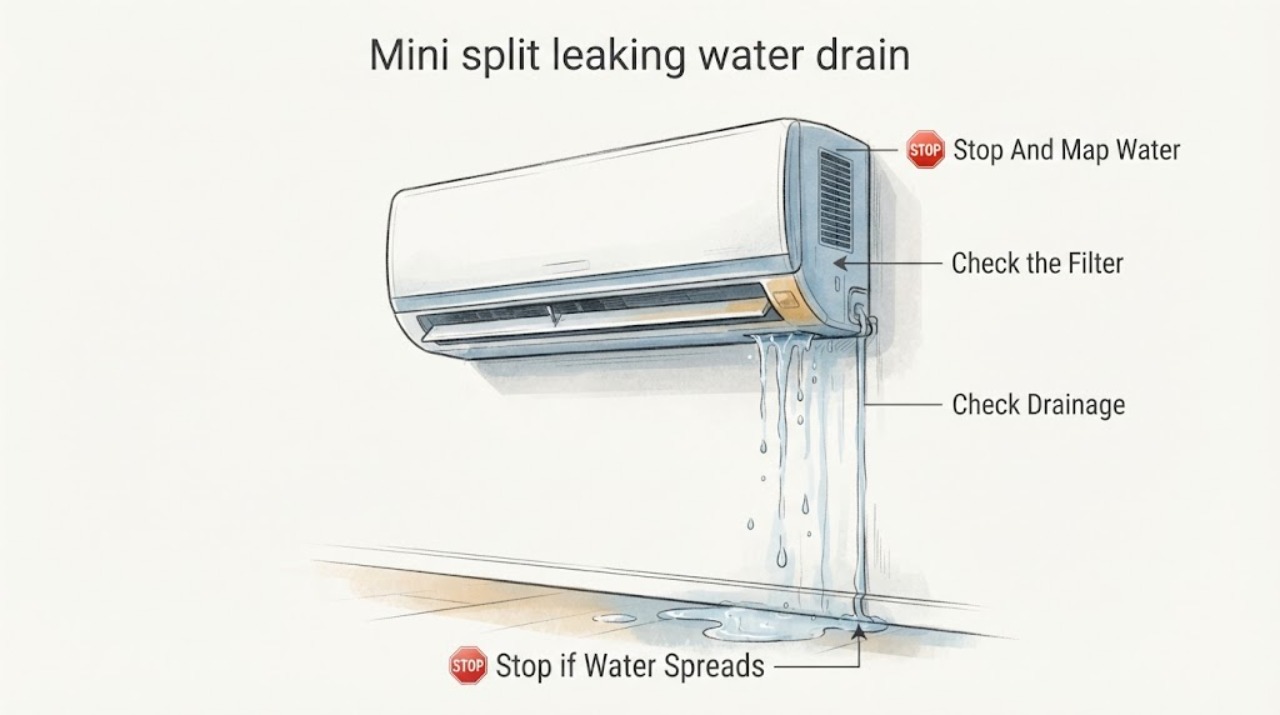
Work through in order
Diagnostic checks
Use only checks that match the exact appliance or system and its official guide.
-
Check 1
Turn the mini-split off, place towels or a shallow container below the indoor unit, and trace the first wet location without removing the cover. Note whether water comes from the bottom of the indoor unit, a wall penetration, the visible drain outlet, or a nearby pipe or surface.
Expected result: Record the first wet point, whether water appears only in cooling, whether it is a steady stream or intermittent drip, and whether the visible drain outlet is producing water outdoors.
Next step: Keep the system off and select the matching branch. Do not restart it repeatedly to make the leak appear.
Stop if: Stop immediately for water near wiring or an outlet, a rapidly spreading leak, a loose indoor unit, burning odor, smoke, or an unsafe ladder or wet floor.
Why this matters
Why: Water from the indoor-unit bottom with little or no outdoor drainage supports a blocked or poorly routed condensate path, but a pan, pump, frozen coil, or installation issue can cause the same pattern. Water at a wall penetration or connection may be a line or installation leak rather than a simple clog.
-
Check 2
With the unit off and power isolated only from a dry, safe position, inspect the washable air filter as the owner's manual describes. Look for heavy dust, visible ice on the coil or piping, reduced airflow before shutdown, or a musty wet area; do not touch a fan, coil, wiring, or refrigerant tubing.
Expected result: Record a visibly dirty filter with no ice, a clean filter, ice on the coil or line, water continuing while the unit is off, or an interior area that cannot be viewed without removing covers.
Next step: Clean or replace the filter only according to the model instructions and let any ice melt without forced heat. Arrange HVAC service for recurring ice, a clean-filter leak, a hidden interior, or abnormal cooling.
Stop if: Do not scrape ice, use a hair dryer or heat gun, spray cleaner into the coil, or continue if water can reach electrical parts.
Why this matters
Why: A dirty filter can restrict airflow and contribute to coil icing, whose meltwater may overwhelm the pan. Ice with a clean filter, persistent water while off, or an inaccessible interior makes a refrigerant, defrost, pan, pump, or concealed-drain issue more likely and is not a reason to keep cooling.
-
Check 3
From ground level or another safe position, inspect the visible end of the condensate drain for kinks, crushing, a submerged tip, algae or debris at the outlet, a sharp upward loop, or no drainage while the system had been cooling. Do not pull on a buried hose or insert a tool into the indoor unit.
Expected result: Record a freely positioned outlet with water draining, a kink or submerged end, visible buildup, a buried or inaccessible line, or no water at the outlet while the indoor unit leaks.
Next step: If the manual explicitly permits an external owner-level clearing method and the outlet is safely accessible, follow only that method. Otherwise leave the system off and request HVAC service for a concealed, buried, pressurized, or inaccessible drain.
Stop if: Do not blow compressed air toward the indoor unit, pour chemicals or improvised mixtures into a concealed line, cut tubing, climb unsafely, or disconnect a drain pump or electrical connection.
Why this matters
Why: A kink, submerged tip, upward loop, or visible obstruction can impede gravity drainage. No outdoor flow with indoor leakage supports a restriction, disconnected line, pump failure, or pan problem, but it does not identify which one without model-specific testing.
-
Check 4
Check installation context from outside the unit: note whether the leak began after installation, wall work, cleaning, or movement, and whether the visible drain route appears to descend continuously without a crushed section. Do not loosen the indoor unit or alter the wall sleeve, line set, or drain routing.
Expected result: Record a recent installation or movement, a visible hose slope problem, a drain hose that enters a buried pipe, an indoor unit that appears loose or tilted, or no installation change.
Next step: Contact the installer or a qualified HVAC technician for concealed routing, mounting, slope, or drain-pump inspection. Keep the unit off if water is reaching the wall or wiring.
Stop if: Do not unhook the wall unit, remove line-set insulation, drill the wall, or alter drain piping as an owner check.
Why this matters
Why: Recent work, an incorrect slope, an improperly inserted concealed hose, or a shifted indoor unit can prevent condensate from reaching the drain. These conditions require correction without assuming algae or debris is the cause.
-
Check 5
With the system off, record whether there is repeated ice on a clean filter, hissing, weak or warm cooling, unusually long run time, or a recent loss of cooling performance. Do not test refrigerant pressure, loosen service valves, or operate the system to force an ice event.
Expected result: Record normal cooling with no ice, recurring coil or pipe ice, hissing, weak airflow with a clean filter, or long running without reaching the setting.
Next step: Keep the system off and arrange a licensed HVAC technician for refrigerant, coil, fan, or control diagnosis when these warning signs occur.
Stop if: Do not handle refrigerant, use a gauge, open service valves, solder tubing, or continue operation if ice is repeatedly forming or the unit is losing cooling.
Why this matters
Why: Recurring ice with a clean filter and weak cooling can be consistent with a refrigerant or airflow problem, while hissing can indicate a refrigerant-line issue. These observations do not prove a refrigerant leak and require professional diagnosis rather than topping up or opening the circuit.
-
Check 6
After the filter has been cleaned or replaced exactly as instructed and all visible water is contained, use the system only if the manual permits a brief supervised check. Observe the indoor unit, wall, drain outlet, and floor; stop at the first new water, ice, abnormal sound, or loss of cooling.
Expected result: Record dry operation with outdoor drainage, water returning indoors, no outdoor drainage, new ice, weak cooling, or an electrical or mechanical warning.
Next step: Turn the system off and provide the observations to an HVAC technician if any leak or warning returns. Do not use repeated cycles as a substitute for drain testing.
Stop if: Stop the check immediately for water near electrics, rapid overflow, an unsecured unit, ice, hissing, burning odor, or loss of cooling.
Why this matters
Why: Dry operation with drainage supports a filter or temporary condensate issue, but recurrence points toward a restriction, pan, pump, slope, installation, or refrigerant problem. No outdoor drainage while water returns indoors is a service signal, not a reason to run longer.
-
Check 7
Prepare the service request with the mini-split brand and model if safely visible, indoor-unit location, operating mode, first wet point, outdoor drain behavior, filter and ice observations, installation history, drain visibility, cooling performance, and any warning sounds. Do not remove covers or parts to collect more information.
Expected result: Confirm that the record contains external observations and dates rather than an assumed clog, refrigerant charge, failed pump, or replacement part.
Next step: Arrange qualified HVAC service when the leak persists, recurs, is concealed, or requires drain clearing, panel access, pump work, refrigerant work, electrical testing, or mounting correction.
Stop if: Stop all owner troubleshooting when the next step requires refrigerant access, electrical testing, indoor-unit removal, concealed drain access, cutting, soldering, or unsafe ladder work.
Why this matters
Why: This pattern lets an HVAC technician separate a drain restriction from filter icing, pan or pump damage, poor routing, installation error, refrigerant trouble, or an electrical issue.
Use your observations
Decision map
Find the observation that best matches what you see, then follow the next safe action.
-
PATH 01Next step
What you see
The indoor unit leaks during cooling, water is absent or reduced at the outdoor drain outlet, the filter is clean or has been serviced, and the visible drain route is kinked, submerged, or visibly obstructed.
Do this next
Keep the system off. Use an external clearing method only when the exact manual explicitly permits it and the outlet is safely accessible; otherwise call an HVAC technician to clear and verify the drain, pan, and any pump.
-
PATH 02Next step
What you see
The filter is heavily dirty, airflow was weak, ice is visible on the coil or line, and water appears as the ice melts.
Do this next
Clean the filter only as instructed and allow ice to melt without forced heat. If ice returns with a clean filter or cooling remains abnormal, stop cooling and request HVAC service for airflow, coil, or refrigerant diagnosis.
-
PATH 03Next step
What you see
The leak began after installation or wall work, the hose enters a buried pipe, the drain route rises or is crushed, or the indoor unit appears shifted or tilted.
Do this next
Have the installer or a qualified HVAC technician inspect the concealed hose, mounting, slope, and drain connection. Do not alter the wall unit or buried line yourself.
-
PATH 04Next step
What you see
The filter is clean, the visible line appears open, water still spills from the indoor unit, the pan is visibly damaged, or the model uses a drain pump that is silent or unreliable.
Do this next
Leave the unit off and schedule service for pan, pump, internal drain, fan, or control diagnosis. Do not remove the cover or reach into the indoor unit to clear it.
-
PATH 05Next step
What you see
Recurring ice occurs with a clean filter, cooling is weak or prolonged, hissing is present, water reaches electrics, the unit is loose, or the leak is rapid or damaging the wall.
Do this next
Keep the system off and arrange licensed HVAC service; use electrical help when water has reached energized equipment. Do not open the refrigerant circuit, use gauges, or restore operation to reproduce the symptom.
Helpful context
Understand the symptom
A blocked drain is only one possible cause
In cooling mode, a mini-split removes moisture from indoor air. Condensate should collect in the indoor drain pan and flow away through a drain line. Algae, dust, mold, a kink, a poor slope, a submerged outlet, or a buried-line problem can stop that flow and let water back up. A dirty filter can also restrict airflow, freeze the coil, and create a rush of meltwater when the ice melts. A cracked or tilted pan, installation problem, or low refrigerant can produce similar water at the wall-mounted unit.
Protect the wall, floor, and electrical parts first
Stop cooling and catch water with a towel or shallow container. Keep water away from the indoor unit's electrical area, outlet, disconnect, and control wiring. If power cannot be isolated from a dry, safe position, do not reach through water or remove a cover. Never open a refrigerant circuit or handle refrigerant because the system is leaking water; those checks belong to a qualified HVAC technician.
Use the manufacturer's access limits
Filter cleaning and a view of an already accessible drain outlet may be reasonable owner checks, but mini-split layouts vary. A buried or concealed hose, drain pump, pan, coil, fan, wiring, or installation slope requires model-specific access. Only use an external drain-clearing method when the exact owner's manual expressly describes it and the outlet is safely reachable; otherwise document the symptom and call service.
Safety boundary
Stop conditions
- Turn the mini-split off and contain water before inspection; do not reach through water or remove covers near energized electrical parts.
- Do not open refrigerant circuits, use gauges, add refrigerant, scrape coil ice, apply a hair dryer or heat gun, cut or solder drain or refrigerant tubing, or blow compressed air toward the indoor unit as an owner check.
- Stop for recurring ice, weak cooling, hissing, a loose unit, rapid overflow, wall damage, burning odor, smoke, or water near electrical parts; arrange qualified HVAC or electrical service.
Only after diagnosis
Potential parts
- condensate drain hose or drain-line component
Consider this category only when service confirms a kinked, disconnected, crushed, poorly routed, or obstructed condensate path after separating pan, pump, filter, and installation causes.
Confirm exact indoor-unit model, hose size and routing, slope requirements, fittings, and manufacturer-approved installation information before sourcing or changing any drain component. - mini-split condensate drain pan
Consider a pan only when qualified inspection confirms a crack, corrosion, displacement, or other failure that allows condensate to escape despite a verified drain path.
Verify exact indoor-unit model, pan geometry, mounting, sensor or pump interface, and approved replacement procedure before replacement. - condensate drain pump or float component
Consider this category only when the system uses a pump and service confirms pump, float, or control failure rather than a blocked line or pan overflow.
Confirm whether the pump is factory-integrated or accessory, its electrical and control requirements, model fit, and manufacturer service instructions. - air filter or airflow service component
Consider this category only when the installed filter is damaged, missing, or no longer cleanable and restricted airflow is contributing to icing or condensate overflow.
Verify exact indoor-unit model, filter dimensions, frame and media design, and the manufacturer's care and fit information before sourcing.
When checks do not resolve it
Need a professional?
Call a qualified HVAC technician when the leak persists after filter care, the drain is blocked beyond a safely accessible outlet, the hose is buried or poorly sloped, the pan or pump may be damaged, the indoor unit is loose, ice returns with a clean filter, cooling is abnormal, or the next check requires panel removal, electrical testing, refrigerant access, cutting, soldering, or unsafe ladder work. Seek prompt electrical help for water near energized wiring, an outlet, disconnect, or control. Stop immediately for rapid overflow, wall damage, burning odor, smoke, or an unstable unit.
Safety scope: Owner checks are limited to stopping the system, safe water containment, filter care, external drain-route observation, and model-approved power isolation. A qualified HVAC technician must handle concealed drain access, pumps, pan removal, electrical testing, refrigerant circuits, coil or fan access, mounting, tubing changes, and unsafe ladder work.
Have this ready
- Provide brand and model if safely visible, indoor-unit location, operating mode, first wet point, timing, outdoor drain behavior, filter and ice observations, cooling performance, drain visibility and route, recent installation or movement, warning sounds, and photographs only of dry, externally visible areas.
Common questions
FAQ
Why is my mini split leaking water indoors?
Condensate may be backing up because the drain line is blocked, kinked, poorly sloped, or concealed incorrectly. A dirty filter that freezes the coil, a damaged pan, a drain pump issue, installation trouble, or refrigerant problem can look similar. Trace the first wet point and outdoor drainage before assuming a clog.
Can a dirty mini-split filter cause water to leak?
Yes. Restricted airflow can make the indoor coil freeze; when that ice melts, the resulting water can overwhelm the drain pan. Clean the washable filter only according to the model instructions, and call HVAC service if icing returns with a clean filter.
How do I know whether the condensate drain is blocked?
Indoor water with little or no water at the outdoor drain outlet, a musty stagnant-line smell, or a visible kink or buildup supports restricted drainage. It does not prove where the blockage is. A buried or inaccessible line should be serviced rather than probed or pressurized.
Can I use compressed air or chemicals to clear the mini-split drain?
Do not improvise with compressed air, chemical cleaner, or a mixture poured into a concealed line. Only use an external clearing method when the exact manual explicitly permits it and the outlet is safely accessible; otherwise have an HVAC technician clear and verify the drain.
Should I keep running the mini split while it is leaking?
Turn it off and contain the water. Repeated operation can spread water damage and can complicate a coil-ice or drain problem. Resume only after model-approved checks leave the area dry and safe; stop again if water, ice, abnormal sound, or cooling loss returns.
What if my mini-split drain hose is hidden in the wall?
Do not pull, cut, or pressurize a buried hose. Note the leak timing and wall penetration, then contact the installer or a qualified HVAC technician to inspect the concealed routing, slope, connection, and any drain pump.
Does ice on a mini-split coil always mean low refrigerant?
No. A dirty filter or airflow restriction can also cause icing. If ice returns with a clean filter, cooling is weak, or hissing is present, stop operating the system and request professional airflow and refrigerant diagnosis.
When is a mini-split water leak urgent?
Stop immediately for rapid overflow, wall or ceiling damage, water near wiring, an outlet, disconnect, or control, burning odor, smoke, a loose indoor unit, or loss of cooling. Keep clear and arrange HVAC or electrical help as appropriate.
Read the exact guide
Official sources
- [LG Air Conditioner Noises] There is water dripping sound from the inside of the air conditioner.LG USA Support · LG support guidance used for concealed or recently installed drain-hose context; it is not a universal mini-split repair procedure.
- Ductless Mini Split RepairCarrier · Carrier repair guidance used for the distinction between basic filter checks and professional drain, refrigerant, electrical, or component work.
- Mini Split Leaking Water: Diagnosis and RepairCarrier · Carrier manufacturer resource used for general ductless leak mechanisms and safe escalation; exact equipment manual and qualified technician govern.
Community feedback
Share a repair observation
Share a plain-text repair observation. Accepted observations are published automatically; this page may take a moment to update.