
On this page
Start here
Quick answer
Water dripping from a mini-split indoor head usually means condensate is not leaving through the intended drain path, but a dirty filter that freezes the coil, a damaged drain pan, poor hose routing, an unlevel indoor head, a condensate pump problem, or low refrigerant can look similar. First protect the wall and floor, and turn the system off if water is reaching electrical parts. Then identify whether the drip occurs during cooling or after shutdown, inspect the filter and visible hose end without opening the head, and note ice, kinks, disconnection, or a submerged hose. Do not remove the indoor cover, chip ice, handle refrigerant lines, or pour cleaner into an unknown drain; persistent, recurrent, or active leaks need qualified HVAC service.
Before you begin
Safety first
- This article supports ordinary-access observation and model-approved filter care or external hose checks only. Do not open the indoor head, touch wet electrical parts, chip or heat ice, pressure-flush an unknown drain, handle refrigerant, or perform electrical testing.
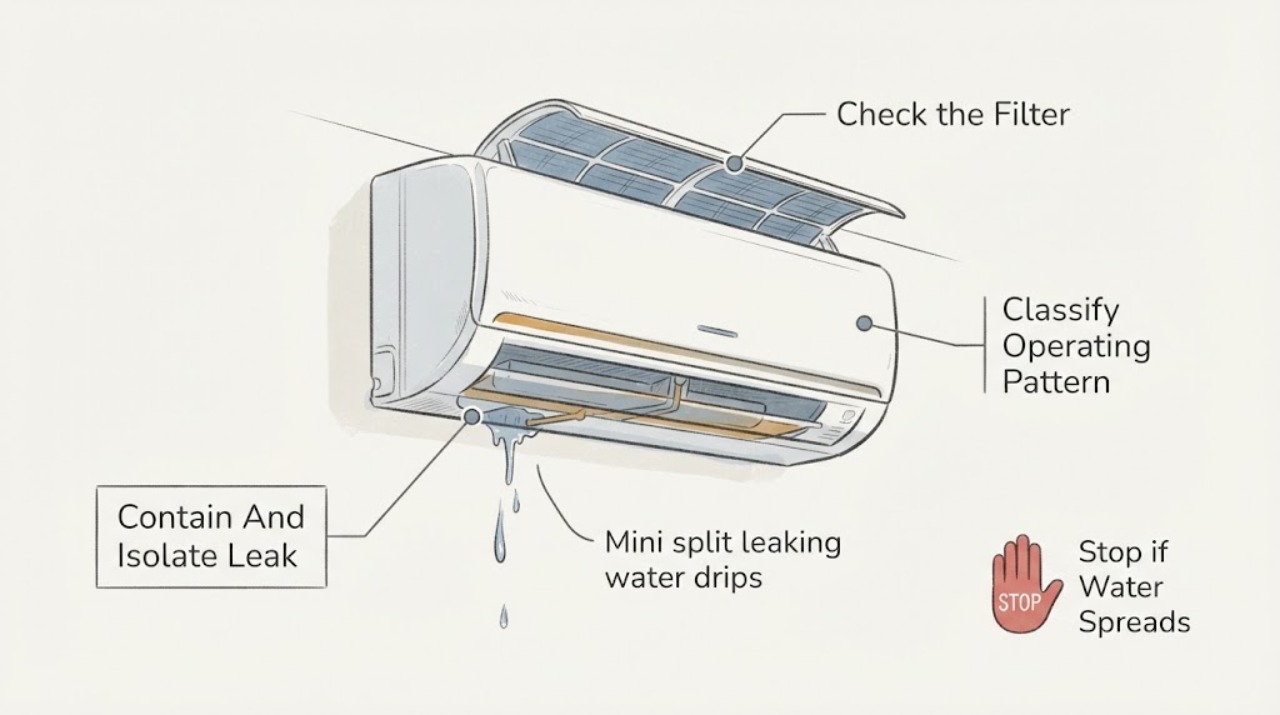
Work through in order
Diagnostic checks
Use only checks that match the exact appliance or system and its official guide.
-
Check 1
Place a container or absorbent material under the indoor head, keep it clear of the unit, and switch the mini split off with the remote or controller; if water is reaching electrical parts, turn off the dedicated breaker only when it can be done without contact with wet equipment.
Expected result: Record whether water is pooling, reaching a receptacle or wiring, staining the wall, dripping from the lower edge, coming from a visible hose connection, or continuing after shutdown.
Next step: Leave the system off when water is near electrical parts or damage is progressing, protect belongings, and arrange prompt HVAC service. If the area is dry and safe, continue only with ordinary-access observations.
Stop if: Do not touch wet wiring, open the indoor cover, move a wet unit, or keep operating the system to see whether the leak worsens.
Why this matters
Why: Water near electrical parts or active structural damage is an immediate safety boundary. Continued dripping after shutdown can be meltwater from a frozen coil or water backed up in the pan or drain, while a localized surface bead may be condensation; neither can be safely diagnosed by touching the cabinet.
-
Check 2
Note the mode and timing of the drip: COOL, DRY, HEAT, immediately after shutdown, during startup, or while the system is off; also note whether the outdoor unit and indoor airflow behave normally.
Expected result: Record whether the leak happens only while removing humidity, only after cooling stops, during heating, after a long run, or independently of operation, and whether the system is short-cycling, weak, or noisy.
Next step: Keep the operating pattern with photos and timestamps, then inspect the filter and visible drain route only if the area remains electrically safe and the model manual permits those checks.
Stop if: Do not force a test run while water is entering electrical parts, and do not interpret a dripping sound alone as proof of a blocked drain.
Why this matters
Why: A leak during or after COOL or DRY focuses attention on condensate collection and drainage. Leakage during HEAT or while fully off may indicate a different condensate, installation, plumbing, or residual-water condition; weak cooling plus ice makes airflow, refrigerant, or coil-freeze causes more plausible.
-
Check 3
With power safely off, inspect the user-accessible air filter and intake area, then clean or rinse the filter only according to the exact model instructions; do not remove covers or reach toward the coil or fan.
Expected result: Classify the filter as visibly loaded with dust, clean, wet, damaged, or not safely removable; note visible frost or ice, weak airflow, or a musty odor through ordinary openings.
Next step: Restore a clean, dry filter as directed and leave the system off long enough for any model-approved recovery; call service if the leak, ice, or weak airflow remains or returns.
Stop if: Do not chip ice, use a heat gun or hair dryer, spray chemicals into the coil, or operate with a missing or wet filter.
Why this matters
Why: A dirty filter can restrict airflow, freeze the indoor coil, and produce meltwater that overwhelms the drain pan. A clean filter with persistent ice, weak airflow, or a leak points toward a drain, refrigerant, coil, fan, or control fault that cleaning alone will not resolve.
-
Check 4
Inspect only the exposed condensate drain hose and outlet from a dry, safe position; compare its route with the model's installation guidance without pulling on buried sections or dismantling the indoor head.
Expected result: Look for a disconnected or torn hose, severe bend or upward loop, a submerged outlet, an outlet that is not draining during a safe COOL or DRY check, or a clear downward route with no visible damage.
Next step: Correct only an obvious external obstruction or container-submersion issue when the manual explicitly permits it and the system is dry; otherwise photograph the route and arrange HVAC service or installer review.
Stop if: Do not pull a hose from the wall, cut or splice concealed tubing, pour bleach or drain cleaner, force a flush, or open the indoor unit.
Why this matters
Why: A disconnected, kinked, submerged, or upward-routed hose can allow condensate to back up into the indoor head. A clear exterior route with continued leaking leaves a concealed blockage, pan, pump, level, refrigerant, or internal fault more likely; lack of visible discharge alone is not a complete diagnosis.
-
Check 5
Review whether the drip began after installation, relocation, wall work, severe weather, or a change in the visible hose path, and photograph the indoor head's apparent level, wall penetration, and accessible drain route.
Expected result: Record any head movement, gap at the wall opening, hose slope change, new bend, water staining, or recent work; do not loosen the mounting bracket or refrigerant connections.
Next step: Send the photographs and installation history to the original installer or a qualified HVAC technician for level, drain, pan, and pump inspection.
Stop if: Do not shim, remount, tilt, or open the head yourself, and do not handle insulated refrigerant lines or electrical connections.
Why this matters
Why: A changed route, unlevel indoor head, or inadequate drain slope can make condensate pool and overflow. A leak unrelated to installation history can still involve the pan, pump, blockage, airflow, or refrigerant and needs the same safety boundary.
-
Check 6
Prepare a service record with the brand, model, installation date, operating mode, drip location and timing, filter result, frost or airflow result, drain-hose observations, photographs, and whether the leak returned after shutdown or a safe filter or route correction.
Expected result: Confirm whether the leak is active, whether wall or electrical damage is present, whether cooling performance is weak, and whether any hissing, burning odor, abnormal noise, or repeated fault indication occurred.
Next step: Keep the system off when unsafe, protect the area, and give the record to a licensed or otherwise qualified HVAC technician; ask them to verify drainage and identify the cause before returning the unit to service.
Stop if: Do not add refrigerant, open service valves, test live wiring, dismantle the fan or pan, or continue operating a unit that leaks onto electrical parts.
Why this matters
Why: An active or recurrent indoor leak, especially with ice, weak cooling, damage, or abnormal sounds, is more likely to require pan, pump, drain, installation, airflow, refrigerant, or electrical diagnosis than another cleaning attempt.
Use your observations
Decision map
Find the observation that best matches what you see, then follow the next safe action.
-
PATH 01Safety boundary
What you see
Water is reaching a receptacle, wiring, control area, wall cavity, ceiling, or other electrical component, or the leak is causing active property damage.
Do this next
Stop the system, turn off the dedicated breaker only if it is safe to do so without touching wet equipment, contain the water, and arrange prompt HVAC service; use a qualified electrician if electrical damage is suspected.
Why this path and its safety boundary
Why it matters: The immediate hazard is electrical or structural water damage, regardless of whether the original cause is a drain blockage, pan, pump, frost, or hose issue.
Safety stop: Do not touch wet wiring, open covers, keep the unit running, or restore power to a wet component.
-
PATH 02Safety boundary
What you see
The drip occurs in COOL or DRY, the filter is not severely dirty, and the exposed drain hose is kinked, disconnected, upward-routed, submerged, or not visibly draining as expected.
Do this next
Correct only a clearly external, model-approved hose or container issue while the area is dry and safe; otherwise have the installer or HVAC technician clear and verify the drainage path.
Why this path and its safety boundary
Why it matters: Condensate backup or return through the drain route is more likely than a filter-only cause, although a concealed blockage or pan problem may remain.
Safety stop: Do not pull buried tubing, flush an unknown hose with chemicals or pressure, or open the indoor head.
-
PATH 03Safety boundary
What you see
The filter is heavily loaded and the indoor coil shows visible ice or the leak increases after cooling stops.
Do this next
Turn the system off, clean or replace the filter only as the model directs, and arrange service if ice or leaking persists; allow only the exact model-approved recovery method.
Why this path and its safety boundary
Why it matters: Restricted airflow with coil freeze and meltwater is more likely, but low refrigerant or another airflow fault can produce a similar pattern.
Safety stop: Do not scrape or heat the coil, keep running a frozen unit, or add refrigerant yourself.
-
PATH 04Safety boundary
What you see
The leak began after installation, relocation, wall work, or a change in the drain route, and the visible hose or mounting appears altered.
Do this next
Keep the evidence and contact the original installer or a qualified HVAC technician to verify level, drain routing, pan and pump operation without dismantling the unit yourself.
Why this path and its safety boundary
Why it matters: Incorrect level, hose slope, connection, or wall routing is more likely than ordinary filter maintenance alone.
Safety stop: Do not tilt or remount the indoor head, pull the drain hose from the wall, or touch refrigerant lines or wiring.
-
PATH 05Safety boundary
What you see
The filter is clean, the accessible hose route is clear and downward, but water continues to drip or returns after a temporary correction; cooling is weak, ice returns, or a pump or pan cannot be viewed safely.
Do this next
Leave the system off when leaking, document the pattern, and arrange qualified HVAC diagnosis of the pan, pump, drain, coil, refrigerant circuit, and controls.
Why this path and its safety boundary
Why it matters: A concealed blockage, damaged pan, condensate pump, low refrigerant, defrost or airflow issue, or internal installation fault is more likely than a user-level obstruction.
Safety stop: Do not remove the cabinet, test refrigerant pressure, open service valves, or keep operating to force water through the system.
-
PATH 06Safety boundary
What you see
There is an intermittent dripping sound but no visible water, the unit is recently installed or has a buried hose, and the system otherwise operates normally.
Do this next
Observe the unit during safe operation for actual water, photograph any moisture, and have the installer review a buried or newly installed drain route if the sound persists or visible leakage appears.
Why this path and its safety boundary
Why it matters: A hose insertion or routing issue, or normal early water-drop noise, is possible; sound alone does not prove an active indoor leak.
Safety stop: Stop operation if visible water reaches electrical parts, the wall, or floor, or if cooling performance becomes abnormal.
Helpful context
Understand the symptom
Protect the area and establish when the indoor head drips
Place a container or absorbent material below the drip without blocking the unit or touching wiring. Note whether water is coming from the lower edge, a hose connection, the wall penetration, or only forming as surface condensation. Record whether it happens in COOL or DRY mode, after the system stops, during HEAT mode, or even when the system is off. A visible leak from the indoor head is not something to ignore: Daikin specifically lists indoor-unit water leakage as a reason to turn off the breaker and call service.
Understand the indoor head's condensate route
In cooling or dry operation, moisture removed from room air collects in the indoor drain pan and should leave through a drain hose. A blockage, disconnected hose, poor downward route, submerged outlet, damaged pan, or pump problem can send that water back into the head. A dirty filter can also restrict airflow, freeze the indoor coil, and create a larger meltwater load when the ice thaws. The location of the drip helps narrow the path, but it does not identify a specific part without model-specific inspection.
Check the filter and visible airflow without opening the cabinet
With the system safely off, inspect the user-removable filter and the area around the indoor air intake. Clean or rinse it only as the exact model's instructions allow, let it dry as directed, and restore it correctly. Look for ice or frost visible through ordinary openings, weak airflow, or a musty odor. If the filter is clean but ice or a leak remains, do not scrape or heat the coil; low airflow, low refrigerant, and other faults require professional diagnosis.
Inspect the exposed drain hose route from a safe position
Follow only the accessible portion of the condensate hose. Look for a disconnected or torn section, a severe bend, an upward loop, an outlet submerged in a container, or an end that is not draining when the model is operating in COOL or DRY. LG notes that a submerged end or hose without a downward slope can allow water to flow back into the unit. Do not pull a buried hose through the wall, open the indoor head, or pour chemicals or water into a drain whose route and material you cannot confirm.
Treat installation and recurrence as diagnostic clues
If the leak began after installation, relocation, wall work, or a change in the hose route, photograph the indoor head, wall penetration, and visible hose path for the installer or technician. A unit that is not level or a drain line without the required slope can pool condensate and overflow. If the leak returns after a filter clean or a temporary drain correction, the remaining possibilities include an internal pan, pump, concealed blockage, defrost or airflow issue, low refrigerant, or installation fault rather than a finished repair.
Safety boundary
Stop conditions
- Turn the system off if water reaches electrical parts, the wall cavity, ceiling, receptacle, wiring, or other equipment, and disconnect power only through a safe accessible breaker without touching wet components.
- Do not remove the indoor cover, drain pan, fan guard, or mounting bracket, and do not pull buried drain tubing through the wall.
- Do not chip or heat ice, spray chemicals into the unit, pour bleach or drain cleaner into an unknown hose, or force a high-pressure flush.
- Do not open service valves, add or release refrigerant, test live electrical circuits, or handle refrigerant lines and wiring.
- Stop operation and arrange HVAC service for active or recurrent leaks, weak cooling with ice, a damaged pan or hose, abnormal sounds or smell, or water damage.
Only after diagnosis
Potential parts
- mini split drain hose
Consider this class only when model-specific inspection confirms that the existing condensate hose is torn, disconnected beyond a simple approved correction, kinked beyond recovery, or incorrectly sized or routed.
Match the exact indoor-unit model, hose diameter, connector, insulation, routing, slope, and installation requirements; do not splice or replace concealed hose based on appearance alone. - condensate drain treatment
Consider this category only if the exact manufacturer permits a particular condensate treatment and a qualified or model-approved maintenance procedure identifies biological buildup; it is not a substitute for finding a kink, pan, pump, or installation fault.
Confirm the product chemistry, material compatibility, pump and drain requirements, and manufacturer instructions; never pour an unknown chemical into the indoor unit or mix cleaners. - mini split drain pan
Consider this class only after model-specific service diagnosis confirms a cracked, corroded, warped, or otherwise defective indoor drain pan rather than a blocked route, pump, filter-freeze, or installation issue.
Match the exact indoor-unit model, pan geometry, drain outlet, insulation, pump arrangement, and manufacturer fit; pan removal and replacement require qualified service.
When checks do not resolve it
Need a professional?
Arrange qualified HVAC service promptly for water near electrical parts or active wall, ceiling, or floor damage. Call when the leak persists after an approved filter or visible route correction, the hose is concealed or severely bent, the indoor head may be unlevel, the drain pan or condensate pump cannot be safely inspected, ice or weak cooling is present, refrigerant is suspected, or the leak returns after shutdown. Keep the system off whenever operating it could spread water or damage electrical components.
Safety scope: This article supports ordinary-access observation and model-approved filter care or external hose checks only. Do not open the indoor head, touch wet electrical parts, chip or heat ice, pressure-flush an unknown drain, handle refrigerant, or perform electrical testing.
Common questions
FAQ
Why is water dripping from the indoor head of a mini split?
The condensate may not be leaving through the drain hose because of a blockage, kink, disconnection, submerged or upward route, damaged pan, or pump issue. A dirty filter can freeze the indoor coil and create meltwater, while low refrigerant or improper installation can look similar. Turn the system off if water reaches electrical parts and arrange service for a persistent leak.
Can a dirty mini-split filter cause an indoor water leak?
Yes. Restricted airflow can make the indoor coil freeze; when the ice melts, the water can overwhelm the drain pan. Clean the user-accessible filter only as the exact model directs. Do not chip or heat ice, and call HVAC service if freezing or leaking continues.
What should I look for on the mini-split drain hose?
From a safe dry position, look for a disconnected or torn section, severe bend, upward loop, submerged outlet, or a route that is not sloping downward as the model requires. Do not pull buried tubing, pressure-flush an unknown drain, or open the indoor head; have an installer or technician correct concealed or uncertain routing.
Can I keep running a mini split that is dripping water?
Do not keep running it when water is reaching electrical parts, the wall, ceiling, or floor, or when the leak is active and worsening. Turn it off, contain the water, and arrange HVAC service. Even when the area is safe, a recurrent indoor leak can damage the pan, wall, or electrical components.
When does a mini-split water leak need an HVAC technician?
Call when the leak persists after an approved filter or visible hose correction, the hose is concealed or badly routed, the pan or pump cannot be safely inspected, ice or weak cooling is present, the leak began after installation, or refrigerant, electrical, mounting, or internal work may be involved.
Read the exact guide
Official sources
- Care and CleaningDaikin · Daikin operation manual for a specified wall-mount series; exact model manual controls settings, maintenance, access, and service.
- Mini Split Leaking Water: Diagnosis and RepairCarrier · Carrier consumer guidance for ductless mini-split leaks; exact model instructions and qualified service control the repair procedure.
- [LG Air Conditioner Noises] There is water dripping sound from the inside of the air conditioner.LG USA Support · LG support article about dripping sounds; an actual visible leak or model-specific condition requires additional troubleshooting or service.
- [LG Air Conditioner] Perform a Pre-Summer Check to Stay CoolLG USA Support · LG general support guidance; images and procedures may differ by model, and concealed or unsafe repairs need service.
- Why Is My AC Leaking Water?Carrier · Carrier general air-conditioner guidance used for shared condensate and electrical-water safety principles; the mini-split model manual controls the exact procedure.
Community feedback
Share a repair observation
Share a plain-text repair observation. Accepted observations are published automatically; this page may take a moment to update.