
On this page
Start here
Quick answer
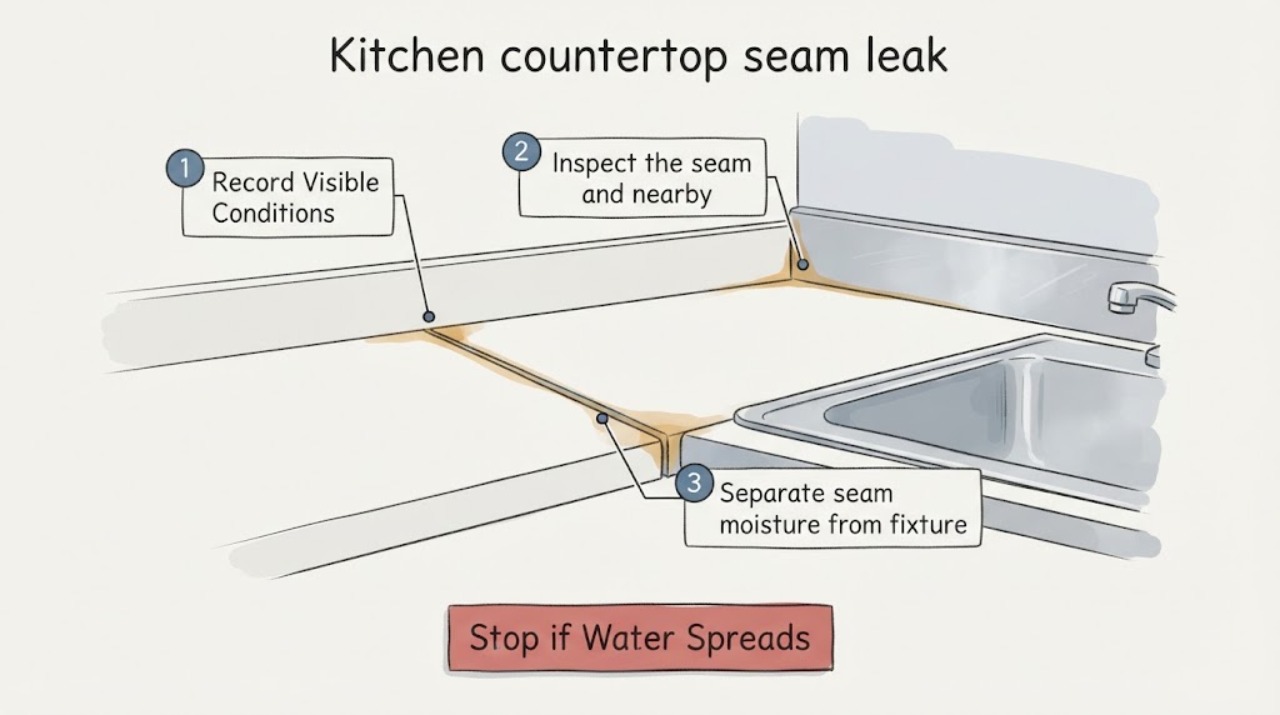
First determine when the leak appears and whether it is at the seam itself, the sink or faucet edge, the backsplash, or a cabinet-side plumbing connection. From a dry, safe position, document existing moisture, stains, swelling, seam separation, and movement without adding water or pulling the countertop. Stop using the affected sink or counter if water is reaching electrical equipment, the cabinet base is swelling, or the leak is active. A small failed seal may need compatible silicone, but a moving seam, wet substrate, or recurring source needs countertop, plumbing, or water-damage service before any cosmetic seal is applied.
Work through in order
Diagnostic checks
Use only checks that match the exact appliance or system and its official guide.
-
Record when and where the leak appears
From a dry position, photograph the seam and note whether moisture is visible now. Record the last known trigger—sink use, faucet use, dishwasher operation, cleaning, a spill, rain at a nearby wall, or no known trigger—without deliberately recreating it.
Expected result: Map the first visible wet point: along the seam, at the sink rim, around a faucet opening, along the backsplash, at a countertop end, or beneath the cabinet. Note whether the drip is immediate, delayed, intermittent, or present even when fixtures have not been used.
Next step: Keep the photo, trigger history, and map for service. Avoid adding water or repeating a suspected trigger until the area is dry and the source can be assessed safely.
Stop if: Stop using the sink and counter if water is active, the cabinet floor is wet, water approaches an outlet or appliance, or the source cannot be kept contained.
Why this matters
Why: Timing and first appearance help separate a countertop seal concern from a fixture, supply, drainage, or wall-side source. Water appearing away from the seam does not prove the seam failed; it may have traveled along the underside or cabinet structure.
-
Inspect the seam and nearby surface without probing
Use normal light or a flashlight to view the full accessible seam from above. Look for an open line, missing or cracked sealant, discoloration, a raised edge, a height difference, or a seam that appears to have shifted. Do not press, pry, scrape, cut, or pull the seam.
Expected result: Record whether the seam is straight and closed, has a short open section, is separated along much of its length, or shows a step or change in alignment. Note whether the visible seal is continuous around the sink and backsplash transitions.
Next step: Photograph the seam end-to-end and identify the material if known, such as laminate, solid surface, stone, or wood-based worktop. Do not apply a new seal over a wet, moving, dirty, or unknown joint.
Stop if: Stop if the countertop shifts, an edge is sharp, a large gap opens, or inspection would require removing trim, a sink, or the countertop.
Why this matters
Why: A small, stationary gap can be a sealing detail, while separation, height change, or a wavering seam can indicate movement or loss of support that a bead of caulk may not correct. Corian’s fabrication guidance emphasizes fit and alignment for solid-surface seams, so an unknown material or moving seam should be assessed by a countertop professional.
-
Separate seam moisture from fixture and plumbing clues
From a dry position, visually inspect the sink rim, faucet base, exposed drain or supply areas, dishwasher-side edge, and backsplash junction. Look for existing droplets, mineral tracks, stains, or dampness; do not touch wet fittings, loosen connections, or run water to reproduce the leak.
Expected result: Record whether the seam is dry while a fixture edge is wet, whether a stain begins under a supply or drain area, and whether moisture is confined to the top surface or visible inside the cabinet. Note any recent plumbing or appliance work.
Next step: Keep the affected fixture out of use and arrange plumbing or countertop service based on the first wet point. Provide photos from a safe, dry position and do not attempt concealed plumbing work.
Stop if: Stop immediately for active plumbing leakage, a wet electrical outlet or appliance, sewage-like water, or water spreading into the cabinet or wall.
Why this matters
Why: IKEA recommends sealing worktops and sink installations against moisture, but a wet supply, drain, or fixture base is a plumbing or installation issue rather than proof that the countertop seam needs silicone. A source that remains wet without counter use is more urgent than a cosmetic seal failure.
-
Check cabinet-side moisture and progression
Look inside the accessible cabinet without removing shelves, panels, or plumbing. Observe the underside of the countertop, cabinet top rails, side panels, and floor for dampness, swelling, staining, softened material, odor, or mold-like growth. Compare with an older dry photo if available.
Expected result: Record a dry cabinet, a localized stain below the seam, a trail from a fixture, widespread swelling, or moisture that continues after the counter has been left unused. Note whether the seam gap or cabinet damage is increasing.
Next step: Keep the cabinet open only if that is safe and does not expose wiring or plumbing hazards; otherwise close it and arrange service. Share the photos and timeline with the technician.
Stop if: Stop entering the cabinet if there is standing water, exposed wiring, strong odor, unstable material, or any need to dismantle a panel or connection.
Why this matters
Why: Localized old staining may be a past event, but active dampness, swelling, odor, or spreading damage means the source and substrate need attention before sealing. A countertop repair kit cannot restore a wet or deteriorated cabinet support or stop an active plumbing leak.
-
Track movement and repeat appearance safely
Take a dated photo of the seam from the same angle after the area is dry. Record whether the gap, edge height, staining, or moisture returns during ordinary use already reported by the household; do not perform a prolonged leak test or load the seam to check movement.
Expected result: A dry, unchanged seam with no cabinet damage differs from a seam that opens, shifts, or leaks repeatedly. Note whether the change follows temperature, humidity, cabinet settling, fixture use, or recent installation work.
Next step: Provide the timeline, photos, countertop material, seam location, and any plumbing or cabinet history when requesting a quote. Let the professional decide whether the joint needs cleaning, resealing, alignment, support, or replacement.
Stop if: Stop normal counter or sink use if the leak recurs, the seam moves, the cabinet softens, or water reaches an electrical or appliance area.
Why this matters
Why: Progression or repeat leakage lowers the chance that a surface-only patch will be durable. A stable, dry, isolated seal failure may be reviewed for compatible silicone after the material and joint are identified.
Use your observations
Decision map
Find the observation that best matches what you see, then follow the next safe action.
-
PATH 01Safety boundary
What you see
The seam has a small visible gap, the countertop is stable and dry, the cabinet is sound, and no fixture or plumbing source is wet.
Do this next
Ask a countertop professional to identify the material and confirm whether a compatible silicone sealant can be applied after proper surface preparation. Do not cover a wet or moving joint.
Why this path and its safety boundary
Safety stop: If the gap reopens or moisture returns, stop cosmetic sealing and request a fit, support, and source assessment.
-
PATH 02Safety boundary
What you see
The seam is separated, raised, misaligned, or moving, or the gap extends along much of the joint.
Do this next
Request countertop service to assess alignment, support, seam material, and whether the top can be repaired without removal. Provide end-to-end photos and avoid applying pressure or sealant.
Why this path and its safety boundary
Safety stop: Keep weight and normal work away from the affected area if the top shifts or an edge is sharp.
-
PATH 03Safety boundary
What you see
The first wet point is at a faucet, sink rim, drain, supply, dishwasher edge, or other fixture rather than the seam.
Do this next
Stop the affected fixture and request plumbing or appliance service, with countertop service if the worktop has absorbed moisture or the seal has been damaged.
Why this path and its safety boundary
Safety stop: Do not tighten, disconnect, or test a wet connection; stop if water approaches electrical equipment or spreads inside the cabinet.
-
PATH 04Safety boundary
What you see
The cabinet underside is swollen, damp, stained, odorous, or deteriorating, or the leak remains active when the counter is unused.
Do this next
Arrange prompt water-damage, plumbing, and countertop assessment as appropriate. Keep the area dry and provide photos showing the source path and extent.
Why this path and its safety boundary
Safety stop: Do not conceal the damage with caulk, remove cabinet panels, or continue using the sink until the active source and safety conditions are addressed.
Helpful context
Understand the symptom
The seam may not be the source
Water can travel along the countertop before appearing at a seam. A leak that starts only when the sink, faucet, dishwasher, or nearby supply is used may come from a fixture or connection rather than the seam. A leak that appears after wiping the counter or during ordinary splash exposure points to a surface seal, sink edge, or seam, but the timing still needs to be documented rather than assumed.
Protect the cabinet while you observe
Keep the area dry and place an absorbent towel or container below an existing drip only if it can be done without touching electrical equipment or plumbing. Do not remove the countertop, open a concealed wall, probe the seam, or run a long water test.
Only after diagnosis
Potential parts
- silicone-caulk
Only consider a silicone sealant after the countertop material and joint are identified, the seam is stable and dry, and the source of water is no longer active.
Match the sealant to the countertop, sink, finish, joint location, and manufacturer guidance; a new bead cannot correct movement, poor fit, or concealed leakage. - countertop-repair-kit
Only consider a repair kit when a countertop professional confirms a localized, stable surface or seam defect that the kit is designed to address.
Match the kit to laminate, solid surface, stone, or wood-based material and color; do not use it over wet, swollen, moving, or unsupported material. - leak-alarm
Consider a leak alarm only as a monitoring aid after the source has been addressed or while awaiting service; it is not a repair or a substitute for supervision.
Place it only on a dry, accessible surface away from electrical hazards and follow its instructions; confirm that the alarm is suitable for the cabinet environment.
When checks do not resolve it
Need a professional?
Call countertop service for a separated, moving, or recurring seam; call plumbing or appliance service when the first wet point is a faucet, sink, drain, supply, or dishwasher connection. Request water-damage help when cabinet material is swollen, damp, odorous, or deteriorating.
Have this ready
- Provide the leak timing, first wet-point map, countertop material if known, seam photos, fixture and cabinet observations, recent installation or plumbing history, and whether water reaches an outlet or appliance.
Common questions
FAQ
How can I tell whether the seam or the sink is leaking?
Record the first place that becomes wet and when it appears. A wet faucet base, sink rim, drain, or supply points toward that fixture; a stable dry fixture with moisture limited to a seam keeps the seam in consideration. Do not deliberately run water to reproduce an active leak.
Can I just apply silicone over a leaking countertop seam?
Only after the material, joint, and source are confirmed and the seam is stable, dry, and clean. Silicone cannot correct a moving or poorly fitted seam, stop a concealed plumbing leak, or restore swollen cabinet material.
What if the cabinet under the seam is swollen?
Stop using the affected area and arrange prompt plumbing, countertop, or water-damage assessment. Photograph the swelling and moisture from a safe position, but do not remove cabinet panels or conceal the damage with a new bead of sealant.
Read the exact guide
Official sources
- Should I use silicone sealant when mounting a worktop or sink?IKEA · Supports the role of silicone as a moisture barrier at compatible worktop or sink installations; it does not authorize resealing an unknown or moving seam.
- Do I need to seal the hole around the kitchen tap?IKEA · Supports distinguishing a faucet-opening seal from the countertop seam and treating moisture protection as material- and installation-dependent.
- Use & CareCorian · Supports promptly wiping spills and seeking professional repair for deeper or persistent countertop damage; exact care varies by material.
- Corian Solid Surface Fabrication/Installation Fundamentals: SeamingCorian · Supports treating fit, alignment, and movement as distinct from a simple surface seal; it is not a homeowner procedure for an unknown countertop.
Community feedback
Share a repair observation
Share a plain-text repair observation. Accepted observations are published automatically; this page may take a moment to update.