
On this page
Start here
Quick answer
A sink cutout does not automatically mean the whole kitchen countertop must be replaced. First document whether the visible problem is limited to a failed seal or loose sink, or whether the cutout edge is cracked, swollen, delaminated, unsupported, or allowing water into the cabinet structure. Keep the sink and surrounding counter dry, avoid leaning on or lifting a loose sink, and do not cut the countertop or dismantle the cabinets. A countertop fabricator or remodeling professional can compare the sink type, material, existing cutout, support, and cabinet condition and then quote a localized repair, a new cutout in a replacement top, or a full countertop replacement. If the sink is unstable, water is actively entering the cabinet, the counter is sagging, or nearby electrical equipment is wet, stop using that area and arrange prompt professional service.
Before you begin
Safety first
- Do not cut, drill, grind, sand, pry, lift, or remove the countertop or sink; do not dismantle cabinets, disconnect plumbing, disturb mold or softened material, or touch wet electrical equipment. Keep an unstable or actively leaking sink out of use until qualified service assesses it.
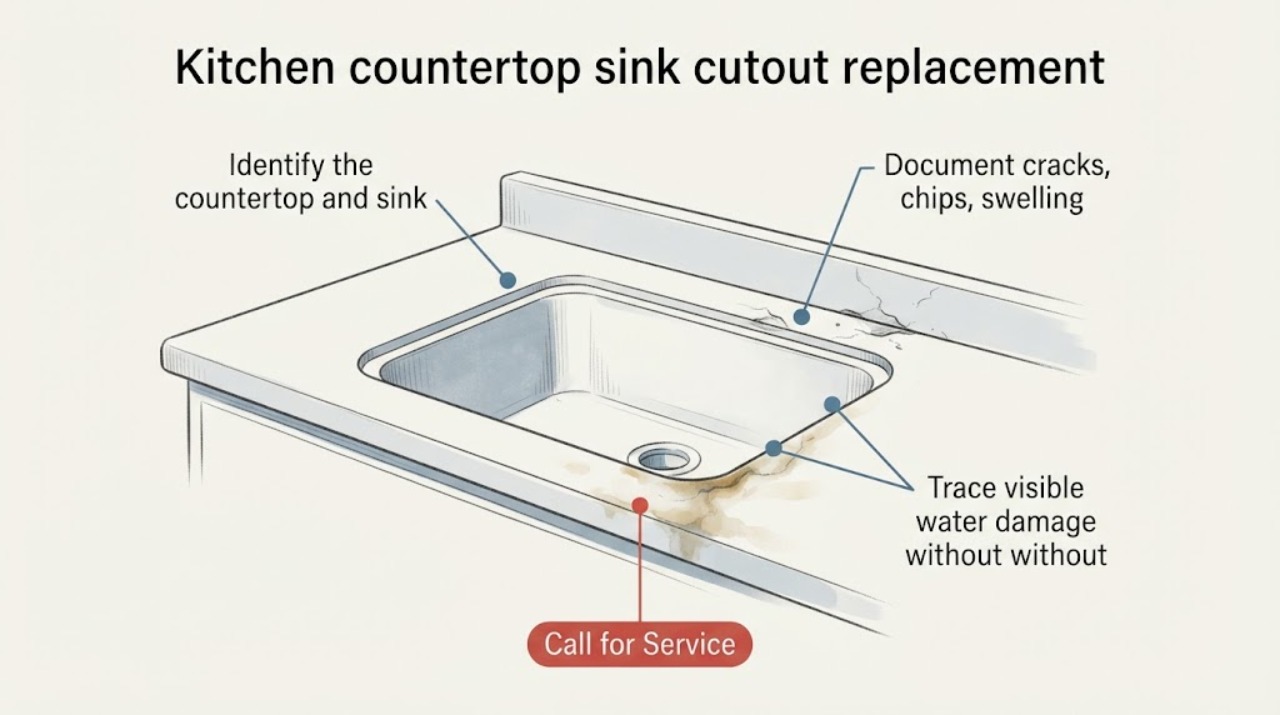
Work through in order
Diagnostic checks
Use only checks that match the exact appliance or system and its official guide.
-
Identify the countertop and sink arrangement
From a safe, dry position, identify the countertop material if known and whether the sink is top-mounted, under-mounted, flush-mounted, or integrated. Photograph the sink rim and the cutout edge without lifting, prying, or loosening the sink.
Expected result: Note the sink style, the visible edge finish, any seam near the opening, and whether the countertop appears to be one piece or joined around the sink.
Next step: Give the material, sink style, and photos to a countertop fabricator or remodeling professional. Do not choose a repair compound or cutting method from appearance alone.
Stop if: Stop if the sink shifts, the counter flexes, an edge is falling away, or inspection would require lifting the sink or removing plumbing or cabinetry.
Why this matters
Why: The sink arrangement and surface material determine how the opening is supported, sealed, and fabricated. They also determine whether a local repair is plausible or a replacement top and new fabrication should be considered.
-
Document cracks, chips, swelling, and delamination
Use a light and camera from a standing position to inspect the visible perimeter of the sink cutout and the counter surface around it. Do not probe, scrape, sand, pry, or enlarge the opening.
Expected result: Record whether damage is a hairline surface mark, a through-crack, a chipped corner, a swollen or separated laminate edge, a soft-looking substrate, or a gap that is changing. Note its location relative to the sink rim and any nearby seam.
Next step: Send close and wide photos to the professional and ask for an assessment of both the visible top and the support below. Do not conceal structural damage with caulk or a cosmetic kit.
Stop if: Stop using the sink if the crack is widening, an edge is sharp or loose, the top is sagging, or a piece could fall into the cabinet.
Why this matters
Why: A surface-only finish or seal issue may be a localized maintenance item, while a through-crack, separated layer, softened substrate, or damage at a corner or seam can affect support and may require fabrication or replacement.
-
Trace visible water damage without disturbing the cabinet
With the sink unused, look from the front of the cabinet and from the floor for visible water, staining, swollen panels, damp contents, or a drip path. Only move loose, dry contents if they can be removed without reaching through water or touching wiring.
Expected result: Note whether water is present now, whether staining is directly below the cutout or farther along a supply, drain, or cabinet joint, and whether wood or finish looks swollen or softened.
Next step: Keep the area dry and report the source pattern to a countertop or plumbing professional as appropriate. Do not disconnect pipes, cut the cabinet, or begin mold remediation.
Stop if: Stop immediately for active leaking, sewage-contaminated water, a saturated cabinet base, mold disturbance, or any wet electrical outlet, appliance cord, or junction.
Why this matters
Why: Water limited to the perimeter may point toward a seal or sink-support issue, but water from plumbing or a cabinet joint can mimic a cutout leak. Swelling or softening means the support condition needs professional review, not just a new bead of sealant.
-
Check whether the sink remains stable
Visually compare the sink rim or reveal with the surrounding countertop while the sink is empty and unused. Do not press down on the sink, lift it, remove clips, or perform a filled-sink test.
Expected result: Record a uniform rim or reveal, a visible gap, a separated seal, a tilted sink, movement already noticed during ordinary use, or a sink that appears to be bearing on a damaged edge.
Next step: Stop loading or using an unstable sink and request an on-site assessment. Include the sink type and whether the countertop beneath it appears supported.
Stop if: Stop and isolate the area if the sink can shift, the cutout edge is crumbling, the counter is sagging, or the sink could fall.
Why this matters
Why: A stable sink with a localized seal gap may need a seal-focused assessment. A visible gap with movement, tilt, or damaged support is a safety and structural concern and can make continued use worsen the countertop or cabinet damage.
-
Prepare the replacement or repair scope
Collect the sink model or installation paperwork if available, countertop material and color information, photos of the top and cabinet, and notes about when the issue began and whether it followed an impact, plumbing leak, or prior installation.
Expected result: A complete record may show a single seal event, recurring moisture, an impact-related crack, a material failure, a support problem, or a mismatch between the sink and the existing opening.
Next step: Request a countertop fabricator or remodeling professional to inspect the cutout, sink support, cabinet condition, and any nearby plumbing before selecting materials or ordering parts.
Stop if: Stop if preparing the information would require removing the sink, cutting the top, disconnecting plumbing, opening a wall, or disturbing suspected mold or structural damage.
Why this matters
Why: A professional can use these distinctions to decide whether to quote local seal or edge work, a replacement sink cutout, a replacement countertop section, or a full top replacement. No single visual sign proves the required scope.
Use your observations
Decision map
Find the observation that best matches what you see, then follow the next safe action.
-
PATH 01Next step
What you see
The countertop is intact, the sink is stable, and the visible issue is limited to a local seal gap with no swelling or ongoing water path.
Do this next
Ask a qualified countertop or remodeling professional to confirm whether a compatible seal repair is appropriate for that sink and material. Keep the area dry until it is assessed; do not assume a new seal will correct hidden support damage.
-
PATH 02Next step
What you see
The cutout edge is cracked, chipped through, delaminated, swollen, or close to a seam, or the top flexes or sags.
Do this next
Treat it as a fabrication and support assessment. Stop loading the sink and obtain a professional quote for repair, a replacement section, or a replacement countertop rather than cutting the installed top yourself.
-
PATH 03Next step
What you see
The sink moves, tilts, has a visible support gap, or appears to be separating from the countertop.
Do this next
Stop using the sink and keep people away from the unstable area. Request prompt countertop service and include photos of the sink rim, cutout, and cabinet support.
-
PATH 04Next step
What you see
Water is active, the cabinet base is swollen or soft, or the source may be a supply, drain, or appliance connection rather than the cutout.
Do this next
Limit use of the sink and arrange appropriate plumbing or remodeling assessment. Do not cut the cabinet, disconnect pipes, or cover the damage before its source and extent are documented.
-
PATH 05Next step
What you see
There is mold, sewage-contaminated water, a wet electrical component, or a structural concern.
Do this next
Isolate the area and use qualified remediation, plumbing, electrical, or remodeling professionals as applicable. Do not disturb contaminated material or touch wet electrical equipment.
-
PATH 06Next step
What you see
The proposed work requires cutting, grinding, drilling, sink removal, cabinet demolition, or access to concealed plumbing or support.
Do this next
Stop and obtain an on-site quote from a trained countertop fabricator or remodeling professional. The installed top and cabinet are not a safe practice surface for an unplanned cutout change.
Helpful context
Understand the symptom
Repair or replacement depends on what the cutout is doing
A small, surface-level seal failure is a different project from a cracked cutout edge or a top that no longer supports the sink. The material also matters: laminate, solid surface, quartz, porcelain, and natural stone have different fabrication and support requirements. A professional needs the sink style, countertop material, cutout shape, visible damage, and cabinet support before recommending a repair or replacement.
Why field cutting is not a safe shortcut
Sink openings concentrate stress in the countertop, and the sink load must be transferred through suitable support rather than left to a damaged edge. Manufacturer and industry guidance emphasizes accurate templating, clean cutouts, edge treatment, seam planning, and adequate support. Cutting or enlarging an installed top can damage the slab, cabinetry, plumbing, or surrounding finish, so leave fabrication and structural decisions to a trained countertop professional.
What to prepare for a quote
Take clear photos from above and inside the cabinet without disturbing the sink or damaged material. Record the countertop material if known, sink style, approximate age, where water appears, whether the sink moves, and whether damage is spreading. Clear loose items from the cabinet only if it can be done from a dry, stable position; do not disconnect plumbing or remove the cabinet.
Only after diagnosis
Potential parts
- silicone-caulk
Consider this only if a professional confirms that the countertop and sink are structurally sound and the issue is limited to a compatible perimeter seal.
Sealant chemistry, surface preparation, sink style, and manufacturer instructions vary; confirm compatibility and application with the countertop or sink manufacturer or a qualified installer. - countertop-repair-kit
Consider this only after a professional identifies a localized cosmetic or surface repair that does not involve a cracked cutout, softened substrate, sink support, or active leak.
Repair products are material- and finish-specific and may not restore structural support or waterproofing; verify the exact material and warranty implications before use.
When checks do not resolve it
Need a professional?
Arrange a countertop fabricator or remodeling professional when a sink cutout needs replacement assessment, the edge is cracked or swollen, the sink is loose, water has reached the cabinet, or the work would involve cutting, sink removal, cabinet access, or structural support. Use prompt service for an unstable sink or active leak.
Safety scope: Do not cut, drill, grind, sand, pry, lift, or remove the countertop or sink; do not dismantle cabinets, disconnect plumbing, disturb mold or softened material, or touch wet electrical equipment. Keep an unstable or actively leaking sink out of use until qualified service assesses it.
Have this ready
- Provide the countertop material and color if known, sink style and model if available, photos of the cutout from above and below, the location and progression of cracks or swelling, the water pattern and any plumbing history, and whether the sink moves or the top flexes.
Common questions
FAQ
Does a damaged sink cutout always require a new countertop?
No. A stable sink and intact countertop with a localized seal issue may have a repair path, while a cracked, swollen, delaminated, or unsupported cutout may require fabrication or replacement. A professional must assess the material, sink style, support, and water damage together.
Can I enlarge or recut the sink opening myself?
Do not recut an installed countertop as a shortcut. The cutout concentrates stress and may involve dust, hidden support, plumbing, seams, and sink load. Have a trained countertop fabricator evaluate the top and produce a safe scope.
Is a new bead of caulk enough when the sink leaks?
Only if a professional confirms that the sink and cutout are stable and the problem is limited to a compatible seal. Caulk cannot restore a cracked edge, swollen substrate, loose sink support, or a leak that originates in plumbing.
What photos help a countertop professional quote the work?
Provide a wide view of the counter, close views of every crack or chip, the sink rim and cutout edge, the cabinet area below, visible water paths or swelling, the sink style, and any material or installation information. Do not remove the sink or cabinet to obtain the photos.
When should I stop using the sink?
Stop using it if the sink moves or tilts, the countertop flexes or sags, the cutout edge is crumbling, water is active or reaching electrical equipment, the cabinet is soft or swollen, or the area is contaminated. Isolate the area and arrange qualified service.
Read the exact guide
Official sources
- How to Cut a Sink Hole in a Formica Laminate CountertopFormica · Manufacturer guidance showing that sink templates, cutout fit, support, and sealing depend on the laminate countertop and sink arrangement; it is not permission to alter an installed countertop in this professional-service topic.
- Natural Stone Institute - Installation StandardsNatural Stone Institute · Industry-association overview identifying sink cutouts, seam placement, support, and tolerances as technical countertop fabrication topics; it does not establish a universal repair method for a particular home.
- The Fabrication Series: Know Your ProfessionalsCaesarstone · Manufacturer explanation of templating, fabrication, installation, support, and professional handling for quartz countertop projects; exact requirements vary by material and installation.
- The Basics of Slab FabricationCaesarstone · Manufacturer fabrication guidance for Caesarstone surfaces; use it as material-specific context, not as a universal repair specification for every countertop.
Community feedback
Share a repair observation
Share a plain-text repair observation. Accepted observations are published automatically; this page may take a moment to update.