
On this page
Start here
Quick answer
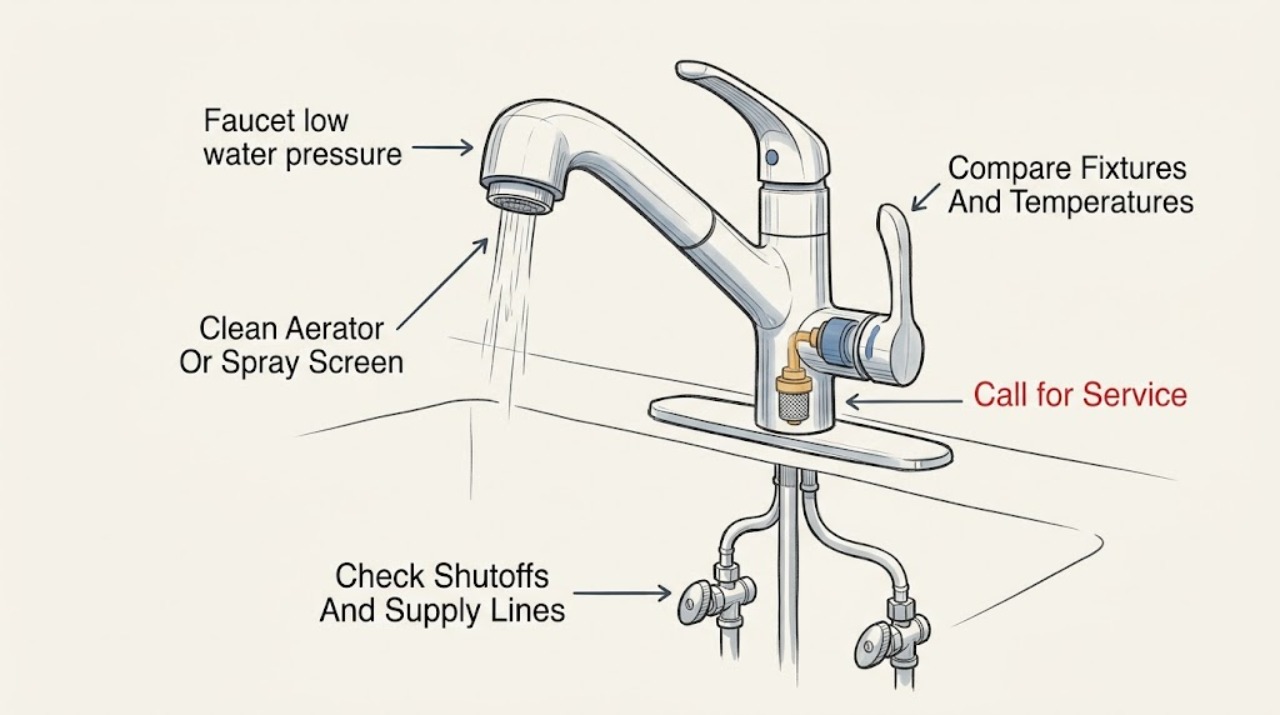
When a Delta faucet has low water pressure, first compare it with another fixture and compare hot flow with cold flow. If only this faucet is weak, clean the accessible aerator or spray-head screen, check that the hot and cold shutoff valves are open, and look for kinked supply lines. Delta says clogged flow restrictors and debris can greatly reduce flow, and that a faucet should be flushed after water has been turned off for repairs. Pull-down or touch models may also have a screen or filter in the spray head, hose, or solenoid path. Do not remove a flow restrictor just to increase flow, force a seized aerator, disconnect a pressurized line, or open a cartridge or solenoid without the exact model instructions. If all fixtures are weak, only one temperature is weak after the visible checks, flow remains low after an approved flush, or the faucet leaks, arrange plumbing service.
Before you begin
Safety first
- This article supports fixture comparison, ordinary-access outlet cleaning, visible shutoff and hose inspection, and a model-approved flush. A qualified plumber must handle pressurized disconnection, cartridge or valve-body work, solenoid or concealed-line service, upstream pressure diagnosis, and any repair near electrical components.
Work through in order
Diagnostic checks
Use only checks that match the exact appliance or system and its official guide.
-
Check 1
Run the Delta faucet at full normal opening and compare its flow with a nearby faucet, then compare hot and cold flow at the Delta faucet without removing parts.
Expected result: Record low flow at every fixture, low flow only at this faucet, low flow on hot only, low flow on cold only, or low flow on both temperatures; note whether another fixture changes the result.
Next step: Use the matching branch below before ordering parts; keep the faucet assembled until the symptom is localized.
Stop if: Stop for a leak inside a cabinet or wall, uncontrolled flow, water near electrical equipment, or any need to alter the main plumbing.
Why this matters
Why: Whole-home or multi-fixture weakness points toward building pressure, a main valve, or upstream plumbing. A single-faucet problem points toward its aerator, spray path, supply, shutoff, cartridge, or solenoid. A temperature-specific problem makes the affected supply side or internal passage more likely.
-
Check 2
If only the Delta faucet is weak, inspect and clean the aerator at the spout or the screen inside the spray head when the installed model is designed for that access; use gentle grip and preserve the gasket.
Expected result: Record a clogged screen or aerator, mineral scale, damaged gasket, no removable screen, or normal screen with low flow still present; for a wand, note whether flow improves with the wand removed only if the model instructions permit that test.
Next step: Rinse or clean only as Delta's model instructions allow, reinstall the gasket and aerator or spray head, and retest. If removal requires force or the screen is not intended to be removed, stop and request model-specific help.
Stop if: Do not crush a decorative aerator, poke a screen with sharp tools, remove a flow restrictor permanently, or run a pull-down hose where it can retract into the body.
Why this matters
Why: Debris at the last outlet restriction can explain a localized low-flow symptom. A clean or non-removable outlet with continued weakness shifts attention to the hose, solenoid, supply, shutoff, flow regulator, or cartridge.
-
Check 3
Look under the sink or at the accessible faucet service area and confirm the hot and cold shutoff valves are open; inspect the visible supply lines for kinks, crushing, moisture, or a partially closed valve without disconnecting a line.
Expected result: Record open and dry shutoffs, a partially closed valve, a stuck or leaking valve, a kinked hose, or a sound visible line with low flow still present.
Next step: Open a normally operating valve only as far as its design permits and retest; do not force a seized valve. Arrange plumbing service for a leak, corrosion, damaged hose, or low flow that remains after the visible check.
Stop if: Do not loosen a pressurized connection, twist a corroded stop, use a tool on a fragile valve, or continue if water reaches the cabinet floor.
Why this matters
Why: A partly closed valve or kinked hose can restrict one or both sides before water reaches the Delta faucet. A sound open supply path makes an outlet restriction, flow regulator, solenoid screen, cartridge, or upstream pressure issue more likely.
-
Check 4
If the low flow began after a shutoff, installation, or plumbing repair, follow Delta's faucet-flush procedure for the installed design: remove only the approved outlet part, open the faucet as directed, and flush into the sink while keeping small parts and gaskets accounted for.
Expected result: Record improved flow after flushing, debris captured in the outlet part, no change, a leak at a connection, or a flush procedure that cannot be performed without internal disassembly.
Next step: Reinstall the approved outlet component and retest; arrange service when debris returns, flow remains low, or the model requires internal component removal.
Stop if: Do not flush through a disconnected pressurized line, leave out the aerator or screen, mix cleaning chemicals, or continue with a leaking connection.
Why this matters
Why: Improvement after flushing supports debris introduced during the water event. No change points toward a persistent outlet, regulator, supply, solenoid, cartridge, or building-pressure problem. A leak after reassembly indicates a sealing or connection fault.
-
Check 5
Record the Delta model and whether the faucet is single-handle, two-handle, pull-down, pull-out, or touch-operated; use the exact manual to locate any flow regulator, cartridge, spray screen, or solenoid filter before considering internal access.
Expected result: Record a confirmed model and accessible component, an unknown model, a screen or regulator identified by the manual, or a cartridge and valve body that require panel or supply access.
Next step: Follow only the exact model's maintenance procedure with water supplies off for internal work; if the model or part cannot be confirmed, provide photos and arrange plumbing service.
Stop if: Do not bypass a solenoid, remove a flow regulator by guesswork, open a cartridge that the manual treats as non-serviceable, or proceed with an unisolated supply.
Why this matters
Why: Delta manuals use different low-flow paths by model. A touch or pull-down unit may have an additional screen or solenoid, while a basic lavatory faucet may point to an aerator or cartridge. A guessed part can create a leak or alter intended flow control.
-
Check 6
After a permitted cleaning, visible supply correction, or model-specific repair, restore the outlet parts and supplies slowly, run cold then hot, and make one controlled flow comparison while watching every connection.
Expected result: Record normal flow, partial improvement, continued low flow on one side, continued low flow on both sides, a new leak, pulsing flow, or a return of debris.
Next step: Close the supplies for any returning leak and arrange service when low flow persists, the faucet cannot be matched to a manual, or the repair requires cartridge, solenoid, concealed-line, or main-pressure testing.
Stop if: Stop for an active leak, uncontrolled flow, damaged fitting, electrical or touch-faucet component exposed to water, or any need to remove a pressurized part.
Why this matters
Why: Full recovery after cleaning or flushing supports a localized restriction. Partial or temporary recovery suggests debris remains or a deeper regulator, cartridge, solenoid, supply, or pressure fault. A leak or pulsing stream needs connection and valve diagnosis.
Use your observations
Decision map
Find the observation that best matches what you see, then follow the next safe action.
-
PATH 01Safety boundary
What you see
The Delta faucet and other nearby fixtures have low flow, or flow changes when another fixture runs.
Do this next
Check only accessible whole-home valves and recent water-work conditions; arrange plumbing assessment if pressure remains low or fluctuates.
Why this path and its safety boundary
Why it matters: An upstream pressure, main valve, supply, or building-plumbing issue is more likely than a clogged Delta aerator.
Safety stop: Do not change a pressure regulator, open concealed plumbing, or adjust a main valve that is stuck or leaking.
-
PATH 02Safety boundary
What you see
Only the Delta faucet is weak, both temperatures are affected, and the aerator or spray-head screen contains scale or debris.
Do this next
Clean or rinse the approved screen or aerator, preserve its gasket and flow-control parts, and retest without sharp tools or permanent modification.
Why this path and its safety boundary
Why it matters: A last-outlet restriction is plausible; the faucet body and supply may still be normal.
Safety stop: Stop if the outlet will not release without force, the screen is non-removable, or cleaning causes a leak.
-
PATH 03Safety boundary
What you see
Cold flow is normal but hot flow is weak, or hot flow is normal but cold flow is weak, with the other fixtures normal.
Do this next
Inspect the affected visible valve and hose, then use the exact Delta manual for internal diagnosis with both supplies isolated before service.
Why this path and its safety boundary
Why it matters: The affected shutoff, supply line, inlet path, flow regulator, or temperature-side cartridge passage is more likely than a whole-faucet outlet clog.
Safety stop: Do not disconnect a single hot or cold line under pressure or substitute a cartridge without model confirmation.
-
PATH 04Safety boundary
What you see
Low flow began after a shutoff, installation, or repair and improves when Delta's approved flush is performed, but debris returns or flow falls again.
Do this next
Stop repeated flushing and arrange plumbing service to locate the debris source and inspect the model-specific internal path.
Why this path and its safety boundary
Why it matters: Debris may be entering from the supply, a connector, a regulator, or a valve passage; a one-time outlet cleaning may not remove the source.
Safety stop: Do not leave the aerator, screen, or regulator out to mask the symptom, and do not flush a disconnected pressurized line.
-
PATH 05Safety boundary
What you see
The outlet, visible supplies, and approved flush are clear, but flow stays low, pulses, or a leak appears after reassembly.
Do this next
Close the supplies if leaking and request model-specific plumbing diagnosis; provide the model, flow comparisons, screens inspected, and exact work performed.
Why this path and its safety boundary
Why it matters: A cartridge, flow regulator, solenoid screen, valve body, hose, concealed line, or building-pressure problem is more likely than a simple aerator clog.
Safety stop: Do not keep tightening, remove flow-control components, open a sealed solenoid or cartridge, or operate with water near electrical parts.
Helpful context
Understand the symptom
Decide whether the restriction is at the faucet or in the home
A low-flow Delta faucet can be isolated to its aerator, spray head, flow restrictor, hose, solenoid screen, supply line, shutoff valve, or cartridge. If several nearby fixtures are weak, compare them before taking the faucet apart because the cause may be upstream pressure or plumbing. If only one faucet is weak, compare hot and cold separately; a temperature-specific difference makes a side-specific supply or internal passage more likely.
Start at the last removable restriction
Delta says debris can clog an aerator or flow restrictor and recommends cleaning those parts or flushing the faucet after a water shutoff. Pull-out and pull-down designs may add a screen in the spray head or a filter in a solenoid. Remove only a part the installed model is designed to release, keep every gasket and screen in order, and do not discard or modify a flow-control component.
Use model-specific instructions for internal parts
Delta manuals show different service paths: one model may use a removable aerator and cartridge, another a flow regulator in a connector, and a touch faucet a screen or filter in the spray assembly or solenoid. A cartridge or internal valve is not a universal low-flow fix. Shut off hot and cold supplies before internal service, and have a plumber handle corroded connections, hidden restrictions, leaks, or uncertain model fit.
Safety boundary
Stop conditions
- Do not remove or modify a Delta flow restrictor, aerator, regulator, screen, cartridge, or solenoid by guesswork; retain every gasket and small part.
- Shut off hot and cold supplies before internal service or a disconnected line, and stop if a valve will not isolate water.
- Stop for a leak, uncontrolled flow, water near electrical or touch-faucet parts, corroded fittings, cabinet or wall water damage, or a connection that will not seat.
- Do not use sharp tools on screens, force a seized aerator or valve, flush through a pressurized disconnected line, or leave an outlet part out during operation.
Only after diagnosis
Potential parts
- Delta faucet aerator or spray-head screen
Consider this category only when the low flow is isolated to one faucet and inspection finds a damaged, blocked, or non-restorable aerator or spray-head screen.
Confirm the exact Delta model, outlet design, gasket, flow marking, and removal method; do not discard or permanently remove a flow-control part. - Delta flow regulator or solenoid filter
Consider this category only for a model that includes the identified regulator or solenoid filter and after debris or damage is confirmed in that path.
Confirm the exact faucet model, connector, filter orientation, solenoid type, and model instructions; do not bypass the regulator or solenoid. - Delta faucet valve cartridge or valve assembly
Consider this category only after outlet, supply, and approved flush checks are complete and model-specific testing supports a cartridge or valve-assembly restriction or failure.
Confirm the exact Delta model, handle arrangement, valve family, orientation, retainer, and installation instructions before ordering or opening the water path. - faucet supply hose or shutoff valve
Consider this category only when the visible hot or cold hose or shutoff is kinked, damaged, leaking, stuck, or unable to provide normal flow after safe inspection.
Confirm connection type, size, hose length, valve design, access, and local plumbing requirements; isolate water before replacement and do not force corrosion.
When checks do not resolve it
Need a professional?
Arrange qualified plumbing service when multiple fixtures have low pressure, only one temperature remains weak after visible supply checks, flow does not recover after the approved aerator or flush procedure, debris returns, the model-specific regulator, cartridge, or solenoid needs internal service, a shutoff is stuck or leaking, or the faucet leaks after reassembly. Service is also appropriate when a flow restriction is inside a wall or the faucet model cannot be confirmed.
Safety scope: This article supports fixture comparison, ordinary-access outlet cleaning, visible shutoff and hose inspection, and a model-approved flush. A qualified plumber must handle pressurized disconnection, cartridge or valve-body work, solenoid or concealed-line service, upstream pressure diagnosis, and any repair near electrical components.
Common questions
FAQ
Why does my Delta faucet have low water pressure but the rest of the house is normal?
A restriction at the Delta faucet is likely. Compare hot and cold flow, then inspect the aerator or spray-head screen, visible supply valves and hoses, and any model-specific regulator or solenoid screen. Clean only parts the exact model permits and keep all gaskets and flow-control components in place.
Can a clogged Delta aerator cause low flow?
Yes. Delta says debris can clog an aerator or flow restrictor and greatly reduce flow. Clean the approved aerator gently, preserve its gasket, and retest. If the outlet is not designed to be removed or flow remains low, use the model guide or arrange plumbing service.
Why is only the hot or cold side of my Delta faucet weak?
A temperature-specific restriction points toward the affected shutoff valve, supply hose, inlet passage, flow regulator, or cartridge path. Inspect only visible valves and hoses first; shut off both supplies before internal work and do not disconnect a pressurized line.
Should I remove the flow restrictor from my Delta faucet?
No. Do not permanently remove or modify a flow restrictor. It may be part of the faucet's intended flow control, and changing it can create an uneven stream, damage internal parts, or cause a plumbing-compliance issue. Clean the approved screen or identify the actual restriction instead.
What if my Delta faucet is still low-flow after cleaning the aerator?
Check the hot and cold shutoffs, visible hoses, and any approved flush procedure, then identify the exact model. Persistent low flow can involve a regulator, solenoid screen, cartridge, valve body, supply, or upstream pressure. Arrange service if internal access, a leak, or model uncertainty is involved.
Read the exact guide
Official sources
- Why does my faucet have low water pressure?Delta Faucet Company · Official Delta guidance for kitchen, lavatory, and tub or shower faucets; the installed model's manual controls exact access and parts.
- 106351 TWO HANDLE WIDESPREAD BATHROOM FAUCETSDelta Faucet Company · Official Delta manual for specified two-handle widespread bathroom faucet models; parts and access vary by model.
- 114376 TOUCH2O WITH TOUCHLESS PULL-DOWN KITCHENDelta Faucet Company · Official Delta manual for specified Touch2O and touchless pull-down models; electronic and screen arrangements vary by model.
- How to Fix Your FlowDelta Faucet Company · Official Delta consumer article for faucet aerators and shower screens; decorative or model-specific outlets may not be removable.
- 77253 SINGLE HANDLE LAVATORY CENTERSET AND VESSELDelta Faucet Company · Official Delta manual for specified single-handle lavatory faucet models; other models require their own manual.
Community feedback
Share a repair observation
Share a plain-text repair observation. Accepted observations are published automatically; this page may take a moment to update.