
On this page
Start here
Quick answer
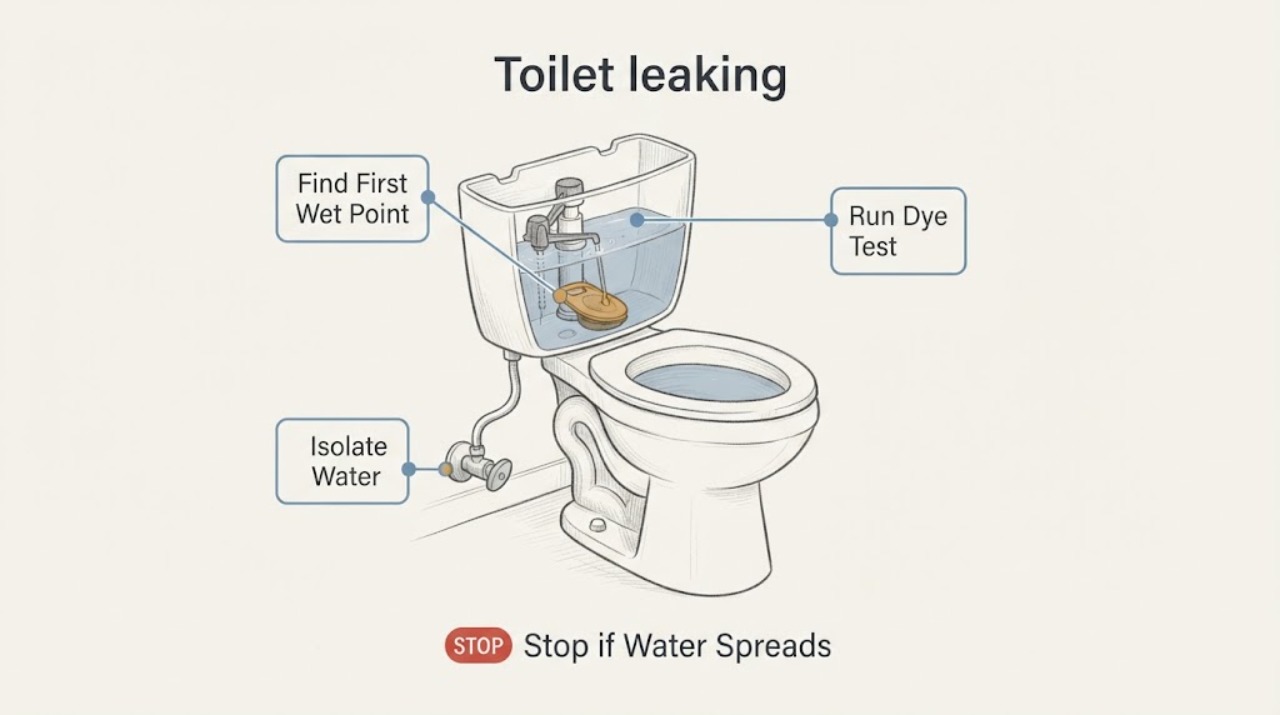
First stop the water at the toilet's local shutoff valve, turning it gently clockwise if the valve is accessible and safe to reach. Then identify the first wet point: color appearing in the bowl indicates a tank-to-bowl leak, commonly the flapper or flush valve; water entering the overflow tube points toward the fill valve; moisture at the supply connection points to the hose or shutoff; and water at the tank seam, bolts, or floor needs a plumber's assessment. Do not keep flushing an overflowing or unstable toilet, force a stuck valve, use the toilet with cracked porcelain or a wet floor near electrical equipment, or remove the tank and base seal without model-specific guidance.
Before you begin
Safety first
- This article supports ordinary-access observation, water isolation, and a no-flush dye test only. Do not force valves, disconnect pressurized plumbing, lift or tilt the fixture, tighten porcelain hardware by guesswork, open walls or floors, or touch wet electrical equipment.
Work through in order
Diagnostic checks
Use only checks that match the exact appliance or system and its official guide.
-
Check 1
If water is actively running or the bowl is rising, locate the toilet's local shutoff on the wall or floor and turn it gently clockwise until flow stops; use the home's main shutoff only if the local valve will not close and you can reach it safely.
Expected result: Record whether the flow stops, slows but continues, sprays from the valve, or cannot be reached without stepping into water or touching damaged hardware.
Next step: Keep the valve closed, do not flush, and arrange plumbing service when isolation fails or the leak is rapid; if water is spreading toward electrical equipment, leave the wet area and use the appropriate emergency utility or safety route.
Stop if: Stop immediately for uncontrolled flow, wastewater overflow, a valve that breaks or sprays, standing water near electrical equipment, or a floor that feels unsafe.
Why this matters
Why: A closed local valve isolates a continuing supply while you diagnose the leak. A valve that will not close, a pressurized spray, or water near electrical equipment makes further inspection unsafe.
-
Check 2
With the water isolated when possible, dry the outside of the toilet and place separate dry tissue at the tank seam, tank-to-bowl hardware, supply connection, shutoff, bowl base, and nearby floor or wall; observe without removing fittings.
Expected result: Note the first tissue that becomes wet: a tank edge or bolt, supply connection, valve stem, bowl base, wall, or floor away from the toilet. Also note whether the water is clear, dirty, or has a sewer odor.
Next step: Keep the supply closed if the source is external, clean only a small safe surface, and give the wet-point location and water appearance to a plumber; do not disconnect a pressurized line.
Stop if: Stop for dirty overflow, water entering a wall or ceiling, a spreading floor leak, cracked porcelain, a rocking bowl, or any need to move or tilt the fixture.
Why this matters
Why: The first wet point narrows the path to an internal tank seal, supply connection, base or drain connection, or concealed plumbing. Dirty water or sewer odor is a sanitation concern rather than a simple clean-water drip.
-
Check 3
Only when the bowl is clear and there is no active external overflow, remove the tank lid, add a small amount of food coloring or a dye tablet to the tank, and wait without flushing according to the water authority's test guidance.
Expected result: Check whether colored water appears in the bowl; record whether it appears quickly, only after a delay, or not at all. Do not perform the test if the tank or bowl is cracked or unstable.
Next step: If color appears, continue to the water-level and flapper checks with the supply isolated; if the bowl stays clear, inspect the external wet point and the overflow behavior instead of repeatedly flushing.
Stop if: Stop for overflow, an unstable fixture, chemical cleaner in the tank that cannot be identified, wastewater contamination, or any need to dismantle the flush valve.
Why this matters
Why: Color in the bowl confirms a tank-to-bowl leak, usually at the flapper or flush valve. No color makes that internal path less likely, but it does not rule out a fill-valve overflow, supply leak, tank seam, base, or intermittent leak.
-
Check 4
From the top of the tank, identify the normal water line and watch one refill cycle only if the fixture is stable and the local valve can be closed; do not bend a float arm, adjust a screw, or put hands into moving parts unless the exact instructions authorize it.
Expected result: Record whether water stops below the overflow opening, continues into the overflow tube, rises above the normal line and then falls, or never stops after the bowl is clear.
Next step: Close the local valve and arrange a plumber when the fill valve does not shut off, the overflow is active, or the correct adjustment is not stated for the exact toilet; do not rely on repeated handle movement.
Stop if: Stop for uncontrolled refill, a float or valve that is broken, a tank that is cracked or overfilled, or a need to replace an internal valve without confirming the fixture instructions.
Why this matters
Why: Water entering the overflow or failing to shut off points toward a fill-valve or level-control problem. A level that rises and later falls can accompany a flapper leak. A high level can waste water even when the bowl dye result is unclear.
-
Check 5
After closing the local valve and allowing the tank level to settle, inspect only from the open tank for a chain or trip lever that holds the flapper open, a flapper that is visibly warped or deteriorated, grit at the flush-valve seat, or a missing seal; do not pry the seal or use tank chemicals as a remedy.
Expected result: Record whether the chain is taut, tangled, or slack; whether the flapper closes flat; and whether the rubber or valve seat shows visible damage or sediment.
Next step: Use only the exact toilet instructions for a simple seal inspection or replacement, preserve the old part for identification, and repeat one dye test after any permitted repair; call a plumber when the seat, valve, or fit is uncertain.
Stop if: Do not force the flapper, remove a flush valve, use sharp tools, add chlorine tablets, or continue if porcelain or the valve seat is damaged.
Why this matters
Why: Misalignment, deterioration, or sediment can leave a gap between the flapper and flush valve and explain a positive dye test. An intact-looking seal with a continuing leak may require a model-specific flush-valve or seat assessment.
-
Check 6
With the valve closed, visually inspect the supply hose, shutoff body, tank underside, tank-to-bowl hardware, and tank seam from ordinary access; touch only a dry external surface with a tissue, without loosening a nut or tightening porcelain hardware.
Expected result: Classify the source as the hose or shutoff connection, the tank seam or hardware, a hairline crack, or no visible source; note whether moisture returns when the valve is opened only under safe conditions.
Next step: Leave the valve closed and arrange plumbing service for any tank crack, seam, hardware, valve-body leak, or hidden path; never use force to test a brittle connection.
Stop if: Stop for a crack, spraying connection, corroded or seized shutoff, water entering the wall, or any need to disconnect a pressurized hose or lift the tank.
Why this matters
Why: A connection leak may need a compatible hose, washer, or valve repair. A tank seam, crack, or tank-to-bowl joint can put water outside the intended path and may worsen under pressure; no visible source can indicate an intermittent or concealed leak.
-
Check 7
Inspect the floor around the bowl and the ceiling or wall below, if safely visible, for new dampness, discoloration, soft material, sewer odor, or movement of the bowl; do not rock, lift, or continue flushing the fixture.
Expected result: Record whether water starts at the bowl base, appears below the room, is clean or dirty, and whether the bowl moves or the porcelain is cracked.
Next step: Keep the supply closed and stop using the toilet until a plumber assesses the base, drain, seal, porcelain, and affected structure; document the location without opening the floor or wall.
Stop if: Stop for a rocking bowl, cracked porcelain, sewage, a saturated or collapsing floor, ceiling damage, or water near electrical equipment.
Why this matters
Why: A base leak, drain-joint problem, structural movement, or water damage is outside a flapper-only repair. A clean tank leak can still damage flooring; dirty water or sewer odor needs prompt sanitation-focused service.
Use your observations
Decision map
Find the observation that best matches what you see, then follow the next safe action.
-
PATH 01Safety boundary
What you see
Colored tank water appears in the bowl during a no-flush dye test.
Do this next
With the supply isolated, inspect chain alignment, flapper condition, and visible sediment; use only model-specific permitted repair guidance and repeat one dye test after the repair.
Why this path and its safety boundary
Why it matters: Water is crossing the tank-to-bowl seal, most often at the flapper or flush valve.
Safety stop: Call a plumber instead of forcing the valve when the flapper seat, flush valve, porcelain, or replacement fit is uncertain.
-
PATH 02Safety boundary
What you see
The tank continues filling or sends water into the overflow opening.
Do this next
Close the local shutoff and arrange plumbing service unless the exact toilet instructions give a safe adjustment that you can perform without force.
Why this path and its safety boundary
Why it matters: The fill valve or level-control path is not shutting off at the intended level.
Safety stop: Do not leave an overflowing tank supplied, bend parts by guesswork, or keep flushing to reset it.
-
PATH 03Safety boundary
What you see
The first wet point is the supply hose, shutoff, or valve body rather than the bowl or tank seam.
Do this next
Keep the local valve closed, protect the floor from further water, and have a plumber assess the hose, washer, shutoff, and wall connection.
Why this path and its safety boundary
Why it matters: The leak is on the pressurized clean-water connection and can worsen when the valve is open.
Safety stop: Do not disconnect or tighten a seized, corroded, or spraying connection, and do not reopen it to test a leak near electrical equipment.
-
PATH 04Safety boundary
What you see
Moisture begins at the tank seam, tank-to-bowl hardware, or a visible tank crack.
Do this next
Close the supply, do not tighten porcelain hardware by force, and request a plumber's assessment of the tank and seal before using the toilet.
Why this path and its safety boundary
Why it matters: The tank, gasket, hardware, or porcelain may be compromised; this is not established as a flapper leak.
Safety stop: Stop for a crack, spreading seam, unstable tank, or any need to lift or separate the tank.
-
PATH 05Safety boundary
What you see
Water begins at the bowl base or floor, appears below the room, is dirty, or has a sewer odor.
Do this next
Keep the supply closed, stop using the toilet, contain only a small safe amount from the surface, and arrange prompt plumbing service.
Why this path and its safety boundary
Why it matters: A base seal, drain connection, concealed pipe, overflow, or sanitation issue is possible and requires professional diagnosis.
Safety stop: Do not mop around energized equipment, pour chemicals into the toilet, open the floor, or use the fixture while the base or floor is unstable.
-
PATH 06Safety boundary
What you see
The bowl dye test is negative and no external wet point is visible, but the toilet runs intermittently or the meter shows unexplained use.
Do this next
Record when the sound or water use occurs, check other fixtures, and have a plumber investigate rather than repeatedly flushing or replacing random parts.
Why this path and its safety boundary
Why it matters: An intermittent internal leak, pressure-related behavior, concealed connection, or another fixture may still be involved.
Safety stop: Stop if the meter continues moving with all safe fixtures isolated, water damage appears, or the source may be inside a wall or floor.
-
PATH 07Safety boundary
What you see
Porcelain is cracked, the bowl or tank rocks, water is uncontrolled, or water reaches electrical equipment.
Do this next
Leave the area if unsafe, close the main water supply only if it can be reached safely, and use an emergency plumber, utility, or safety service appropriate to the hazard.
Why this path and its safety boundary
Why it matters: The immediate risk is structural damage, flooding, sanitation, or electric shock rather than a routine internal-part adjustment.
Safety stop: Do not touch wet electrical equipment, use a damaged fixture, force the shutoff, or attempt a tank or base repair.
Helpful context
Understand the symptom
Separate an internal tank leak from an external leak
A toilet can lose water silently into the bowl, run intermittently, leak from a tank connection, or put water onto the floor. The first wet point matters more than the size of the puddle: wipe the outside dry, watch where new moisture starts, and keep the local shutoff accessible. Water in the bowl after a dye test is an internal tank-to-bowl path; water outside the tank or at the floor requires a different inspection and may involve a seal, connection, porcelain, or drain joint.
Use a dye test without flushing during the test
Municipal water guidance recommends putting a small amount of food coloring or a dye tablet in a clear toilet tank, waiting without flushing, and checking the bowl. Color in the bowl confirms that tank water is crossing the flush valve or flapper seal. It does not identify every external leak, so also inspect the tank, supply connection, shutoff, base, wall, and floor. Remove colored tank-cleaning products first so they do not obscure the result.
Treat the tank and floor as structural boundaries
A damp tank seam, loose-looking tank hardware, rocking bowl, cracked porcelain, stained ceiling below, or dirty water at the base is not the same problem as a worn flapper. Do not tighten porcelain hardware by force, lift or tilt a water-filled fixture, or keep using a toilet that is unstable or discharging wastewater. A licensed plumber can isolate the supply, assess the tank-to-bowl and base connections, and determine whether a seal or fixture repair is safe.
Safety boundary
Stop conditions
- Close the local water valve and stop using the toilet for uncontrolled flow, active overflow, a valve that sprays or will not close, or water that reaches electrical equipment.
- Do not use a toilet with cracked porcelain, a rocking bowl or tank, a spreading tank seam, a saturated floor, ceiling damage, dirty wastewater, or a sewer odor.
- Do not force shutoff hardware, tighten porcelain tank or bowl hardware by guesswork, disconnect a pressurized hose, tilt the fixture, or open a wall or floor.
- Do not repeatedly flush, use sharp tools on the flush valve, add tank chemicals to solve a leak, or replace internal parts without confirming the exact toilet instructions and fit.
- Arrange prompt plumbing service when the source is at the base, drain, tank seam, valve body, concealed connection, or an unstable structure, or when a safe internal check does not identify the leak.
Only after diagnosis
Potential parts
- toilet flapper or flush-valve seal
Consider this category only when a dye test confirms tank water entering the bowl and inspection finds a worn, warped, misaligned, or contaminated seal.
Confirm the exact toilet model, flush-valve opening, chain connection, and manufacturer fit information; do not assume a universal seal fits every tank. - toilet fill valve
Consider this category only when the tank does not shut off at its intended level, sends water into the overflow, or the exact instructions identify a failed fill valve.
Confirm the toilet model, valve style, inlet connection, water-level range, and installation instructions before selecting a replacement. - tank-to-bowl gasket and hardware
Consider this category only when the first wet point is the tank-to-bowl joint and a plumber or exact fixture instructions support a seal repair.
Confirm the tank and bowl model relationship, gasket dimensions, hardware arrangement, and porcelain condition; do not tighten hardware until the porcelain and procedure are verified.
When checks do not resolve it
Need a professional?
Call a qualified plumber when the local shutoff will not isolate the water, the fill valve overflows, the dye test remains positive after an allowed flapper check, the tank or porcelain is cracked, the tank seam or supply connection leaks, water appears at the base or below the room, wastewater or sewer odor is present, the bowl is unstable, or the source remains hidden. Keep the supply closed and provide the wet-point location, dye result, tank-level behavior, photos, and any water-damage observations.
Safety scope: This article supports ordinary-access observation, water isolation, and a no-flush dye test only. Do not force valves, disconnect pressurized plumbing, lift or tilt the fixture, tighten porcelain hardware by guesswork, open walls or floors, or touch wet electrical equipment.
Common questions
FAQ
How can I tell whether a toilet leak is the flapper?
With the bowl clear and the toilet stable, add dye to the tank without flushing and check the bowl after the recommended wait. Color in the bowl confirms tank water is crossing the flapper or flush-valve seal. If the outside is wet instead, locate the first external wet point rather than replacing a flapper by guesswork.
What does it mean if water rises into the toilet overflow?
The fill valve or level-control path may not be shutting off at the intended level. Close the local water valve and arrange plumbing service unless the exact toilet instructions provide a safe, model-specific adjustment. Do not leave an overflowing tank supplied.
Why is water leaking from the bottom of the toilet?
Water at the base can come from a base seal or drain connection, but it can also run down from the tank or supply connection. Dry the outside and use tissue to find the first wet point. Keep the supply closed and stop using the toilet for dirty water, sewer odor, a rocking bowl, cracked porcelain, or a leak that reaches the floor below.
Can I keep flushing a toilet that is leaking?
Do not keep flushing when the bowl is rising, the tank overflows, water reaches the floor, the fixture is unstable, or the source is unknown. Close the local shutoff if it is safe, avoid wet electrical equipment, and arrange plumbing service.
Should I replace the tank parts with universal parts?
Only consider a flapper, fill valve, or tank gasket after the observation supports that part and the exact toilet model and instructions confirm fit. A tank-to-bowl joint, porcelain crack, base leak, or concealed connection needs professional assessment rather than a generic part.
Read the exact guide
Official sources
- Toilet Leak DetectionNew York City Department of Environmental Protection · NYC DEP household toilet leak guidance; exact toilet instructions and local plumbing requirements control a particular fixture.
- ToiletsSouthwest Florida Water Management District · WaterMatters household toilet conservation guidance; model-specific instructions control any adjustment or replacement.
- How to Check for LeaksCity of Tampa Water Department · City of Tampa residential leak-detection guidance; it is general household guidance and does not replace exact fixture instructions.
- Leak Alerts: Find and Fix LeaksSan Francisco Public Utilities Commission · SFPUC household leak guidance for toilets and other fixtures; the installed fixture instructions control repairs.
Community feedback
Share a repair observation
Share a plain-text repair observation. Accepted observations are published automatically; this page may take a moment to update.