
On this page
Start here
Quick answer
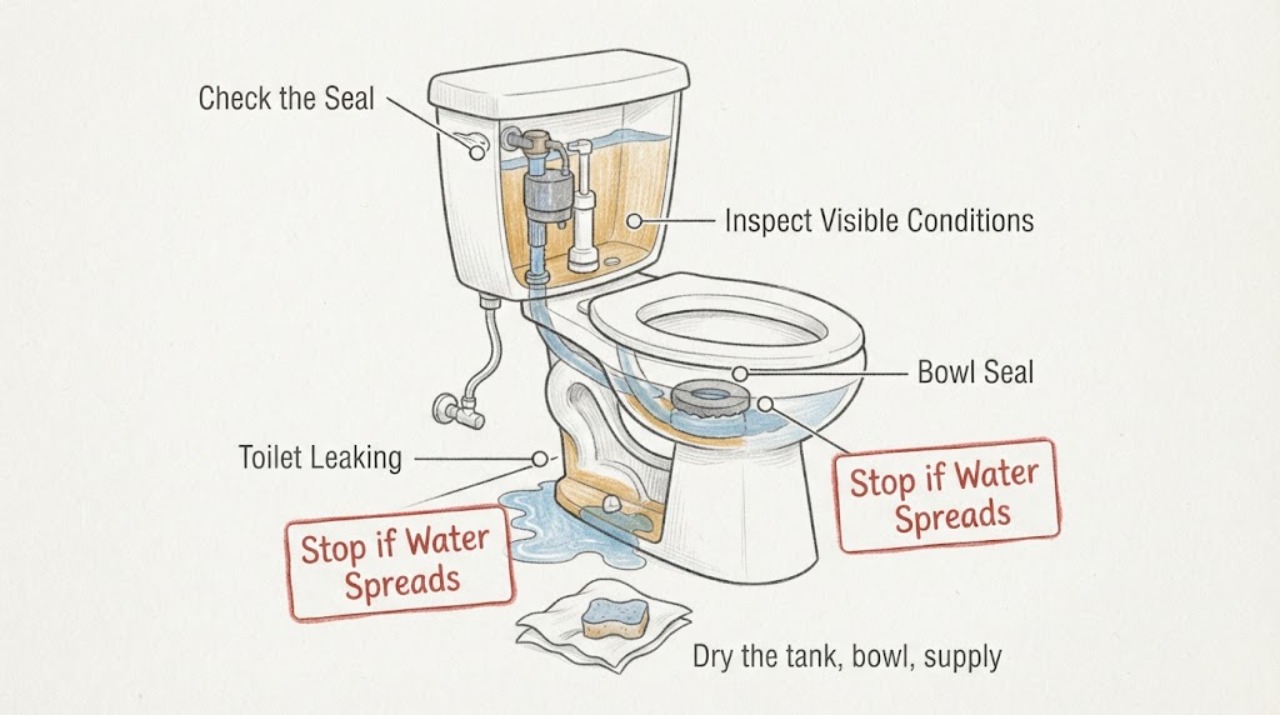
Close the toilet's water shutoff if water is actively escaping, protect the floor, and trace the highest wet point before buying a part. Water at the supply connection, between tank and bowl, inside the tank, or at the floor has different causes: a loose or damaged supply seal, tank gasket or bolts, a flapper or flush valve, a fill valve or overflow, or a bowl-to-floor seal. Do not keep flushing a leak at the floor, a cracked tank or bowl, or any leak that can reach a ceiling below; isolate it and call a qualified plumber.
Work through in order
Diagnostic checks
Use only checks that match the exact appliance or system and its official guide.
-
Check 1
Dry the tank, bowl, supply line, shutoff, and floor with separate towels, then watch the toilet without flushing. Identify the first wet point and whether the leak is clean supply water, tank water, bowl water, or water that could be coming from the floor or wall. If water is actively running, close the toilet shutoff and avoid standing in the spill.
Expected result: Water returns continuously at the shutoff or supply connection, pools at the floor, reaches a lower ceiling, or the source cannot be separated from wastewater.
Next step: Keep the toilet out of service, close the shutoff if it operates normally, clean up safely, and call a qualified plumber. If the shutoff will not stop the water or the leak is from a pressurized connection, use the home's appropriate water isolation and obtain urgent help rather than disassembling the toilet.
Why this matters
Why: A continuous or potentially contaminated leak can damage the building quickly and may not be caused by a tank valve; the immediate priority is stopping water and containing damage.
-
Check 2
Inspect the visible supply connection from the wall shutoff to the toilet tank while the area is dry. Check the connection nut, supply line, fill-valve shank, and nearby porcelain for a wet fitting, a split or kinked line, a missing seal, or a crack; do not twist the toilet or pull on the line.
Expected result: The first wet point is where the supply line enters the tank or shutoff, or the line, nut, or porcelain is visibly damaged.
Next step: Close the shutoff and keep the toilet unused. A sound, accessible connection may be gently reseated or snugged only as the model instructions permit; replace a damaged line or seal with the exact approved type, and use a plumber for a seized valve, cracked porcelain, or any leak that returns.
Why this matters
Why: The leak is on the pressurized supply path rather than the flush valve. A damaged line or cracked porcelain can worsen when the water is restored.
-
Check 3
For a two-piece toilet, observe the joint between tank and bowl during a single controlled flush only if there is no active floor leak or cracked porcelain. Look for water at the tank bolts, washers, or tank-to-bowl gasket, and stop immediately if the joint leaks or the tank rocks.
Expected result: Water appears only at the tank-to-bowl joint during or immediately after flushing, or the tank is loose or uneven.
Next step: Close the water supply and do not keep flushing. If the model instructions allow, an accessible tank connection can be tightened evenly without force; a damaged gasket, loose tank, cracked porcelain, or leak that remains needs a plumber or model-qualified repair.
Why this matters
Why: The tank bolts, washers, or tank gasket may not be sealing or aligned. Overtightening porcelain hardware can chip or break the tank or bowl and create a larger leak.
-
Check 4
Check for an internal tank leak without removing the tank. Fill the tank to its marked operating line, note the level, close the toilet's water shutoff, and wait long enough for a meaningful level change. Keep the tank lid and all moving parts in place while observing.
Expected result: The tank level drops after the supply is closed, or water continues entering the bowl or overflow while the supply is open.
Next step: Leave the shutoff closed if water is being lost. Follow only the exact model's instructions for cleaning or adjusting an accessible valve; replace a flapper, flush seal, or fill valve only after the observed path and model fit are confirmed. Persistent loss needs plumbing service.
Why this matters
Why: A falling tank level points toward water passing the flush valve, flapper, or tank gasket. A fill valve that continues to admit water can also overfill or send water into the overflow; the exact valve design determines the repair.
-
Check 5
Observe the tank water level and refill behavior after a normal refill, without bending a float arm or altering an unknown adjustment. Look for water entering the overflow, a fill valve that keeps running, a flapper chain that holds the flush valve open, or a valve that shuts off but still seeps.
Expected result: The fill valve runs when nobody flushed, water reaches the overflow, the chain holds the flush seal open, or the valve slowly leaks after it shuts off.
Next step: Close the shutoff if the tank is overflowing or the leak is continuous. Use the manufacturer's model instructions for an accessible debris-cleaning or adjustment step; call a plumber if the valve, seat, overflow, pressure vessel, or porcelain needs replacement or the cause remains uncertain.
Why this matters
Why: The tank is losing or over-admitting water internally. A worn or dirty flush seal, a stuck float or fill valve, or an incorrect water level can all produce a visible leak or a hidden drain leak.
-
Check 6
Check the bowl-to-floor perimeter and the ceiling or room below after drying the area. Flush only if there is no existing floor leak and the toilet is stable; observe whether moisture appears at the base only during the flush, whether the bowl rocks, or whether a ceiling stain grows.
Expected result: Water appears at the bowl-to-floor joint during a flush, the bowl rocks or is not level, or a ceiling below shows fresh moisture.
Next step: Stop flushing, close the supply, keep weight off the toilet, and call a qualified plumber. Do not lift or rock the toilet to inspect the seal; removal and resealing require the correct model and floor connection assessment.
Why this matters
Why: The bowl seal, flange, mounting, porcelain, or drain connection may be leaking under discharge flow. A floor leak is not repaired by replacing a tank flapper, and rocking can break a watertight seal.
-
Check 7
Rule out condensation only after all connections and the floor are dry. Wipe the tank and bowl dry, note room humidity and recent cold-water use, and place a dry towel beneath the tank without covering the supply connection or base. Check whether moisture forms broadly on the outside surface rather than at one fitting.
Expected result: Moisture forms as a broad film on a cold tank or bowl and does not return at a fitting, tank joint, or floor seal when the toilet is not being used.
Next step: Monitor the area and improve bathroom ventilation or address the model-specific condensation cause. If water collects at a seam, connection, or base, stop using the toilet and continue with the appropriate leak-service branch.
Why this matters
Why: Surface condensation can look like a leak but does not explain water that returns from a joint or appears only during flushing. A confirmed fitting or floor source remains a plumbing leak.
Use your observations
Decision map
Find the observation that best matches what you see, then follow the next safe action.
-
PATH 01Next step
What you see
Water is running continuously, reaching the floor or a ceiling below, or may be contaminated.
Do this next
Close the toilet shutoff if safe, keep the toilet out of service, contain the water, and call a qualified plumber. Use the home's main isolation only if the local shutoff cannot control the leak.
-
PATH 02Next step
What you see
The supply line, shutoff connection, fill-valve shank, or nearby porcelain is the first wet point.
Do this next
Close the shutoff and repair the model-appropriate line, seal, or connection without forcing it. A damaged line, seized valve, or cracked porcelain needs qualified service.
-
PATH 03Next step
What you see
The tank-to-bowl joint leaks during a flush or the tank rocks.
Do this next
Stop flushing and close the supply. Do not overtighten tank hardware; have the bolts, washers, gasket, alignment, and porcelain checked and repaired.
-
PATH 04Next step
What you see
The tank level drops after the water supply is closed, or water continues into the bowl or overflow.
Do this next
Treat it as an internal flush or fill-valve leak. Use only model-specific accessible cleaning or adjustment instructions; replace a valve or seal after diagnosis, or call a plumber.
-
PATH 05Next step
What you see
Water appears at the bowl-to-floor joint during flushing, the bowl rocks, or a lower ceiling is wet.
Do this next
Stop flushing and keep the toilet out of service. Arrange plumbing service for the bowl seal, flange, mounting, drain connection, or porcelain; do not rock or lift the toilet.
-
PATH 06Next step
What you see
Moisture forms broadly on the cold outside surface and no fitting, seam, or floor leak returns when the toilet is idle.
Do this next
Monitor and address condensation or ventilation. If a localized wet point returns, treat it as a plumbing leak and stop using the toilet as needed.
Helpful context
Understand the symptom
A toilet can appear to leak at its base when water began higher up and ran down the porcelain. Dry the outside, then observe when the first drop returns: while the tank fills, during a flush, continuously between flushes, or only when someone uses the bathroom. That timing is often more useful than the size of the puddle.
Treat water at the floor as potentially contaminated, and keep it away from electrical equipment. A cracked vitreous-china tank or bowl, an uncontrolled supply leak, or water staining a ceiling below is not a tightening experiment; shut off the supply and arrange plumbing service.
Only after diagnosis
Potential parts
- flush valve seal or flapper
Consider only when the tank level falls with the supply closed or water is observed passing from the tank into the bowl and the flush seal is confirmed as the path.
Seal shape, valve design, and chain or actuator arrangement are model-specific; confirm the exact toilet documentation. - fill valve or water control valve
Consider only when the fill valve continues admitting water, leaks at its body, or fails a model-specific cleaning or adjustment check.
Connection size, height, overflow arrangement, and approved replacement vary by toilet model. - tank-to-bowl gasket and bolts
Consider only when water begins at the tank-to-bowl joint and inspection confirms a displaced, damaged, or compressed gasket or hardware.
Bolt pattern, gasket profile, washers, and porcelain design must be confirmed; overtightening can break the tank or bowl. - supply line seal or connector
Consider only when the first wet point is the pressurized supply connection and the shutoff and porcelain are sound.
Line length, connection type, seal, and shutoff compatibility must be verified before replacement. - bowl-to-floor seal or flange hardware
Consider only when water appears at the bowl-to-floor joint during flushing or a qualified inspection confirms a failed floor connection.
Floor, flange, bowl outlet, mounting, and seal conditions must be inspected; do not select a generic seal without measuring the installed connection.
When checks do not resolve it
Need a professional?
Close the water supply and call a qualified plumber for a leak at the bowl-to-floor joint, a cracked tank or bowl, an uncontrolled supply leak, water reaching a ceiling below, a loose or rocking toilet, a pressure-assisted vessel leak, or any leak that returns after an accessible connection is correctly seated. Do not overtighten porcelain hardware, remove the toilet to inspect a floor seal, or keep flushing to test an active leak.
Common questions
FAQ
Why does a toilet leak only when it is flushed?
Timing narrows the path. Water at the tank-to-bowl joint points toward tank hardware or a gasket, while water at the floor during discharge points toward the bowl seal, flange, mounting, porcelain, or drain connection. Stop flushing if the leak reaches the floor.
Why does the toilet keep refilling when nobody flushed?
Water may be passing a flush seal or flapper into the bowl, causing the fill valve to replace the lost water, or the fill valve may be admitting water continuously. Close the shutoff if the tank is overflowing and diagnose the observed water path.
Can I tighten the bolts on a leaking toilet tank?
A model guide may allow even, slight tightening of accessible tank hardware, but overtightening can chip or break porcelain. If the tank rocks, the gasket is damaged, or the leak remains, stop using the toilet and call a plumber.
How can I tell a toilet leak from condensation?
Dry every connection and observe the first returning moisture. Condensation forms broadly on a cold outside surface while a plumbing leak returns at a fitting, seam, tank joint, or floor and often follows filling or flushing.
Read the exact guide
Official sources
- How To Clean The Toilet Water Control Valve Of DebrisAmerican Standard · American Standard toilet water-control or fill-valve slow-leak cleaning guidance
- TroubleshootingKohler Co. · Kohler pressure-assist toilet leak-location decision flow
- Kohler Toilet Installation InstructionsKohler Co. · Kohler toilet supply, tank-to-bowl, floor seal, leak checks, and overtightening warnings
- Kohler One-Piece Toilet TroubleshootingKohler Co. · Kohler toilet tank-level, flush-valve, flapper, float-valve, and overflow troubleshooting
Community feedback
Share a repair observation
Share a plain-text repair observation. Accepted observations are published automatically; this page may take a moment to update.