
On this page
Start here
Quick answer
If a toilet still leaks after two plumber visits, stop repeating the same adjustment and document the first place that becomes wet, when it happens, and whether the water is clean tank supply or contaminated bowl or drain water. Close the toilet shutoff valve for an active or growing leak, stop using the toilet if water appears at the base, and protect nearby flooring. From a dry position, use paper towels to trace the first wet point, compare leaks during refill and flushing, and use a tank dye test only for a quiet internal tank-to-bowl leak. A leak that returns after service may be coming from a different upstream or hidden point, a seal or connection that was not isolated, a cracked or rocking fixture, or a drain or floor problem. Do not keep tightening porcelain hardware, caulk over the base, remove the toilet, use drain chemicals, or keep flushing to reproduce the leak. Give the dated observations and prior repair details to a licensed plumber and request a new leak-isolation plan.
Work through in order
Diagnostic checks
Use only checks that match the exact appliance or system and its official guide.
-
Check 1
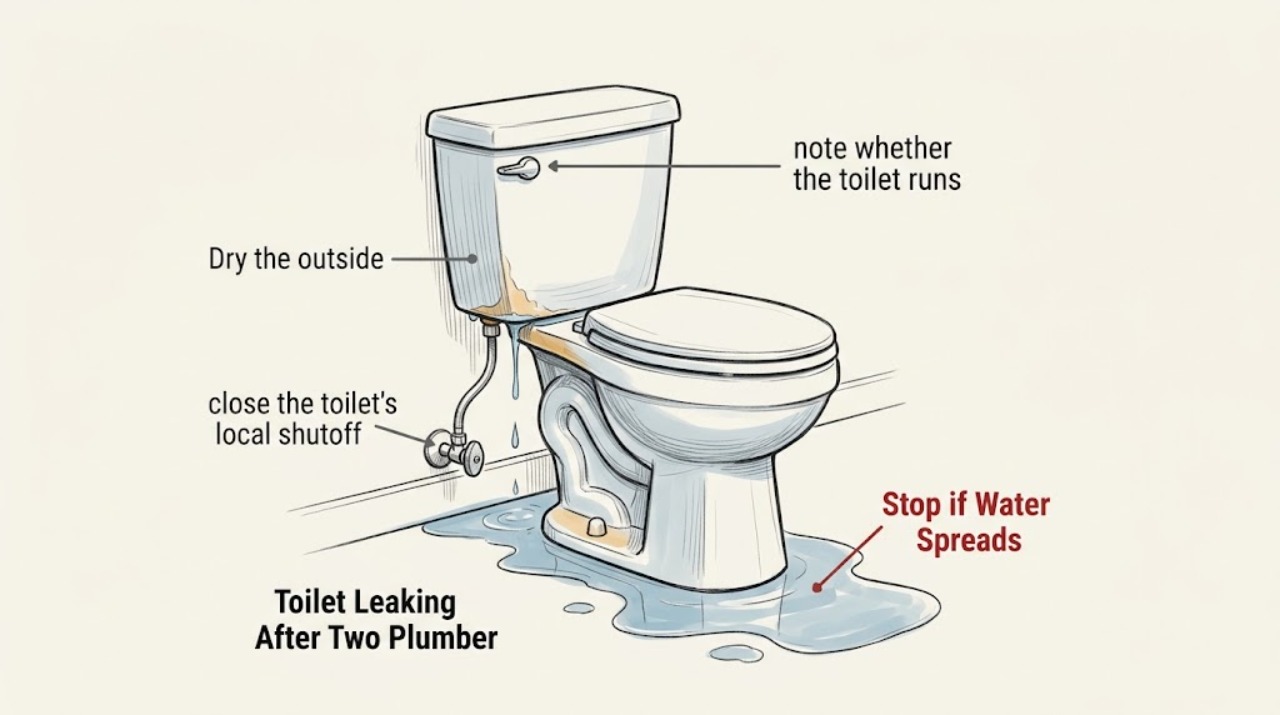
If water is actively escaping, close the toilet's local shutoff valve by hand if it is safely accessible and stop flushing. If the valve will not close, leaks at the valve, or water is spreading, keep clear and use the building or main shutoff only if it is safely accessible.
Expected result: Record whether the flow stops, slows, or continues after the local valve is closed, and whether the leak is a drip, spray, seep, or spreading pool.
Next step: Keep the toilet out of service until the source is identified. For a failed shutoff, uncontrolled flow, or water near electrical equipment, request prompt plumbing or building emergency help.
Why this matters
Why: A leak that stops when the local supply is closed is connected to the toilet's pressurized supply or tank path; continued water may be residual, drain-related, an adjacent fixture, or a failed shutoff valve. The result is triage evidence, not permission to dismantle the toilet.
-
Check 2
Dry the outside of the toilet, the supply connection, the tank-to-bowl seam, the bowl sides, and the floor with separate dry paper towels. Without flushing, watch from a safe standing position for the first towel or surface that becomes wet.
Expected result: Record the first wet point and whether water travels down from above: supply line or valve, fill-valve connection, tank-to-bowl seam, bowl crack, base, nearby wall, or another fixture.
Next step: Photograph the dry setup and first wet point, then stop the test. Send the exact location to the plumber who will handle the next diagnosis; do not tighten several unrelated connections at once.
Why this matters
Why: The first wet point is more useful than the largest puddle. A higher wet point can run down and imitate a base leak; a base that becomes wet from below or after a flush needs a different diagnosis than a supply connection that leaks during refill.
-
Check 3
If there is no active external leak and the floor is dry, note whether the toilet runs or leaks silently without a flush, only during refill, or only after a flush. Do not repeatedly flush a toilet that leaks at the base.
Expected result: Record the exact trigger, delay, duration, and whether a ripple or refill sound continues in the bowl or tank.
Next step: Use the matching branch below and provide the timing pattern to the plumber. After two visits, do not authorize another part swap without identifying which observation the proposed repair is meant to change.
Why this matters
Why: A silent bowl ripple or periodic refill can be an internal flapper or flush-valve seal issue. A leak during refill points more toward a pressurized supply, fill valve, or tank fitting. A leak after flushing includes tank joints, bowl or base seals, drain connections, and overflow or blockage paths.
-
Check 4
For a quiet internal leak only, add a few drops of food coloring or a dye tablet to the toilet tank without flushing and wait about 10 minutes. Keep dye away from porous surfaces and flush promptly after the observation to avoid staining.
Expected result: Record whether color appears in the bowl before flushing, while the outside of the toilet remains dry.
Next step: Stop this test if the tank or floor is already leaking. Give the result to the plumber; do not assume a flapper replacement addresses a separate base or supply leak.
Why this matters
Why: Color reaching the bowl without a flush supports a leaking flapper or flush-valve seal. No color does not rule out an external, base, supply, intermittent, or drain leak, and a positive dye test does not explain water on the floor.
-
Check 5
With the water supply closed if needed and without removing parts, look inside the tank only if it can be done without lifting a heavy or cracked lid. Observe the water level, overflow behavior, visible chain or lever binding, fill-valve shutoff, and any crack or wet trail.
Expected result: Record water entering the overflow, a chain holding the seal open, a fill valve that does not stop, water around a tank fitting, or a crack. Do not reach into moving or pressurized mechanisms or force a stuck component.
Next step: Keep the valve closed and arrange service for a crack, tank fitting, persistent overflow, or any recurring condition after prior work. Use the exact model information only to let the professional select compatible parts.
Why this matters
Why: Overflow or a fill-valve or lever issue can cause tank water to run into the bowl; a tank fitting or crack is an external leak risk. A model-specific internal repair may be appropriate, but the symptom does not establish the correct part or fit.
-
Check 6
Compare a no-flush period with one normal flush only if the toilet is dry, stable, and there is no contaminated-water or structural warning. Have an observer watch separate dry towels and stop immediately at the first leak.
Expected result: Record whether the leak starts during refill, at the end of the flush, several moments later, or not at all; note rocking, movement, gurgling, slow bowl recovery, or water backing up.
Next step: Do not repeat the flush test. If the base leaks, the toilet rocks, water backs up, or the floor is soft, stop using the fixture and ask a plumber to assess the fixture, drain connection, and supporting floor as one system.
Why this matters
Why: A flush-linked leak can implicate a tank-to-bowl or base/drain path, while movement or backup raises the importance of fixture stability, drain restriction, or floor damage. This observation cannot distinguish a failed seal from a cracked or hidden connection.
-
Check 7
Build a service record from both prior visits: date, first wet point, trigger, photos or video taken from a safe position, work reportedly performed, parts or seals changed, whether the leak stopped temporarily, and the exact time or condition when it returned.
Expected result: Look for a changed symptom rather than only a changed part: for example, a supply leak resolved but a post-flush base leak remains, or an internal running leak resolved while water still appears at a fitting.
Next step: Give the record to the next licensed plumber or request that the original plumber document the diagnosis, test result, repair scope, and what observation would confirm success. Do not keep the toilet in service merely to collect more leak events.
Why this matters
Why: A changed symptom can show that an earlier repair addressed one path while another path remains. No change after two visits supports requesting a fresh isolation and test plan instead of repeating the same repair.
Use your observations
Decision map
Find the observation that best matches what you see, then follow the next safe action.
-
PATH 01Safety boundary
What you see
Do this next
Close the local shutoff, keep the fixture out of service, and request plumbing service for the pressurized connection or valve. Do not repeatedly tighten a fitting or replace a washer without isolating the first wet point.
Why this path and its safety boundary
Safety stop: Use the tank-to-bowl, base-after-flush, internal silent-leak, or urgent-water branch.
-
PATH 02Safety boundary
What you see
Do this next
Treat this as evidence of an internal flapper or flush-valve seal leak. Report the exact model and dye result to the plumber; a compatible seal may be considered, but it does not explain a separate floor leak.
Why this path and its safety boundary
Safety stop: Do not conclude that the toilet is leak-free; continue with location and timing evidence for intermittent, tank-joint, base, or drain leaks.
-
PATH 03Safety boundary
What you see
Do this next
Stop using the toilet and treat the water as potentially contaminated. Request a plumber to assess the bowl, base seal, drain connection, fixture stability, and floor; do not caulk over the base or keep flushing to reproduce the leak.
Why this path and its safety boundary
Safety stop: Use the supply, tank seam, internal running, or no-visible-leak branch based on the first wet point.
-
PATH 04Safety boundary
What you see
Do this next
Pause further repeat repairs and request a written re-diagnosis that names the first wet point, test condition, repair performed, and confirmation test. A second licensed plumber or building maintenance may be appropriate when the source remains disputed or hidden.
Why this path and its safety boundary
Safety stop: If a single safe adjustment clearly stopped a verified internal leak and no external water is present, monitor without repeated flushing; arrange service if it recurs.
-
PATH 05Safety boundary
What you see
Do this next
Stop immediately, keep people and pets away from the water, close the accessible supply or building shutoff if safe, and request prompt plumbing or building emergency help. Do not touch wet electrical equipment or enter a compromised ceiling or floor area.
Why this path and its safety boundary
Safety stop: Continue only the dry-location observations above and keep the toilet out of service until the recurring source is identified.
Helpful context
Understand the symptom
Two visits change the goal from adjustment to leak isolation
The phrase after two plumber visits does not identify a particular failed part. It means the next useful evidence is a repeatable leak pattern: the first wet point, the fixture action that preceded it, how quickly water appears, and whether the previous work changed that pattern. Water can run down porcelain or flooring from a higher connection and make the base look guilty. A quiet tank-to-bowl leak can also waste water without making the floor wet. Treat a recurring leak as an unresolved diagnosis until the source and the repair result are both documented.
Separate clean supply water, tank water, and drain water
A wet paper towel alone cannot tell you whether the water came from the pressurized supply connection, the tank, the bowl, or the drain. Water that appears only while the tank refills points toward a supply or fill-valve path. Water that appears only after flushing may be escaping at a tank joint, bowl, base seal, drain connection, or a higher fixture. Water at the base should be treated as potentially contaminated until a plumber identifies the source, especially if it follows a flush. Keep hands away from unknown water, avoid spreading it to electrical equipment or flooring, and stop using the fixture when the leak is active or the floor is soft.
Safety boundary
Stop conditions
- Stop immediately for a rapid or uncontrolled leak, a shutoff valve that will not stop flow, sewage or drain backup, water near electrical equipment, a wet ceiling, soft or collapsing flooring, visible porcelain or tank cracks, or contaminated water that cannot be contained safely.
- Stop using the toilet when water appears at the base after a flush, the fixture rocks, the bowl backs up, or the leak returns after a repair. Do not keep flushing to reproduce the event.
- Do not remove the toilet, disconnect supply tubing, dismantle a tank, loosen tank bolts, tighten porcelain hardware repeatedly, or apply caulk as a substitute for finding the leak source after two visits.
- Do not use drain chemicals or mix cleaning products while diagnosing a leak. Do not touch unknown water with bare hands, and do not work on a wet area near energized electrical equipment.
When checks do not resolve it
Need a professional?
Request prompt plumbing service for any active external leak, water at the base, a recurring leak after two visits, a failed shutoff, a rocking toilet, a suspected drain or floor problem, or any leak whose first wet point cannot be identified safely. Use building maintenance or emergency plumbing help for uncontrolled flow, sewage backup, ceiling or structural damage, or water near electrical equipment. Provide the prior visit dates and repair notes so the next visit begins with leak isolation rather than an unrecorded repeat adjustment.
Common questions
FAQ
Why can a toilet still leak after two plumber visits?
The visible puddle may not be the original source. A supply connection, tank seam, internal seal, base or drain connection, intermittent flush trigger, cracked fixture, or damaged floor can produce similar symptoms. Record the first wet point and timing, then ask for a written re-diagnosis rather than repeating the same adjustment.
How do I find the first wet point without taking the toilet apart?
Close the local shutoff if water is active, dry the outside and floor, place separate dry paper towels at the supply connection, tank seam, bowl sides, and base, and watch from a safe position. Record which towel becomes wet first and whether it happens during refill or after a flush. Do not keep flushing a toilet that leaks at the base.
What does a toilet dye test prove?
If food coloring or dye placed in the tank reaches the bowl before flushing, it supports an internal flapper or flush-valve seal leak. It does not prove why water is on the floor, and a negative test does not rule out a supply, base, intermittent, or drain leak. Flush promptly after the test to avoid staining.
Should I tighten the toilet bolts or caulk around the base after two visits?
No. Repeated tightening can damage porcelain, and caulk can hide or redirect water without repairing a base, drain, or floor problem. If water appears at the base, the toilet rocks, or the leak returns, stop using it and ask a plumber to isolate the bowl, seal, drain connection, and supporting floor.
Read the exact guide
Official sources
- Home MaintenanceU.S. Environmental Protection Agency WaterSense · EPA WaterSense homeowner guidance for toilet leak dye testing, toilet maintenance, and contacting a plumber for unresolved toilet problems.
- TroubleshootingKohler · Kohler Pressure Assist toilet troubleshooting paths for leaks at the tank and bowl, water supply connection, pressure vessel, and toilet bowl or base.
- Fix a Leak WeekU.S. Environmental Protection Agency WaterSense · EPA WaterSense leak-identification guidance for locating household leaks and distinguishing silent toilet leaks with a dye test.
- Toilet Constantly Leaking or RunningKohler Assist · Kohler troubleshooting for one- and two-piece toilets with constant tank-to-bowl running, fill-valve, trip-lever, overflow, and model-specific part considerations.
Community feedback
Share a repair observation
Share a plain-text repair observation. Accepted observations are published automatically; this page may take a moment to update.