
On this page
Start here
Quick answer
A leak at a roof junction is often caused by failed or incorrectly layered flashing where a roof meets a wall, chimney, dormer, vent, or another roof plane, but water can travel from a higher point before it appears indoors. From inside, map the stain or drip without opening the roof; from the ground, use binoculars to look for displaced shingles, missing step or kick-out flashing, open laps, or damaged flashing at the junction. Do not climb onto a wet or steep roof or pry up shingles. If the leak is active, the ceiling is sagging, water is near electrical equipment, or there is visible structural damage, contain the water from a safe location and call a qualified roofing professional promptly.
Work through in order
Diagnostic checks
Use only checks that match the exact appliance or system and its official guide.
-
Check 1
Inside the top floor, attic, or accessible ceiling area, locate the stain or drip and compare it with the nearest wall line, chimney, dormer, vent, valley, or roof edge; take photos without removing insulation or ceiling material.
Expected result: The wet area is directly below a visible junction, is offset downslope from one, or appears only after wind-driven rain or a particular direction of storm.
Next step: Record the junction and weather pattern for the roofer. Do not cut open the roof or wall to chase the stain; continue with a safe exterior observation from the ground.
Why this matters
Why: A directly aligned wet area makes that junction a useful first suspect, while an offset area or weather-direction pattern makes water migration along the roof deck, underlayment, or wall drainage plane more likely. The ceiling mark alone cannot prove the entry point.
-
Check 2
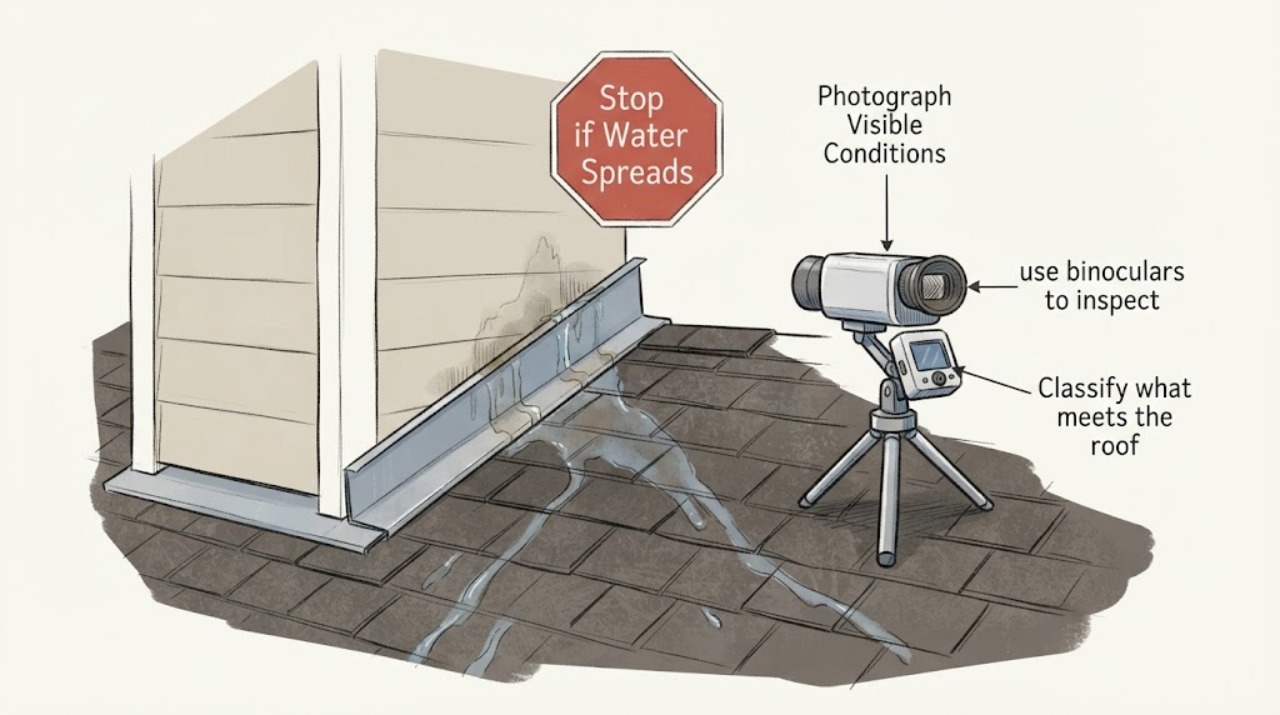
From the ground or another secure non-roof location, use binoculars to inspect the suspected roof-to-wall junction and the lower end of the wall for missing or displaced step flashing, a missing kick-out, lifted shingles, open laps, or runoff aimed at the wall.
Expected result: Flashing or shingles look loose or absent, the lower junction sends water onto the wall instead of away from it, or the visible layers appear continuous with no obvious defect.
Next step: Photograph the detail from the ground and request a qualified roofing inspection. Do not climb onto the roof or pull back shingles to verify the overlap.
Why this matters
Why: A missing, loose, or poorly directed detail supports a flashing or drainage-plane defect. A clean view does not rule out concealed flashing, underlayment, or wall integration failure because much of the assembly is hidden.
-
Check 3
Classify what meets the roof at the leak location: a vertical wall or dormer, a chimney, a vent or pipe, or the valley between two roof planes; note whether the junction is visible from the ground.
Expected result: The leak aligns with a wall-to-roof run, a chimney or dormer corner, a pipe or vent boot, or a valley where runoff converges.
Next step: Tell the roofer the junction type and whether the leak follows wind or heavy runoff. Leave concealed flashing and any roof-access inspection to the professional.
Why this matters
Why: Different junctions use different flashing assemblies. A wall run points toward step and kick-out details; a chimney may involve base and counter flashing; a pipe or vent needs a properly integrated penetration flashing; and a valley must safely carry concentrated water. Treating one type with a generic patch can leave the actual drainage path unchanged.
-
Check 4
After rain has stopped and only from a safe ground-level position, look for water being concentrated at the junction by a blocked or overflowing gutter, a missing diverter, or runoff spilling down the adjoining wall; do not clear a roof gutter from a ladder as part of this diagnosis.
Expected result: Runoff visibly pours onto the wall or over the junction, the gutter overflows at that point, or the leak occurs without any visible concentration of water there.
Next step: Photograph the flow pattern and ask the roofer to assess both the junction and the drainage path. Do not apply a surface patch or rely on sealant before the layered flashing is inspected.
Why this matters
Why: Concentrated runoff can overwhelm or bypass a junction detail and makes the gutter, kick-out, or diverter part of the drainage problem. Leakage without visible concentration keeps concealed flashing, underlayment, or a penetration defect in consideration.
-
Check 5
Check the room below and any accessible wall or attic area for spreading dampness, soft materials, mold-like growth, or water near a light, outlet, or other electrical equipment; keep occupants away from the wet area.
Expected result: The ceiling is sagging, water is active or spreading, materials are soft or visibly damaged, or water is near electrical equipment; alternatively, the area is dry with an old isolated stain.
Next step: For active water, sagging, electrical proximity, or suspected structural damage, keep clear, use only safe occupant-level containment, and call a qualified roofer promptly; use local emergency procedures if there is immediate danger. Do not handle wet electrical equipment or open the ceiling.
Why this matters
Why: Active or electrically adjacent water raises the urgency beyond a routine flashing inspection and can indicate ongoing damage inside the assembly. A dry isolated stain may be historical, but it still needs confirmation after the next suitable rain or professional inspection.
Use your observations
Decision map
Find the observation that best matches what you see, then follow the next safe action.
-
PATH 01Next step
What you see
Do this next
Have a qualified roofer inspect and repair the junction as an integrated assembly. Keep off the roof and document the visible defect for the appointment.
-
PATH 02Next step
What you see
Do this next
Ask a roofer to inspect the penetration and its layered membrane or flashing integration. Do not remove a boot, mortar, cap, or shingles to test the theory.
-
PATH 03Next step
What you see
Do this next
Give the roofer the weather and location pattern and request a systematic roof-and-wall moisture inspection. Avoid adding sealant or opening interior finishes before the path is traced.
-
PATH 04Next step
What you see
Do this next
Keep people clear, use safe indoor containment only, and call a qualified roofing professional promptly; use local emergency procedures for immediate danger. Do not touch wet electrical equipment or climb onto the roof.
Helpful context
Understand the symptom
Why a junction leak can appear away from the flashing
Flashing is meant to keep water moving down and out where roof planes, walls, and penetrations meet. Step flashing is layered with the shingles at a roof-to-wall intersection, while a kick-out piece sends concentrated runoff away from the wall. If a layer is missing, reversed, loose, or no longer integrated with the wall drainage plane, water can enter behind the cladding and travel before it reaches a ceiling or attic stain. A stain therefore identifies the water path, not necessarily the failed joint.
Keep the inspection visual and the repair professional
Use a flashlight in an accessible attic or ceiling area and binoculars from the ground, but do not remove siding, shingles, counterflashing, or wall coverings to expose a suspected junction. Roof junction repairs require the correct overlap and integration with underlayment, shingles, cladding, or a penetration boot; a bead of sealant alone may hide the entry path without restoring drainage. Photograph the pattern and give those observations to a roofer.
Only after diagnosis
Potential parts
- roof-to-wall step and kick-out flashing
Consider this part class only when a roofer confirms missing, damaged, or incorrectly directed flashing at a roof-to-wall junction.
The material, dimensions, shingle exposure, wall cladding, and installation sequence must match the existing roof assembly and local requirements; do not order from a photo alone. - roof flashing membrane or underlayment transition
Consider this only when professional inspection finds a failed or missing transition between the flashing and the roof or wall drainage plane.
The membrane must be approved for the roof covering and compatible with the existing underlayment, cladding, and flashing metals; a roofer should specify and install it. - penetration flashing or vent boot
Consider this only when the confirmed leak source is a pipe, vent, or similar roof penetration rather than the adjacent roof-to-wall junction.
Confirm the pipe size, roof covering, slope, material, and installation details before selecting a replacement; the visible diameter alone is not enough.
When checks do not resolve it
Need a professional?
Call a qualified roofing professional for any confirmed or suspected flashing leak at a roof junction, especially when the junction is concealed, the roof is steep or wet, the leak returns after a surface patch, or the water path is unclear. Seek prompt help for active dripping, a sagging ceiling, water near electrical equipment, widespread dampness, mold-like growth, soft framing, or storm damage. Stay on the ground for exterior checks; do not climb, pry up shingles, remove siding or counterflashing, open the ceiling, or substitute sealant for a properly layered flashing repair.
Common questions
FAQ
Can a roof junction leak appear several feet away from the flashing?
Yes. Water can move beneath shingles or along the roof and wall drainage layers before it reaches the attic or ceiling. Treat the stain as a clue to the path, not proof of the exact entry point, and have the junction and the area above it inspected.
What should I look for at a roof-to-wall junction from the ground?
Use binoculars to look for displaced shingles, missing or loose step flashing, a missing kick-out at the lower end, open-looking laps, or runoff being directed onto the wall. A clean view does not rule out concealed flashing or underlayment failure.
Is roof flashing leak repair a safe DIY project?
Do not climb onto a wet or steep roof or pry up shingles to test a suspected leak. Flashing must be layered and integrated with the roof and wall drainage planes, so a qualified roofer should diagnose and repair the assembly, especially when the entry point is concealed.
When is a flashing leak an urgent problem?
Treat active spreading water, a sagging ceiling, water near electrical equipment, substantial dampness, soft materials, or suspected structural damage as urgent. Keep clear, contain water only from a safe indoor location, and contact a qualified roofing professional promptly.
Read the exact guide
Official sources
- Step Flashing at Roof-Wall IntersectionsU.S. Department of Energy Building Science Education · Directly supports the roof-wall junction condition, layered flashing, water intrusion risk, and kick-out/step-flashing inspection logic.
- Whole-House WeatherizationU.S. Department of Energy Weatherization Assistance Program · Supports urgency when water intrusion is active or affecting insulation, mold/moisture conditions, or other building materials.
- Understanding Roof Flashing: Essential Protection for Every HomeGAF · Supports symptom-led inspection of visible flashing, the possibility of water damage at roof junctions, and leaving roof flashing installation to a professional.
- Sealing PenetrationsU.S. Department of Energy Building Science Education · Supports the branch for leaks at chimneys, vents, pipes, and other roof penetrations and the risk of interior water damage.
- BSC Information Sheet 303 - Common Flashing DetailsU.S. Department of Energy Building America Program / Building Science Corporation · Supports distinguishing roof-to-wall, kick-out, valley, and penetration details and checking whether flashing directs water down and out.
Community feedback
Share a repair observation
Share a plain-text repair observation. Accepted observations are published automatically; this page may take a moment to update.