
On this page
Start here
Quick answer
A roof flashing leak is a water-intrusion problem at a roof-to-wall joint, valley, chimney, vent, skylight, or other penetration, but the wet spot inside may be displaced from the entry point. From the floor or a safe window, record the exact ceiling or wall location, when it appears relative to rain and wind, visible moisture or staining, and nearby gutter or downspout behavior. Do not climb, use a ladder, walk on the roof, probe, puncture, scrape, or apply tape, sealant, or roofing cement as a temporary fix. Protect people and belongings from active water, then arrange a qualified roofing inspection with the observations.
Before you begin
Safety first
- Do not climb the roof, use a ladder, enter an attic, probe or puncture surfaces, remove shingles or flashing, scrape staining, run a hose to reproduce the leak, or apply tape, caulk, roofing cement, or other temporary sealants.
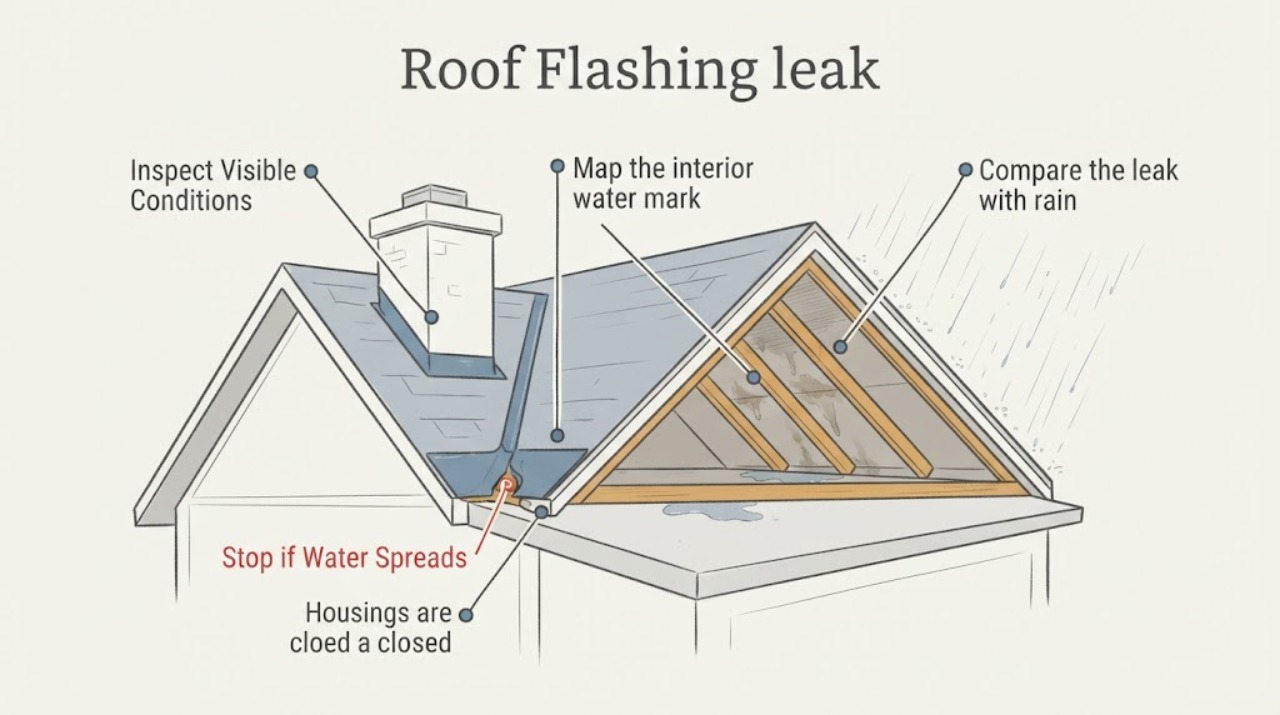
Work through in order
Diagnostic checks
Use only checks that match the exact appliance or system and its official guide.
-
Map the interior water mark
From the floor, record the room, ceiling or wall surface, nearby corner or roof-to-wall line, and whether the mark is a spot, streak, bubbling finish, sagging area, or active drip; do not cut into the surface or press on it.
Expected result: The mark is directly below a roof edge or wall joint, near a chimney or skylight line, at an interior corner, or displaced from any obvious exterior feature.
Next step: Photograph the mark with a room and date note, move belongings only if the floor is safe, and give the location map to the roofer.
Stop if: Stop if the ceiling sags, water is near a light or electrical fixture, the floor is slippery, or the surface might fall.
Why this matters
Why: The pattern helps a roofing professional select likely exterior junctions, but water may travel before appearing. A soft, bulging, or spreading finish indicates active damage and raises urgency.
-
Compare the leak with rain and wind
Write down whether the moisture appears during rain, after rain stops, during wind-driven rain from one direction, after snow or ice melt, or without a recent weather event; do not go outside to check the roof while the weather is active.
Expected result: The leak follows ordinary rain, only follows wind-driven rain, appears after a delay, recurs in dry weather, or has not returned since the original event.
Next step: Keep a simple weather-and-leak log and share it with the roofing professional; do not reproduce the leak with a hose or by opening a surface.
Stop if: Stop observing outdoors during wind, lightning, heavy rain, ice, snow, or any condition that makes the ground or access unsafe.
Why this matters
Why: Weather and delay patterns help distinguish a rain-entry investigation from plumbing, condensation, or an older damp-material issue. A delayed or intermittent leak still needs assessment because the water may be traveling through concealed layers.
-
Look for safe, visible exterior clues
From the ground or a safe window, look only at visible roof-wall lines, chimney or vent edges, skylight surroundings, eaves, gutters, and downspouts; note missing-looking metal, open-looking joints, rust, streaking, overflow, or water running against a wall without reaching or touching anything.
Expected result: A visible detail appears displaced or corroded, water is streaking below a joint, the gutter overflows near the suspected area, the downspout discharges poorly, or no exterior clue is visible.
Next step: Record the side of the building and the nearest feature, then request a roof-and-drainage assessment; leave all metal, shingles, sealants, and wall finishes intact.
Stop if: Stop if the only view requires a ladder, roof access, leaning over an edge, touching a loose part, or approaching during bad weather.
Why this matters
Why: A visible clue can focus the professional's inspection, while no clue is common because flashing may be under roofing or behind wall finishes. Gutter or downspout overflow can mimic or worsen a flashing leak and should be reported separately.
-
Check for moisture spread without opening the assembly
From normal interior access, note adjacent wall or ceiling stains, peeling or swollen finish, damp odor, visible condensation, or moisture on the floor; if a moisture meter is already available, record a non-invasive reading without drilling, removing trim, or disturbing the surface.
Expected result: The affected area is dry and unchanged, dampness is spreading, a meter shows a localized difference, or the ceiling/wall is soft or visibly deformed.
Next step: Provide the moisture map and any readings to the roofer or water-intrusion professional and keep the area ventilated only if doing so is safe and does not spread contamination.
Stop if: Stop if mold disturbance, falling material, active electrical risk, structural movement, or unsafe access is present.
Why this matters
Why: A spreading or deformed area suggests continuing or accumulated water and needs prompt professional evaluation. A dry surface today does not prove the flashing is sound because concealed materials may retain moisture.
-
Decide whether immediate protection is needed
Ask whether water is actively entering, the ceiling or wall is bulging, belongings are at risk, or water is near electricity; make the decision from visible conditions and do not attempt a roof-side patch.
Expected result: One or more urgent conditions are present, or the area is dry and stable while service is being arranged.
Next step: Move people away, place belongings elsewhere only from a safe dry floor, and contact qualified help; tell the professional the exact location and weather trigger.
Stop if: Stop all DIY investigation when active water, electrical exposure, structural instability, or unsafe weather is present.
Why this matters
Why: Active water, a deformed ceiling, or electrical proximity requires prompt professional and possibly emergency building response. A stable dry area still needs a scheduled roof inspection if the leak has recurred or the source is uncertain.
Use your observations
Decision map
Find the observation that best matches what you see, then follow the next safe action.
-
PATH 01Safety boundary
What you see
The mark is small, dry, and has not returned, with no structural, electrical, or active-water warning.
Do this next
Keep the record and arrange a roofing inspection if the cause is not known, especially if the area is near a roof-wall junction or penetration.
Why this path and its safety boundary
Safety stop: Escalate if the mark spreads, becomes damp, or returns with weather.
-
PATH 02Safety boundary
What you see
Water appears after rain near a chimney, skylight, vent, valley, or roof-to-wall line.
Do this next
Request a qualified roof-flashing and water-intrusion inspection focused on that feature and the water path above it.
Why this path and its safety boundary
Safety stop: Do not climb, probe, remove roofing, or apply a temporary surface patch.
-
PATH 03Safety boundary
What you see
Overflow, poor downspout discharge, or water against the wall is visible near the suspected leak.
Do this next
Request coordinated gutter, drainage, and roofing assessment rather than assuming the flashing alone failed.
Why this path and its safety boundary
Safety stop: Do not redirect, disconnect, or repair elevated drainage components during the observation.
-
PATH 04Safety boundary
What you see
The ceiling is sagging, water is near electrical equipment, or active water is spreading.
Do this next
Leave the affected area, keep clear of electrical hazards, and obtain prompt professional or emergency building help.
Why this path and its safety boundary
Safety stop: Do not touch fixtures, cut the ceiling, climb for a bucket, or enter unstable areas.
-
PATH 05Safety boundary
What you see
The suspected fix would require roof access, a ladder, puncturing a surface, or applying sealant or tape as a temporary patch.
Do this next
Stop and schedule a qualified roofing professional who can inspect and restore the layered water-control detail safely.
Why this path and its safety boundary
Safety stop: Do not continue beyond ground and interior observation.
Helpful context
Understand the symptom
Why the wet spot may not be the flashing location
Flashing is part of the roof and wall water-control layer. Water can enter at a roof-wall intersection or penetration and travel sideways or downward through roofing, sheathing, insulation, or framing before becoming visible indoors. Gutters, roof covering, and other penetrations can produce similar patterns, so a ceiling stain is a location clue rather than proof of one failed piece.
Keep the inspection non-destructive
Use only a stable floor position or a normal window view. Do not enter the attic, climb a ladder, step onto the roof, touch flashing, pull siding, remove shingles, drill or puncture a surface, scrape staining, or cover the area with tape, caulk, or roofing cement. A professional needs to see the original drainage layers and determine whether the water source is flashing, roofing, or another exterior detail.
Only after diagnosis
Potential parts
- flashing-sealant
Consider this category only after a qualified roofer identifies a compatible, manufacturer-approved sealing detail; a generic sealant is not a safe temporary diagnosis or substitute for layered flashing.
Confirm roof material, flashing metal, weather conditions, and manufacturer instructions before any professional application. - roof-repair-tape
Consider this category only if a roofing professional specifies it as part of a complete repair plan; do not apply tape to hide an active leak or puncture the roof.
Compatibility depends on the roof membrane, flashing, substrate, temperature, and drainage detail; the professional should confirm the full layered installation. - moisture-meter
Consider this category only as an optional observation aid for documenting a suspected wet area; it cannot locate the roof entry point or prove that flashing is the cause.
Use only non-invasive readings according to the instrument instructions and have a professional interpret them with the building materials and leak history.
When checks do not resolve it
Need a professional?
Request roofing service when an interior mark follows rain, returns after drying, appears near a roof-wall joint or penetration, or is accompanied by visible exterior clues, gutter overflow, spreading dampness, or damaged finishes.
Safety scope: Do not climb the roof, use a ladder, enter an attic, probe or puncture surfaces, remove shingles or flashing, scrape staining, run a hose to reproduce the leak, or apply tape, caulk, roofing cement, or other temporary sealants.
Have this ready
- Provide the room and surface map, photos from safe positions, weather and timing log, visible roof feature or runoff clues, moisture observations or readings, and any history of prior roof work without changing the area before inspection.
Common questions
FAQ
Can a ceiling stain show exactly where the flashing failed?
No. Water can travel sideways or downward through roofing and wall assemblies before appearing indoors. The stain is a location clue for a professional inspection, not proof of the entry point.
Should I climb up to inspect the flashing after it rains?
No. Stay on the floor or use a safe window view. Do not use a ladder, walk on the roof, reach over an edge, or inspect during wind, rain, lightning, ice, or other unsafe conditions.
Is roofing tape or caulk a safe temporary fix?
Do not apply a temporary patch as part of this observation workflow. It can hide the water path or interfere with the layered repair; preserve the area and have a qualified roofer assess it.
What if the leak is near a chimney, skylight, or vent?
Record the interior location and rain pattern and request a professional inspection of the penetration and surrounding flashing. Do not remove or touch the exterior material.
When is a flashing leak urgent?
Request prompt help for active water, spreading dampness, a sagging ceiling, water near electricity, falling material, or any sign of structural or interior damage.
Read the exact guide
Official sources
- Roof Valleys and Penetrations SealedU.S. Department of Energy Building America Solution Center · Supports naming valleys and penetrations as professional inspection targets without providing a user repair procedure.
- Look for Missing Roof and Wall FlashingU.S. Department of Energy Building America Solution Center · Supports understanding why flashing directs water down and out and why missing or damaged details need professional attention; the article limits the reader to safe ground and interior observation.
- Leak Detection and Flow Monitoring DevicesU.S. Environmental Protection Agency WaterSense · Supports using moisture observations as clues that reduce damage while recognizing that detection does not identify the roof entry point.
- Addressing Indoor Environmental Concerns During RemodelingU.S. Environmental Protection Agency · Supports treating roof and flashing details as part of the building moisture-control layer and escalating water intrusion rather than masking it.
Community feedback
Share a repair observation
Share a plain-text repair observation. Accepted observations are published automatically; this page may take a moment to update.