
On this page
Start here
Quick answer
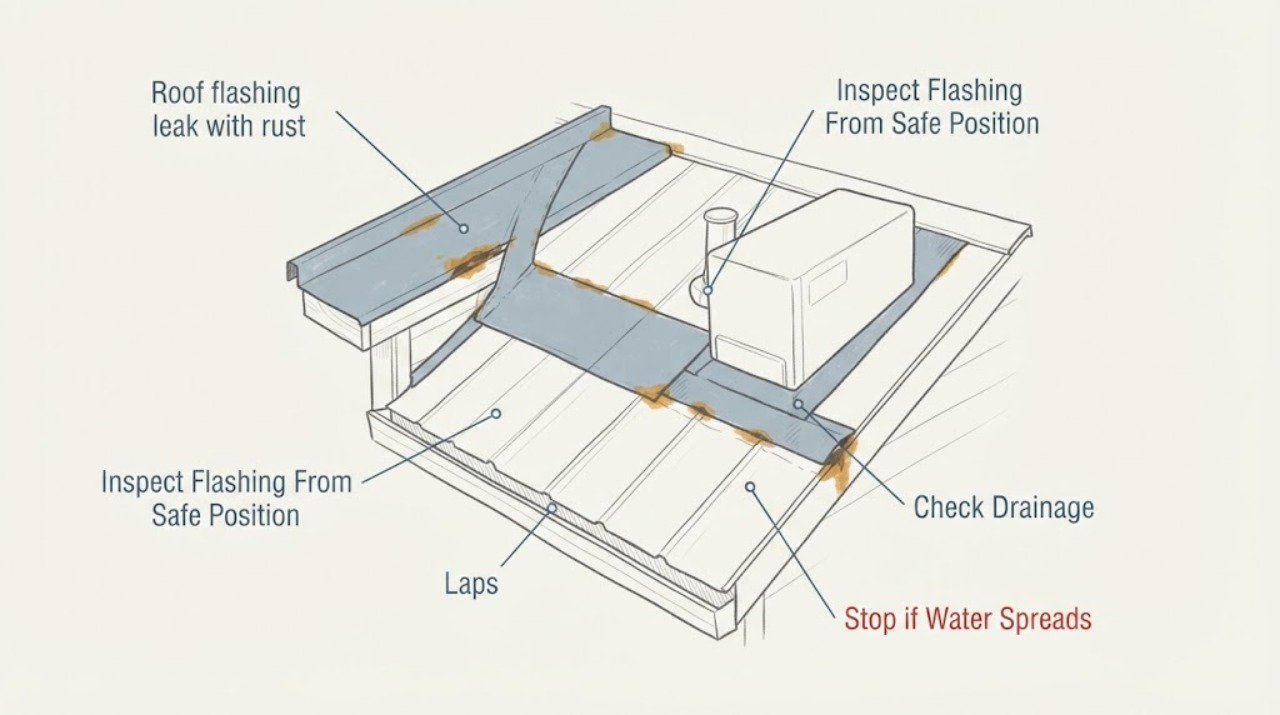
Rust, an open lap, a gap, loose fastener, or failed seal at roof flashing can let water behind the roof covering or into a wall, but the visible stain inside is not always directly below the entry point. From inside, document the stain or damp area only where access is safe; from the ground, look for rust, open seams, loose flashing, damaged roof covering, missing caulk, debris, and a gap at a wall, chimney, skylight, or pipe penetration. Do not walk a wet or steep roof, pry up shingles, remove flashing, or rely on a bead of caulk as a permanent repair. Protect belongings from active water and arrange a qualified roofer promptly, especially when the flashing is loose, rusted through, open at a lap, or water is reaching insulation, framing, wiring, or finished walls.
Before you begin
Safety first
- This article supports documenting indoor moisture and inspecting roof details from safe ground-level or interior positions. It does not authorize roof walking, ladder or fall-risk work, shingle or flashing removal, structural opening, electrical handling, or integrated roof-wall repair.
Work through in order
Diagnostic checks
Use only checks that match the exact appliance or system and its official guide.
-
Check 1
From inside the building, photograph the ceiling or wall stain, dampness, peeling finish, soft material, or active drip without opening the assembly; note the room, the weather, and whether the area is near a roof-wall junction, chimney, skylight, vent, or attic space.
Expected result: Record whether the leak appears only during rain, follows wind direction or snowmelt, is spreading, smells musty, or is near electrical equipment, insulation, framing, or a finished wall; note the approximate area above it without assuming it is the entry point.
Next step: Protect belongings and document the timing and weather, then use a safe attic or ground-level check to narrow the roof feature; arrange a roofer when the leak is active, recurring, or near building services.
Stop if: Do not cut into a wet ceiling, touch wet electrical equipment, enter an unsafe attic, or climb toward the roof feature to chase the stain.
Why this matters
Why: The indoor pattern confirms moisture intrusion but does not locate the flashing defect by itself. A stain away from the roof feature can reflect water traveling along concealed layers, while active spread or wet structural material increases the urgency of professional assessment.
-
Check 2
From the ground, a window, or another secure non-roof position, use binoculars or a camera zoom to inspect the flashing around roof-wall intersections, chimneys, skylights, valleys, vents, and roof edges; look for rust, corrosion, open laps, separated corners, missing or loose fasteners, failed caulk, and damaged roofing nearby.
Expected result: Record whether the metal is surface-stained or rusted through, whether a lap or corner is visibly open, whether flashing has lifted or shifted, whether a sealant patch is cracked, and whether shingles, membrane, masonry, or wall cladding are damaged around it.
Next step: Photograph the feature and stop at visual evidence; provide the exact roof feature and defect pattern to a qualified roofer for an integrated repair assessment.
Stop if: Do not walk on the roof, pull flashing, lift shingles, scrape rust from a roof edge, remove fasteners, or use a ladder where footing, fall protection, or overhead clearance is uncertain.
Why this matters
Why: A rust hole, open lap, shifted flashing, or cracked seal is a plausible entry path, but the correct repair depends on how the flashing is layered into the roof and wall. A sound-looking visible edge does not rule out concealed damage or a leak higher up the drainage path.
-
Check 3
From safe ground-level access, inspect adjacent gutters, downspouts, roof valleys, debris accumulation, and the flashing transition around the suspected leak; check whether a blocked outlet or backed-up water could be sending runoff against the flashing or roof edge.
Expected result: Record whether gutters or outlets are blocked, joints are loose, water stains are below a valley or roof-wall intersection, debris is collecting against a flashing edge, or water discharges toward the wall or foundation.
Next step: Remove only loose debris that is safely reachable without roof access; arrange a roofer for blocked high outlets, water behind the flashing, or any detail that needs re-sealing, re-lapping, or roof-cover removal.
Stop if: Do not flush a suspected interior downspout with water, chip ice from a roof drain, climb onto the roof, or direct test water into a wall or penetration.
Why this matters
Why: A blocked or poorly draining system can create water backup that resembles a flashing failure or adds load and wetting around the flashing. If drainage is clear but rust, a gap, or recurring interior moisture remains, flashing integration or concealed roof damage becomes more likely.
-
Check 4
If the attic or service space can be reached without roof access and is dry, stable, and safely lit, observe the underside of the roof deck, insulation, wall top plate, and framing near the suspected flashing feature; do not move insulation or open finishes merely to find the leak.
Expected result: Record wet insulation, darkened or soft wood, daylight at a joint, mold-like growth, a water trail along framing, or no visible moisture despite an indoor stain; note whether the trail starts above or beside the flashing feature.
Next step: Photograph accessible evidence and have a roofer assess the flashing, roof covering, and concealed layers; dry or damaged insulation and framing may require additional building-envelope or remediation work.
Stop if: Do not crawl on unsupported ceiling surfaces, disturb suspected mold or contaminated material, handle wet wiring, or perform a destructive opening without qualified assessment.
Why this matters
Why: Wet insulation, framing discoloration, or a water trail supports an ongoing moisture path and can indicate damage beyond the visible flashing. No moisture at the time of inspection does not disprove an intermittent wind-driven or storm-dependent leak.
-
Check 5
Combine the weather history, interior moisture, exterior flashing condition, drainage findings, and access limitations to classify the issue as a dry surface defect, recurring leak, active leak, or storm-damaged roof detail; do not apply a surface patch before documenting the defect.
Expected result: Record whether the flashing is rusted through, open at a lap, loose, missing, or merely stained; whether water is actively entering; whether the roof covering or wall is damaged; and whether the repair would require shingles, underlayment, masonry, siding, or penetration work to be disturbed.
Next step: Arrange qualified roofing service promptly for any leak or failed flashing and describe the exact feature, rust or gap, weather trigger, and interior evidence; use only safe interior water-control measures while awaiting service.
Stop if: Do not nail, screw, pry, seal, paint, or replace flashing from the roof as a temporary experiment, and do not delay service while water is entering concealed building materials.
Why this matters
Why: Surface rust without moisture is a maintenance clue, while a hole, open lap, active water, wet insulation, or damaged roof-wall transition is a functional leak requiring repair. A flashing defect that crosses several layers cannot be safely judged by caulk appearance alone.
Use your observations
Decision map
Find the observation that best matches what you see, then follow the next safe action.
-
PATH 01Safety boundary
What you see
The metal shows surface discoloration or early corrosion, but there is no active leak, open lap, visible hole, loose edge, wet insulation, or interior water trail.
Do this next
Photograph and monitor the feature from a safe position, keep roof drainage clear, and schedule a qualified roof inspection before the next wet season or when the corrosion changes.
Why this path and its safety boundary
Why it matters: The condition is a warning of material deterioration rather than confirmed flashing failure; corrosion can progress and the visible surface may not show the full condition of the lap or concealed edge.
Safety stop: Do not sand, paint, or coat roof flashing from an unsafe position or treat a surface coating as proof the layered flashing remains watertight.
-
PATH 02Safety boundary
What you see
The flashing is rusted through, has a hole, open lap, unsealed corner, missing fastener, shifted piece, or cracked temporary sealant and the interior leak follows rain or snowmelt.
Do this next
Protect the interior and arrange a qualified roofer to inspect and repair or replace the affected flashing, roofing, underlayment, and adjacent materials as needed.
Why this path and its safety boundary
Why it matters: The visible defect is a credible entry path, but a durable fix must restore the flashing and its overlap with the roof and wall drainage layers; surface caulk alone may not address concealed damage.
Safety stop: Do not climb to patch the hole, lift shingles, pull fasteners, or apply roofing tar as a substitute for integrated flashing repair.
-
PATH 03Safety boundary
What you see
The leak appears during heavy rain, gutters or roof drains are blocked, debris is trapped near the detail, or water backs up at a valley, roof edge, or outlet while the flashing itself is not yet visibly open.
Do this next
Clear only safely reachable loose debris, then have the drainage path and flashing inspected if moisture recurs, water travels behind the edge, or the outlet is inaccessible.
Why this path and its safety boundary
Why it matters: Runoff or blockage may be overwhelming or wetting the detail and can coexist with concealed flashing damage; clearing drainage does not prove the roof-wall or penetration flashing is sound.
Safety stop: Do not flood a roof or interior drain to test it, chip ice, climb onto the roof, or assume a clear gutter has ruled out a flashing leak.
-
PATH 04Safety boundary
What you see
Water is actively entering, insulation or framing is wet, the wall or ceiling is soft or spreading, the roof is steep or wet, the flashing is detached after a storm, or access requires climbing or working near utilities.
Do this next
Keep occupants away from the affected area, protect contents without touching wet electrical equipment, document the leak from a safe location, and obtain prompt qualified roofing and any needed building-envelope or remediation assessment.
Why this path and its safety boundary
Why it matters: The problem has moved beyond a safe visual check and may involve concealed building damage or an immediate fall and water-damage hazard.
Safety stop: Do not enter an unsafe attic, walk the roof, remove wet finishes, touch wet wiring, or attempt emergency flashing work without appropriate professional access and equipment.
Helpful context
Understand the symptom
A flashing gap is a water-path failure
Flashing is part of a layered drainage system at vulnerable places such as roof-wall intersections, valleys, chimneys, skylights, and pipe or vent penetrations. The layers overlap so water is directed down and out rather than behind the roofing or into the wall. Rust, a separated lap, a loose edge, missing fastener, or failed seal can interrupt that path.
Trace the leak without assuming the stain is the source
Water can travel along roofing, underlayment, sheathing, framing, or a wall cavity before it appears indoors. Record when the leak appears, which roof feature is uphill or above the damp area, and whether it follows wind-driven rain or only certain storms. A ground-level view and a safe attic observation can narrow the area, but they cannot certify the concealed leak path.
Use the professional boundary early
Replacing step or continuous flashing requires integrating the new material with shingles, underlayment, wall drainage layers, or a penetration boot. A surface patch may conceal rust or an open lap while water continues behind it. Roof access, shingle removal, flashing integration, and repairs around chimneys or penetrations belong to a qualified roofing professional, particularly when the roof is wet, steep, damaged, or difficult to access.
Safety boundary
Stop conditions
- Do not walk a wet, steep, damaged, or difficult-to-access roof; do not use a ladder without appropriate footing, fall protection, and overhead clearance.
- Do not pry up shingles, remove flashing, replace fasteners, alter roof-wall layers, or repair around chimneys, skylights, vents, or other penetrations as a casual patch.
- Do not rely on caulk, roofing tar, paint, or a surface patch to resolve rust or an open flashing lap without correcting the integrated drainage path.
- Stop for active water near wiring, wet or soft framing, spreading ceiling or wall damage, unsafe attic access, a detached storm-damaged detail, or any suspected structural deterioration.
- Arrange qualified roofing service when flashing is rusted through, open, loose, missing, or recurrently leaking, or when diagnosis requires roof access, shingle removal, underlayment, masonry, siding, or building-envelope work.
Only after diagnosis
Potential parts
- corrosion-resistant roof flashing
Consider this category only when a qualified roofer confirms that flashing is rusted through, missing, incorrectly layered, or permanently damaged and identifies the roof-wall, valley, edge, or penetration detail requiring replacement.
Match the roof covering, wall drainage layers, penetration or intersection detail, metal compatibility, and local code; a generic strip cannot be assumed to fit an existing assembly. - roofing sealant for flashing detail
Consider sealant only when the qualified repair scope identifies a compatible sealant joint or minor maintenance detail after the underlying flashing, overlap, and substrate are sound; sealant is not a substitute for a rust hole or open lap.
Confirm compatibility with the roof membrane, metal, shingles, masonry, temperature, and manufacturer instructions; do not select by color or generic water-resistance claims. - roof penetration flashing boot or collar
Consider this category only if inspection identifies a cracked, rusted, displaced, or failed boot or collar around a vent or pipe and confirms that the penetration detail is the leak source.
Confirm pipe dimensions, roof covering, flashing material, weather exposure, and installation layering before ordering; penetration flashing should be integrated by a qualified installer.
When checks do not resolve it
Need a professional?
Arrange a qualified roofer promptly for a rust hole, open lap, loose or missing flashing, recurring leak, water behind the roof edge, wet insulation or framing, damaged roof covering, or any detail at a chimney, skylight, valley, wall intersection, or penetration. Treat active water entry, spreading interior damage, storm-detached flashing, unsafe roof access, and wet electrical areas as urgent rather than a do-it-yourself sealing task.
Safety scope: This article supports documenting indoor moisture and inspecting roof details from safe ground-level or interior positions. It does not authorize roof walking, ladder or fall-risk work, shingle or flashing removal, structural opening, electrical handling, or integrated roof-wall repair.
Common questions
FAQ
Does rust on roof flashing always mean the roof is leaking?
No. Surface rust is a warning of deterioration, while rust-through, an open lap, loose flashing, or an interior water trail makes a leak more likely. Photograph the condition from a safe position and have the flashing and adjacent roof layers assessed rather than coating it blindly.
Can I seal a flashing gap with roofing caulk?
Do not assume caulk is a permanent repair. Flashing must overlap and integrate with the roof and wall drainage layers; a bead may crack or hide a rusted, loose, or incorrectly layered detail. A qualified roofer should determine whether the joint needs compatible sealant, re-lapping, or flashing replacement.
Why is the ceiling stain not directly below the rusty flashing?
Water can travel along shingles, underlayment, roof decking, framing, or a wall cavity before appearing inside. Use the stain location and weather timing to narrow the area, but do not assume the nearest visible rust is the sole entry point.
When does a roof flashing leak need a roofer immediately?
Arrange prompt service for active water, a rust hole, open lap, loose or missing flashing, water behind the roof edge, wet insulation or framing, a spreading ceiling or wall stain, storm damage, or any inspection requiring a wet or steep roof, shingle removal, penetration work, or access near utilities.
Read the exact guide
Official sources
- Flashing of Roof-Wall Intersections in Existing HomesPacific Northwest National Laboratory, U.S. Department of Energy Building America Solution Center · DOE Building America technical guidance for existing roof-wall intersections; details must be adapted to the roof covering, wall assembly, and adopted code.
- Look for Missing Roof and Wall FlashingPacific Northwest National Laboratory, U.S. Department of Energy Building America Solution Center · DOE Building America homeowner inspection guide; it supports visual identification, while missing or defective flashing should be handled according to the roof and wall assembly requirements.
- Reroof Of StructuresSolano County, California · Solano County reroofing and maintenance guidance; local code, permits, roof materials, and licensed-professional requirements vary by jurisdiction.
- Moisture Control Guidance for Building Design, Construction and MaintenanceU.S. Environmental Protection Agency · EPA building-moisture guidance for inspection and maintenance; exact roof assemblies, access, and repair requirements depend on the property and adopted code.
Community feedback
Share a repair observation
Share a plain-text repair observation. Accepted observations are published automatically; this page may take a moment to update.