
On this page
Start here
Quick answer
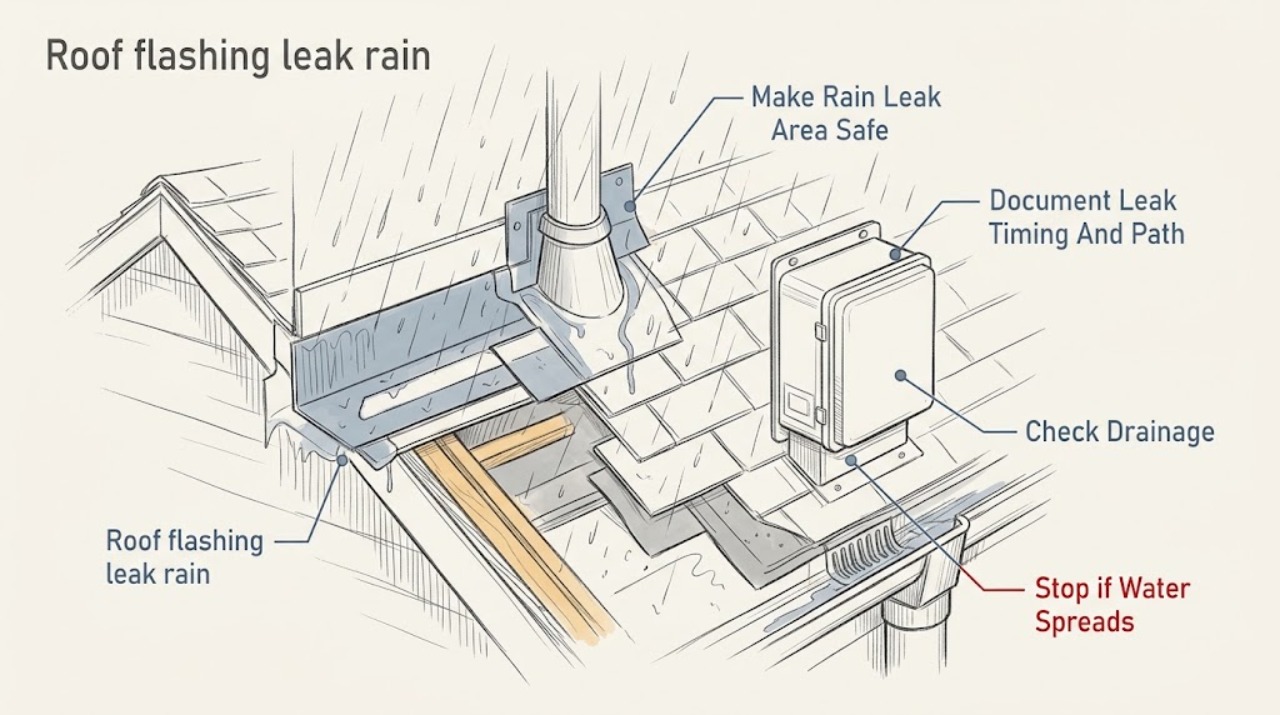
A roof flashing leak that appears during rain needs source tracing and a weather-safe repair, not a bead of interior caulk or a guessed patch. From the ground, document where the ceiling or wall becomes wet, when the drip starts, and whether the location is near a roof-wall intersection, chimney, skylight, plumbing vent, HVAC curb, valley, or gutter. Do not climb a wet roof, walk on damaged roofing, remove shingles, or probe the flashing. Proper flashing is part of a continuous drainage plane: step flashing protects roof-wall intersections, and flashing around penetrations directs rain out of vulnerable joints. Arrange a qualified roofer or building-envelope professional to inspect the flashing, laps, fasteners, counter-flashing, underlayment, and drainage path. If water reaches electrical equipment, the ceiling sags or cracks, the roof is structurally damaged, or the leak is entering rapidly, keep people clear and use emergency or qualified electrical help before any roof work.
Before you begin
Safety first
- This article supports safe observation from stable ground or dry interior access and limited containment only. Do not climb a wet roof, enter an unsafe attic, puncture a ceiling, touch wet electrical equipment, or improvise flashing repairs.
Work through in order
Diagnostic checks
Use only checks that match the exact appliance or system and its official guide.
-
Check 1
From a doorway or other stable dry position, check the interior area affected by the rain-linked leak before approaching the ceiling or roof.
Expected result: Record standing water, water near a light or outlet, a sagging or bulging ceiling, new cracks, falling material, popping or creaking, rapid flow, or a blocked exit.
Next step: Keep people and pets out of the area. Arrange a qualified electrician when water is near electrical equipment, and leave or secure the building and contact emergency responders if collapse, fire, gas odor, or immediate danger is suspected.
Stop if: Do not stand beneath a bulge, enter standing water, touch wet fixtures or wiring, use a ladder, or climb onto the roof while rain or wind makes access unsafe.
Why this matters
Why: Water near electrical equipment can create shock and fire risk; sagging, cracking, or structural sounds can indicate a ceiling or roof hazard. These findings take priority over locating the exact flashing detail.
-
Check 2
Photograph the interior stain, active drip, nearby wall or ceiling joint, and any accessible exterior context from the ground; log when rain began and when the leak changed.
Expected result: Note whether water appears only during wind-driven rain, begins after a delay, follows a roof slope or wall line, emerges near a chimney, skylight, vent, dormer, or exterior wall, or continues after rain stops.
Next step: Give the timeline, photos, roof plan, recent roof work, and weather event to a qualified roofer or building-envelope professional; keep the interior container in place only while the area remains safe.
Stop if: Do not mark the roof by climbing, pull back shingles, probe joints, remove sealant, or open the ceiling to follow the water path.
Why this matters
Why: Timing and travel direction help the roofer prioritize a roof-wall intersection, penetration, valley, gutter or drainage path, but the visible wet point may be downstream from the flashing failure. A delayed drip may be retained water rather than proof that the roof is no longer leaking.
-
Check 3
From ground level and without leaning a ladder against gutters, observe the visible roof edge, gutters, downspouts, wall intersection, and penetration surrounds when weather and footing are safe.
Expected result: Look for displaced or missing flashing visible from below, open seams or laps, rust or corrosion, damaged roof covering, blocked gutters or downspouts, overflowing water at a wall, vegetation or debris, or a damaged vent, chimney, skylight, or curb.
Next step: Photograph the feature and report its location rather than touching it. Ask the roofer to inspect the complete drainage path and the flashing integration, including the upslope and downslope sides of the detail.
Stop if: Do not clear a roof gutter from a roof or ladder during rain, pull on flashing, apply sealant, chip ice, or step on roof covering to get a closer view.
Why this matters
Why: A visible open lap, loose piece, overflow, or damaged penetration makes a rainwater-control defect plausible, but exterior appearance cannot confirm what is happening below the roof covering. A blocked drainage path can overload flashing and wall intersections during rain.
-
Check 4
Compare the rain-linked leak with safe observations of plumbing, HVAC, and indoor use without intentionally running water or entering the attic.
Expected result: Record whether the drip occurs only during rain, also occurs during dry weather, changes after an upstairs fixture or appliance is used, appears below an HVAC unit, or follows a condensation pattern.
Next step: Call the trade that matches the evidence while asking the roofer to inspect the suspected flashing when rain is the trigger. Keep suspected plumbing fixtures or HVAC equipment off if they are also leaking until the appropriate professional evaluates them.
Stop if: Do not open walls or ceilings, run fixtures to reproduce a leak, operate wet HVAC or appliances, or use an interior patch to conceal an unconfirmed source.
Why this matters
Why: A leak that reliably follows rain makes the roof or exterior drainage branch more likely; a leak that occurs independently of weather may instead involve plumbing, HVAC condensate, or moisture in a cavity. A rain event can expose more than one defect, so timing alone does not prove flashing failure.
-
Check 5
Request a documented roof inspection focused on the flashing system and an interior moisture assessment before authorizing finish repairs.
Expected result: Have the report identify the failed detail, the drainage-plane sequence, condition of step or counter-flashing, laps, fasteners, sealants, underlayment, roof covering, gutters and adjacent wall or ceiling materials, plus any electrical or structural impact.
Next step: Follow the professional's sequence: make the roof safe, repair or replace the failed flashing detail with compatible materials, verify the leak is controlled, dry affected assemblies, and then repair interior finishes.
Stop if: Do not paint, caulk, install new drywall, or accept a surface-only patch while moisture remains or the roof-water path has not been confirmed.
Why this matters
Why: A durable repair depends on restoring water flow and flashing continuity, not merely sealing the visible edge. Wet insulation, sheathing, framing or electrical parts may need separate drying, replacement or testing.
Use your observations
Decision map
Find the observation that best matches what you see, then follow the next safe action.
-
PATH 01Safety boundary
What you see
Rainwater reaches a light, outlet, wiring, HVAC electrical equipment, or standing water, or the ceiling sags, cracks, pops, or sheds material.
Do this next
Keep clear and leave the area if needed. Have a qualified electrician isolate affected circuits from a dry location and obtain a qualified building or structural assessment before reentry or roof access; call emergency responders for fire, collapse or gas odor.
Why this path and its safety boundary
Why it matters: The immediate issue is electrical or structural safety, not a routine flashing repair. Wet electrical equipment can remain hazardous, and a loaded ceiling may fail.
Safety stop: Do not touch wet fixtures, enter water, stand under the damaged ceiling, use a ladder, or climb onto the roof.
-
PATH 02Safety boundary
What you see
The leak appears during rain near a dormer, parapet, sidewall, roof-to-wall intersection, or exterior wall, and the ground-level view suggests an open lap, loose flashing, missing fastener, or overflow at the wall.
Do this next
Have a qualified roofer inspect the full roof-wall assembly and drainage path, including the upslope and downslope transitions, rather than sealing only the visible interior stain.
Why this path and its safety boundary
Why it matters: A step, counter, through, or kick-out flashing and drainage-plane defect is more likely than a ceiling-only problem; water may be entering the wall cavity before appearing inside.
Safety stop: Do not pull flashing, add exterior caulk, remove siding, or climb the roof during rain to confirm the detail.
-
PATH 03Safety boundary
What you see
Rain-linked water appears below or near a chimney, plumbing vent, skylight, roof hatch, HVAC curb, exhaust, or other roof penetration.
Do this next
Ask the roofer to inspect and document the penetration and its shingle or membrane integration, then repair the approved water-shedding layers rather than relying on a surface seal.
Why this path and its safety boundary
Why it matters: The penetration's flashing, counter-flashing, curb, seal, or underlayment transition is a likely focus; the surrounding roof covering may also be contributing.
Safety stop: Do not climb to apply sealant around a hot flue, vent, skylight or wet roof, and do not block a drain or vent opening as a temporary repair.
-
PATH 04Safety boundary
What you see
During rain, gutters or downspouts overflow, water ponds near the leak, the roof covering is visibly damaged, or the drip is near a valley or roof edge rather than a single penetration.
Do this next
Have a qualified roofer assess the roof covering and drainage components together, with the gutter and downspout path included in the repair plan.
Why this path and its safety boundary
Why it matters: A drainage obstruction, failed roof covering, edge detail, valley, or membrane defect may be adding water load to the flashing system; a flashing-only repair may not stop the leak.
Safety stop: Do not clear roof drainage from a wet roof or ladder, chip ice, pressure-wash the roof, or seal over ponding water without a qualified plan.
-
PATH 05Safety boundary
What you see
The ceiling remains wet or drips during dry weather, the leak follows a fixture or appliance, or a qualified roof inspection finds no active flashing breach.
Do this next
Have the appropriate plumber, HVAC technician, or water-damage professional trace the source and assess drying, while preserving the roof inspection record and avoiding cosmetic repairs.
Why this path and its safety boundary
Why it matters: Plumbing, HVAC condensate, interior moisture, or retained water in the assembly becomes more likely; a rain coincidence or water travel path may have obscured the source.
Safety stop: Do not keep applying roof sealant, run wet HVAC or appliances, or open the ceiling or wall without confirming electrical and structural safety.
Helpful context
Understand the symptom
Why flashing leaks can appear away from the failed detail
Flashing is a water-shedding system, not just surface sealant. Rain can enter at a roof-wall joint, pipe, vent, chimney, skylight, curb, valley, or failed lap, then travel along the underlayment, sheathing, framing, or wall cavity before it appears indoors. A stain directly below a window, wall, or ceiling is therefore a location clue rather than proof of the breach. Note the path and timing, but let the roofer trace the drainage plane.
Temporary containment is not a roof repair
A container under an interior drip and moving belongings away from water can reduce damage when done from stable dry flooring. A temporary exterior weather barrier may limit additional rain only when installed by someone who can do so safely and in a way that does not damage the roof. Do not climb onto a wet roof or improvise a patch with caulk, roofing tar, tape, or a fastener; the wrong repair can block drainage or hide the failed flashing detail.
Dry the assembly before cosmetic work
A flashing repair is not complete when the ceiling stain looks dry. Water may remain in insulation, sheathing, wall cavities, or framing and can create mold or rot conditions. Repair the entry path first, then have affected materials assessed and dried before painting or replacing interior finishes. If electrical fixtures were wet, they require a separate qualified electrical assessment before reuse.
Safety boundary
Stop conditions
- Do not climb or walk on a wet, icy, damaged, steep, or wind-exposed roof; do not lean a ladder against gutters or use a ladder to investigate during rain.
- Do not stand under a sagging or bulging ceiling, puncture it, pull on flashing, or open the ceiling or wall to trace water without qualified safety assessment.
- Do not touch wet electrical fixtures, outlets, wiring, or appliances; do not enter standing water to reach a breaker or restore power before qualified inspection.
- Do not use interior caulk, roofing tar, tape, or a guessed sealant as the repair, and do not paint or replace interior finishes until the source and drying status are confirmed.
- Call emergency responders for fire, gas odor, imminent collapse, or an unsafe building; use qualified roofing, electrical, plumbing, HVAC, structural, or water-damage service for the corresponding branch.
Only after diagnosis
Potential parts
- step flashing or counter-flashing
Consider this category only when qualified inspection confirms a roof-wall intersection, dormer, parapet or counter-flashing defect and identifies the installed roof system.
Match the roof covering, wall drainage plane, metal type, overlap and manufacturer or local installation requirements; do not cover a failed detail with surface caulk alone. - pipe, vent, skylight or curb flashing assembly
Consider this only when the leak path is confirmed at a specific roof penetration and a roofer identifies the flashing or curb assembly as failed.
Match penetration size, roof covering or membrane, temperature exposure, counter-flashing and drainage-plane integration; use the manufacturer's details where applicable. - roof underlayment or self-sealing membrane
Consider this only if inspection finds damaged or missing underlayment or a membrane transition beneath the flashing and the repair requires removal of roof covering.
Confirm climate, roof type, manufacturer instructions, compatible adhesives and required laps with the qualified roofer; do not apply a random membrane over wet materials. - gutter, downspout or drainage component
Consider this only when overflow, blocked drainage, loose joints or damaged outlets are confirmed as contributing to the rain-linked leak.
Match roof drainage layout, outlet capacity, slope, attachment and discharge location; do not work at roof edges during unsafe weather.
When checks do not resolve it
Need a professional?
Arrange qualified roofing or building-envelope service for every rain-linked flashing leak, especially when water is entering a wall or ceiling, the roof has penetrations or a wall intersection, the source is not directly visible, or a prior sealant patch failed. Call a qualified electrician when water reaches electrical equipment or standing water blocks safe access. Call emergency responders for fire, gas odor, structural movement, imminent collapse, or an unsafe building.
Safety scope: This article supports safe observation from stable ground or dry interior access and limited containment only. Do not climb a wet roof, enter an unsafe attic, puncture a ceiling, touch wet electrical equipment, or improvise flashing repairs.
Common questions
FAQ
Why does a roof flashing leak show up in a ceiling away from the flashing?
Rain can move along the underlayment, roof deck, framing, wall cavity or ceiling before it becomes visible. The stain is a location clue, not proof of the entry point. Document the timing and visible path, then have a qualified roofer trace the drainage plane.
Can I seal roof flashing with caulk while it is raining?
Do not climb onto a wet roof or apply a guessed sealant. A surface patch can block drainage or hide a failed lap, counter-flashing or underlayment transition. Use safe interior containment and arrange a qualified roof inspection and weather-safe repair.
What should I inspect around a suspected flashing leak?
From the ground, note the nearest roof-wall intersection, dormer, chimney, skylight, plumbing vent, HVAC curb, valley, roof edge, gutter and downspout. Look only for visible open seams, overflow, corrosion or displaced material; do not touch or climb to verify the detail.
Should I use a roof tarp as a temporary repair?
A temporary weather barrier can reduce additional rain only when it can be secured safely and without unsafe roof or ladder work. During rain or wind, keep off the roof and use a qualified roofer. A tarp is not a substitute for restoring the flashing and drainage layers.
When is a flashing leak an emergency?
Treat a sagging or cracking ceiling, falling material, water near electrical equipment, standing water, rapid flow, fire, gas odor, or an unsafe roof or building as an emergency or urgent safety boundary. Leave the area as needed, keep others away, and use emergency responders or qualified electrical and structural help before roof work.
Read the exact guide
Official sources
- Moisture Control Guidance for Building Design, Construction and MaintenanceU.S. Environmental Protection Agency · EPA building moisture-control guidance; it is not a substitute for roof-safety training or a site-specific qualified inspection.
- Doing it YourselfU.S. Environmental Protection Agency · EPA flooded-home recovery guidance; a localized roof leak may need less extensive cleanup, but the caution about roof safety and complete drying applies to water-damaged interiors.
- Snow and Roof DamageFairfax County, Virginia · Fairfax County guidance focused on snow and roof distress; the warning signs and evacuation boundary also apply when a rain-linked leak is accompanied by sagging, cracks, or structural sounds.
- What to Do to Protect Yourself From Electrical HazardsCenters for Disease Control and Prevention · CDC disaster electrical-safety guidance; a qualified electrician and utility determine safe isolation and restoration for a particular home.
- Step Flashing at Roof-Wall IntersectionsU.S. Department of Energy, Building Science Education · DOE Building Science Education construction guidance; installed roof and wall details, manufacturer instructions, and local requirements control a particular repair.
- Sealing PenetrationsU.S. Department of Energy, Building Science Education · DOE Building Science Education guidance for penetration water management; a qualified roofer must adapt the detail to the installed roof system and local requirements.
Community feedback
Share a repair observation
Share a plain-text repair observation. Accepted observations are published automatically; this page may take a moment to update.