
On this page
Start here
Quick answer
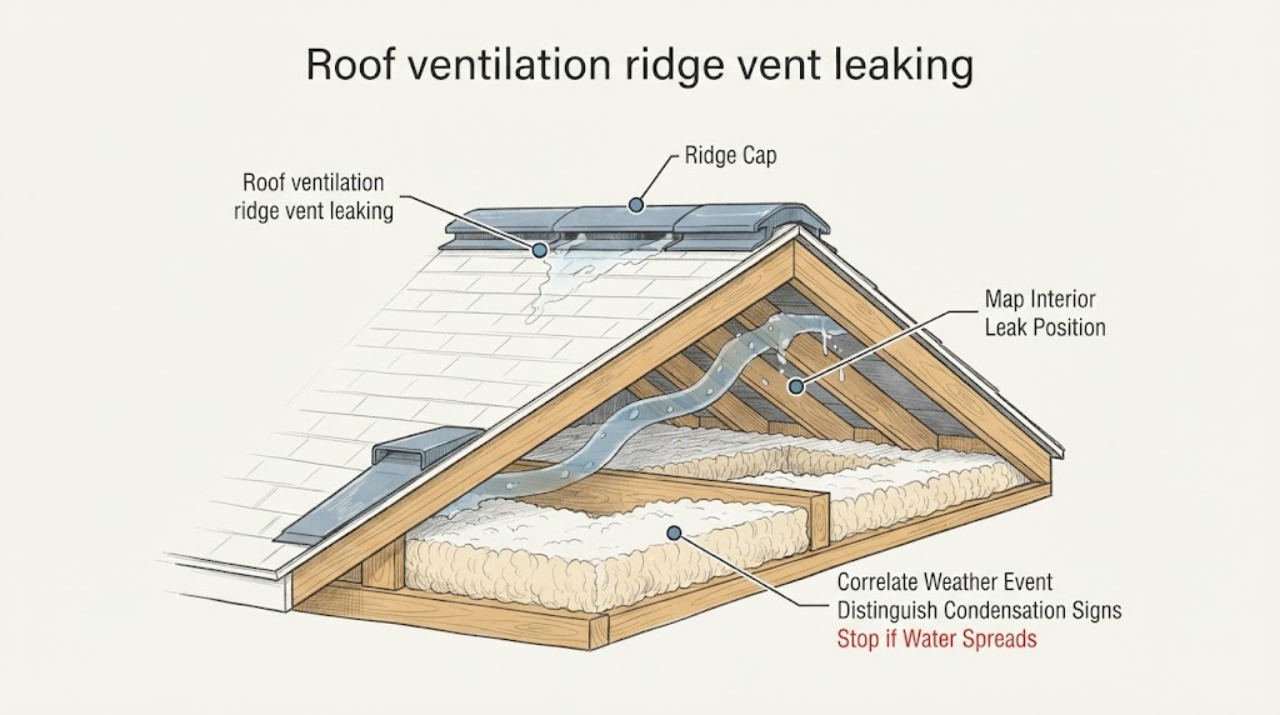
Do not climb onto the roof, enter the attic, use a ladder, remove a ridge vent, apply sealant, place a tarp, or inspect during a storm. From inside the living space and from safe ground after weather clears, record where the ceiling stain appears, whether it coincides with wind-driven rain, snow or ice, whether there are signs of condensation, and whether roof debris or visible ridge-cap damage can be seen without approaching the roof. A ridge-area leak can be caused by the vent, ridge-cap or flashing details, wind-driven water, an adjacent roof area, or attic condensation; the ceiling stain alone cannot identify the source. Keep the area dry, protect belongings without disturbing the ceiling, and arrange prompt roofing service for active dripping, spreading stains, sagging material, electrical contact, or suspected mold.
Work through in order
Diagnostic checks
Use only checks that match the exact appliance or system and its official guide.
-
Check 1
From the room below, photograph and map the stain, drip, bubbling paint, or ceiling discoloration relative to the ridge direction, exterior walls, chimney or penetrations, and light fixtures. Do not press the ceiling, open it, or touch a wet electrical fitting.
Expected result: The mark is centered under the apparent ridge, near an exterior wall or penetration, spread along a ceiling seam, limited to one spot, or near electrical equipment.
Next step: Keep the location documented and arrange roofing service. If the mark is wet near electricity, keep clear and use qualified electrical or emergency assistance as appropriate.
Stop if: Stop if the ceiling sags, material is falling, water is near electricity, or the area cannot be observed without standing on furniture.
Why this matters
Why: The position gives the roofer a starting area, but water can travel along roof framing or ceiling materials. A ridge-adjacent mark is not proof that the ridge vent itself is the entry point.
-
Check 2
Record when the leak appeared relative to ordinary rain, wind direction, wind-driven rain, snow, ice, thawing, or a dry period. Use weather history and the first time the stain was noticed; do not go outside during a storm or reproduce the leak with a hose.
Expected result: The mark appears only during wind-driven rain, after snow or thaw, after ordinary rain from any direction, during dry cold weather, or without a clear weather event.
Next step: Keep the event dates, approximate duration, and weather direction for service. Leave the roof and attic inspection to a professional.
Stop if: Stop all exterior observation during lightning, high wind, active precipitation, icy conditions, or any unsafe ground condition.
Why this matters
Why: Wind, snow, and thaw timing can help a roofer distinguish weather exposure from possible condensation or a persistent source, but timing alone cannot identify the failed detail. A dry-weather appearance makes moisture-vapor and condensation history worth reporting rather than assuming rain entry.
-
Check 3
From living spaces, note indoor humidity clues such as recurring window condensation, a musty odor, dampness after cooking or bathing, or stains that appear in cold weather without rain. Do not enter the attic, move insulation, scrape growth, or sample a stain.
Expected result: The pattern follows cold weather or indoor humidity, follows rain or snow instead, has a musty or mold-like odor, or has no visible condensation context.
Next step: Give the humidity and seasonality history to the roofer and, when odor or suspected growth is present, arrange appropriate moisture or indoor-environment assessment.
Stop if: Stop if suspected mold, wet insulation, damaged ceiling material, or an unsafe attic-access request arises.
Why this matters
Why: Condensation in roof cavities can resemble a roof leak and can contribute to moisture damage, while rain-linked staining points the roofer toward exterior water entry. Odor or suspected growth raises a separate indoor-environment concern and should not be disturbed.
-
Check 4
Only after weather is calm and from a safe ground-level viewpoint, look for obvious displaced ridge-cap pieces, roof debris, missing visible material, or water marks on nearby exterior walls and eaves. Do not use a ladder, climb, reach, move debris, or zoom into a roof area from an unsafe position.
Expected result: There is visible debris or apparent displacement near the ridge, damage at another roof edge, staining at an eave or wall, or no observable exterior change.
Next step: Photograph only what is safely visible and provide the direction and date to a roofer. Do not attempt a temporary roof repair.
Stop if: Stop immediately for wind, ice, wet surfaces, falling debris, unstable ground, traffic exposure, or any need to approach the roof.
Why this matters
Why: A ground-level observation can help the roofer prioritize a storm or wind-related check, but absence of visible damage does not clear the vent or flashing. The exterior appearance cannot replace a roof inspection.
-
Check 5
Record the roof age if known, recent reroofing or ridge-vent work, changes to insulation or exhaust ventilation, prior stains, nearby chimney or penetration work, and whether the room has been unusually humid. Do not remove finishes or access concealed roof spaces to verify the history.
Expected result: The leak followed roof work, follows a recurring seasonal pattern, began after a storm, has a long-standing stain, or has no known trigger.
Next step: Send the timeline, photos, roof documents if available, and exact room location to the roofer. Keep the area dry and avoid disturbing the ceiling.
Stop if: Stop when the next step would require roof access, attic entry, vent removal, sealing, or disturbing wet or suspect materials.
Why this matters
Why: History helps a roofing professional compare the ridge-vent detail with the rest of the roof and consider both exterior infiltration and condensation. It is evidence for the service call, not a diagnosis or a repair instruction.
Use your observations
Decision map
Find the observation that best matches what you see, then follow the next safe action.
-
PATH 01Next step
What you see
The stain or drip appears during wind-driven rain, snow, thaw, or after a storm
Do this next
Arrange prompt roofing service and provide the weather direction, timing, and safe ground-level photos. Do not inspect or patch the roof during unsafe weather.
-
PATH 02Next step
What you see
The mark appears in dry cold weather or follows indoor humidity and condensation clues
Do this next
Tell the roofer and an appropriate moisture professional that condensation is a possibility. Do not enter the attic or disturb insulation, ceiling materials, or suspected mold.
-
PATH 03Next step
What you see
The ceiling is actively dripping, sagging, shedding material, or wet near electricity
Do this next
Keep people clear, protect belongings only from a dry safe location, and request prompt roofing and appropriate emergency or electrical service. Do not touch wet fixtures or puncture the ceiling.
-
PATH 04Next step
What you see
Visible ground-level evidence suggests wind damage or displaced ridge material
Do this next
Give the images and storm timing to a roofer and wait for a professional inspection. Do not move debris, climb, tarp, seal, or remove the vent.
-
PATH 05Next step
What you see
Suspected mold, musty odor, wet insulation, or recurring moisture is present
Do this next
Stop disturbing the area and arrange moisture-source and indoor-environment assessment. Do not scrape, sample, clean, or demolish the affected material yourself.
Helpful context
Understand the symptom
Why a ridge-vent stain is not automatically a vent failure
A ridge vent is one part of a roof ventilation system. Manufacturer information describes ridge ventilation as an exhaust path that works with intake ventilation, while roof systems also rely on ridge caps, underlayment, flashing, and roof-deck protection. Water can enter at or near the ridge and travel before it becomes visible indoors, and warm moist air can also condense in roof cavities. The safe first step is to document the pattern, not to assign a cause from the stain alone.
Keep the inspection interior and ground-level
Use only normal standing locations inside the home or a safe exterior viewpoint after rain, wind, snow, or ice has passed. Do not enter an attic, touch wet insulation, disturb suspected mold, step onto the roof, use a ladder, remove shingles or vent covers, apply caulk or tape, or set a tarp. A roofer can inspect the roof assembly and ventilation path with the right access and fall protection.
Only after diagnosis
Potential parts
- roof-sealant
Consider sealant only if a qualified roofer identifies a compatible, accessible sealing detail and confirms that sealing is appropriate for the exact roof and vent system; it is not a substitute for correcting damaged flashing, cap shingles, ventilation geometry, or moisture sources.
Confirm the roof covering, vent material, climate, substrate, and manufacturer-approved sealant before purchase; do not apply it from a ladder or roof. - roof-repair-tape
This category is relevant only when a professional specifies a temporary or localized repair compatible with the roof system and confirms that it will not block ventilation or conceal active damage.
Match the roof covering, vent membrane, temperature and moisture conditions, and manufacturer instructions; do not use tape as an uninspected storm patch. - moisture-meter
A moisture meter may help a qualified professional map moisture in accessible interior materials after a visible leak or condensation concern is documented; it does not identify the roof entry point by itself.
Confirm the instrument's material modes, calibration, safe contact surfaces, and professional interpretation before relying on a reading; do not probe wet or damaged materials.
When checks do not resolve it
Need a professional?
Call a qualified roofer promptly for any ridge-area stain or drip, especially after wind-driven rain, snow, thaw, or a storm. Escalate urgently for active dripping, a sagging ceiling, water near electrical equipment, visible roof debris or displacement, musty odor, or suspected mold.
Have this ready
- Provide room and ceiling location, dated photos, weather and wind direction, snow or thaw history, condensation and indoor-humidity clues, safe ground-level exterior observations, roof age and recent work, prior leak history, and whether the ceiling is still wet.
Common questions
FAQ
Does a ceiling stain under the ridge prove the ridge vent is leaking?
No. Water can travel through roof and ceiling assemblies, and condensation can resemble rain entry. Record the interior location and weather or humidity timing, then have a roofer inspect the ridge, caps, flashing, adjacent roof areas, and ventilation system.
Can I seal a ridge vent from the ground or attic?
No. Do not climb, enter the attic, remove the vent, apply sealant or tape, or place a tarp. A roof professional must determine whether the issue is the vent, ridge cap, flashing, adjacent roof detail, or condensation before selecting a repair.
What should I do if the ceiling is actively dripping?
Keep people clear, avoid wet electrical fixtures, protect belongings only from a dry safe position, and request prompt roofing service. Do not puncture the ceiling, touch wet material, or inspect the roof during a storm.
Read the exact guide
Official sources
- Mold and Your HomeU.S. Environmental Protection Agency · General moisture and indoor-environment context for a roof leak; it does not authorize disturbing suspected mold.
- Ridge VentsGAF · General residential roofing-system context; product and roof-specific instructions govern service work.
- Addressing Indoor Environmental Concerns During RemodelingU.S. Environmental Protection Agency · General building-moisture context; it is not a roof-repair procedure.
Community feedback
Share a repair observation
Share a plain-text repair observation. Accepted observations are published automatically; this page may take a moment to update.