
On this page
Start here
Quick answer
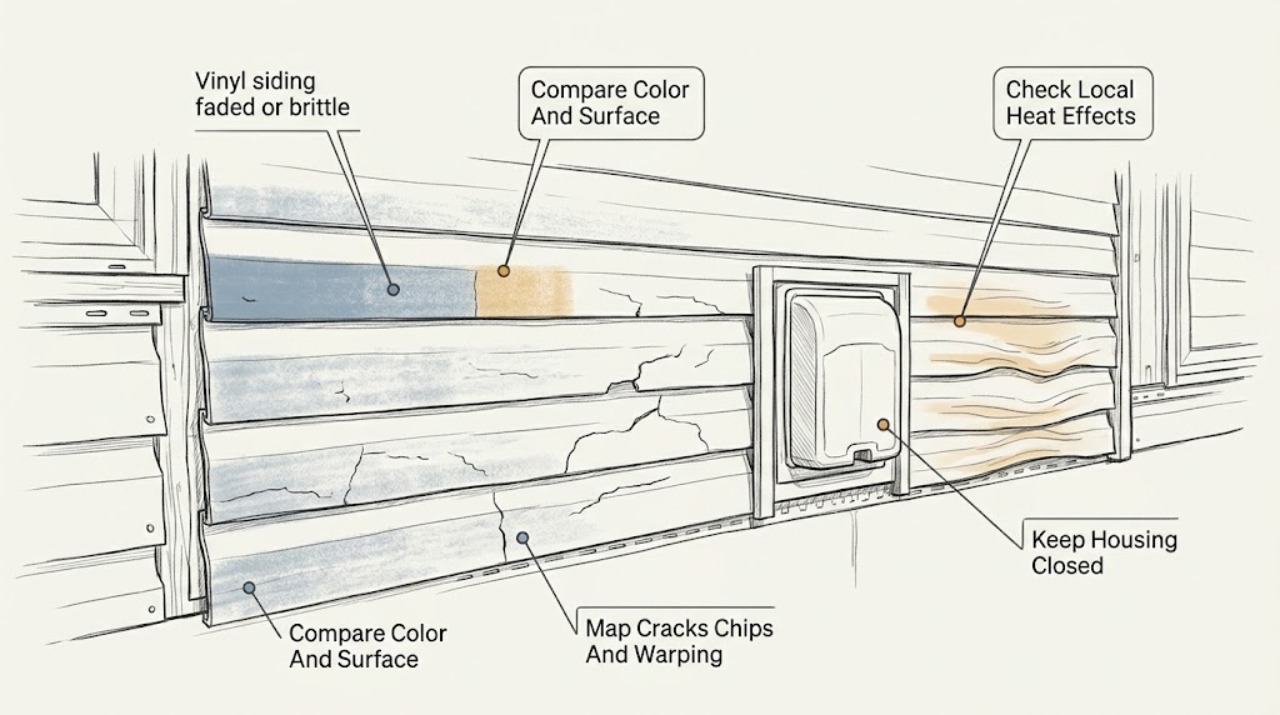
Start by separating an appearance change from material or installation damage. From the ground or a safe window, photograph the affected elevation and compare it with shaded and adjacent areas. Note uniform fading, a powdery or chalky-looking surface, cracks or chips, panels that bow or ripple, and a localized hot or reflective area. Do not climb, bend, press, pry, remove, cut, paint, or test brittleness by force. Uniform fading may be an age or UV-color question; cracking, warping, loose-looking panels, or a concentrated heat pattern needs a professional siding assessment. The installed profile, manufacturer, color, exposure, trim, and wall drainage details determine whether a panel can be matched or whether a broader replacement estimate is appropriate. Do not assume a coating, caulk, or replacement strip is compatible from appearance alone.
Work through in order
Diagnostic checks
Use only checks that match the exact appliance or system and its official guide.
-
Check 1
From the ground or a safe window, photograph the affected elevation and compare it with nearby shaded, protected, and similarly oriented panels without touching the siding.
Expected result: Classify the visible change as broad uniform fading, a localized color change, a powdery or chalky-looking surface, streaking or soiling, or an uncertain appearance. Note whether the change follows one elevation, a row, a repair area, or a small patch.
Next step: Save comparison photographs and identify the siding manufacturer, profile, color, and installation age if records are readily available. Ask a siding professional to confirm whether the surface is serviceable before any coating or replacement decision.
Stop if: Stop if checking would require a ladder, roof access, reaching, rubbing, scraping, washing with pressure, bending, or testing the surface by force.
Why this matters
Why: Broad uniform change may be an age, UV, or color-retention question, while a localized change may relate to exposure, cleaning, reflection, or a previous repair. Appearance alone does not establish brittleness or the correct finish treatment.
-
Check 2
Use a zoomed photograph from a safe position to look for cracks, chips, punctures, ripples, bowed panels, separated seams, or loose-looking trim without pressing, prying, or removing anything.
Expected result: Record no visible damage, hairline-looking lines, open cracks or chips, panels that ripple or bow, a panel that appears displaced, or an uncertain condition. Note whether damage is limited to one panel or repeated across an elevation and whether it occurs near an opening or corner.
Next step: Keep the area undisturbed, photograph the pattern, and request a siding assessment that covers panels, trim, openings, and visible drainage details. Do not attempt to snap a panel back, seal an overlap, or remove a damaged section.
Stop if: Stop for loose or sharp edges, exposed underlayment, an opening around a window or door, falling pieces, wind movement, or any need to bend, pull, cut, remove, or handle the siding.
Why this matters
Why: Cracking, distortion, or displacement is a condition for professional assessment rather than a brittleness test. Repeated damage may involve exposure or installation context, while an isolated panel may still need profile and color matching; neither observation proves a concealed wall condition.
-
Check 3
From the ground or a safe window, identify nearby reflective glass, metal, grills, vents, exhausts, lights, or other heat or reflection sources without approaching or touching them.
Expected result: Record no nearby source, a broad sun-exposed elevation, or a localized ripple, gloss change, discoloration, or distortion aligned with a possible heat or reflected-light source. Note whether the same pattern appears on adjacent panels.
Next step: Photograph the siding and the visible source from a safe location and ask a qualified siding professional to assess the panel and any nearby fixture or opening. Do not block, move, shield, or modify the source as a test.
Stop if: Stop for hot surfaces, active exhaust, electrical equipment, fire or smoke, unstable ground, or any need to access a roof, window, vent, fixture, or upper story.
Why this matters
Why: A localized pattern near a heat or reflection source is a useful service clue and should not be treated as ordinary fading. It does not prove the source, temperature, or hidden wall condition, and it does not authorize a paint prescription.
-
Check 4
Compare dated photographs or records for the affected elevation with other elevations and note installation, cleaning, storm, heat, or nearby construction history without recreating any condition.
Expected result: Classify the pattern as gradual and widespread, recent and localized, after a heat or reflection change, after storm or impact, following cleaning or exterior work, or unknown. Note whether the color and profile appear consistent across the wall.
Next step: Provide photographs, elevation, profile, color, age, and event history to a qualified siding contractor or the original installer. Keep the siding untouched while the replacement or repair scope is determined.
Stop if: Stop if comparing the condition would require moving panels, removing trim, climbing, disturbing openings, or making a destructive brittleness or moisture test.
Why this matters
Why: History helps a professional distinguish a planned replacement question from a localized event, but it cannot confirm polymer brittleness, code compliance, or a concealed wall condition. Unknown history increases the value of an in-person inspection.
-
Check 5
Decide whether the concern is a clearly visible, stable appearance change with no cracks, warping, loose panels, localized heat pattern, or unsafe access issue.
Expected result: Answer yes only when the surface appears stable from a safe distance, the pattern is understood, no panel or trim damage is visible, and no climb, removal, bending, or finish experiment would be required. Answer no for cracking, chips, warping, displacement, concentrated heat effects, loose-looking panels, unknown condition, or inaccessible areas.
Next step: For yes, provide comparison photos and product information for a material-specific recommendation. For no, keep people away from loose or damaged pieces and request a qualified siding service visit with the full observation record.
Stop if: Do not climb, bend, remove, cut, paint, caulk overlaps, or perform a destructive brittleness test when the answer is no or any fact is unknown.
Why this matters
Why: Yes supports a planned manufacturer or siding-professional conversation about cleaning, color retention, or a replacement estimate; it does not authorize painting or prove that the surface can be recoated. No means professional assessment of profile, movement, trim, exposure, and replacement scope.
Use your observations
Decision map
Find the observation that best matches what you see, then follow the next safe action.
-
PATH 01Safety boundary
What you see
The color change is broad or gradual, panels look flat and aligned from the ground, and no cracks, chips, warping, or local heat pattern are visible.
Do this next
Ask the siding manufacturer or a qualified contractor about the installed profile, color-retention information, and whether cleaning or a replacement estimate is appropriate. Use comparison photos rather than choosing a paint or coating.
Why this path and its safety boundary
Safety stop: Stop if the surface begins to crack, warp, shed pieces, or if the proposed treatment requires painting, scraping, pressure washing, or a compatibility assumption.
-
PATH 02Safety boundary
What you see
Cracks, chips, punctures, loose-looking panels, distorted locks, or displaced trim are visible, or the siding appears brittle but cannot be safely tested.
Do this next
Request a professional siding assessment and replacement estimate based on profile, color, age, elevation, and the visible damage pattern. Leave the panel untouched.
Why this path and its safety boundary
Safety stop: Do not bend, snap, pry, pull, remove, cut, or seal the damaged panel or overlap.
-
PATH 03Safety boundary
What you see
Ripples, gloss or color changes, or warping are localized near a reflective window, grill, vent, light, exhaust, or other possible heat source.
Do this next
Provide photographs of both siding and the visible source to a siding professional and, when relevant, the fixture or window professional. Request assessment before any finish or panel change.
Why this path and its safety boundary
Safety stop: Do not touch hot surfaces, move or shield a source as a test, alter fixtures, or prescribe paint from the appearance alone.
-
PATH 04Safety boundary
What you see
Multiple elevations are affected, installation or product history is unknown, damage follows a storm or exterior project, or the upper area cannot be safely observed.
Do this next
Arrange a professional exterior-cladding inspection and request a written scope that distinguishes visible siding replacement from any separate wall, trim, or opening assessment.
Why this path and its safety boundary
Safety stop: Do not climb, remove siding to investigate, drill, cut, open wall assemblies, or claim a concealed condition from exterior appearance alone.
Helpful context
Understand the symptom
Use comparison, not a destructive test
A ground-level comparison often tells you whether the concern is color change, surface chalking, cracking, buckling, or a localized heat effect. Photograph the whole wall and several nearby panels in the same light. Do not press the siding to see if it feels brittle or pull at a lock or trim.
Vinyl siding is a moving exterior cladding
Vinyl panels and accessories are designed around product-specific movement, clearances, and drainage. The Vinyl Siding Institute notes that manufacturer instructions govern specialized products and that the material beneath the cladding matters. A repair that traps movement or closes a drainage path can create a new problem, so replacement and trim decisions belong with a qualified siding professional.
Treat heat distortion and concealed conditions separately
A small area near a reflective window, grill, vent, or other heat source can look different from broad age-related fading. That observation does not prove what is behind the siding or prescribe a paint product. Record what is visible and request an exterior-cladding assessment before any panel or finish work.
Only after diagnosis
Potential parts
- exterior caulk
Consider this category only when a qualified siding professional identifies a separate compatible trim, flashing, or opening joint that needs sealant; it is not a general fix for faded, brittle, cracked, or warped siding panels.
Confirm the joint location, siding movement, trim, water-management design, substrate, and manufacturer instructions; do not caulk panel overlaps or close drainage paths by assumption.
When checks do not resolve it
Need a professional?
Call a qualified siding professional for cracking, chips, brittle-looking or displaced panels, warping, loose trim, localized heat or reflection effects, widespread fading, unknown profile or color, storm or impact damage, or any area that cannot be safely viewed from the ground or a window. Request a replacement or repair assessment rather than a generic coating recommendation.
Have this ready
- Provide whole-elevation and close photographs, ground-level observation of fading, chalking, cracking, warping, and local heat context, profile and color if known, installation age, affected elevations, cleaning or storm history, nearby windows or fixtures, and a statement that no ladder, bending, removal, cutting, painting, or destructive brittleness test was attempted.
Common questions
FAQ
How can I tell whether vinyl siding is faded or brittle?
From the ground or a safe window, compare broad color change and chalky appearance with nearby elevations, then look for cracks, chips, ripples, or displaced panels. Do not bend, press, rub, or snap the siding to test brittleness; a professional should assess uncertain material condition.
What does a warped vinyl siding panel mean?
A ripple or bowed panel can be related to exposure, heat or reflection, movement, or installation context. Photograph the panel and nearby window, fixture, trim, and adjacent panels, then request a professional assessment rather than applying paint or forcing the panel flat.
Can I paint faded vinyl siding?
Do not choose a paint or coating from appearance alone. Confirm the exact product, condition, finish, exposure, and manufacturer guidance with a qualified siding professional; cracked, brittle, warped, or displaced panels need assessment rather than a cosmetic prescription.
When should I request a siding replacement estimate?
Request an assessment for cracks, chips, brittle-looking or loose panels, warping, localized heat effects, widespread fading, storm or impact damage, unknown product history, or areas that cannot be safely viewed from the ground. Provide whole-elevation and close photographs.
Read the exact guide
Official sources
- Vinyl Siding: Engineered for LifeVinyl Siding Institute · Industry information for vinyl siding; claims vary by product and certification, and this page is not a diagnosis or painting prescription for an installed wall.
- Vinyl Siding Installation ManualVinyl Siding Institute · Industry installation manual used only for material and system context; it is not a homeowner installation procedure and does not replace the installed product manufacturer's instructions.
Community feedback
Share a repair observation
Share a plain-text repair observation. Accepted observations are published automatically; this page may take a moment to update.