
On this page
Start here
Quick answer
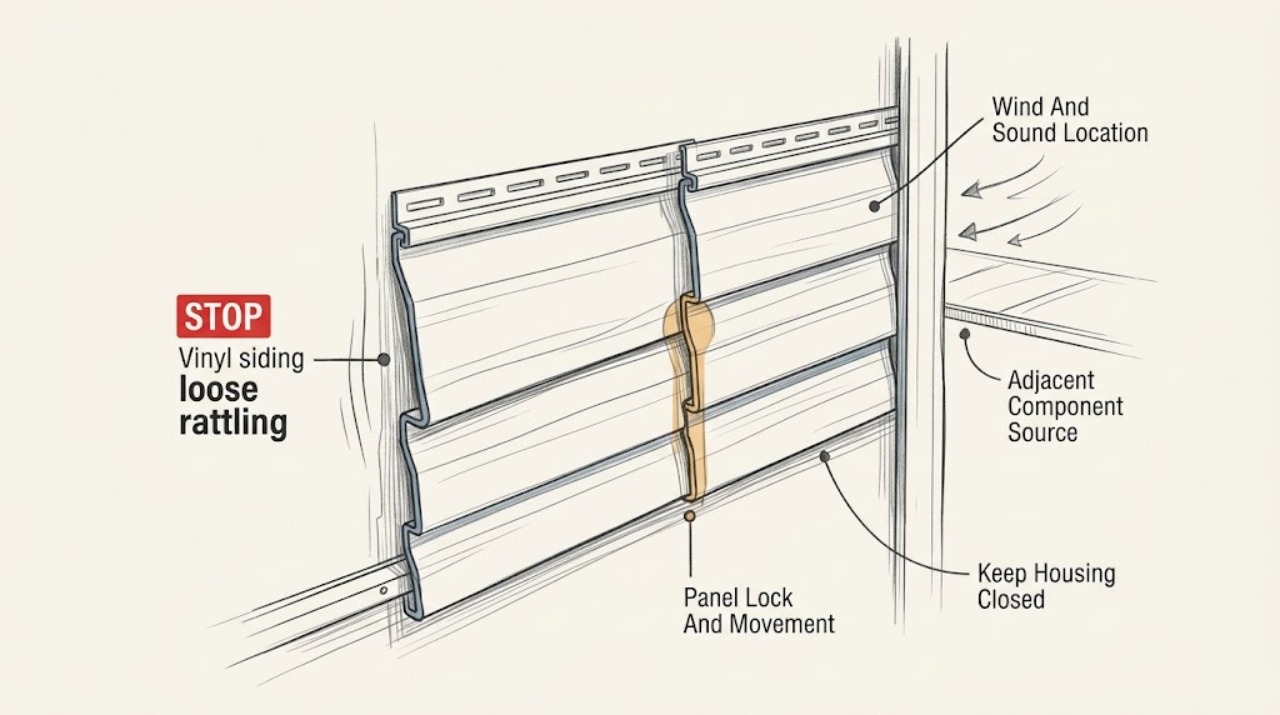
For vinyl siding that rattles, start from the ground by recording wind direction and approximate strength, the exact sound location, and whether the noise follows gusts, sun or temperature changes, or calm weather. Visually note panel sliding, an unlocked lower edge, bowing, or lifted ends, then compare trim, soffit, fascia, gutter, downspout, shutter, and fixture movement. Look for thermal-movement clues and storm or water-entry damage such as punctures, open joints, missing pieces, wet stains, or exposed wall. Do not use a ladder, pull or reseat panels, adjust fasteners, remove trim, seal joints, or handle storm debris; recurring rattling, grinding movement, falling material, or water entry needs qualified siding assessment.
Before you begin
Safety first
- This article covers ground-level observation only. Qualified professionals must handle ladders, roofs, panel removal, fastening, caulking, weather-barrier access, storm debris, structural work, and utility-adjacent repair.
Work through in order
Diagnostic checks
Use only checks that match the exact appliance or system and its official guide.
-
Check 1
From the ground and away from the wall, record the wind direction, approximate strength or weather condition, time of day, and exact location where the vinyl siding rattles; do not stand beneath loose material or approach during a storm.
Expected result: The sound may occur only in one wind direction, during gusts, in calm weather, in sun or shade, or at a repeatable panel, corner, soffit, downspout, or trim location.
Next step: Make a short dated log and photograph the affected elevation, course, corner, window, door, eave, and lower wall from a safe ground-level position.
Stop if: Stop for active wind or storm conditions, falling pieces, exposed wall or wiring, water entering the building, or any need to leave the ground.
Why this matters
Why: A rattle that follows a particular wind direction or gust is a different lead from a noise that changes with sun, temperature, or nearby trim, and location keeps the investigation focused.
-
Check 2
From the ground, visually compare the panel edges and seams for a lifted or unlocked lower edge, bowed face, open overlap, missing end, loose-looking corner, or movement in the wind; do not pull, press, or slide a panel by hand.
Expected result: The panel may look flat and locked, slide or flutter at an overlap, lift at an end, bow between fasteners, or show a cracked, punctured, or missing section.
Next step: Photograph the full panel and adjacent courses, note whether the movement is lateral or outward, and keep people and stored items clear of the wall until assessed.
Stop if: Do not use a ladder, roof, pole, siding-removal tool, nail, screw, adhesive, or force to reseat or secure the panel.
Why this matters
Why: A panel that can move freely, has come out of its lock, or is visibly bowed can rattle differently from a panel that only transmits sound through a trim connection; appearance cannot confirm fastening condition overhead.
-
Check 3
Compare the noise with adjacent trim, corner posts, J-channels, soffit or fascia, vents, shutters, lights, gutters, and downspouts from the ground; observe whether the siding itself moves or only a neighboring piece vibrates.
Expected result: The rattle may come from a trim edge, soffit, downspout, gutter, shutter, vent, light, or siding overlap, and the adjacent part may move independently or together with the panel.
Next step: Record the neighboring part, contact point, and wind response, and give the complete elevation view to a siding professional without unfastening anything.
Stop if: Stop for hanging gutters, loose electrical fixtures, sharp metal, falling trim, overhead work, or any need to reach behind or above the siding.
Why this matters
Why: A loose downspout, soffit, trim piece, or fixture can strike or transmit vibration to siding, so replacing a siding panel would miss the source when the panel remains stable.
-
Check 4
Note whether the rattle changes between cool and warm surfaces, direct sun and shade, morning and afternoon, or seasonal temperature shifts, and look for visible waves, buckling, compressed ends, or panels pinned at trim without touching fasteners.
Expected result: The sound may be strongest in direct sun, after cooling, or at a panel end, and visible clues may include buckling, gaps, pinning at trim, or no change with temperature.
Next step: Log the temperature or sun condition and photograph receiving channels, overlaps, and trim interfaces from the ground; do not tighten, loosen, or add fasteners.
Stop if: Do not climb, remove trim, expose fasteners, drill, nail, screw, caulk over a moving joint, or treat thermal movement as proof of a particular repair.
Why this matters
Why: Vinyl siding and its accessories need room to move as temperature changes; a noise that tracks heat may reflect restricted movement, while a visibly loose or distorted panel needs a different assessment.
-
Check 5
Inspect the ground-level wall, window and door edges, corners, lower courses, and interior-adjacent surfaces for storm impact, punctures, missing pieces, open joints, wet staining, dampness, or a path where water could enter; do not lift siding or weather barriers.
Expected result: There may be no damage, a dent or puncture, a missing or displaced panel, wet sheathing or trim, staining at a window or door, or water at a lower wall or room.
Next step: Photograph damage and water marks, keep the area dry from the inside when safe, and request prompt siding and water-entry assessment after a storm or whenever moisture is suspected.
Stop if: Stop for active water entry, exposed sheathing or wiring, storm debris, unstable wall material, mold-like growth, or any need for temporary work at height.
Why this matters
Why: Rattling after wind, hail, or impact can signal more than noise: an open joint or damaged panel may admit water even when the interior is not yet visibly wet.
-
Check 6
Prepare a service handoff listing wind direction and strength, sound location and timing, panel movement or lock appearance, adjacent trim or soffit or downspout behavior, temperature pattern, storm history, and any water-entry evidence.
Expected result: The record may support a panel or overlap concern, an adjacent-component source, thermal movement, storm damage, water entry, or an unclear condition.
Next step: Arrange qualified siding assessment for recurring or loud rattling, visible movement or damage, suspected water entry, or any source above safe ground-level reach.
Stop if: End user observation if the next step requires a ladder, roof access, panel removal, fastening, caulking, weather-barrier access, or structural or utility work.
Why this matters
Why: A rattle-specific record lets the professional separate panel engagement, neighboring components, thermal movement, fastening restrictions, and storm damage before selecting a repair material.
Use your observations
Decision map
Find the observation that best matches what you see, then follow the next safe action.
-
PATH 01Safety boundary
What you see
The rattle occurs during a particular wind direction or gust and a panel visibly flutters, lifts at an overlap, appears unlocked, or is bowed.
Do this next
Keep people clear and request prompt siding assessment of panel engagement, overlaps, corners, and fastening; do not attempt to reseat or fasten it from a ladder.
Why this path and its safety boundary
Safety stop: Do not pull, press, nail, screw, or cover a moving panel.
-
PATH 02Safety boundary
What you see
The siding panel remains visually stable but a trim edge, soffit, fascia, shutter, gutter, or downspout moves and produces the same sound.
Do this next
Give the professional the exact neighboring source and elevation photos so the adjacent component is assessed before siding replacement is considered.
Why this path and its safety boundary
Safety stop: Do not reach overhead, unfasten trim, or treat the siding as the source without confirming movement.
-
PATH 03Safety boundary
What you see
The rattle changes with sun, shade, or temperature and visible waves, compressed ends, or tight trim interfaces suggest restricted thermal movement without storm damage.
Do this next
Arrange a ground-to-professional inspection of movement allowance, panel engagement, and accessory interfaces; use the material guidance as planning context, not as a user installation procedure.
Why this path and its safety boundary
Safety stop: Do not tighten or loosen fasteners, remove trim, add caulk, or pin a panel to stop movement.
-
PATH 04Safety boundary
What you see
The noise began after wind, hail, debris, or impact and there is a crack, puncture, missing section, open joint, exposed wall, or wet stain.
Do this next
Keep the area protected without climbing or covering the source, document the damage, and request prompt siding and water-entry assessment.
Why this path and its safety boundary
Safety stop: Do not seal over an open joint, lift siding to inspect behind it, or perform temporary elevated storm repair.
-
PATH 05Safety boundary
What you see
The noise is mild and repeatable, no movement or water damage is visible, and the source is reachable only from above the ground.
Do this next
Continue only the ground-level log and arrange a professional inspection; do not assume a loose panel or purchase material from sound alone.
Why this path and its safety boundary
Safety stop: No ladder, roof, pole, panel-removal, or fastening work is part of this path.
-
PATH 06Safety boundary
What you see
The rattle is loud, worsening, accompanied by falling material, open wall, active water, or an unstable gutter, soffit, trim, or panel.
Do this next
Stay away from the elevation and request prompt qualified siding or exterior service; address water entry or electrical danger through the appropriate professional.
Why this path and its safety boundary
Safety stop: Do not approach the falling material, work during the storm, or improvise a brace or cover from a ladder.
-
PATH 07Safety boundary
What you see
Wind, temperature, sound location, panel movement, and adjacent-component checks do not identify a source safely.
Do this next
Preserve the log and photos, keep the area unaltered, and obtain qualified diagnosis instead of replacing or fastening by guesswork.
Why this path and its safety boundary
Safety stop: Do not escalate beyond ground-level observation.
Helpful context
Understand the symptom
Record the rattle, not just the looseness
A vinyl-siding rattle is most useful when recorded as a pattern: wind direction and strength, exact sound location, whether it appears in gusts or calm weather, and whether the panel itself moves. Start from the ground and stay away during storms.
Separate panel, adjacent part, and temperature clues
Compare the panel with nearby trim, soffit, fascia, gutters, downspouts, shutters, and fixtures. Then compare sun and shade or warm and cool conditions for signs of thermal movement or a panel pinned at an interface. Do not touch fasteners or remove trim.
Check storm and water-entry risk
Wind or impact damage can create water-entry risk even when the interior is dry. Photograph open joints, punctures, missing pieces, and wet marks and have a professional assess the siding and wall assembly before any replacement or sealing decision.
Safety boundary
Stop conditions
- Stay on the ground and stop during wind, lightning, hail, falling material, or any condition that makes the exterior unsafe to approach.
- Do not use a ladder or roof, pull or reseat panels, remove trim or soffit, adjust fasteners, drill, nail, screw, caulk moving joints, or lift siding to inspect behind it.
- Stop for storm damage, open wall, active water entry, exposed wiring, unstable gutters or downspouts, sharp debris, or any need to access a weather barrier or structure.
- Use qualified siding, exterior, roofing, water-entry, structural, or utility professionals when the source is above reach, the panel or adjacent part is unstable, or the cause and compatibility are uncertain.
Only after diagnosis
Potential parts
- vinyl-siding-repair-kit
Consider this category only after a professional confirms that the damage is limited, the replacement profile fits, and water-entry risk is controlled.
Match the siding profile, color, texture, exposure, course dimensions, corner and trim interfaces, and weather-barrier condition; a kit cannot correct hidden storm or wall damage. - exterior-caulk
Consider this category only after the source and movement are diagnosed and a professional confirms that sealing is appropriate for that joint.
Confirm the siding, trim, joint, temperature movement, and weather-exposure requirements; sealant must not pin a moving panel or hide an open water path.
When checks do not resolve it
Need a professional?
Call promptly for loud or worsening rattling, a panel that lifts or is unlocked, falling material, storm damage, active water entry, exposed wall or wiring, unstable trim or drainage parts, or any source above safe ground-level reach.
Safety scope: This article covers ground-level observation only. Qualified professionals must handle ladders, roofs, panel removal, fastening, caulking, weather-barrier access, storm debris, structural work, and utility-adjacent repair.
Common questions
FAQ
What should I check first when vinyl siding rattles?
From the ground, record wind direction and strength, where the rattle is loudest, whether the panel moves or appears unlocked, and whether a nearby trim, soffit, gutter, or downspout moves instead.
Can heat or cold cause vinyl siding to rattle?
A temperature-linked rattle can be a clue that panels or accessories cannot move freely, but appearance does not confirm the fastening condition. Do not tighten or loosen fasteners yourself.
Could the noise come from something next to the siding?
Not necessarily. A downspout, soffit, trim piece, gutter, shutter, or fixture can vibrate against stable siding. Identify the moving source from the ground before choosing a siding part.
When does rattling indicate storm or water-entry damage?
After wind, hail, or impact, look from the ground for punctures, missing panels, open joints, exposed wall, wet staining, or water entering at a window, door, corner, or lower wall. Request prompt assessment if any appears.
What should I tell the siding professional?
Provide wind and temperature patterns, exact sound location, panel movement or lock appearance, adjacent-component behavior, photos, storm history, and any interior or exterior water evidence. Do not use a ladder to gather more information.
Read the exact guide
Official sources
- How to Install Vinyl SidingCertainTeed · Official CertainTeed vinyl-siding guidance used for planning observations about free thermal movement, accessory interfaces, and the fact that siding is not itself a watertight wall layer; it is not a ground-level repair procedure for an unknown installation.
Community feedback
Share a repair observation
Share a plain-text repair observation. Accepted observations are published automatically; this page may take a moment to update.