
On this page
Start here
Quick answer
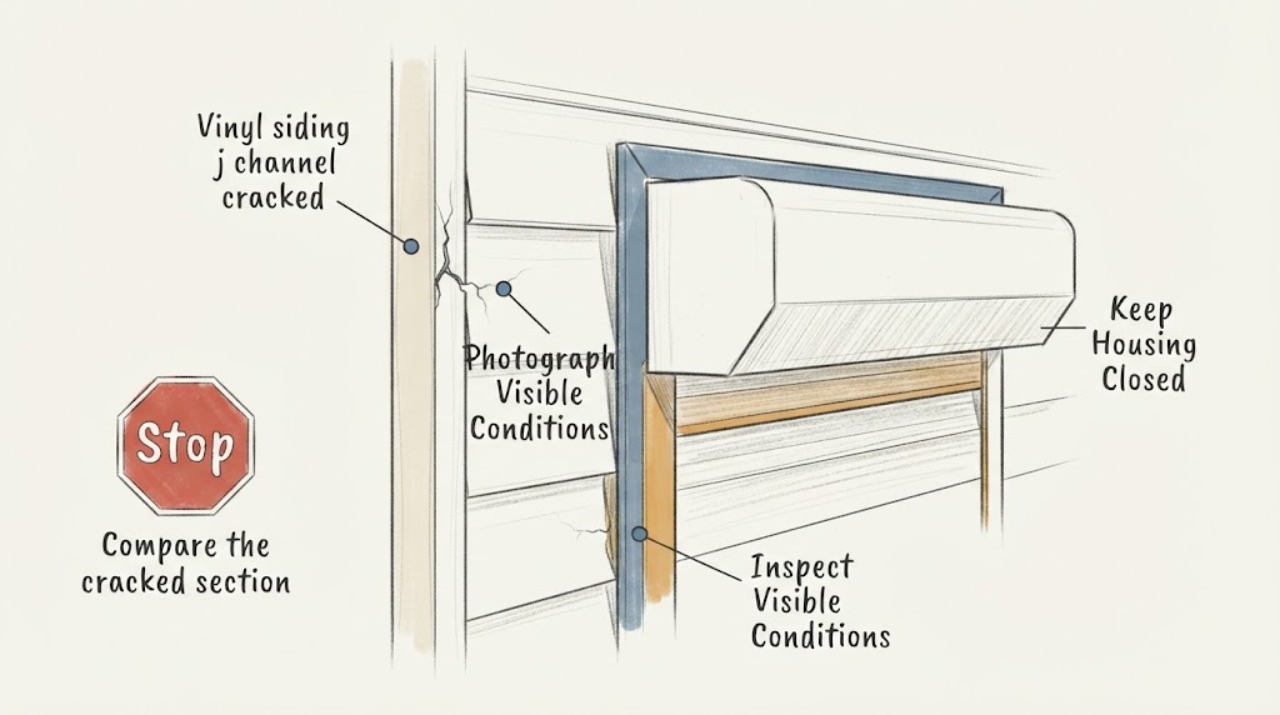
A cracked vinyl-siding J-channel can be isolated trim damage, but it can also leave a joint, window, door, roof intersection, or wall drainage detail exposed. Do not climb, remove siding, open the wall, force the channel, or follow an installation procedure from an elevated position. From the ground or a normally accessible interior view, record the crack, whether the panel or trim has shifted, whether water appears after rain, and whether damage is localized or spreading. Arrange qualified siding service if the crack is open, the channel is loose, water is entering, the wall feels unsafe, or the area cannot be viewed without a ladder.
Work through in order
Diagnostic checks
Use only checks that match the exact appliance or system and its official guide.
-
Check 1
From ground level or a normally accessible window, photograph the cracked J-channel without using a ladder, climbing, reaching, or touching the trim.
Expected result: Record the crack's location, length as an approximate visual description, open or closed appearance, missing piece, sharp edge, loose section, and whether it is at a window, door, corner, roof line, or panel end.
Next step: Keep people clear of the area, save the photos with the location, and request a professional siding assessment that includes the surrounding flashing and drainage detail.
Stop if: Stop if the view requires a ladder, the trim may fall, the wall appears unstable, or you would need to pry, cut, or probe.
Why this matters
Why: A short isolated surface crack may be trim damage, while an open crack at an opening or transition can expose a water path. A loose or falling section raises an immediate exterior-safety concern.
-
Check 2
After safe rainfall, observe the wall and the ground below the cracked channel from a dry, stable position without directing water at the crack.
Expected result: Note wet streaks, drips, staining, runoff behind or beside the trim, damp soil at the foundation, or no visible change; record the affected opening or wall section.
Next step: Photograph the water pattern and request prompt siding and water-intrusion assessment; do not caulk over a wet or moving joint as a diagnostic test.
Stop if: Stop for active interior leakage, electrical equipment near water, rapidly worsening flow, or any need to open the wall or remove siding.
Why this matters
Why: Water appearing at the crack or below an opening means the trim symptom may be connected to a wall drainage or flashing problem. No visible runoff does not prove the wall is dry because concealed layers can drain out of view.
-
Check 3
Compare the cracked section with adjacent J-channel and siding from the same safe viewpoint without pressing, flexing, or pulling the panels.
Expected result: Record bowing, buckling, a panel no longer seated visually, an expanding gap, repeated cracks, or a single damaged area after a storm or impact.
Next step: Mark the affected sections on a photo or sketch and give it to a siding professional; do not attempt to reseat, fasten, or remove the panel.
Stop if: Stop for loose panels, falling trim, exposed sharp edges, wind, ice, or any condition that makes standing near the wall unsafe.
Why this matters
Why: A pattern across several sections can point to movement, attachment, heat, or storm-related damage rather than one replaceable trim piece. A localized impact mark still requires checking whether the weather barrier or flashing behind it was affected.
-
Check 4
Review safe records and the timing of the crack without returning to an elevated exterior location.
Expected result: Note whether it followed hail, wind, impact, repainting, nearby window or roof work, seasonal temperature change, or a prior siding repair; record when it first appeared and whether it has changed.
Next step: Provide dated photos, maintenance history, wall orientation if known, and adjacent work history to the service professional.
Stop if: Do not recreate impact, heat, or water exposure, and do not choose a repair kit solely from color or profile appearance.
Why this matters
Why: A new crack after weather or adjacent work changes the professional inspection scope. Recurrence or progression suggests movement or a wider cladding detail rather than a cosmetic cover-up.
-
Check 5
From a dry interior or ground position, check for signs below or beside the cracked J-channel without opening finishes or touching damp materials.
Expected result: Note interior staining, bubbling paint, musty odor, soft trim, damp insulation visible only from an already open safe area, or no interior sign; record the room and wall boundary.
Next step: Keep occupants away from damaged material, photograph from a safe position, and arrange siding and water-damage service when signs are present.
Stop if: Stop for sagging finishes, visible mold disturbance, contaminated water, electrical contact, or any need to drill, cut, or open the wall.
Why this matters
Why: Interior evidence can indicate water has crossed the cladding assembly, but it cannot identify the exact failed layer. Moisture, mold-like growth, or soft materials require a broader professional assessment.
Use your observations
Decision map
Find the observation that best matches what you see, then follow the next safe action.
-
PATH 01Safety boundary
What you see
Water is entering, interior finishes are damp, or the cracked channel is at a window, door, roof, or wall transition.
Do this next
Request prompt siding and water-intrusion assessment and provide the safe photos and rain timing.
Why this path and its safety boundary
Safety stop: Do not seal over wet materials, remove the channel, or open the wall to search for the leak.
-
PATH 02Safety boundary
What you see
The channel is loose, falling, sharply broken, or the siding behind it appears displaced.
Do this next
Keep people and pets clear and arrange professional exterior repair with appropriate access.
Why this path and its safety boundary
Safety stop: Do not push the trim back, add fasteners, or work beneath unstable material.
-
PATH 03Safety boundary
What you see
The crack is localized, the wall is dry, and no movement or opening is visible from the ground.
Do this next
Keep a dated record and schedule a non-urgent siding inspection before selecting caulk or a repair kit.
Why this path and its safety boundary
Safety stop: Do not treat a dry observation as proof that the weather barrier or flashing is intact.
-
PATH 04Safety boundary
What you see
Cracks or gaps appear across several sections or began after a storm or adjacent construction.
Do this next
Request a broader cladding, trim, attachment, and flashing review rather than a single-piece cosmetic repair.
Why this path and its safety boundary
Safety stop: Do not follow an installation manual, remove siding courses, or alter wall details yourself.
-
PATH 05Safety boundary
What you see
Wind, ice, height, power lines, or unstable ground prevents a safe view.
Do this next
Wait for safe conditions and report the concern to a qualified siding professional using existing photos or a description.
Why this path and its safety boundary
Safety stop: Do not use a ladder, approach a damaged wall during severe weather, or work near overhead lines.
Helpful context
Understand the symptom
J-channel is part of the exterior water-management detail
J-channel receives or finishes vinyl siding around openings, edges, and transitions. The Vinyl Siding Institute's guidance shows that channel, flashing, overlaps, and drainage openings work together; a crack therefore should not be treated as a cosmetic line until the surrounding detail is assessed. A distant view cannot establish whether the channel alone is damaged or whether the wall's drainage plane is exposed.
Document the exterior without opening the wall
The U.S. Department of Energy explains that a water-resistant barrier behind cladding is intended to drain moisture away from the wall cavity, and that cracks and joints can admit water. The checks below locate the symptom and its consequences without ladder work, siding removal, or a repair manual.
Only after diagnosis
Potential parts
- vinyl-siding-repair-kit
Consider this category only if a siding professional confirms that the damage is limited to a replaceable J-channel section and the surrounding flashing, drainage plane, and panels are sound.
Match the siding profile, color, exposure, trim geometry, and manufacturer guidance; do not use a kit to cover an open or wet wall detail. - exterior-caulk
Consider this only for a professional-confirmed compatible stationary detail after the crack, movement, and water path have been assessed; caulk is not a substitute for damaged channel or flashing.
Confirm compatibility with vinyl, adjacent flashing, temperature movement, and the specific joint; do not seal drainage openings or apply it over wet or moving material. - siding-removal-tool
Consider this only as a professional service tool when access to an adjacent panel is required to inspect or repair the J-channel and wall drainage detail.
Confirm the tool and access plan for the installed profile; do not use it to pry, cut, or remove siding as a user observation step.
When checks do not resolve it
Need a professional?
Request siding service for an open or spreading J-channel crack, loose trim, panel displacement, water entry, or damage at a window, door, roof, or wall transition. Request prompt water-damage or electrical help when those hazards are present.
Have this ready
- Provide safe photos, approximate location, rain timing, interior or foundation signs, storm or impact history, adjacent siding work, and any access or height restrictions.
Common questions
FAQ
Can I caulk over a cracked vinyl siding J-channel?
Not as a first step. A crack may involve movement, flashing, or a drainage path. Have the surrounding detail assessed before any compatible sealant is considered, and do not seal drainage openings.
Can I remove the siding to inspect behind the J-channel?
No. This topic is observation-only. Do not remove siding or open the wall; document the visible condition and arrange qualified siding service.
Does a crack in J-channel always mean the wall is leaking?
No. It may be isolated trim damage, but a crack at an opening or transition can expose a water-management detail. Check safe interior and post-rain signs without probing.
When is a cracked J-channel urgent?
Escalate promptly for active water entry, damp interior finishes, loose or falling trim, displaced panels, damage at a window or roof transition, or any unsafe access condition.
Read the exact guide
Official sources
- Vinyl Siding Installation ManualVinyl Siding Institute · Supports treating a cracked J-channel as part of a larger siding and water-management detail rather than assuming a cosmetic-only defect.
- Water Managed Walls: WRBU.S. Department of Energy Building Science Education · Supports distinguishing visible J-channel cracking from possible concealed wall moisture without opening the wall.
- Building Enclosure Science Intro: Drainage Plane Behind Exterior Wall CladdingU.S. Department of Energy Building Science Education · Supports escalation when a cracked trim detail may be associated with concealed wall moisture.
Community feedback
Share a repair observation
Share a plain-text repair observation. Accepted observations are published automatically; this page may take a moment to update.