
On this page
Start here
Quick answer
A cracked vinyl siding starter strip is a concern because it supports and locks the first course while helping the lower wall shed incidental moisture. From stable ground, check whether the bottom edge is still locked, level, and attached, and look for buckling, gaps, damp staining, insects, or loose pieces. Do not climb, remove siding, open the wall, or use a siding tool to test the assembly. Keep people away from loose or falling material, document the condition, and arrange qualified siding service when the strip is cracked, displaced, or allowing moisture behind the cladding.
Before you begin
Safety first
- User observation only: remain on stable ground, do not use a ladder, climb, reach up, pull or unlock siding, remove trim or fasteners, open the wall, cut vinyl, or apply chemicals or sealant as a test. Keep people and pets away from loose, sharp, wet, or falling material.
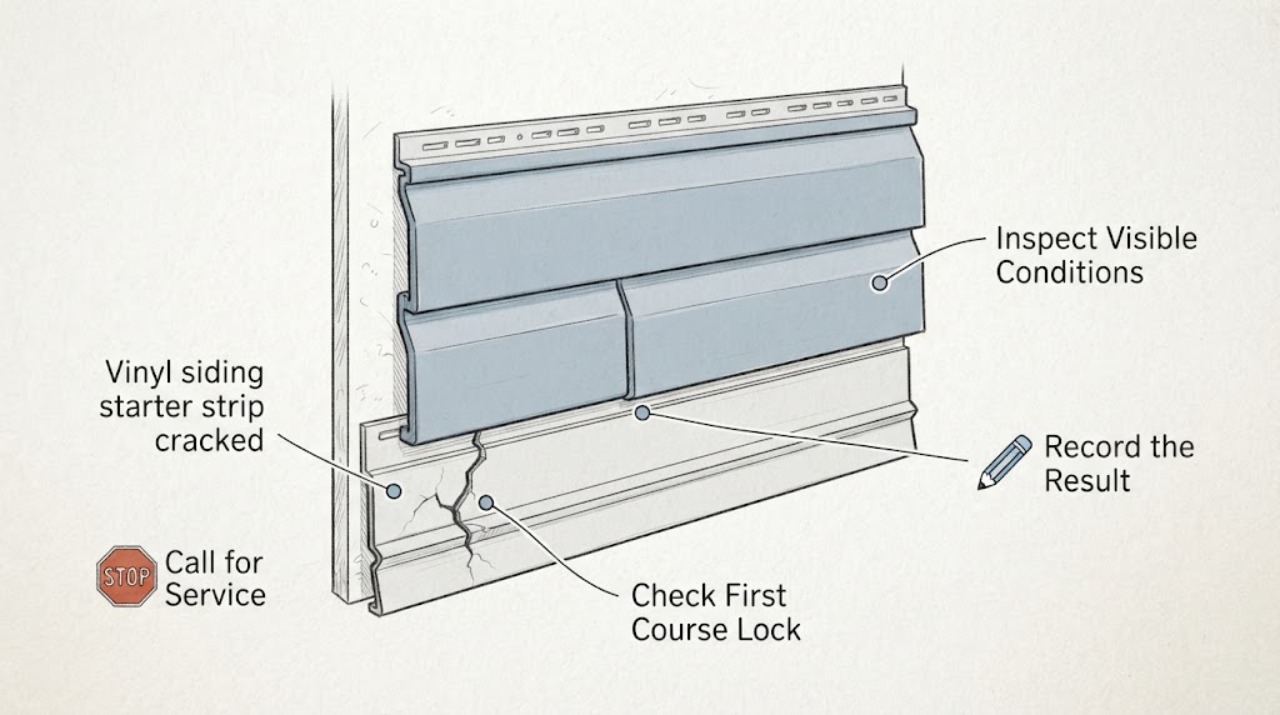
Work through in order
Diagnostic checks
Use only checks that match the exact appliance or system and its official guide.
-
Check 1
From stable ground, visually trace the cracked starter strip along the base of the wall without touching, pulling, or inserting a tool into the siding.
Expected result: Record whether the crack is a short surface line, a split through the strip, a missing section, or a gap that continues into a corner or seam. Photograph the full run and close details from the same safe position.
Next step: Keep the record with the wall location and date, then arrange qualified siding assessment rather than widening or covering the crack.
Stop if: Stop if the strip or panel moves, a fragment is loose overhead, or safe footing and distance cannot be maintained.
Why this matters
Why: A surface mark with no displacement may be limited to the visible accessory, while a split, missing section, or continuing gap can affect the first panel's lock and moisture-shedding path.
-
Check 2
Look along the bottom edge of the first visible siding course from ground level to see whether it appears seated continuously in the starter strip; do not tug the panel or attempt to unlock it.
Expected result: Note sections that appear lifted, wavy, separated, uneven, or no longer aligned with the adjacent course. Compare the affected span with an undamaged wall section if one is visible at the same height.
Next step: Photograph the transition and keep people, toys, and equipment away from the base until a siding professional evaluates the connection.
Stop if: Stop and isolate the area if the first course is visibly loose, sharp, hanging, or likely to release in wind.
Why this matters
Why: A continuous seated profile is less suggestive of immediate displacement, while a lifted or wavy first course can indicate that the cracked strip is no longer supporting or locking the panel normally.
-
Check 3
Inspect the visible lower wall, trim, foundation edge, and nearby ground from a dry position without lifting siding, probing joints, or opening the wall.
Expected result: Look for recurring dark marks, dampness, staining, soft or swollen trim, peeling adjacent finish, puddling, or soil washed toward the wall. Note whether the evidence follows rain or is present in dry weather.
Next step: Record weather and location, keep the area clear, and request prompt siding or building-envelope assessment if moisture persists or reaches the wall base.
Stop if: Stop if the wall base is soft, collapsing, actively wet, or close to exposed electrical equipment or unsafe standing water.
Why this matters
Why: Moisture evidence near the cracked starter strip raises concern about drainage or water getting behind the cladding, but it does not identify the hidden leak path or prove the strip caused it.
-
Check 4
Compare the cracked starter area with nearby siding from the same ground-level viewing angle, looking for buckling, waviness, impact marks, or a pattern limited to a sunny or exposed section.
Expected result: Note whether distortion is isolated to the starter strip, repeats across several panels, appears near a corner or opening, or follows a recent wind, object impact, or heat event.
Next step: Photograph both the affected and comparison areas and provide the event history to a qualified siding professional.
Stop if: Stop if panels are bowing outward, edges are loose, or fragments could fall onto a walkway or occupied area.
Why this matters
Why: An isolated crack can be local damage; repeated waviness or displacement may involve panel movement, attachment, expansion clearance, substrate, or a broader installation issue that a surface patch will not resolve.
-
Check 5
From outside and without disturbing the cladding, look at the crack, wall base, and adjacent trim for visible insect activity or pest entry signs.
Expected result: Record live insect traffic, small openings, shed material, frass-like debris, nesting material, or staining, and note whether the activity is at the starter strip or elsewhere along the wall.
Next step: Photograph only from a safe distance and ask a siding or pest professional to coordinate assessment; do not spray into the joint or seal an opening while activity may be present.
Stop if: Stop if insects are stinging, the wall material is loose, or investigation would require lifting siding, entering a void, or applying pesticide.
Why this matters
Why: Visible activity can indicate a moisture or access condition behind the cladding, but it cannot establish species, colony location, or structural damage from a ground-level view.
Use your observations
Decision map
Find the observation that best matches what you see, then follow the next safe action.
-
PATH 01Safety boundary
What you see
The crack appears superficial, the starter and first course look seated, and there is no moisture, waviness, or loose material.
Do this next
Document and monitor from the ground while arranging routine siding advice if the mark persists or grows.
Why this path and its safety boundary
Safety stop: Do not climb, pull the panel, or use a removal tool to confirm stability.
-
PATH 02Safety boundary
What you see
The starter strip is split through, missing, bowed, or the first siding course appears lifted or unseated.
Do this next
Restrict access near the wall and arrange qualified siding service for the connection and surrounding cladding.
Why this path and its safety boundary
Safety stop: Do not push the panel back, remove trim, or attempt a temporary fastener or patch.
-
PATH 03Safety boundary
What you see
Dark staining, persistent dampness, soft trim, water tracking, or washed soil is visible near the cracked strip.
Do this next
Request prompt building-envelope or siding assessment and keep the area dry and clear where possible.
Why this path and its safety boundary
Safety stop: Stop if the wall base is unstable, water is active, or electrical exposure is nearby.
-
PATH 04Safety boundary
What you see
Insect activity, debris, or possible entry is visible at or near the starter strip.
Do this next
Arrange coordinated siding and pest evaluation rather than sealing or spraying the opening yourself.
Why this path and its safety boundary
Safety stop: Do not disturb nests, inject chemicals, or close an opening before occupancy and moisture conditions are assessed.
-
PATH 05Safety boundary
What you see
A piece of starter or siding is hanging, moving in wind, or could fall onto a walkway or occupied area.
Do this next
Isolate the area from a safe distance and request urgent professional attention.
Why this path and its safety boundary
Safety stop: Do not reach up, climb, pull, tape, nail, or remove the loose material.
Helpful context
Understand the symptom
Why the starter strip matters
The starter strip is the accessory at the bottom of a wall that receives or locks the first siding course. Vinyl siding is an exterior cladding rather than the wall's water-resistive barrier; the wall assembly is intended to manage incidental water behind the cladding. A crack may be cosmetic, but a split or displaced strip can also leave the first course unsupported, alter the panel profile, or expose a path for water. Ground-level evidence cannot confirm the hidden wall condition.
Observe without turning this into an installation job
Use daylight from a stable position and photograph the full base of the wall. Do not climb, pull on the panel, insert a zip tool, remove fasteners, cut vinyl, open the wall, or apply sealant over a moving or unknown assembly. If the starter or panel is loose, create a visible exclusion area without touching the siding.
A useful service record
Record the wall elevation, approximate length of the crack, whether it follows a seam or corner, the condition of the first panel, recent wind or impact, and any nearby moisture or insect evidence. Dated photos from the same ground position help distinguish a stable mark from ongoing displacement.
Only after diagnosis
Potential parts
- vinyl siding repair kit
Consider only after a siding professional confirms that the visible damage is limited, the surrounding connection is sound, and a repair kit is appropriate for the profile.
Match the exact siding profile, color, exposure, and manufacturer guidance; a generic patch may not restore the first-course lock or water-shedding details. - exterior caulk
Consider only for a professional-specified detail after movement, moisture, and drainage are assessed; sealant should not hide an unseated starter strip or active wall moisture.
Confirm compatibility with vinyl, trim, flashing, and the water-resistive barrier, plus the joint's movement and exposure requirements. - siding removal tool
This tool is relevant only to a qualified siding worker when access is necessary for diagnosis or repair; it is not a safe ground-level test of a cracked starter strip.
The professional should select the method for the siding profile and condition without damaging adjacent panels, flashing, or the wall's moisture-control layers.
When checks do not resolve it
Need a professional?
Arrange qualified siding service for a through-crack, displaced starter strip, unseated first course, recurring moisture, buckling, impact damage, or any uncertain compatibility or hidden-wall concern.
Have this ready
- Provide the wall location, dated ground-level photos, crack pattern, first-course seating, waviness, weather or impact history, moisture marks, pest observations, and whether loose material could fall.
Common questions
FAQ
What does a vinyl siding starter strip do?
It is the accessory at the bottom of the wall that secures or receives the first siding course. It is part of a larger wall and moisture-control assembly, so a crack should be assessed with the first panel, trim, flashing, and visible wall-base condition in mind.
Can I push the first siding panel back into a cracked starter strip?
Do not push, pull, unlock, or remove the panel as a test. A visible crack can be accompanied by hidden displacement or moisture, and manipulating the connection may damage adjacent siding or weather-control layers. Have a siding professional assess it.
Does a cracked starter strip mean water is inside the wall?
Not necessarily. Vinyl siding works with a water-resistive barrier and drainage details, but staining, dampness, soft trim, or recurring water near the crack raises concern and warrants building-envelope assessment.
When is a cracked starter strip urgent?
Isolate the area and seek prompt help when the first course is loose, material may fall, the wall base is soft, moisture is persistent, wind is moving the siding, or the damage affects a walkway. A stable surface mark without displacement can be documented for routine assessment.
Read the exact guide
Official sources
- Vinyl Siding Installation ManualVinyl Siding Institute · Industry guidance on vinyl siding accessories, starter strips, water-resistive barriers, and moisture-control context
- GlossaryAlside · Manufacturer definitions for starter strip, buttlock, channel, flashing, and weep holes in siding assemblies
- Vinyl Siding: Engineered for LifeVinyl Siding Institute · Industry overview of vinyl siding weather, moisture-drainage, and impact-performance claims
Community feedback
Share a repair observation
Share a plain-text repair observation. Accepted observations are published automatically; this page may take a moment to update.