
On this page
Start here
Quick answer
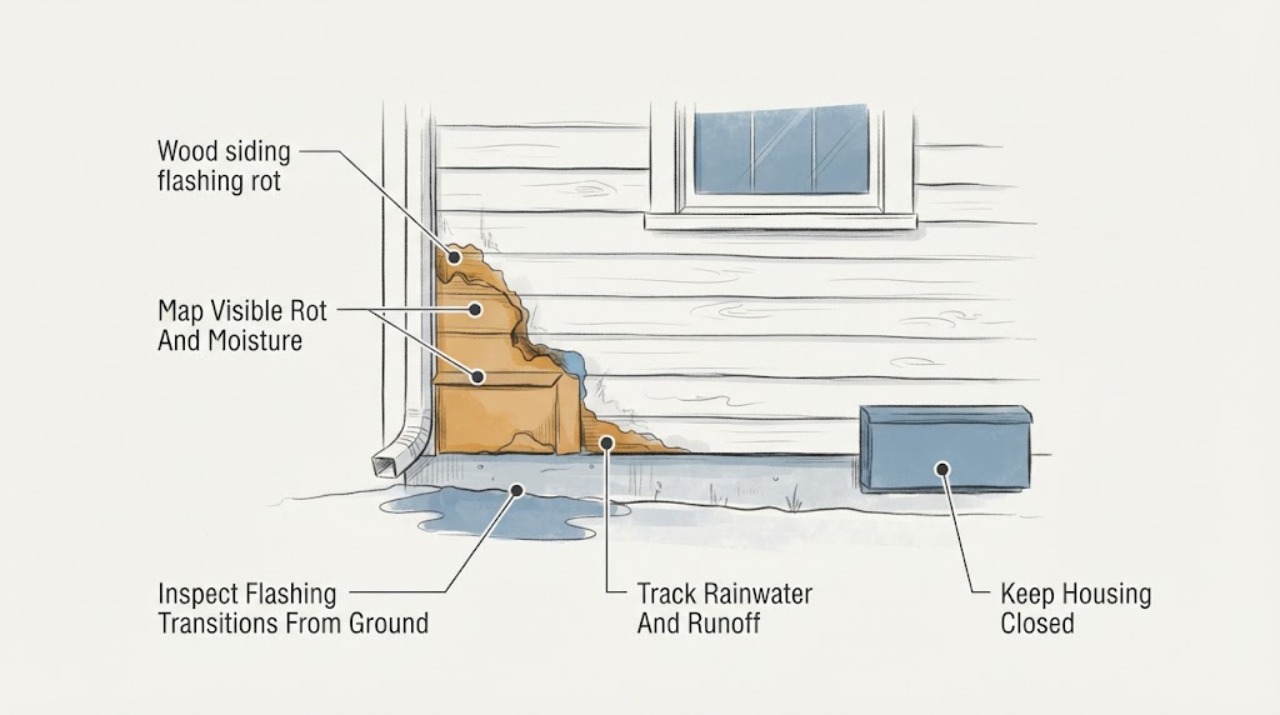
Treat rot at wood siding and flashing as a water-management problem, not a surface-filler problem. From ground level or another safe accessible position, photograph peeling paint, staining, swelling, soft-looking wood, missing or displaced flashing, failed-looking joints, and where water appears after rain; also check for interior dampness near the same wall. Do not climb, remove siding or trim, open the wall, pull flashing, scrape rot, or seal over wet wood. If the wood is soft, the leak is active, staining extends indoors, flashing is missing at a roof, window, door, or wall transition, or safe inspection cannot identify the water path, keep the area protected and call a qualified siding, roofing, or building-envelope professional promptly.
Work through in order
Diagnostic checks
Use only checks that match the exact appliance or system and its official guide.
-
Check 1
From ground level or another stable accessible position, photograph and map visible peeling paint, dark staining, swelling, cracking, open joints, fungal-looking growth, or soft-looking wood on the siding and trim; do not press, probe, scrape, or remove any material.
Expected result: The affected area may be limited to finish, concentrated below a joint or opening, spread along the bottom edge, or accompanied by wet materials, sagging, or a musty interior odor.
Next step: Record the location, approximate visible extent without disturbing the wall, and whether the condition changes after rain. Keep water away from the area and call a siding or building-envelope professional if wood looks decayed or moisture is recurring.
Stop if: Stop for unstable siding, falling trim, exposed fasteners, active water entry, mold-like growth over a broad area, or any need to climb, probe, scrape, or open the wall.
Why this matters
Why: A localized mark can be an entry-point clue, while spreading staining, soft-looking wood, or interior moisture raises concern for concealed sheathing or framing damage. A dry surface does not prove that the wall assembly is dry.
-
Check 2
Without climbing or removing cladding, inspect from ground level the visible transitions at the roof-to-wall edge, window and door trim, wall base, corners, and penetrations such as vents or pipes; look for missing, lifted, displaced, rusted, or visibly misdirected flashing and gaps where water could enter.
Expected result: A transition may look continuous and dry, show a missing or displaced diverter or flashing edge, have an open-looking joint, or be too high or concealed to view safely.
Next step: Photograph each transition and identify whether it is near a roof, opening, or penetration. Do not seal, bend, fasten, or pull the flashing; request a qualified exterior-wall or roofing assessment.
Stop if: Stop for any roof or ladder access, loose metal, exposed membrane, unstable trim, damaged utility penetration, or a request to remove siding or flashing.
Why this matters
Why: Flashing details are most important where two surfaces meet. A visible gap or missing diverter can explain repeated wetting, but the actual overlap with the wall water-control layer cannot be confirmed without professional access.
-
Check 3
During or after ordinary rain, observe from a safe ground position where water travels at the affected wall, especially below roof edges, gutters, downspouts, windows, doors, and horizontal siding joints; do not stand under an active roof edge or redirect fittings by hand.
Expected result: Water may shed away normally, stream down the siding, collect at a roof-wall intersection, overflow a gutter, splash at the base, or reappear indoors after the exterior dries.
Next step: Record the weather timing, flow path, and indoor symptoms with photos or video from a safe position. Keep the wall protected and call a qualified professional when runoff reaches the siding or enters the building.
Stop if: Stop for lightning, slippery ground, flooding, falling debris, roof-edge access, active interior water near electrical equipment, or any need to alter a gutter, downspout, roof, or flashing.
Why this matters
Why: A continuous stream or concentrated runoff at a transition can keep wood wet and accelerate rot. Water at the base can also reflect grade or splashback. The observation narrows the source but does not prove which hidden layer or trade must repair it.
-
Check 4
From inside the building, look at the wall, ceiling, window or door trim, and floor area opposite the exterior rot without opening finishes; compare staining, dampness, peeling paint, odor, or condensation with the exterior location.
Expected result: The interior may be dry, show a matching stain or damp patch, have a musty odor, or show water in a nearby but not directly matching location.
Next step: Photograph both sides, keep furnishings away from wet materials, and arrange exterior-wall and water-damage assessment if interior finishes or insulation are damp. Do not cut an inspection opening yourself.
Stop if: Stop for a bulging ceiling or wall, active dripping near electrical equipment, suspected contaminated water, mold-like growth, or any need to remove drywall, trim, or insulation.
Why this matters
Why: A matching interior mark increases concern that water has crossed the wall assembly, while a different location may indicate that water is traveling before becoming visible. Neither result confirms the full extent of damage.
-
Check 5
At safe accessible areas only, compare the same siding and flashing locations on a dry day and after rain; note whether discoloration, dampness, odor, or water marks recur, and use a non-invasive moisture meter only if you already have one and can follow its instructions without probing or removing finishes.
Expected result: The area may remain dry, become damp after rain, show recurring marks, or produce inconsistent readings because the surface, material, and meter vary.
Next step: Record the date relative to weather, exact accessible location, and any meter reading without inventing a threshold. Share the record with a qualified professional and leave the siding and flashing undisturbed.
Stop if: Stop for wet or unstable surfaces, a meter that requires probing, hidden or elevated areas, exposed wiring, or any instruction to open the wall or remove cladding.
Why this matters
Why: Recurring moisture supports an ongoing water-management problem. A single surface reading cannot establish whether sheathing or framing is wet and should not be used to decide on filler, caulk, or siding replacement.
Use your observations
Decision map
Find the observation that best matches what you see, then follow the next safe action.
-
PATH 01Next step
What you see
Water is actively entering, interior materials are damp, the wall or ceiling is bulging, wood is soft-looking over a broad area, or damage is spreading.
Do this next
Keep people away from unstable material, protect belongings only from a dry safe position, and call a qualified siding or building-envelope professional plus water-mitigation help when needed. Do not open the wall or cover wet materials with filler or caulk.
-
PATH 02Next step
What you see
Rot or staining is concentrated where a roof meets the wood siding, below a gutter, or at the end of a roof-wall intersection.
Do this next
Arrange a qualified roofing and exterior-wall assessment for step, kick-out, and drainage-plane conditions. Do not climb, alter roof materials, or install a diverter from a ladder.
-
PATH 03Next step
What you see
Damage is below or beside a window, door, vent, pipe, light, or other wall penetration.
Do this next
Call a siding or building-envelope professional to evaluate the opening, trim, flashing, and water-control layer together. Do not remove trim, siding, sealant, or the penetration cover as a test.
-
PATH 04Next step
What you see
Rot is concentrated at the bottom edge of siding or near grade, splashback, a deck, or a hard surface.
Do this next
Request an exterior-wall assessment of base flashing, drainage, grade, and splashback. Do not dig, remove the siding, bury the bottom edge, or seal over wet wood.
-
PATH 05Next step
What you see
Flashing looks missing, lifted, displaced, rusted through, or unable to direct water outward from a transition.
Do this next
Photograph the detail and keep the wall undisturbed while arranging qualified repair. The hidden overlap with the wall water-control layer cannot be confirmed from a ground-level view.
-
PATH 06Next step
What you see
The exterior looks mostly intact, but marks, odor, or moisture recur after rain or the interior shows a matching symptom.
Do this next
Treat the source as unresolved and call a building-envelope professional. Do not rely on caulk, filler, paint, or a single surface meter reading to close a concealed water path.
-
PATH 07Next step
What you see
Only superficial peeling or staining is visible, the wall remains stable and dry, and no recurrence or interior symptom is observed.
Do this next
Document the area and monitor it from safe accessible positions after rain. Before cosmetic coating, have a professional or the exact siding guidance confirm that the substrate and flashing path are dry and sound.
Helpful context
Understand the symptom
Rot usually means water is getting in or not drying
Flashing is part of a wall drainage system: it should work with the weather-resistive barrier and siding to direct water down and out. Missing, poorly integrated, or displaced flashing at a roof-to-wall intersection, window, door, penetration, or wall base can let water reach the wood behind the siding. Wood may show peeling paint, staining, swelling, or decay, but the visible defect may be smaller than the wet framing or sheathing behind it.
Separate the location clue from the repair decision
A stain below a window can reflect window or trim flashing, while a vertical stain under a roof edge can reflect step or kick-out flashing. Rot at the bottom of a wall can involve base flashing, grade, splashback, or drainage-plane details. These patterns guide the next professional inspection; they do not establish that caulk, filler, or a replacement board will correct the source.
Keep the wall closed and stay off high-access areas
A safe first pass is visual and ground-level. Do not climb a ladder or roof, remove siding, open a wall, pull trim, probe soft wood, or disturb flashing to see how far the damage extends. If the wall is actively wet or the wood is unstable, keep people clear and arrange an assessment before cosmetic repairs or cleanup.
Safety boundary
Stop conditions
- Do not climb ladders or roofs, remove siding or trim, open the wall, pull flashing, probe soft wood, or alter roof, gutter, downspout, window, door, or penetration details.
- Do not seal, caulk, paint, or fill over wet or decayed wood before the water path and concealed damage are assessed.
- Stop for active water entry, unstable siding or wall material, falling trim, slippery or flooded ground, mold-like growth, suspected contamination, or water near electrical equipment.
- If ground-level observations cannot establish a dry, stable, and recurring-free condition, call a qualified siding, roofing, or building-envelope professional and provide the mapped locations, weather timing, photos, and interior clues.
Only after diagnosis
Potential parts
- exterior-wood-filler
Consider this category only after a professional confirms that the moisture source is corrected and the remaining defect is limited, stable surface damage rather than active rot or concealed structural damage.
Confirm the wood species, substrate dryness, exposure, product use, and coating system before ordering; filler cannot replace flashing, drainage, or decayed wood repair. - exterior-caulk
Consider this category only when a professional confirms that a specific exterior joint is intended to be sealed after flashing and water-shedding details are correct and the surfaces are dry.
Confirm joint design, substrate, movement, exposure, coating compatibility, and manufacturer instructions; do not seal drainage paths, weep openings, or wet or decayed wood. - moisture-meter
Consider this category only as a screening accessory after a professional identifies a safe accessible surface and explains how readings should be interpreted for the wood and meter type.
Confirm the meter's material settings, sensing depth, calibration, and limitations; a surface reading is not proof that hidden sheathing or framing is dry.
When checks do not resolve it
Need a professional?
Call a qualified siding, roofing, or building-envelope professional when wood looks soft or decayed, rot recurs after rain, flashing is missing or displaced, staining is at a roof-wall, window, door, penetration, or wall-base transition, or interior materials show matching dampness or odor. Arrange water mitigation promptly for active entry or spreading damage. Do not climb, open the wall, remove cladding, or apply cosmetic filler or caulk before the moisture path is assessed. Provide safe photos, the affected elevation and transition, weather timing, visible flow path, interior symptoms, prior repairs, and any non-invasive observations.
Common questions
FAQ
Does rotten wood siding always mean the flashing failed?
Not always. Possible sources include roof or gutter runoff, window or door transitions, penetrations, base-of-wall splashback, grade, plumbing, or a concealed wall problem. Rot is a water-management clue; photograph the pattern and have the source assessed before replacing boards.
Can I fill or caulk rotten wood siding?
Do not cover wet or decayed wood before the water path is corrected. Filler and caulk may be appropriate only for a confirmed dry, stable surface or joint after professional assessment; they cannot replace flashing or repair concealed damage.
Where should I look for flashing related to wood siding rot?
From a safe ground-level position, look at roof-to-wall edges, window and door trim, wall penetrations, corners, transitions between materials, and the bottom of the wall. Look for staining, missing or displaced visible metal, open joints, or concentrated runoff, but do not climb or remove siding.
Why can the inside wall be damp even when the siding looks mostly intact?
Water can travel behind siding through a transition or drainage-plane defect before appearing indoors. A dry exterior surface does not prove the wall is dry. Compare exterior and interior locations without opening finishes and call a building-envelope professional when symptoms recur.
Is a moisture meter enough to confirm the wall is dry?
No. A non-invasive reading is only a screening clue and depends on the material, meter, surface, and depth. Record readings without inventing a threshold, and have a professional interpret them when rot or concealed damage is suspected.
When should wood siding flashing rot be treated as urgent?
Call promptly for active water entry, spreading stains, soft-looking or unstable wood, damp interior finishes, musty odor, a bulging wall or ceiling, or visible missing or displaced flashing at a roof, opening, or wall transition. Stay off ladders and keep the wall undisturbed.
Read the exact guide
Official sources
- Step and Kick-Out Flashing at Roof-Wall IntersectionsU.S. Department of Energy Building America Solution Center (PNNL) · General roof-wall water-management guidance; roof and siding work requires appropriate professional access and model or site-specific details.
- Look for Missing Roof and Wall FlashingU.S. Department of Energy Building America Solution Center (PNNL) · General visual moisture guidance; ground-level safety and professional access limits apply to existing homes.
- Flashing at Bottom of Exterior WallsU.S. Department of Energy Building America Solution Center (PNNL) · General residential wall water-management guidance; existing wall construction, materials, access, and local requirements vary.
Community feedback
Share a repair observation
Share a plain-text repair observation. Accepted observations are published automatically; this page may take a moment to update.