
On this page
Start here
Quick answer
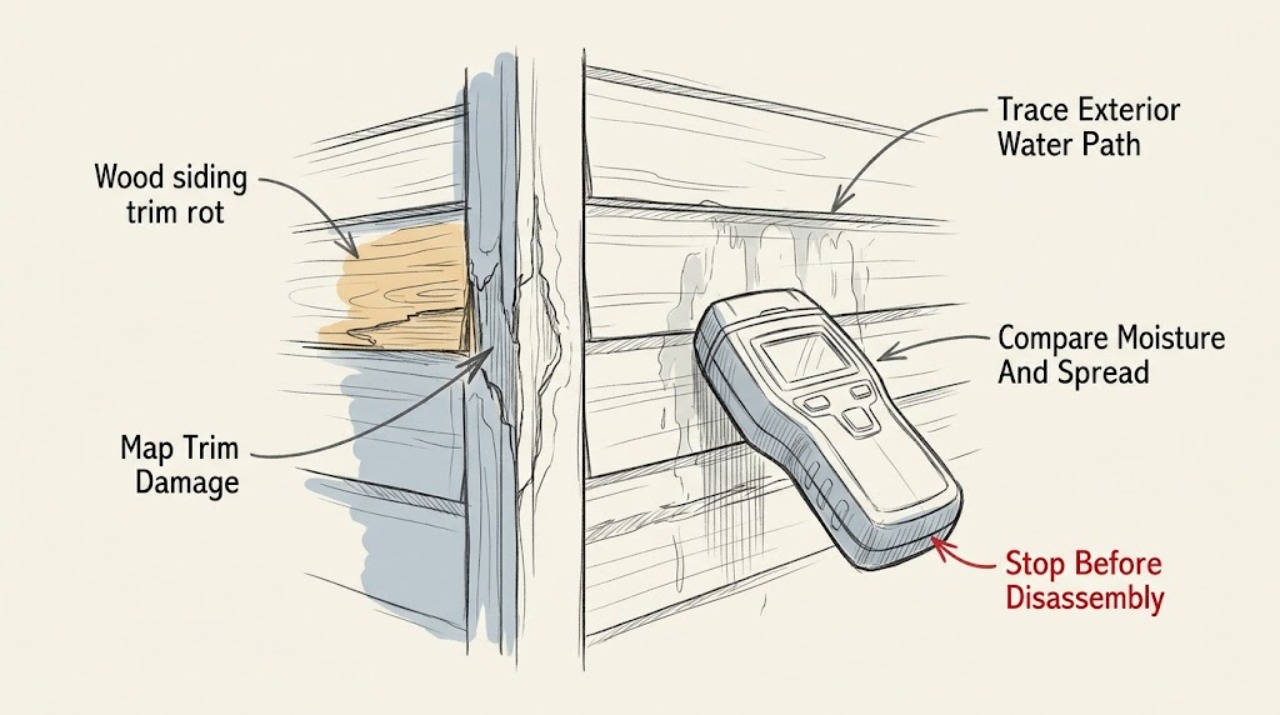
Rot in wood siding trim is usually a moisture-path problem, not just a bad patch of paint. From a stable position, photograph the trim and look for peeling finish, swelling, open joints, soft or crumbly wood, staining, and water coming from above or around an opening. Check gutters, downspouts, roof-edge flashing, window or door trim, sprinklers, spigots, and ground clearance without removing siding or climbing. If the wood is soft, the area stays wet after weather clears, damage is spreading, the wall may be involved, or mold or structural movement is present, stop disturbing it and arrange a qualified siding or building-envelope assessment.
Work through in order
Diagnostic checks
Use only checks that match the exact appliance or system and its official guide.
-
Check 1
From the ground or another stable, dry position, photograph the full trim section and its nearby joints, corners, openings, and lower edge. Do not pry, cut, drill, scrape mold, or climb to reach it.
Expected result: Record whether the finish is peeling, the wood is swollen, split, soft-looking, crumbly, darkened, loose, or separated at a joint, and whether the visible area is isolated or extends into adjacent siding.
Next step: Use the location and photos to inspect possible water sources above and beside the trim.
Stop if: Stop if the trim or surrounding wall is unstable, pieces are falling, access requires a ladder or roof, or the area is wet near electrical equipment.
Why this matters
Why: Peeling or staining indicates weather exposure or wetting but does not by itself prove that the trim is rotten. Softness, crumbling, distortion, or a loose joint makes material loss and hidden damage more likely.
-
Check 2
Inspect, without removing siding or flashing, the roof edge and overhang, gutters, downspouts, window and door perimeter trim, nearby hose bibs or sprinklers, and the ground or plant growth next to the wall.
Expected result: Look for overflow marks, a leaking or disconnected downspout, water streaks, an open joint, failed-looking flashing, splashback, soil or mulch touching the wood, or a wet spot that appears after rain or watering.
Next step: Photograph the suspected source and have the water-management detail corrected or evaluated before replacing or coating the trim.
Stop if: Do not climb, remove roof or window components, enter a crawlspace, or reach behind cladding to chase the leak.
Why this matters
Why: A repeatable wet trail from above or around an opening makes runoff or envelope leakage more likely than an isolated finish defect. Water directed onto the trim can keep the end grain or joint wet long enough for decay to develop.
-
Check 3
After the weather has cleared, compare the affected trim with a nearby visually sound section. If available, use a moisture meter exactly as its instructions allow on the wood surface; do not insert a probe into a damaged wall or rely on one reading as a rot diagnosis.
Expected result: Note whether the affected area remains visibly damp or measures consistently wetter than the nearby comparison area, and whether staining, odor, or damage continues toward the wall or an interior surface.
Next step: Arrange a qualified inspection when moisture stays elevated, the pattern spreads, or the wall cavity may be involved; provide the comparison and photos.
Stop if: Do not disturb suspected mold, cut into the wall, or use a meter in a place that requires hazardous access.
Why this matters
Why: Persistent or localized high moisture supports an ongoing or hidden water source. A dry reading does not prove that earlier wetting or concealed decay is absent, especially when the surface has had time to dry.
-
Check 4
Without scraping or forcing the trim, compare the surface finish with the wood's shape and fastener area, and check from a safe viewpoint whether the piece is bowed, detached, or exposing an end or joint.
Expected result: A failing coating over firm, stable wood is different from trim that is soft-looking, swollen, fractured, loose, or missing material at an end or joint.
Next step: Have the material, extent, and replacement or repair method verified before buying filler, sealant, primer, or replacement trim.
Stop if: Stop if the inspection would require prying boards, removing fasteners, handling unknown coatings, or exposing an unstable wall assembly.
Why this matters
Why: A finish-only failure may be a maintenance issue after the moisture path is corrected, while distortion, missing wood, or looseness raises concern for decay and for damage behind the trim.
-
Check 5
From inside the building, look only at already accessible areas opposite or near the exterior trim for new staining, dampness, peeling finish, musty odor, or visible mold. Do not open the wall to investigate.
Expected result: Interior changes, a musty odor, or visible mold suggest that water may have reached the wall assembly; no interior sign does not exclude concealed wet sheathing or framing.
Next step: Contact an experienced building inspector, siding professional, or qualified mold-remediation professional as appropriate, and report any health concern before disturbing the area.
Stop if: Stop immediately for contaminated water, extensive mold, health symptoms, structural movement, or any need to remove wall finishes.
Why this matters
Why: A suspected hidden moisture or mold problem changes the job from cosmetic trim maintenance to building-envelope and possibly remediation assessment. Disturbing a hidden mold site can spread spores.
Use your observations
Decision map
Find the observation that best matches what you see, then follow the next safe action.
-
PATH 01Next step
What you see
The coating is peeling or weathered, but the wood remains firm and stable, the trim is not distorted, and no repeatable wet path is visible.
Do this next
Verify the wood condition and compatible finish or end-grain treatment, then address nearby drainage before refinishing.
Why this path and its safety boundary
Why it matters: This pattern is more consistent with finish weathering than confirmed rot, although the exposed end grain or joint still needs a material-appropriate moisture-control plan.
-
PATH 02Next step
What you see
The trim damage aligns with water streaks, gutter or downspout overflow, roof-edge runoff, or an opening around a window or door.
Do this next
Arrange envelope or siding service to verify the flashing and drainage path, and document the source before repair.
Why this path and its safety boundary
Why it matters: The exterior water-management detail is a more likely driver than the trim alone; replacing the visible piece first can leave the wetting mechanism in place.
-
PATH 03Next step
What you see
The trim is soft-looking, crumbly, swollen, loose, remains wetter than nearby wood, or the damage continues toward the wall or interior.
Do this next
Stop cosmetic patching and obtain a qualified inspection of the trim, sheathing, and framing before selecting replacement material.
Why this path and its safety boundary
Why it matters: Decay or concealed wetting is more likely, and the visible trim may not define the full repair area.
-
PATH 04Next step
What you see
There is extensive or disturbed mold, contaminated water, a musty interior with suspected hidden growth, structural movement, falling material, or unsafe access.
Do this next
Keep people and pets away, stop the relevant work, and contact an experienced building-envelope or mold professional; seek urgent help for immediate structural danger.
Why this path and its safety boundary
Why it matters: This exceeds a routine trim observation. Disturbing the material can create exposure or worsen a structural and moisture problem.
Helpful context
Understand the symptom
Why trim rots at edges and joints
Exterior wood can decay when moisture accumulates or repeatedly fluctuates. Trim ends, joints, and places where siding meets vertical trim are especially vulnerable because exposed end grain and small gaps can absorb water. Peeling paint, swelling, or pulled fasteners are evidence that the wood has been getting wet, but appearance alone cannot show how far decay has traveled.
Find the water path before choosing a repair
A damaged trim piece may be the downstream symptom of roof runoff, overflowing gutters, a leaking downspout, failed flashing, an opening around a window or door, a nearby hose or sprinkler, or water held against the lower wall. Water stains do not always appear directly below the entry point. A sound-looking surface can therefore coexist with wet sheathing or framing behind it.
A surface coating is not a rot repair
Sealing end grain, maintaining a sound exterior finish, providing drainage, and keeping roof edges and gutters working can reduce future wetting, but those measures do not restore decayed wood. Do not paint over soft material or seal a suspected leak before its source and the condition behind the trim have been assessed.
Safety boundary
Stop conditions
- Do not climb onto a roof or ladder, remove siding or flashing, or open a wall to investigate trim rot as a routine check.
- Do not paint, caulk, fill, or seal over soft wood or an active leak before the moisture source and repair extent are known.
- Stop for unstable or falling trim, structural movement, contaminated water, extensive or disturbed mold, health symptoms, or hazardous access.
- Seek urgent assistance for immediate structural danger; keep people and pets clear of the affected area.
Only after diagnosis
Potential parts
- matching exterior wood trim
Consider replacement only after an inspection confirms that the trim has lost sound material and the water source and hidden damage have been addressed.
Confirm species or manufactured material, dimensions, exposure, finish, and local installation requirements with the manufacturer or qualified professional. - roof-edge or opening flashing
This category is relevant only when the water-path check points to runoff or leakage at a roof edge or wall opening.
Flashing must integrate with the existing siding and water-resistive layers; do not choose a generic piece from appearance alone. - exterior wood primer or end-grain sealer
Consider a compatible coating only for sound wood after the moisture source and the repair extent are confirmed; coating cannot restore rotten fibers.
Verify substrate, existing coating, exposure, preparation, and manufacturer instructions before application.
When checks do not resolve it
Need a professional?
Arrange a qualified siding or building-envelope assessment when trim is soft, crumbly, swollen, loose, persistently wet, spreading, or associated with interior staining or suspected hidden mold. Call promptly when a roof edge, gutter, downspout, window, door, sprinkler, or grade condition is directing water into the trim. Do not disturb unstable, contaminated, or inaccessible material.
Common questions
FAQ
Is peeling paint on wood siding trim proof that the trim is rotten?
No. Peeling paint shows that the finish has weathered or the wood has been getting wet, but it does not show the depth of damage. Compare the shape and firmness of the trim, look for a repeatable water path, and have soft or distorted wood assessed.
Where should I look for the cause of rot at siding trim?
Start above and beside the damaged area: roof-edge flashing and overhangs, gutters and downspouts, window and door openings, hose bibs or sprinklers, and ground or plant contact. Water can travel inside an assembly, so the visible stain may not be at the entry point.
Can I fill and paint wood siding trim that feels soft?
Do not treat a soft or crumbly section as a cosmetic defect. First identify and correct the moisture source and determine whether the trim, sheathing, or framing has decayed. A qualified professional can confirm the safe repair and compatible replacement material.
Does a dry moisture-meter reading rule out hidden rot?
No. A dry reading only describes the tested spot and moment. Earlier wetting may have dried, and concealed damage may be outside the meter's sensing area. Compare with nearby sound wood and use the pattern, history, and visible condition to decide whether an inspection is needed.
When should I stop investigating wood siding trim rot?
Stop for unstable or falling material, unsafe ladder or roof access, contaminated water, extensive or disturbed mold, structural movement, or any need to open the wall. Keep people away and contact a qualified building-envelope or mold professional; seek urgent help for immediate structural danger.
Read the exact guide
Official sources
- A Brief Guide to Mold, Moisture and Your HomeU.S. Environmental Protection Agency · Applies when exterior trim damage is associated with indoor moisture, hidden mold, or contaminated water; it does not diagnose wood rot.
- Build Green: Wood Can Last for CenturiesUSDA Forest Service, Forest Products Laboratory · General homeowner wood-decay guidance; hidden conditions require a site-specific assessment.
- Improving the performance of painted wood siding: rain screen, end-grain seal, and back primingUSDA Forest Service, Forest Products Laboratory · General painted wood siding and trim moisture-control guidance; not a substitute for an inspection of this wall.
- Before you install exterior wood-based sidingUSDA Forest Service, Forest Products Laboratory · General exterior wood siding guidance; the installed assembly and local requirements control.
Community feedback
Share a repair observation
Share a plain-text repair observation. Accepted observations are published automatically; this page may take a moment to update.