
On this page
Start here
Quick answer
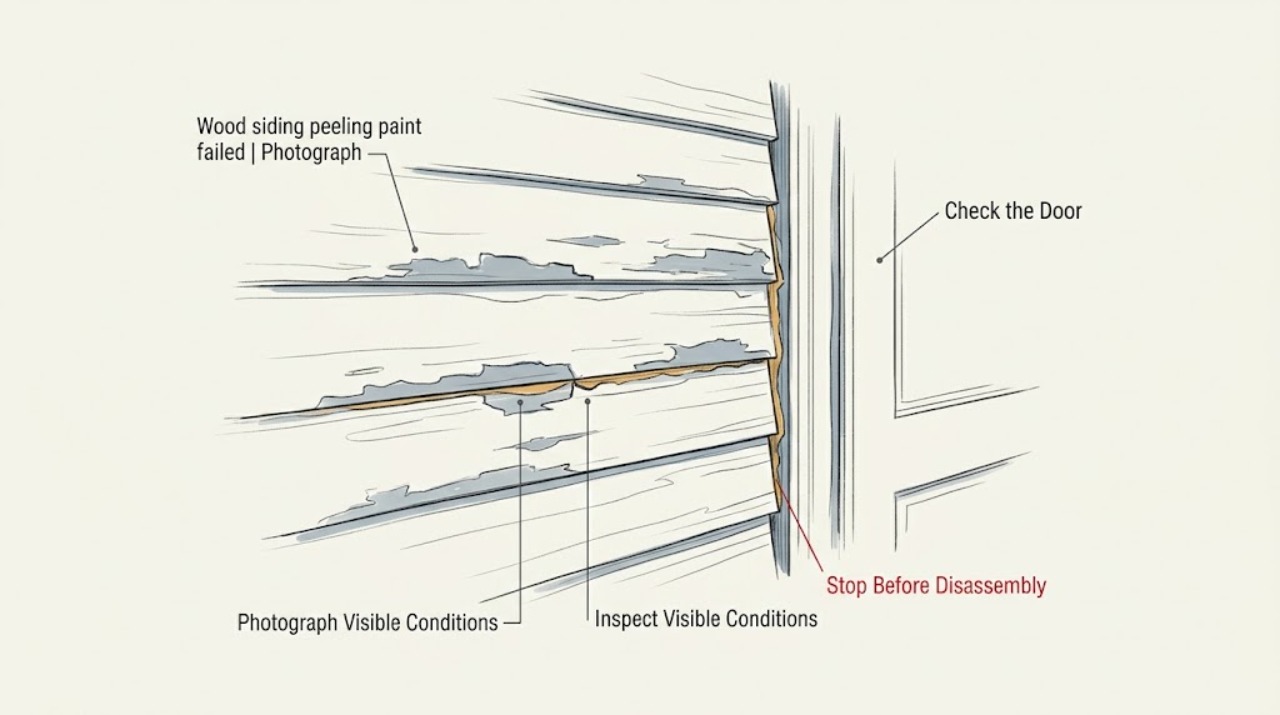
Peeling paint on wood siding with failed caulk should begin with a ground-level seam and moisture assessment, not another coat of paint. From stable ground, photograph failed joints around windows, doors, trim, corners, penetrations, and board ends; note cracked or missing caulk, gaps, soft or swollen wood, staining, and whether the damage follows rain or roof and gutter runoff. Check visible flashing, drip edges, gutters, and downspout discharge without removing siding or climbing. A localized, dry seam with sound wood can lead to a qualified prep, recaulk, and repaint plan; persistent moisture, soft wood, missing flashing, or peeling across elevations needs a broader siding or wall-envelope assessment. Do not use a ladder, remove boards, scrape or sand old paint, or work at height; paint on a pre-1978 home may require a lead-safe certified contractor.
Before you begin
Safety first
- Observation and planning only: do not use ladders or roof access, remove siding or flashing, scrape or sand paint, probe questionable wood, apply caulk or paint over an unknown moisture source, or disturb possible lead-coated or unstable material.
Work through in order
Diagnostic checks
Use only checks that match the exact appliance or system and its official guide.
-
Check 1
From stable ground, photograph every reachable failed caulk joint near windows, doors, trim, corners, board ends, utility penetrations, and siding transitions, then compare the peeling paint pattern with the seam.
Expected result: Record whether the caulk is cracked, separated, missing, brittle, or still bonded; note whether peeling is confined to the joint or extends across the board, edge, or an entire wall elevation.
Next step: Mark the locations on a simple elevation sketch and give the photographs to a siding or exterior-paint professional for a ground-level repair scope.
Stop if: Stop if the joint is out of reach from the ground, the siding is loose or falling, or any check would require a ladder, roof access, prying, or removing a board.
Why this matters
Why: Peeling that follows one failed joint can be a local weather-seal failure, while peeling beyond the seam may indicate coating failure or moisture behind the siding rather than caulk alone.
-
Check 2
Inspect the exposed wood and paint edges from the ground without scraping or probing: look at the board face, end grain, lower edges, and the area immediately around the failed seam.
Expected result: Note dry, firm-looking wood with clean paint loss versus swelling, cupping, splits, dark staining, soft-looking areas, open joints, insect holes, or paint that is lifting in several layers.
Next step: Photograph the worst and least-affected examples and ask a qualified professional to determine whether the scope is surface preparation, wood repair, or siding and wall-envelope investigation.
Stop if: Do not touch or disturb flaking material if lead paint, mold-like growth, contaminated debris, unstable boards, or falling chips are suspected.
Why this matters
Why: Sound wood with a localized coating edge supports a limited surface and sealant assessment; swelling, decay-like softness, staining, or repeated wetting means filling or repainting could hide a moisture or wood-replacement problem.
-
Check 3
Trace visible water paths from the ground: inspect gutters and downspouts, roof-to-wall runoff, window and door heads and sills, trim transitions, and any visible flashing or drip edge without climbing or dismantling.
Expected result: Record staining or peeling directly below an opening, roof intersection, gutter overflow point, or penetration, and note whether water can visibly drain away from the wall or appears to collect at the failed joint.
Next step: Include the water-path sketch in a siding or building-envelope assessment and have gutters, flashing, and wall drainage reviewed as a coordinated system.
Stop if: Stop for roof access, ladder work, active water entry, sagging or unstable siding, electrical service near the inspection area, or any need to remove flashing.
Why this matters
Why: A failed caulk joint may be the symptom of a larger flashing or drainage path; sealing the face without correcting the path can leave wood wet and allow decay to continue.
-
Check 4
Map the distribution and timing of the peeling paint: compare shaded and exposed walls, older and newer caulk lines, lower and upper wall areas visible from ground, and conditions after rain or prolonged damp weather.
Expected result: Note whether the same seam detail fails repeatedly, whether several elevations or many openings are affected, and whether the pattern follows one exposure or the whole siding system.
Next step: Share the map and history with a siding contractor or building-envelope professional so the repair can be sized as local maintenance or a coordinated system correction.
Stop if: Do not create a water test, pull on siding, remove caulk, or inspect upper areas by climbing to confirm the pattern.
Why this matters
Why: One repeatable seam points toward local sealant detailing; repeated failures at many joints, broad elevation peeling, or weather-linked expansion and contraction calls for coating, moisture, or systemic siding review.
-
Check 5
Prepare a service handoff with the elevation sketch, joint and paint photographs, wood and moisture observations, visible flashing and drainage notes, siding age and finish history, and the home's approximate construction date.
Expected result: Confirm that the handoff distinguishes failed caulk, coating loss, suspected wet or decayed wood, and drainage or flashing concerns, and states which areas could not be reached safely.
Next step: Request a written scope from a qualified siding or exterior-paint professional; ask for lead-safe credentials when painted surfaces in a pre-1978 home may be disturbed.
Stop if: Do not scrape, sand, repaint, recaulk, remove siding, or use a ladder until the material, access, moisture source, and safe-work scope are confirmed.
Why this matters
Why: A precise handoff prevents a systemic moisture or wood problem from being treated as a cosmetic caulk replacement and alerts the provider to lead-safe or height-related boundaries.
Use your observations
Decision map
Find the observation that best matches what you see, then follow the next safe action.
-
PATH 01Next step
What you see
A single reachable joint has failed caulk, the surrounding wood appears dry and sound, and peeling is limited to the seam.
Do this next
Request a localized exterior sealant and coating assessment; consider compatible exterior caulk and paint only after the professional confirms surface preparation and a dry substrate.
-
PATH 02Next step
What you see
Paint is peeling beyond the joint but the wood looks firm and there is no visible water path or staining.
Do this next
Have an exterior-paint professional assess coating adhesion, surface preparation, exposure, and finish compatibility; do not cover the failure with a new coat from a ladder.
-
PATH 03Next step
What you see
The wood is swollen, split, soft-looking, stained, or repeatedly damp near the failed caulk.
Do this next
Pause cosmetic repair and obtain a siding or building-envelope assessment that identifies and corrects the moisture source before deciding on wood replacement or refinishing.
-
PATH 04Next step
What you see
Peeling or staining follows a window, door, roof-wall intersection, gutter overflow, downspout, or other flashing and drainage detail.
Do this next
Request coordinated flashing and drainage diagnosis; do not rely on face-applied caulk or remove siding to inspect the wall cavity yourself.
-
PATH 05Next step
What you see
The same failed-joint and peeling pattern appears across several openings, elevations, or siding courses.
Do this next
Treat it as a systemic siding or coating service need and obtain a broader exterior assessment rather than ordering a single tube of sealant.
-
PATH 06Next step
What you see
The area requires a ladder or roof access, or the home may have pre-1978 paint or unknown lead coating.
Do this next
Keep the inspection ground-level and hire an appropriately qualified, lead-safe and height-capable professional; do not scrape, sand, or disturb the paint yourself.
Helpful context
Understand the symptom
Failed caulk is a clue, not a complete diagnosis
A failed joint can let water reach the paint edge, but peeling may also come from coating adhesion, repeated wood movement, wet or decayed boards, or a larger wall drainage problem. Start by matching the paint boundary to the caulk boundary and documenting the pattern from safe ground.
Separate surface failure from wet wood
Dry, sound-looking wood with a localized paint edge is a different scope from swelling, staining, open joints, or soft-looking wood. Moisture can interfere with paint adhesion and increase susceptibility to decay, so a new finish should not be used to hide an uncorrected water path.
Follow the water path
Look from the ground at openings, roof and wall intersections, gutters, downspouts, drip edges, and siding transitions. Flashing and drainage layers are intended to direct water out and down; a recurring failure below one detail or after rain deserves envelope assessment rather than repeated surface caulk.
Keep access and paint hazards professional
This page stops at ground-level observation and planning. Ladders, roof access, siding removal, scraping, sanding, repainting, and repairs on an older painted home can add fall, material, or lead exposure hazards. Use qualified siding and lead-safe professionals for those scopes.
Only after diagnosis
Potential parts
- exterior-wood-filler
Consider this only when a professional confirms a small, dry, non-structural wood defect after the moisture source is corrected; filler is not a substitute for replacing decayed or extensively damaged siding.
Confirm the wood species, exposure, substrate condition, paint system, and manufacturer instructions before purchase or application. - exterior-caulk
Consider this only when the failed joint is localized, the substrate is dry and sound, and the professional confirms the joint is suitable for a compatible exterior sealant.
Confirm joint movement, substrate, finish, weather conditions, paintability, and manufacturer guidance before purchase or application. - siding-paint
Consider this only after coating adhesion, wood moisture, surface condition, and any lead-safe requirements are assessed; paint cannot correct wet wood, bad flashing, or systemic drainage.
Confirm the existing coating, wood condition, preparation scope, exposure, local environmental requirements, and product instructions before purchase or application.
When checks do not resolve it
Need a professional?
Call a qualified siding or building-envelope professional when wood appears wet or soft, failures recur after rain, flashing or drainage is suspect, several elevations are affected, access requires height, or painted surfaces may contain lead; use a lead-safe certified contractor where applicable.
Safety scope: Observation and planning only: do not use ladders or roof access, remove siding or flashing, scrape or sand paint, probe questionable wood, apply caulk or paint over an unknown moisture source, or disturb possible lead-coated or unstable material.
Have this ready
- Provide an elevation sketch, ground-level photographs of joints and paint boundaries, staining or swelling notes, rain and weather timing, visible gutter and flashing observations, siding and finish age, approximate home age, and any area that could not be reached safely.
Common questions
FAQ
How can I tell whether failed caulk caused the peeling paint?
From the ground, compare the paint boundary with the caulk joint and photograph the pattern. Peeling limited to one failed seam with dry, sound-looking wood supports a local sealant assessment; peeling across boards, staining, swelling, or repeated dampness needs a moisture and coating review.
What signs suggest wet or decayed wood behind the paint?
Look for swelling, cupping, splits, dark staining, open joints, soft-looking areas, recurring dampness, or peeling that expands beyond the seam. Do not probe, scrape, or remove the siding to test it; have a qualified professional assess the wood and water source.
Should I just add new caulk over the failed joint?
Not before the joint, substrate, and water path are assessed. New sealant over failed material or wet wood can hide the cause and fail again. A professional should decide whether the scope is joint preparation, wood repair, flashing or drainage correction, or a larger siding service.
When is peeling paint a siding-wide problem?
When similar failures appear at many openings, across several elevations or courses, or after the same weather exposure, treat it as a coating, moisture, or siding-system pattern. Document the distribution and request a broader exterior assessment instead of replacing one visible seam.
Can I scrape and repaint wood siding myself?
Do not scrape, sand, repaint, remove boards, or use a ladder as part of this observation path. High work adds fall risk, and paint on a pre-1978 home may contain lead. Use a qualified siding professional and ask for lead-safe credentials when painted surfaces may be disturbed.
Read the exact guide
Official sources
- Building Enclosure Science Intro Drainage Plane Behind Exterior Wall CladdingU.S. Department of Energy Building Science Education · Supports visual water-path and flashing questions for siding; it does not authorize siding removal or replace site-specific envelope design.
- Lead-Safe Renovations for DIYersU.S. Environmental Protection Agency · Supports the no-scraping, no-sanding boundary and lead-safe professional escalation for pre-1978 or unknown painted siding.
- Wood and Moisture RelationshipsOregon State University Extension Service · Supports distinguishing moisture-related coating failure from a purely cosmetic seam issue; site-specific moisture and wood condition require professional assessment.
Community feedback
Share a repair observation
Share a plain-text repair observation. Accepted observations are published automatically; this page may take a moment to update.