
On this page
Start here
Quick answer
Treat suspected wood-siding rot as a moisture and exterior-envelope problem, not just a cosmetic patch. From the ground or a safe window view, record the affected location, discoloration or peeling pattern, visible gaps or distortion, nearby gutters/downspouts and roof or window transitions, and any interior stain or musty odor. Do not climb, probe, press, cut, remove siding, open the wall, disturb mold, or claim that a board is structurally sound from appearance alone. Arrange a siding or building-envelope professional, with urgent service when boards are loose, falling, visibly bulged, or the wall is taking on water; provide the pattern and moisture-source observations so the professional can determine whether repair, replacement, or concealed-wall evaluation is needed.
Before you begin
Safety first
- Stay at ground level or use a safe window view. Do not climb, probe, press, cut, remove siding, open the wall, disturb suspected mold, alter drainage, or make a structural judgment from appearance alone.
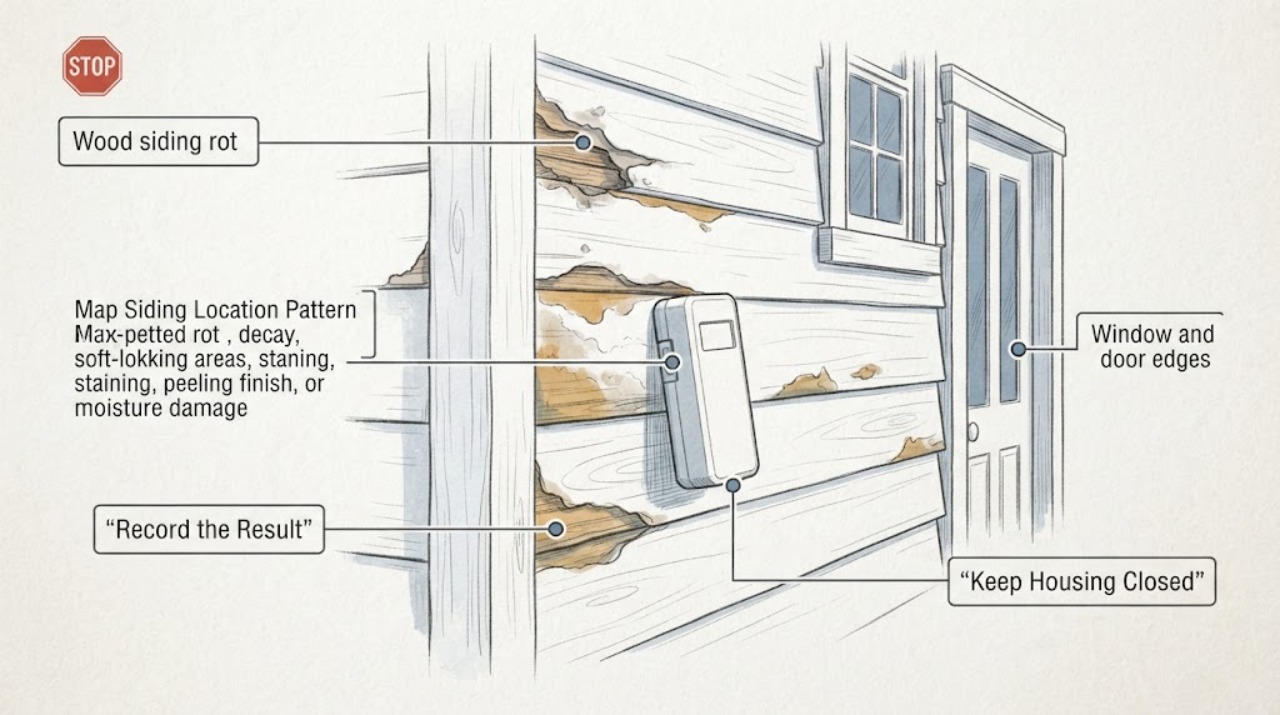
Work through in order
Diagnostic checks
Use only checks that match the exact appliance or system and its official guide.
-
Check 1
From the ground or a safe window, observe and record the wall elevation, approximate height, board course, and whether the suspected damage is isolated, repeated at joints, concentrated below an opening, or spread across a larger area.
Expected result: The change is localized, follows a joint or opening, repeats along a wall, or has no clear pattern; photograph it only from a stable safe position.
Next step: Give the location and pattern to a siding or building-envelope professional and avoid disturbing the boards while waiting for assessment.
Stop if: Stop if viewing requires a ladder, roof access, reaching over an edge, entering an unstable area, or standing below loose material.
Why this matters
Why: The pattern helps a professional prioritize a local detail or a broader moisture path, but it does not identify the cause or prove the extent of decay.
-
Check 2
From a safe distance, look for dark or uneven discoloration, peeling or blistered finish, exposed end grain, splitting, holes, or a surface that appears crumbly or deformed; do not touch, scrape, press, or probe the siding.
Expected result: The finish is intact, weathered or peeling, or the board visibly appears split, deformed, crumbly, or partly missing.
Next step: Photograph the appearance from a safe location and ask the professional to assess the board, adjacent trim, and concealed moisture path before any repair decision.
Stop if: Stop if material is falling, the surface moves, the wall bulges, or a closer look would require contact or a ladder.
Why this matters
Why: These are condition clues only. Weathering and paint failure can resemble decay, while visible deformation or missing material raises the need for professional evaluation.
-
Check 3
From the ground or a window, observe visible water-context clues such as a gutter or downspout that overflows or discharges near the wall, a roof-to-wall transition, a window or door edge, sprinklers, splashback, or a damp-looking area after rain; do not climb or alter any drainage component.
Expected result: A plausible moisture source or wetting pattern is visible, or no source can be seen from the safe viewpoint.
Next step: Record the weather and source context and request a professional envelope and drainage assessment rather than sealing over the visible board.
Stop if: Stop if investigating the source would require roof or ladder access, moving a gutter, opening a joint, touching wet material, or entering standing water.
Why this matters
Why: Rainwater, splash, drainage, and poorly managed joints can all contribute to moisture damage; a source that is not visible may be concealed or intermittent.
-
Check 4
From inside the building and without opening a wall, observe the corresponding interior area for a stain, peeling finish, damp-looking trim, musty odor, or change after rain; do not disturb suspected mold or remove wall coverings.
Expected result: There is no visible interior change, or a stain, damp appearance, odor, or recurring change is present near the exterior siding area.
Next step: Tell the professional the interior location and timing, and request evaluation of both the siding and the wall moisture path.
Stop if: Stop if the interior surface is wet, visibly moldy, crumbling, electrically affected, or unsafe to approach.
Why this matters
Why: Interior correlation raises concern that moisture may be reaching the wall assembly, but the absence of an interior sign does not rule out concealed damage.
-
Check 5
From a clear ground-level position, look for loose or displaced boards, a bulging wall line, widening gaps, sagging trim, falling fragments, or a change after wind or rain; do not brace, push, fasten, or handle the siding.
Expected result: The siding line appears stable, or movement, displacement, sagging, bulging, or falling material is visible.
Next step: Keep people away and request urgent building-envelope or structural assessment when movement or falling material is present; otherwise schedule a timely moisture and siding inspection.
Stop if: Stop and move away if boards shift, pieces fall, the wall appears to lean or bulge, or wind makes the observation unsafe.
Why this matters
Why: Visible movement or falling material is an urgent safety warning and cannot be ruled safe by a photograph; a stable appearance still does not establish hidden framing condition.
Use your observations
Decision map
Find the observation that best matches what you see, then follow the next safe action.
-
PATH 01Safety boundary
What you see
Discoloration or peeling is visible but the siding line appears stable and no interior moisture sign is present.
Do this next
Schedule a timely siding or building-envelope inspection and provide photographs, location, weather history, and visible drainage context.
Why this path and its safety boundary
Safety stop: Do not paint, caulk, press, probe, or cover the area before the moisture cause and condition are assessed.
-
PATH 02Safety boundary
What you see
The suspected rot is concentrated near a window, door, roof intersection, joint, gutter, or downspout.
Do this next
Request a professional inspection of the opening or drainage transition and the adjacent siding and wall layers.
Why this path and its safety boundary
Safety stop: Do not climb, remove trim, open the wall, redirect a gutter, or seal a joint as a diagnostic experiment.
-
PATH 03Safety boundary
What you see
An interior stain, damp-looking finish, recurring musty odor, or change after rain is present near the exterior area.
Do this next
Treat it as a potentially active moisture path and arrange prompt siding/building-envelope service; request professional evaluation for any concealed wall or mold concern.
Why this path and its safety boundary
Safety stop: Do not scrape, sample, open, or perform DIY mold remediation on the wall or siding.
-
PATH 04Safety boundary
What you see
Boards are loose, displaced, bulging, sagging, or shedding material.
Do this next
Keep people and pets away from the wall and request urgent professional or building-safety assessment.
Why this path and its safety boundary
Safety stop: Do not touch, brace, fasten, remove, or stand below the affected siding.
-
PATH 05Safety boundary
What you see
No clear moisture source or pattern is visible from a safe viewpoint.
Do this next
Preserve the dated observations and have a professional assess the concealed drainage, flashing, and wall condition; uncertainty is a reason to inspect, not to probe.
Why this path and its safety boundary
Safety stop: Stop all observation if a safe ground or window view is unavailable.
Helpful context
Understand the symptom
Why the visible board may not be the whole problem
Wood can decay when moisture repeatedly enters or remains in the siding or the wall assembly. Rain can reach joints, window and door transitions, roof intersections, and drainage details. A discolored board may be surface weathering, while a soft-looking or distorted area may indicate deeper damage; only a qualified inspection can separate those possibilities.
Keep the first inspection observational
Use a ground-level view or a window view from inside the home. Do not climb a ladder or roof, press or probe the wood, remove paint or boards, cut into the wall, scrape suspected mold, or handle loose pieces. The goal is to capture location, pattern, timing, and safe moisture clues for the professional.
What to tell the siding professional
Share the wall elevation, height and approximate area, when the change was first noticed, recent rain or irrigation, nearby gutter or downspout behavior, window or roof intersections, interior signs, and any movement or falling material. State clearly which observations were made from a safe distance and which areas could not be viewed.
Only after diagnosis
Potential parts
- exterior-wood-filler
Consider only if a professional confirms that the affected wood is limited, stable, and suitable for a repair rather than board replacement or concealed-wall work.
Confirm the product's exterior use, substrate, paintability, and professional fit for the siding species and condition; do not use filler to hide active moisture or unstable wood. - exterior-caulk
Consider only after the moisture source and joint condition are assessed and a professional confirms that sealing is appropriate for that location.
Confirm compatibility with the existing finish, siding, flashing, and joint movement; sealing over wet or decayed material can conceal the problem. - moisture-meter
Consider only for professional or post-stabilization documentation; a reading should not be obtained by probing a damaged board or opening the wall.
Confirm the device's material modes and limitations, and treat readings as supporting evidence rather than proof of rot extent or structural safety.
When checks do not resolve it
Need a professional?
Arrange a siding or building-envelope professional when wood siding appears to be decaying, repeatedly wets, or shows interior correlation. Use urgent service when boards move, fall, bulge, or the wall is taking on water.
Safety scope: Stay at ground level or use a safe window view. Do not climb, probe, press, cut, remove siding, open the wall, disturb suspected mold, alter drainage, or make a structural judgment from appearance alone.
Common questions
FAQ
Can I poke the siding to see whether it is rotten?
No. This workflow is observation-only. Do not press, probe, cut, or remove siding; record what is visible from the ground or a safe window and have a professional assess it.
Does peeling paint prove wood siding rot?
No. Peeling or discoloration can have several causes. It is a useful condition clue, but it does not establish decay or the extent of hidden damage.
Should I caulk over a suspected rotten board?
Not before the moisture source and substrate are assessed. Sealing wet or decayed wood can conceal the problem; ask a siding professional whether repair or replacement is appropriate.
When is wood-siding rot urgent?
Request urgent help when boards move, fall, bulge, or the wall is taking on water. Keep people away and do not touch or brace the affected siding.
Read the exact guide
Official sources
- Water Managed Walls: WRBU.S. Department of Energy Building Science Education · Supports explaining that cladding joints can admit water and that a drainage plane and properly integrated flashing help manage it.
- Addressing Indoor Environmental Concerns During RemodelingU.S. Environmental Protection Agency · Supports treating excess moisture and water entering cavities as potential causes of rot and using proper flashing and drainage strategies.
- A Brief Guide to Mold, Moisture and Your HomeU.S. Environmental Protection Agency · Supports acting promptly on moisture, avoiding disturbance of hidden mold, and routing concealed moisture damage to experienced professionals.
Community feedback
Share a repair observation
Share a plain-text repair observation. Accepted observations are published automatically; this page may take a moment to update.