
On this page
Start here
Quick answer
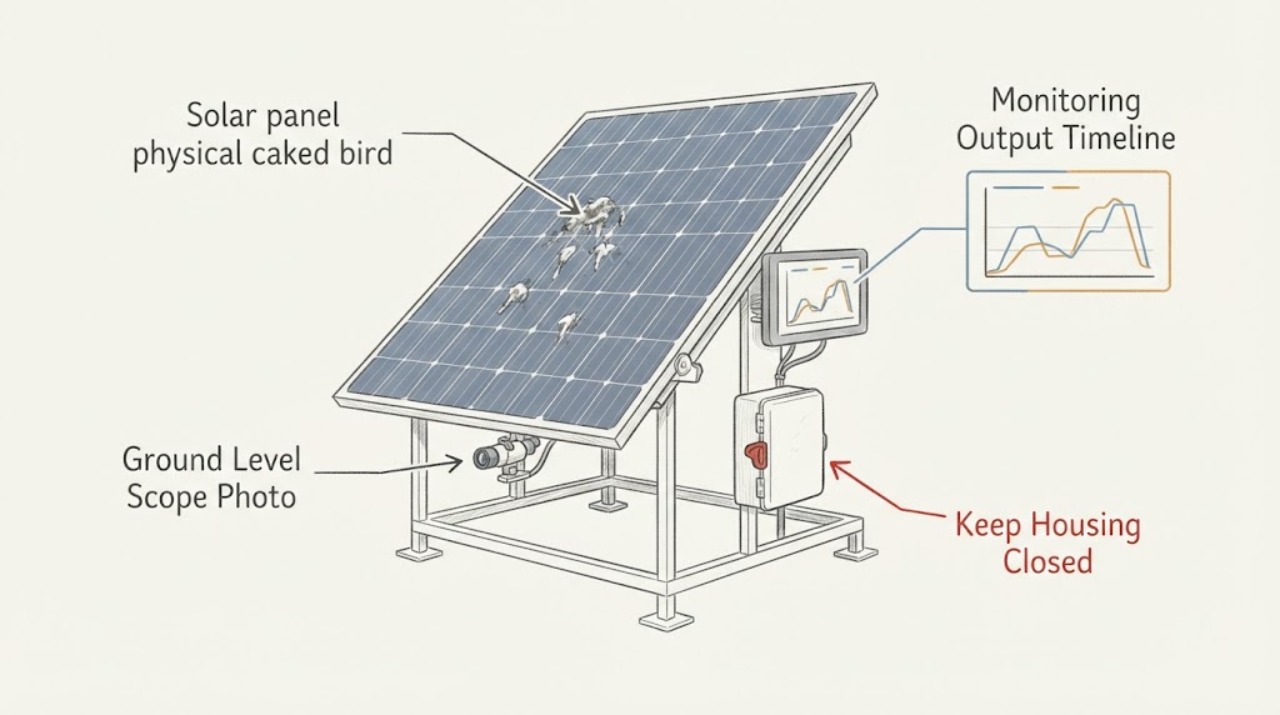
Treat caked bird droppings as a maintenance and safety decision, not a reason to climb onto a roof. From the ground or an existing safe viewing point, document where the debris is visible, whether it appears on one module or a larger area, and whether the monitoring trend changed at the same time. Check the inverter or monitoring app only through its normal user interface, without electrical testing or repeated resets. Do not touch panels, scrape or chemically clean them, handle birds or nests, or open modules. Send the photos, location, output timeline, and roof or ground-mount access details to the solar installer or a qualified cleaning/O&M professional; ask them to handle all access and electrical isolation.
Work through in order
Diagnostic checks
Use only checks that match the exact appliance or system and its official guide.
-
Check 1
From ground level or an existing safe window or balcony, take a zoomed photo of the array without climbing, using a ladder, reaching toward the panels, or touching any module or bird debris.
Expected result: Record whether the caked material appears on one module, a row, a broad section, or only around the array; note visible cracks, shifted equipment, loose items, or nest-like material without approaching it.
Next step: Save the original photo with its date and safe vantage point, and send it to the installer or qualified solar O&M provider for an access and condition assessment.
Stop if: Stop observing and keep people away if a module, rack, conduit, or other array component appears loose, cracked, hanging, sparking, or damaged. Request professional service and do not approach birds or nests.
Why this matters
Why: A localized mark and a broad area create different service scopes, but appearance alone cannot establish how much energy production changed. Visible module or mounting damage increases urgency beyond routine cleaning.
-
Check 2
Open the solar monitoring app or read the inverter display only through its normal owner interface and record the existing production or availability trend; do not open equipment, perform electrical tests, or repeatedly reset it.
Expected result: Note whether the system reports normal operation, an alert or offline state, a gradual change, or a change that begins around the date the debris was noticed.
Next step: Export or screenshot the normal user-facing status and give it to the installer or O&M provider with the photo timeline. Leave any fault state for qualified diagnosis.
Stop if: Stop if the interface shows a fault, smoke, heat, damaged equipment, or other hazard; keep clear of the equipment and arrange qualified solar/electrical service.
Why this matters
Why: A concurrent visual and monitoring change is useful for triage but does not prove causation; weather, shading, communication, equipment, and soiling can overlap. An offline or fault indication needs system service rather than cleaning advice.
-
Check 3
Compare the visible debris pattern with the array layout and the surrounding site from a safe distance, noting whether nearby trees, perches, roof edges, or ground-mounted access areas appear to be involved without approaching wildlife.
Expected result: Record whether the same area is repeatedly affected, whether debris is on the panel face or only below the array, and whether there are visible nest, bird, or other animal signs.
Next step: Share the site context and safe photos with the service provider and ask them to coordinate any wildlife-sensitive work under applicable local requirements.
Stop if: Stop and keep distance if a bird, nest, carcass, or droppings area could expose anyone to wildlife or biological hazards. Do not touch, move, clean, or collect it.
Why this matters
Why: A recurring or concentrated pattern helps a professional plan an inspection and discuss non-contact mitigation. Animal signs make wildlife and public-health precautions relevant; they are not a cue to handle or relocate anything.
-
Check 4
Write down when the debris was first noticed and compare that timeline with recent rain, wind, bird activity, shading, and the monitoring trend, using existing records rather than returning to the array during unsafe weather.
Expected result: Record whether the material is recent or hardened, whether rain changed its appearance, and whether the production or availability pattern changed before, after, or independently of the observation.
Next step: Send the dated timeline and normal-interface records to the installer or O&M provider and ask for a professional inspection and cleaning recommendation appropriate to the array and access conditions.
Stop if: Stop all outdoor observation during lightning, high wind, wet roof conditions, or other hazardous weather; resume only from a safe location or leave the assessment to a professional.
Why this matters
Why: Timing helps a professional decide whether the issue is a routine soiling scope, a recurring bird-access problem, or a separate performance fault. It does not support a reliable percentage-loss claim from photos alone.
-
Check 5
From the ground, record whether the array is rooftop, carport, or ground-mounted and whether any safe route is already available to a service crew; do not plan a DIY climb or reach over an edge.
Expected result: Note access constraints, overhead hazards, visible obstructions, and whether the array is near people, vehicles, drains, or electrical equipment.
Next step: Give the access description and photos to the installer or cleaning/O&M provider and request a written scope that covers access, wildlife precautions, panel-safe methods, and post-service monitoring.
Stop if: Stop if assessment would require a roof, ladder, panel contact, electrical isolation, or entry into an area with wildlife or damaged equipment.
Why this matters
Why: Access and surrounding hazards determine the professional method and urgency. A difficult or elevated array should be handled by a qualified service provider with the right access and electrical-safety plan.
Use your observations
Decision map
Find the observation that best matches what you see, then follow the next safe action.
-
PATH 01Next step
What you see
The debris is localized, the system reports normal operation, and there is no visible damage or wildlife hazard from the safe vantage point.
Do this next
Send dated photos and the monitoring timeline to a qualified solar cleaning or O&M provider for routine-scope advice; do not clean or touch the array yourself.
-
PATH 02Next step
What you see
A large area appears caked, the pattern keeps returning, or the production trend changed near the observation date.
Do this next
Request a professional inspection that considers soiling, shading, equipment status, safe access, and non-contact bird mitigation. Do not claim a specific output loss from visual evidence alone.
-
PATH 03Next step
What you see
The app or inverter interface shows an alert, offline state, repeated fault, or another performance issue independent of the photos.
Do this next
Escalate to the installer or qualified solar/electrical service for diagnosis. Do not open the inverter, test DC wiring, or repeatedly reset the system.
-
PATH 04Next step
What you see
There is a nest, live bird, carcass, substantial droppings exposure, or any loose, cracked, wet, or damaged array component.
Do this next
Keep people and pets away and arrange qualified solar service; ask the provider to coordinate wildlife-safe handling where applicable. Do not touch, move, clean, or approach the material.
-
PATH 05Next step
What you see
The array is rooftop or otherwise inaccessible without a ladder, roof access, panel contact, or electrical work.
Do this next
Stop the inspection at the safe vantage point and hire a qualified solar O&M or cleaning provider with an access and electrical-safety plan.
Helpful context
Understand the symptom
What you can learn safely
A photo and a monitoring timeline can establish scope without proving that droppings caused a particular output change. Bird debris is one form of PV soiling, but weather, shading, system availability, and other operating conditions can also change production. Use the observations to prioritize a professional inspection rather than estimating a loss from appearance alone.
Keep the array untouched
Rooftop modules and their wiring remain electrical equipment even when the system appears idle. Do not climb, use a ladder to reach the array, step on or touch a module, scrape deposits, spray chemicals or water, move a nest, or perform DC or inverter tests. A qualified service provider can select a safe access and cleaning method for the model, roof, warranty, and local conditions.
What to give the service provider
Record the array location, the date and time of each photo, the visible scope, any bird activity or nesting signs seen from a safe distance, the monitoring or inverter status shown normally, and whether the production pattern changed before or after the debris appeared. Do not enter a restricted area to collect evidence.
Only after diagnosis
Potential parts
- solar-panel-cleaning-brush
Consider this only if a qualified provider specifies a panel-safe brush as part of an approved cleaning scope; visible bird debris alone does not justify DIY roof work.
Confirm the module manufacturer's care requirements, access method, material compatibility, warranty terms, and local safety constraints before any use. - solar-panel-wash-tool
Consider this only after a qualified installer or O&M provider defines a safe, panel-compatible cleaning method and confirms that cleaning is warranted by site and monitoring evidence.
Do not select a pressure, chemical, or reach tool from appearance alone; the service provider must confirm module, roof, electrical, and warranty compatibility.
When checks do not resolve it
Need a professional?
Have this ready
- Provide dated safe-vantage photos, array type and location, debris scope, bird or nest observations made from a distance, monitoring or inverter status, production timeline, recent weather, access constraints, and any visible damage.
Common questions
FAQ
Can bird droppings lower solar production?
Soiling can block light and may affect production, but a photo alone cannot establish a percentage loss or prove that debris is the only cause. Compare the dated visual observation with the normal monitoring trend and have a qualified provider assess it.
Should I climb up and scrub the panels?
No. Rooftop access, panel contact, scraping, chemical cleaning, and electrical isolation are outside this safe check. Send photos and the monitoring timeline to a qualified solar cleaning or O&M provider.
What if there is a bird nest near the panels?
Keep people and pets away and do not touch, move, clean, or seal the area. Tell the solar service provider so wildlife-sensitive handling and any local requirements can be considered.
How do I know whether the debris caused an output change?
You generally cannot determine that from appearance alone. Record when the debris was seen, the monitoring status and trend, weather or shading context, and the affected scope; a professional can separate soiling from other performance causes.
Read the exact guide
Official sources
- EERE Success Story – The Plug-and-Play Device That Streamlines Solar CleaningU.S. Department of Energy · DOE describes soiling as including bird droppings, notes that soiling can affect energy output, and discusses using monitoring data to inform cleaning schedules.
- Life Cycle of Photovoltaic Systems: Operate and Maintain an Existing Photovoltaic SystemU.S. Department of Energy · DOE recommends regular site monitoring, tracking performance over time, and professional inspection and testing after damage or faults; this article limits the owner to normal-interface and ground-level observations.
- Solar Operations and Maintenance Resources for Plant OperatorsU.S. Department of Energy · DOE explains that PV arrays need operations and maintenance and that regular O&M helps address soiling and other performance and lifecycle risks.
Community feedback
Share a repair observation
Share a plain-text repair observation. Accepted observations are published automatically; this page may take a moment to update.