
On this page
Start here
Quick answer
Water in a water-heater drain pan can come from condensation, a connection, drain valve, relief-valve discharge, condensate path, or a leaking tank, so do not assume the pan itself is the source. From a dry, stable position, document the water level, visible origin, timing, floor and wall damage, and whether water is near electricity. If the heater is actively leaking, hot, gas-fired, flood-damaged, or near wet electrical equipment, stop using it and obtain urgent qualified service. Do not operate a gas valve, perform live electrical testing, drain or open the tank, or touch wet components.
Before you begin
Safety first
- Do not operate gas valves, perform live electrical testing, open covers, drain or disassemble the tank, move the heater, touch wet components, or run the unit to reproduce the leak.
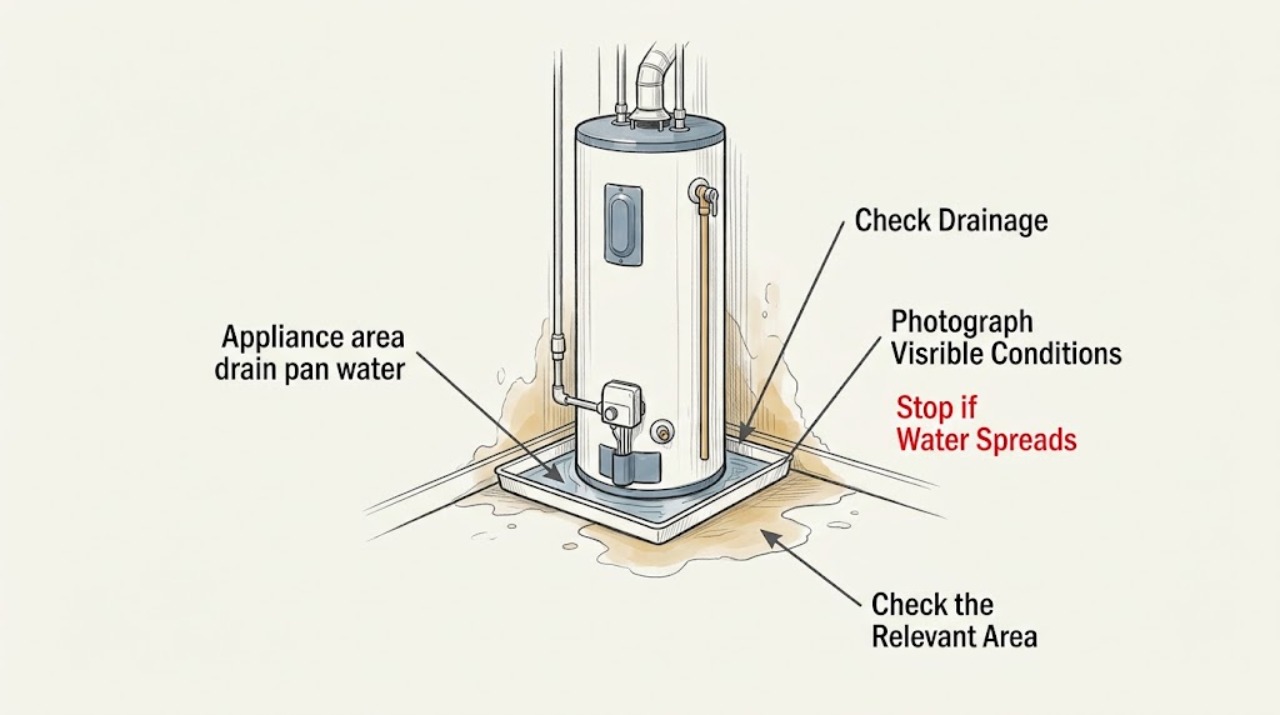
Work through in order
Diagnostic checks
Use only checks that match the exact appliance or system and its official guide.
-
Check 1
From a dry, stable position, look at the appliance area and pan without touching the heater, pan, pipes, valves, wiring, or water; photograph the scene and note whether the water is a film, puddle, rising level, or overflow.
Expected result: Record whether the floor is wet beyond the pan, whether water is hot or producing steam, and whether it is near an outlet, cord, control, furnace, or other electrical equipment.
Next step: Keep the area clear and call qualified emergency, water-damage, plumbing, or heating help as appropriate; do not reach into the pan or operate equipment from a wet position.
Stop if: Stop immediately for gas odor, smoke, fire, steam, hot or forceful water, standing water near electrical equipment, a flooded floor, or an unsafe access route.
Why this matters
Why: Overflow, hot discharge, steam, or water near electricity raises the urgency beyond a routine pan inspection and can make even ordinary cleanup unsafe.
-
Check 2
Without moving anything, visually trace the highest visible wet point upward from the pan and photograph any damp pipe connection, drain valve area, relief-valve discharge path, condensate outlet, tank seam, or exterior corrosion.
Expected result: Note whether the water appears to start above the pan, at its outlet, at the heater base, or from an unseen area; record whether the wet point is recurring or only visible after hot-water use.
Next step: Provide the photos and timing to a qualified water-heater professional and leave the unit out of service until its source and safety have been assessed.
Stop if: Do not touch, wipe, tighten, test, open, or remove any valve, connection, cover, drain, tank component, or gas control.
Why this matters
Why: A pan may be collecting water that traveled from a connection or discharge, while water emerging at the tank base can indicate a more serious internal problem; visual tracing cannot confirm the diagnosis.
-
Check 3
Observe the visible pan outlet and drain route from the floor without opening, flushing, probing, or disconnecting it.
Expected result: Record whether the outlet is visibly connected, whether water is backing up or spilling from the pan, and whether the route ends at a floor drain or another visible discharge point.
Next step: Photograph the pan outlet and request urgent service to assess the drain path and the heater; keep people away from any overflow.
Stop if: Stop if the drain is submerged, the area is contaminated, access would require moving the heater, or checking the route would require opening a wall or floor.
Why this matters
Why: A backed-up or absent visible drain path can turn a contained leak into floor damage, but a hidden or blocked route requires professional verification rather than improvised clearing.
-
Check 4
From a dry location, inspect surrounding floors, baseboards, walls, stored materials, and the ceiling below if safely visible for staining, swelling, soft-looking finishes, odor, or spreading moisture; do not probe or remove finishes.
Expected result: Record the affected area, whether the damage is new or recurring, and whether it extends beyond the appliance area or into another room or lower level.
Next step: Keep people out of visibly damaged or contaminated areas and provide dated photographs to a qualified water-damage professional; avoid cosmetic covering that hides the pattern.
Stop if: Stop for sagging ceilings, soft flooring, mold-like growth, sewage-like water, structural movement, or any contact between water and electrical systems.
Why this matters
Why: Spread, swelling, or persistent odor indicates that mitigation may be needed in addition to heater repair and that hidden building materials may need professional assessment.
-
Check 5
Record the water-heater brand, model, fuel type, and any visible status or leak alarm from the exterior label or display without opening the cabinet or operating controls.
Expected result: Note whether the leak appears continuous, follows a hot-water draw, follows a heating cycle, or is accompanied by an alarm, error indication, unusual sound, or loss of hot water.
Next step: Send the identification, timing, photos, water level, and damage extent with the service request; do not resume use to reproduce the leak.
Stop if: Stop if reading the label requires touching a hot or wet surface, entering a flooded area, removing a cover, or approaching gas or electrical hazards.
Why this matters
Why: The model and timing help a professional distinguish condensation, a connection or discharge issue, a condensate path, and possible tank damage without requiring a homeowner to test energized or pressurized components.
Use your observations
Decision map
Find the observation that best matches what you see, then follow the next safe action.
-
PATH 01Safety boundary
What you see
The pan contains a small amount of water, the surrounding area is dry, and no gas, steam, hot discharge, or electrical hazard is present.
Do this next
Leave the heater unused, document the pan and visible source, and arrange prompt qualified water-heater service rather than assuming condensation or waiting for another cycle.
Why this path and its safety boundary
Safety stop: Do not restart the heater to reproduce the water or touch the pan and connections.
-
PATH 02Safety boundary
What you see
Water is overflowing, reaching floors or walls, or the pan outlet is backing up or not visibly draining.
Do this next
Keep the area isolated and arrange urgent plumbing/water-damage service; protect belongings only from a dry, safe location.
Why this path and its safety boundary
Safety stop: Do not use electrical cleanup equipment or move the heater in standing water.
-
PATH 03Safety boundary
What you see
Water appears at the tank base, the tank is corroded or swollen, hot water is forceful, or the unit is flood-damaged.
Do this next
Treat the condition as urgent and have a qualified professional assess replacement or safe isolation; do not attempt tank disassembly or a valve repair.
Why this path and its safety boundary
Safety stop: Leave for gas odor, smoke, fire, steam, rapid discharge, or any electrical hazard and contact appropriate emergency support.
-
PATH 04Safety boundary
What you see
The source is unclear or appears to be a condensate, relief, drain, gas-side, or electrical component.
Do this next
Preserve the photos and timing and let a qualified professional identify the source; the pan location alone is not a diagnosis.
Why this path and its safety boundary
Safety stop: Do not operate gas valves, perform live electrical testing, open covers, drain the tank, or remove any tank component.
Helpful context
Understand the symptom
What a full drain pan can mean
A drain pan is intended to catch water from some leaks or condensate and route it to an appropriate drain, but water in the pan does not identify the failed part. Manufacturer guidance lists condensation, connections, drain valves, relief-valve discharge, element gaskets on some electric models, and tank leakage among possible causes. The safe homeowner task is to preserve the pattern and limit exposure while a qualified water-heater or water-damage professional identifies the source.
Protect the area before investigating
Keep children and pets away, avoid standing in water, and do not use a wet vacuum, mop, or electrical device in a wet area unless the hazard has been made safe by a qualified person. Do not move the heater or pan, touch the gas control, open electrical covers, remove insulation, or drain the tank during this observation-only pass.
Only after diagnosis
Potential parts
- water leak alarm
Consider this category only after the area is made safe and a qualified person confirms that a compatible alarm can be placed without interfering with the pan, drain, fuel, electrical, or service clearances.
Confirm sensor environment, power method, alarm behavior, and compatibility with the installed pan and heater; an alarm does not repair or contain a leak. - wet-dry vacuum
This category is relevant only for a qualified cleanup plan after electrical and contamination hazards are controlled; it is not a safe first response in standing water near powered equipment.
Confirm the equipment is rated for the environment and that a professional has made the power and water conditions safe; never use it to test or disturb the water-heater system. - moisture meter
Consider this category only for professional documentation of accessible flooring or wall materials after the leak is controlled; it cannot identify the heater leak source or hidden damage by itself.
Confirm the meter's material range and safe operating environment; do not probe, drill, or test near energized components or contaminated water.
When checks do not resolve it
Need a professional?
Treat water in or around a water-heater drain pan as urgent when it recurs, rises, overflows, reaches building materials, or is near electricity. Contact a qualified water-heater professional and add water-damage mitigation when floors, walls, or lower levels are affected.
Safety scope: Do not operate gas valves, perform live electrical testing, open covers, drain or disassemble the tank, move the heater, touch wet components, or run the unit to reproduce the leak.
Have this ready
- Provide the heater model and fuel type from the exterior, pan water level, highest visible wet point, leak timing, outlet/drain observations, photos, and the extent of floor or wall damage.
Common questions
FAQ
Does water in the drain pan prove the tank is leaking?
No. Water can come from condensation, a connection, a drain or relief path, a condensate route, or the tank. Photograph the highest visible wet point and have a qualified professional identify the source.
Can I keep using a water heater with water in its pan?
Do not keep operating a unit that is leaking or has recurring water in the pan until it has been assessed. Hot water, gas, electrical, pressure, and building-damage risks may be involved.
Should I empty the drain pan or tank myself?
Not during this observation-only assessment. Do not enter standing water, use powered cleanup equipment near wet electrical systems, move the heater, open covers, or drain a pressurized/hot system. Arrange qualified help.
When is this water-damage issue urgent?
Treat overflow, rapid flow, hot discharge, steam, gas odor, smoke, water near electricity, a tank-base leak, flood damage, or spreading floor and wall moisture as urgent stop conditions. Leave unsafe areas and contact appropriate professionals.
Read the exact guide
Official sources
- Technical Bulletins - Bulletin #51 Puddle On The FloorA. O. Smith · Manufacturer technical context for possible leak origins; no model-specific diagnosis is assumed
- Why Is My Water Heater Leaking?A. O. Smith · General manufacturer homeowner guidance; this article intentionally omits its repair and live-isolation procedures
- Heat Pump Water Heater Installation Best PracticesENERGY STAR · Heat-pump water-heater best-practice context; general drain-pan safety principles are not a model-specific repair instruction
Community feedback
Share a repair observation
Share a plain-text repair observation. Accepted observations are published automatically; this page may take a moment to update.