
On this page
Start here
Quick answer
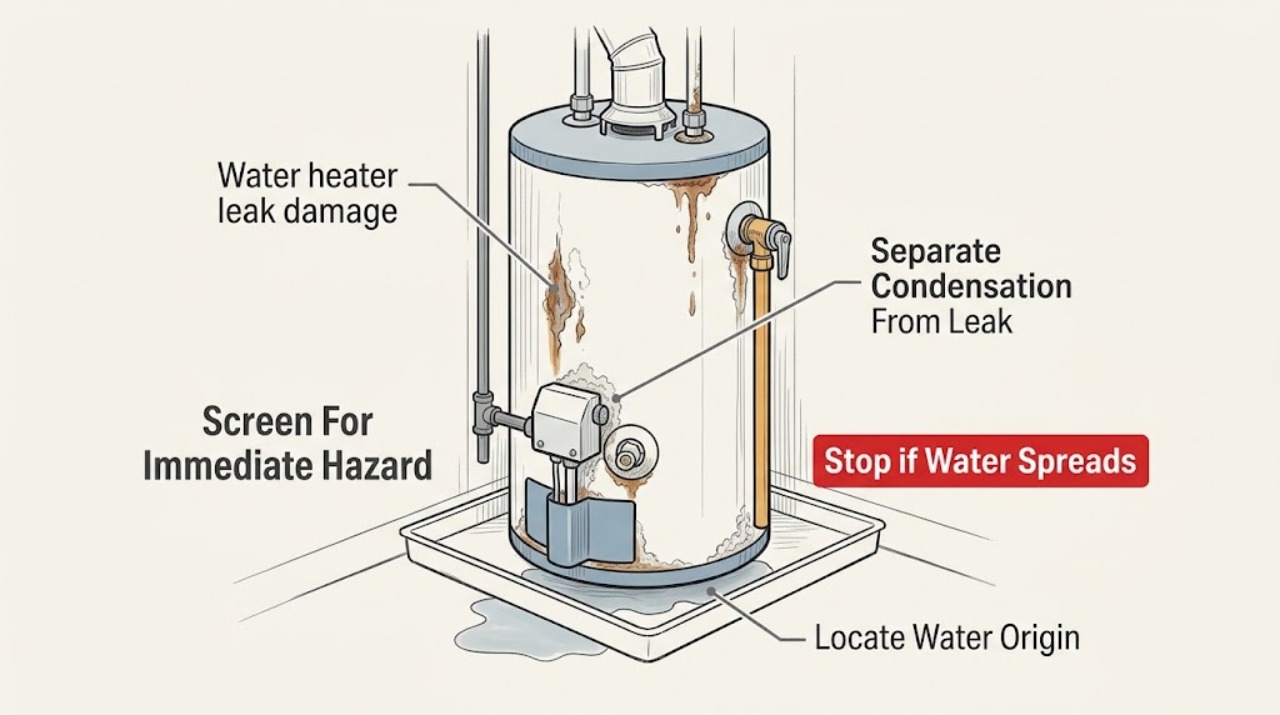
Treat moisture around a water heater as an active leak investigation, not merely a stain. From a safe, dry position, note whether water is coming from a supply connection, drain pan, relief-valve discharge, drain valve, or the tank/base, and look for corrosion or rust trails. If water reaches electrical parts, the burner area, the floor structure, or a gas smell is present, keep clear and seek urgent qualified help. A confirmed tank leak is generally a replacement decision; do not open panels, test a hot relief valve, or attempt to repair corroded pressure or gas connections.
Work through in order
Diagnostic checks
Use only checks that match the exact appliance or system and its official guide.
-
Check 1
From the doorway or another dry position, check whether water is actively spreading, whether it has reached an electrical connection or burner area, and whether there is a gas odor, hissing, smoke, steam, or a bulging or unstable appliance.
Expected result: The leak is active or expanding, water is near electricity or combustion components, hot vapor is present, or a gas odor or unusual sound is detected.
Next step: Keep clear and call the appropriate emergency, gas, electrical, or plumbing professional. If the water shutoff is clearly accessible from a dry location and you know it, isolate the water without approaching the hazard; otherwise wait for service.
Stop if: Do not touch the heater, flip a switch in the wet area, relight a pilot, or investigate a gas odor from inside the appliance area.
Why this matters
Why: These patterns exceed a routine visual check. Water near electrical or combustion components can create shock, fire, or equipment hazards; gas odor requires leaving the area rather than testing the heater.
-
Check 2
With the heater stationary and the floor dry enough to stand safely, trace the highest visible wet mark without touching hot surfaces: look at the cold-water inlet, hot-water outlet, nearby piping, drain pan, drain valve, relief-valve discharge pipe, and the tank's outer shell.
Expected result: Moisture starts at a threaded connection or pipe, appears only in the pan, exits the relief discharge, comes from the drain valve, or reappears at the tank wall or base.
Next step: Photograph the source and keep the heater out of normal use until the leak is identified. Do not tighten or remove a fitting to see whether the leak stops.
Stop if: Stop if the water is hot, the floor is slippery, the source is hidden behind a panel, or reaching it requires leaning over the heater or entering standing water.
Why this matters
Why: A connection or valve can be a localized service repair, while water returning through the tank shell or base is more consistent with tank failure. A pan without a visible upper source still needs professional tracing.
-
Check 3
Record when moisture appears in relation to a long hot-water draw, a burner or heating cycle, weather, and the heater's recovery; compare whether the area dries when the appliance is not heating, without changing a gas control or deliberately creating another heating cycle.
Expected result: Moisture appears briefly after heavy use and then stops, remains after the heater is idle, runs from a fitting, or accumulates again in the pan or at the base.
Next step: Use the exact owner manual or have a technician confirm condensation versus leakage. Treat recurring water as a leak even if the first puddle follows a heating cycle.
Stop if: Do not turn a gas control to a test position, remove covers, drain the tank, or operate a suspected leaking heater to reproduce the symptom.
Why this matters
Why: Condensation can mimic a leak during certain heating conditions, but persistent water after the unit is idle, a wet fitting, or water from the tank/base makes a leak or failed component more likely.
-
Check 4
From the floor, inspect the tank shell, base, fittings, relief-valve area, drain valve, nearby pipe insulation, and the floor or wall for rust trails, flaking metal, staining, swelling, or corrosion concentrated at one connection; do not scrape or sand the surfaces.
Expected result: Corrosion is limited to an external fitting, appears around the relief or drain hardware, forms a seam or base stain on the tank, or is accompanied by rust-colored hot water, rotten-egg odor, hissing, or sizzling.
Next step: Send photos and the model/serial label to a qualified water-heater technician. Do not select a valve, anode, tank, or fitting solely from a visual match.
Stop if: Do not remove the anode, open the relief valve, loosen a corroded fitting, or work on gas or electrical covers.
Why this matters
Why: External fitting corrosion can mark a serviceable connection problem, but corrosion at the tank shell, seam, or base raises concern for internal tank failure. Rust-colored water and unusual sounds add evidence of tank or anode-related deterioration, while hissing or sizzling near a gas heater needs prompt safety inspection.
-
Check 5
If the water is known to be clean and no electrical or gas hazard is present, stop the spread from a safe location, move loose belongings away, blot or extract accessible water, and photograph the heater, pan, floor, wall, and damaged materials before cleanup changes the evidence.
Expected result: The water is contained, materials remain damp, drywall or wood is swelling, mold odor or growth is present, or the source may be sewage, chemicals, or another contaminated liquid.
Next step: Arrange water-heater service and, when materials are wet or damaged, a qualified water-damage professional. Preserve receipts, photos, and the timeline for the property owner or insurer.
Stop if: Do not use fans before confirming the water is clean, do not enter a wet electrical area, and do not remove wall or floor materials around the heater unless directed by a qualified professional.
Why this matters
Why: Prompt drying can limit secondary damage from clean water, but porous materials and concealed cavities may need restoration assessment. Unknown or contaminated water needs containment and trained remediation rather than household fans or casual cleanup.
Use your observations
Decision map
Find the observation that best matches what you see, then follow the next safe action.
-
PATH 01Next step
What you see
Water is active or hot, reaches electrical or burner components, the appliance is unstable, or there is gas odor, smoke, steam, hissing, or sizzling.
Do this next
Leave the hazard area, keep others away, and contact the appropriate emergency, gas, electrical, plumbing, or appliance professional.
Why this path and its safety boundary
Why it matters: This is an immediate safety and property-loss risk, not a routine corrosion inspection.
-
PATH 02Next step
What you see
The highest wet point is a visible inlet/outlet connection, drain valve, or relief-valve discharge, while the tank shell and base remain dry.
Do this next
Keep the heater out of service as appropriate and arrange a plumber or water-heater technician; do not tighten or replace the part while hot, pressurized, or incompletely isolated.
Why this path and its safety boundary
Why it matters: A fitting or valve problem is more likely than a leaking tank, but pressure and temperature conditions still require qualified diagnosis.
-
PATH 03Next step
What you see
Water returns at the tank shell, seam, or base, or corrosion is widespread with rust-colored hot water or repeated pan accumulation.
Do this next
Arrange prompt replacement assessment and water-damage mitigation, and keep the area clear until the source is isolated safely.
Why this path and its safety boundary
Why it matters: Internal tank deterioration or a structural leak is more likely; a tank leak is generally a replacement decision rather than a patch repair.
-
PATH 04Next step
What you see
Moisture appears only around a heating event and stops afterward, or no source can be reached safely.
Do this next
Use the exact model manual or schedule a technician; do not reproduce the event by operating a suspect heater.
Why this path and its safety boundary
Why it matters: Condensation is possible, but an intermittent fitting or concealed leak cannot be ruled out from timing alone.
-
PATH 05Next step
What you see
The leak is contained but flooring, drywall, wood, insulation, or stored contents remain damp, swollen, or moldy.
Do this next
Use clean-water drying guidance only when the source is sanitary and no electrical hazard exists; otherwise use a qualified restoration professional.
Why this path and its safety boundary
Why it matters: Stopping the heater leak does not remove the secondary moisture and indoor-environment risk.
Helpful context
Understand the symptom
Why the leak location matters
Water in a drain pan or on the floor can come from condensation, a pipe or fitting, a drain valve, a temperature-and-pressure relief discharge, or the tank itself. Corrosion on an exterior fitting indicates ongoing moisture at that connection; rust-colored hot water can also indicate internal corrosion or a depleted protective anode. The visible puddle alone does not identify the source.
Make the area safe before observing
Keep people away, avoid touching the heater, and do not step into standing water near electrical equipment. Do not operate a gas control, electrical disconnect, relief-valve lever, drain valve, or hidden shutoff unless the exact appliance instructions and conditions make that action safe. Leave immediately and contact the gas utility or emergency service for a gas odor.
Leak response and appliance repair are separate
If the water source is safely isolated, protect nearby contents and document the damage. Drying a floor or cabinet does not make a corroded tank, relief valve, gas connection, or electrical compartment safe; the heater still needs qualified diagnosis.
Safety boundary
Stop conditions
- Do not touch electrical parts or operate switches in standing water, and do not enter the area for a gas odor, smoke, steam, or combustion warning.
- Do not remove covers, drain a hot tank, lift a relief-valve lever, loosen corroded pressure or gas fittings, or relight a pilot to test a leak.
- Do not assume a dry period proves the leak is gone; a tank leak, relief-valve issue, or condensation pattern still needs model-specific confirmation.
Only after diagnosis
Potential parts
- Connection type, temperature/pressure rating, fuel system, and model installation requirements must be matched by the installer.
- Use the exact rated replacement and discharge arrangement; never cap, plug, or substitute the safety valve.
- Capacity, fuel or electrical service, venting, connections, location, code requirements, and installation must be verified by a qualified professional.
- Material, length, clearance, and model compatibility must be confirmed before ordering or removing anything.
When checks do not resolve it
Need a professional?
Call promptly for any recurring leak or corrosion and immediately for gas odor, active spreading water, water near electricity, hissing/sizzling, or a tank-base leak.
Have this ready
- Water-heater brand, model, serial label, and fuel type if visible from a safe position
- Where the first wet mark appears and whether water is hot
- Photos of the pan, fittings, relief discharge, tank/base, corrosion, and surrounding materials
- Timing relative to hot-water use or heating cycles
- Whether water was isolated and which materials or areas were affected
Common questions
FAQ
Can condensation look like a water-heater leak?
Yes. Condensation can appear around some heating cycles, but persistent water after the unit is idle, water from a fitting, or water returning at the tank base should be treated as a leak until a professional or exact model guidance confirms otherwise.
Does corrosion on the outside mean the tank must be replaced?
Not always. Corrosion limited to a replaceable fitting may have a different repair path, while corrosion or moisture at the tank shell, seam, or base raises concern for internal tank failure. A technician must locate the highest wet point and assess the tank.
Should I open the relief valve or drain the heater to find the leak?
No. Relief and drain components can discharge hot, pressurized water, and operating or draining a suspect unit can add scald, gas, electrical, or flood risk. Photograph what is visible and call a qualified technician.
What should I do with wet flooring or drywall?
If the water is confirmed clean and no electrical hazard exists, protect contents and begin safe drying while arranging repair. Wet porous materials, visible mold, concealed cavities, or unknown or contaminated water warrant a qualified water-damage professional.
Read the exact guide
Official sources
- Mold Remediation in Schools and Commercial Buildings: Table 1 Water Damage—Cleanup and Mold PreventionU.S. Environmental Protection Agency · EPA guidance for building materials and clean-water damage; professional assessment is needed for contaminated water or concealed damage.
- Water Heater Maintenance GuideA. O. Smith · General A. O. Smith gas and electric maintenance guidance; model instructions govern.
- Water Heater Repair: Things to ConsiderA. O. Smith · General A. O. Smith homeowner guidance; exact heater model manual governs.
- Technical Bulletin #51: Puddle On The FloorA. O. Smith · A. O. Smith bulletin; diagnostic principles are general but model details vary.
- Technical Bulletin #15: CondensationA. O. Smith · A. O. Smith bulletin; use the installed unit's manual and qualified service for confirmation.
- Water Heater Maintenance ChecklistA. O. Smith · General A. O. Smith residential guidance; local conditions and model manual govern.
Community feedback
Share a repair observation
Share a plain-text repair observation. Accepted observations are published automatically; this page may take a moment to update.