
On this page
Start here
Quick answer
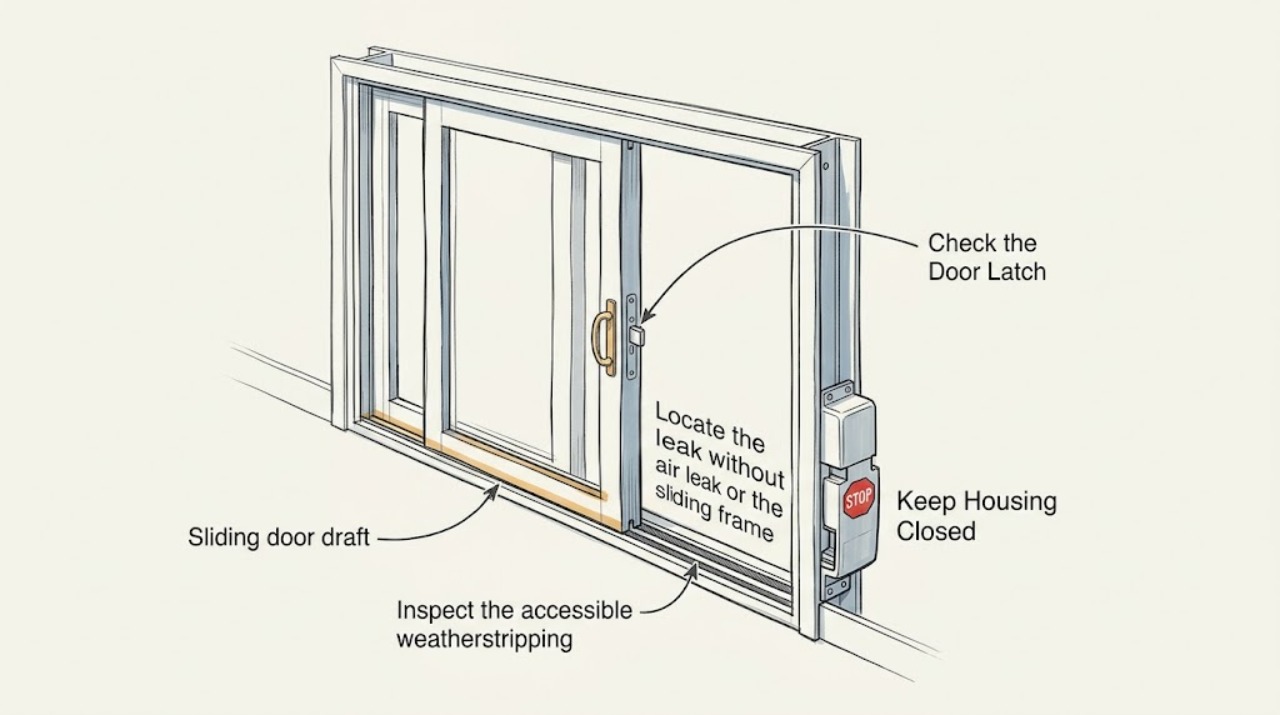
Start by locating the draft, then check whether the sliding panel closes and locks evenly and whether the weatherstripping is torn, flattened, missing, or no longer contacting the frame. Clean only the accessible track and frame surfaces and avoid forcing a stiff door. A damaged seal may be a straightforward weatherstrip or sweep replacement, but a door that will not align, latch, or slide smoothly can also have a roller, track, frame, or installation problem. If the draft remains after the low-risk checks, have a qualified window-and-door professional inspect the unit; do not remove the glass or disassemble the panel to chase an air leak.
Work through in order
Diagnostic checks
Use only checks that match the exact appliance or system and its official guide.
-
Locate the air leak without using a flame
With the door closed and latched, slowly feel for moving air with the back of your hand or use a narrow strip of tissue around the meeting stile, side jambs, bottom edge, fixed-panel joint, and frame perimeter. Do not use a candle, lighter, or other flame.
Expected result: The tissue or airflow changes at one area, several areas, or nowhere obvious.
Next step: Mark or photograph the suspect area and use that location for the seal and operation checks. If the source is unclear, a professional air-leak or home-performance assessment may be more useful than guessing at parts.
Why this matters
Why: A repeatable location narrows the check to a seal, sweep, meeting stile, or perimeter joint. No obvious location does not prove the door is airtight; pressure and temperature differences can make a small leak hard to feel.
-
Check closing, latching, and panel alignment
Move the sliding panel slowly through its full normal travel, close it without force, and engage the latch. Look for a visible gap, a panel that sits higher or lower at one end, scraping, or a latch that does not meet its keeper.
Expected result: The panel glides and latches evenly, or it binds, scrapes, sits out of plane, or will not latch without lifting or pushing hard.
Next step: If the panel binds or will not latch, stop forcing it and request a door inspection. Only use an adjustment that the exact manufacturer's instructions expose to the user; do not remove the panel or glass.
Why this matters
Why: Smooth operation with a localized gap points more toward weatherstripping or a frame seal. Binding or a failed latch can indicate roller, track, frame, or installation alignment that a thicker seal will not fix.
-
Inspect the accessible weatherstripping and sweep
With the door open only as far as it moves normally, inspect the visible pile, fin, bulb, or compression seals along the moving panel, meeting stile, fixed-panel edge, and bottom sweep. Look for a torn, flattened, detached, missing, or visibly discontinuous section, and compare it with the matching section on the other side when one is present.
Expected result: The seal is damaged or missing at the draft location, or it looks continuous but the draft remains.
Next step: Record the door brand, series, handing, and seal location before ordering anything. Do not assume a generic strip will fit or allow the door to latch.
Why this matters
Why: A seal defect at the same location as the air movement supports replacing that seal with the correct profile. A continuous-looking seal with a draft can indicate compression, alignment, frame, or installation leakage rather than a simple strip replacement.
-
Clean the accessible track and frame contact areas
Vacuum loose dirt from the accessible sill track and wipe the frame contact surfaces with a suitable non-abrasive cleaner. Check that the door can close without debris holding the panel away from its seal; do not remove the glass, drill the frame, or block drainage openings.
Expected result: The panel closes more evenly and the draft is reduced, or operation and the draft are unchanged.
Next step: Recheck the exact leak location with the door latched. If the door still binds, will not seal, or has a damaged frame or glass, arrange professional service rather than adding layers of tape or forcing the hardware.
Why this matters
Why: Improvement after cleaning suggests debris was preventing normal contact. No improvement means the leak is more likely related to a worn seal, alignment, frame joint, or installation condition.
Use your observations
Decision map
Find the observation that best matches what you see, then follow the next safe action.
-
PATH 01Next step
What you see
The draft is at a torn or missing seal and the door still operates and latches normally
Do this next
Identify the exact door and seal profile, then consider a correctly matched weatherstrip or sweep; verify that the replacement does not impede operation.
-
PATH 02Next step
What you see
The door binds, scrapes, sits out of alignment, or will not latch
Do this next
Stop forcing the panel and arrange a professional roller, track, frame, or installation assessment before replacing seals.
-
PATH 03Next step
What you see
The draft is at the stationary frame perimeter or fixed-panel joint
Do this next
Request an inspection of the frame-to-wall and fixed-panel seals; do not cover a drainage path or disassemble the panel.
-
PATH 04Next step
What you see
No visible seal defect explains the draft
Do this next
Ask for a professional air-leak assessment or installation inspection rather than buying multiple generic sealing products.
Helpful context
Understand the symptom
What causes a sliding-door draft
Air can enter at the moving panel's weatherstrip, the meeting stile, the fixed-panel joint, the bottom sweep or sill, or the perimeter where the frame meets the wall. A sliding door must seal while still moving freely, so adding a thick seal or forcing the panel can create a second problem. The location of the air movement and the way the door operates are more useful than buying a generic seal first.
When to stop and call a professional
Stop the DIY checks if the glass is cracked, the frame is loose or distorted, the panel is difficult to lift or move, the door cannot latch, water enters around the frame, or a repair would require removing glass or the panel. A trained installer can identify whether the remedy is a model-specific weatherstrip, sweep, roller or alignment adjustment, perimeter air sealing, or a larger installation repair.
Only after diagnosis
Potential parts
- patio-door-weatherstrip
Consider only when the damaged seal is identified and the door still aligns and latches normally.
Match the exact door series, seal location, profile, length, and handing; a generic strip may prevent closure or leave gaps. - door-sweep
Consider only when the draft is specifically at the bottom edge and the sweep is visibly worn or missing.
Verify the sill and sweep design before purchase; do not cover drainage openings or create drag that prevents latching. - rope-caulk
A temporary, removable measure may help at a stationary frame gap while awaiting an assessment; it is not a substitute for correcting a moving-panel seal or installation defect.
Use only where the product is appropriate for the stationary joint and never across a moving track, latch, or drainage path.
When checks do not resolve it
Need a professional?
Call a qualified window-and-door professional when the draft persists after accessible cleaning, the panel will not slide or latch smoothly, the frame or glass is damaged, water enters around the opening, or the leak location is not clear. Request professional help before removing glass or the sliding panel.
Have this ready
- Door brand, series or model information, and approximate installation age if known
- The exact leak location and whether it changes with wind or door position
- Whether the panel binds, scrapes, sits out of alignment, or fails to latch
- Photos of the seal profile, track, frame joints, and any visible damage
Common questions
FAQ
How do I find where my sliding door is drafty?
With the door closed and latched, check the meeting stile, jambs, bottom edge, fixed-panel joint, and frame perimeter with your hand or a narrow strip of tissue. Do not use a candle or lighter.
Should I replace the weatherstrip first?
Only after confirming that the seal is damaged and the panel still closes and latches correctly. A door that binds or sits out of alignment may need a roller, track, frame, or installation assessment instead.
Can I use any sliding-door weatherstrip?
No. Profiles and locations vary by door series. Record the brand, series, handing, seal location, and profile, then match the replacement carefully so it seals without preventing smooth operation or latching.
When should I call a professional?
Call when the draft persists, the panel binds or will not latch, the frame or glass is damaged, water enters, or the leak location is unclear. Do not remove the glass or sliding panel to investigate.
Read the exact guide
Official sources
- Residential Windows, Doors, & SkylightsENERGY STAR · Supports the distinction between air leakage, installation quality, manufacturer instructions, trained installers, and comparing written quotes for door work.
- Install Weatherstripping on an Exterior DoorU.S. Department of Energy, State and Community Energy Programs · Supports checking visible air leakage, correcting door fit before weatherstripping, and verifying that weatherstripping and a sweep do not impede door operation; exact sliding-door profiles remain model-specific.
- Glossary of Common TermsENERGY STAR · Supports using weatherstripping on moving doors and windows and referring unclear air leaks to a professional home-performance assessment.
Community feedback
Share a repair observation
Share a plain-text repair observation. Accepted observations are published automatically; this page may take a moment to update.