
On this page
Start here
Quick answer
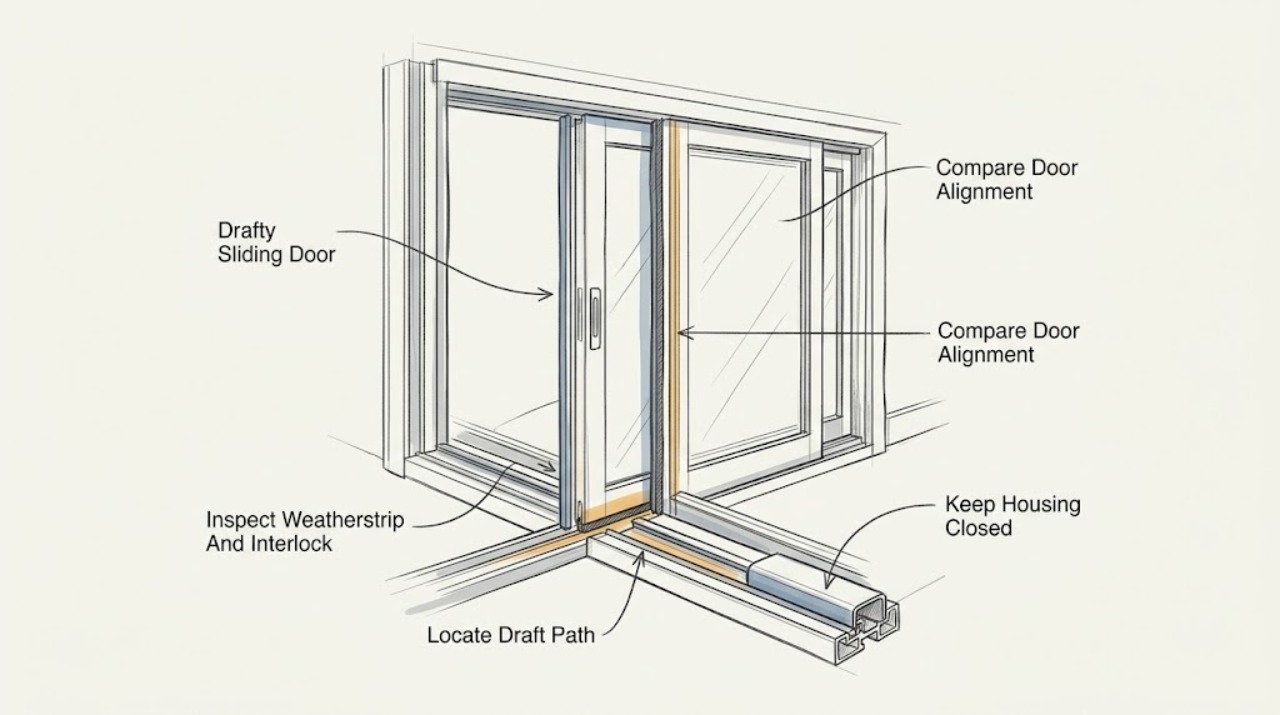
A drafty sliding door usually leaks at the moving-panel seal or interlock, a worn or displaced weatherstrip, a panel that is not sitting square on its rollers, or the fixed frame and trim rather than the glass itself. With the door fully closed and locked, locate the draft using a thin-paper or smoke observation, then check the track, panel reveal, latch pull-in, and visible seals. Adjust or replace only parts identified for the exact door model; if the panel will not close and lock, the frame is loose or distorted, there is water intrusion, or trim must be removed, stop and use a qualified door or building-envelope professional.
Before you begin
Safety first
- Do not remove glass or panels, force rollers, block sill drainage, disturb painted trim with possible lead, or cover the opening with a generic sealant or weatherstrip before the leak path is identified.
Work through in order
Diagnostic checks
Use only checks that match the exact appliance or system and its official guide.
-
Check 1
Close the sliding panel fully, engage the lock, and inspect one short section at a time around the meeting stile, side jambs, fixed-panel edge, and sill. Hold a narrow strip of paper at the closed seam; if needed, use a smoke source only with safe ventilation and away from flammable materials.
Expected result: The paper moves easily or smoke is deflected at the moving-panel seam, the bottom sill, the fixed-panel edge, or the surrounding trim; there is no repeatable draft at the tested locations.
Next step: Mark the strongest leak location and continue only with the corresponding inspection below. Do not use the test to justify removing trim or adding sealant blindly.
Stop if: Stop if the panel cannot close or lock, glass is damaged, smoke enters the room unexpectedly, or a test would require opening a hazardous or inaccessible area.
Why this matters
Why: The repeatable location tells you which assembly to inspect next. A seam or sill result favors the panel seal, interlock, roller height, or weatherstrip; a trim result favors the frame or rough-opening seal. No repeatable result may mean wind pressure or a leak outside the door system, so test in different conditions before modifying anything.
-
Check 2
With the panel closed, look for a uniform gap or reveal from top to bottom and check whether the panel rubs the sill, drags, or sits visibly lower at one corner. If the door manufacturer documents roller adjustment for that exact model, make only the documented small adjustment and recheck operation after each change.
Expected result: The panel is visibly out of square, rubs the frame or sill, rolls poorly, or has a uniform reveal and smooth movement.
Next step: Use the exact owner or manufacturer instructions for roller adjustment; after each permitted adjustment, close and lock the panel and repeat the draft test. If the panel remains uneven or the adjustment hardware is unknown, schedule door service.
Stop if: Stop if the panel must be lifted out, the roller screws are seized, the frame is distorted, or the door would become difficult to lock or operate.
Why this matters
Why: An uneven panel can reduce contact with the weatherstrip and keep the latch from pulling the panel tight. A uniform reveal and smooth movement make alignment a less likely primary cause, so focus on the seal or frame location instead.
-
Check 3
Inspect the visible weatherstrip, meeting-stile interlock, jamb contact, and fixed-panel edge for gaps, flattening, tears, displacement, or dirt. Confirm that the latch engages and pulls the operating panel into the jamb; do not remove the glass or pry on the interlock.
Expected result: The seal is torn, flattened, out of its channel, or not contacted when locked; the interlock or latch has a gap; or the visible seal is continuous and evenly compressed.
Next step: Clean only accessible dirt and use the exact model's documentation to identify the correct seal profile. Replace or reposition a seal only when its channel and model fit are confirmed; otherwise hand the observation to a door professional.
Stop if: Stop if a seal requires glass removal, the interlock is bent, the lock cannot secure the door, or the panel could fall or become unsecured.
Why this matters
Why: A damaged or displaced weatherstrip or a latch that does not pull the panel into contact can be the direct air path. A continuous seal with good contact shifts attention to the sill, frame, or pressure-driven leakage elsewhere.
-
Check 4
Inspect the sill and roller track for dirt, loose pieces, standing water, or an obstruction that keeps the panel from reaching its closed position. Clean accessible debris according to the door manual, then slide and lock the panel without forcing it; do not block weep or drainage paths.
Expected result: Debris or damage prevents smooth travel or full closure, water collects at the sill, or the track is clear and the panel closes smoothly.
Next step: Remove only loose, accessible debris and recheck the seal. If the sill is damaged, drainage is blocked, or water enters during rain, arrange qualified door or building-envelope service rather than caulking over the drainage route.
Stop if: Stop if the sill is cracked, the panel binds, drainage is inaccessible, or the door must be removed to reach the rollers or track.
Why this matters
Why: A blocked or damaged track can hold the panel away from the weatherstrip and create a bottom draft; sill water also warrants attention to drainage and exterior installation. A clear, smooth track makes the sill less likely to be the main air path.
-
Check 5
Repeat the paper or smoke observation at the closed door's interior trim and jamb-to-wall joints, not only at the sliding seam. Look for visible daylight, a trim gap, dust or odor entering around the frame, or a gap that remains even when the panel seal is intact.
Expected result: The draft is strongest around trim or the jamb, there is a visible gap behind or beside the frame, or the draft stays at the panel seam instead.
Next step: For a trim or rough-opening result, document the location and have a qualified professional assess the frame seal. Do not remove trim casually, especially in a pre-1978 home or where painted surfaces may be disturbed.
Stop if: Stop before trim removal when lead paint is possible, complex trim is present, the frame moves, or insulation or sealant is exposed.
Why this matters
Why: A trim or jamb result points to air sealing around the frame or rough opening; a seam result points back to panel alignment or weatherstrip contact. These require different repairs, so caulking the visible interior trim may not correct a concealed installation leak.
Use your observations
Decision map
Find the observation that best matches what you see, then follow the next safe action.
-
PATH 01Next step
What you see
The strongest repeatable draft is at the meeting stile, interlock, or operating-panel jamb.
Do this next
Check that the panel is square, the latch pulls it snugly into the weatherstrip, and the visible seal is seated and undamaged; use only the exact model's adjustment instructions.
-
PATH 02Next step
What you see
The draft is strongest at the bottom rail or the panel does not fully reach the sill closure.
Do this next
Inspect and safely clean the accessible track, check roller alignment and full closure, and preserve the sill's drainage paths.
-
PATH 03Next step
What you see
The draft is around the jamb or interior trim rather than at the moving panel.
Do this next
Treat it as a frame or rough-opening air-sealing problem and document the exact location; do not cover drainage or blindly inject sealant.
-
PATH 04Next step
What you see
The weatherstrip is torn, flattened, missing, or out of its channel, while the panel and lock otherwise operate normally.
Do this next
Record the exact door manufacturer and model and identify the seal profile from its documentation before considering a replacement.
-
PATH 05Next step
What you see
The door will not lock, the frame or glass is damaged, water enters, the panel is unsafe to move, or the draft remains after the visible checks.
Do this next
Stop DIY adjustment and preserve the door in a secure closed position if possible; record the leak location and conditions for a professional.
Helpful context
Understand the symptom
Treat the draft location as the diagnosis. First close and lock the sliding panel, then compare the meeting stile, side jambs, bottom sill, and fixed-panel edge. A leak that moves with the panel points toward the operating seal or alignment; a leak that stays at the wall or trim points toward the frame or rough-opening seal.
A sliding door is a system: the rollers let the panel move on the sill track, the interlocker and latch bring panels together, and weatherstripping limits air and water entry. Do not add a thick generic strip where it can prevent the panel from closing or locking, and do not seal over drainage paths in the sill.
Visible trim or a paper test can identify a likely leak without disassembly. Removing trim, disturbing old paint, or changing the rough-opening seal is a separate moderate-to-difficult project; use a professional when the opening, finish, or paint may be hazardous or the source cannot be isolated.
Safety boundary
Stop conditions
- The sliding panel cannot close and lock securely, or the lock does not pull the panel into contact.
- The glass, frame, sill, interlock, or track is cracked, bent, loose, or unsafe to operate.
- Water enters at the sill, drainage paths are blocked or inaccessible, or the frame moves in the opening.
- The next step requires removing the panel or glass, opening the frame, removing complex trim, or disturbing concealed insulation or sealant.
- The home may contain lead paint and the repair would disturb painted trim or other coated surfaces.
- A generic seal, caulk, or adjustment would prevent smooth operation, damage the frame, or conceal the actual leak path.
Only after diagnosis
Potential parts
- Sliding patio door weatherstrip or interlock seal
Consider only when the visible seal is torn, flattened, missing, or out of its channel after panel alignment and latch contact are checked.
Confirm the complete door manufacturer and model and the seal profile in the manufacturer's documentation; a generic strip may prevent closure or drainage. - Sliding patio door roller assembly
Consider only when the panel remains low, uneven, or difficult to move after accessible debris is cleared and the documented adjustment cannot restore a uniform reveal.
Roller access and fit are model-specific and may require panel removal; do not order from appearance alone. - Sliding patio door latch or receiver
Consider only when the panel is aligned but the lock fails to engage or pull the panel snugly into the weatherstrip.
Verify the exact lock configuration and manufacturer documentation; a latch substitution must not reduce secure closure.
When checks do not resolve it
Need a professional?
Call a qualified door or window professional when the panel remains out of square, the rollers or latch need disassembly, or a model-specific seal cannot be identified., Use a building-envelope or qualified weatherization professional when the draft is at the jamb, trim, rough opening, or exterior frame rather than the moving panel., Arrange prompt service for damaged glass or frame, a door that will not secure, persistent water entry, or a repair involving possible lead paint or concealed installation materials.
Safety scope: Do not remove glass or panels, force rollers, block sill drainage, disturb painted trim with possible lead, or cover the opening with a generic sealant or weatherstrip before the leak path is identified.
Common questions
FAQ
Where does a sliding door usually leak air?
Start at the meeting stile and operating-panel jamb, then check the bottom sill and the fixed-panel edge. If the draft is strongest around the interior trim or jamb-to-wall joint, it is more likely a frame or rough-opening air-sealing issue than a sliding-panel seal issue.
Can adjusting the rollers reduce a draft?
It can when the panel is visibly uneven or does not close into the weatherstrip, but only use the exact manufacturer's instructions. Make small documented changes, check the reveal and operation after each one, and stop if the panel will not lock or requires removal.
Should I add generic weatherstripping to a drafty sliding door?
Not before locating the leak and identifying the door's seal profile. A thicker or misplaced strip can keep a sliding panel from closing, interfere with the latch, or cover a drainage path. Use a model-confirmed seal or have a professional assess it.
What if the draft is around the sliding door trim?
Treat that as a possible frame or rough-opening leak. ENERGY STAR recommends locating leaks before sealing and notes that sealing behind trim is a moderate-to-difficult project; avoid removing painted trim when lead paint may be present and use a qualified professional when the source is concealed.
Read the exact guide
Official sources
- Sealing Behind Window & Door Trim ProjectENERGY STAR · ENERGY STAR window and door air-leak symptoms, paper or smoke leak location, trim sealing, and professional boundary
- The Parts of a Patio DoorPella · Pella sliding patio door rollers, frame, sill, panels, interlocker, and weatherstrip terminology
- Patio Door AdjustmentsAndersen Windows & Doors · Andersen gliding patio door panel, roller, reveal, latch receiver, and weatherstrip-contact adjustments
- Install Weatherstripping on an Exterior DoorU.S. Department of Energy / National Renewable Energy Laboratory · DOE weatherstripping and door-sweep installation outcome, air-infiltration reduction, fit, operation, and adjustment checks
Community feedback
Share a repair observation
Share a plain-text repair observation. Accepted observations are published automatically; this page may take a moment to update.