
On this page
Start here
Quick answer
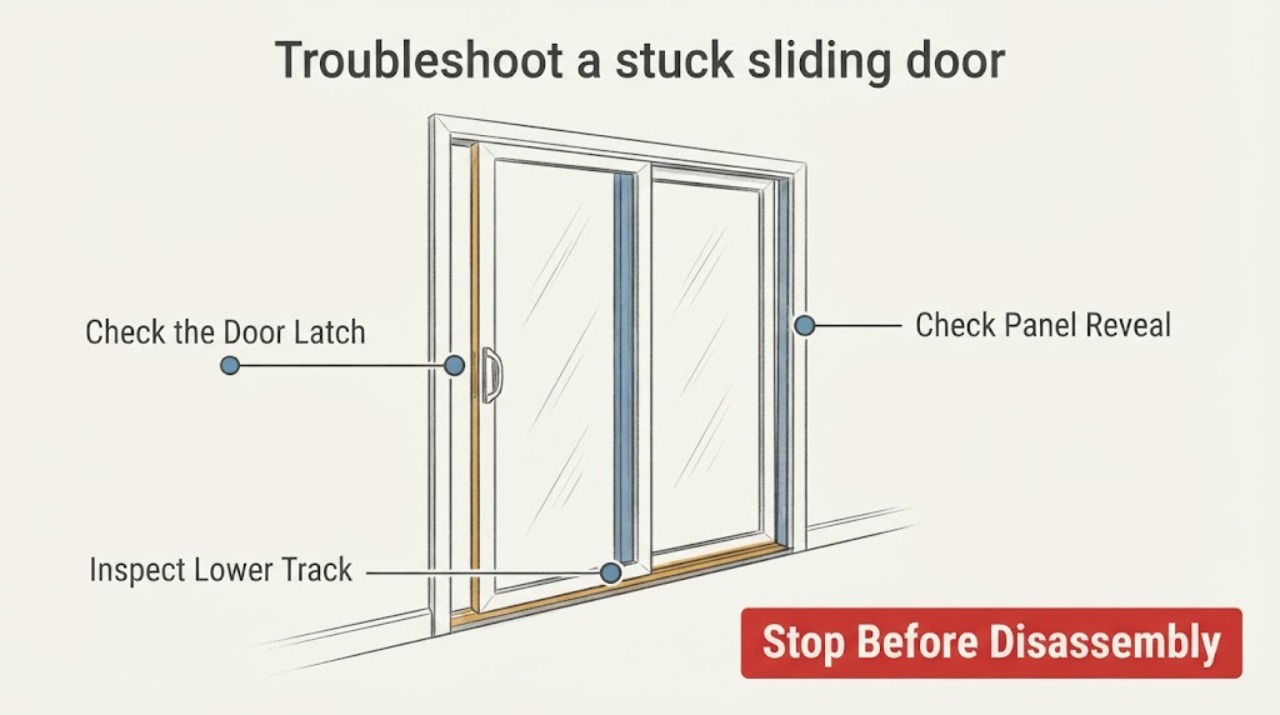
Start by confirming that the latch is released, then inspect the accessible lower track and the panel's alignment without forcing the glass. On a gliding patio door, an uneven top-to-bottom gap points to an operating-panel adjustment issue, while a damaged track, leaning panel, cracked glass, or persistent bind is a stop-and-call condition.
Work through in order
Diagnostic checks
Use only checks that match the exact appliance or system and its official guide.
-
Check 1
With the door closed and your hands clear of the glass edge, operate the handle or latch to the fully unlocked position and try a gentle push from the handle.
Expected result: The latch retracts and the panel moves, or the latch remains engaged and the panel does not move.
Next step: Use the door's model-specific instructions for a latch that will not release; do not force the handle or bypass the lock.
Stop if: Stop if the handle, lock body, or glass moves unexpectedly.
Why this matters
Why: If the latch does not retract, the immediate restriction is hardware or lock engagement rather than a dirty track. If the latch releases but the panel still binds, continue with the running-gear checks.
-
Check 2
With the panel stationary, inspect the accessible lower track and sill from both ends for loose grit, pet hair, paint, a loose fastener, or a visibly damaged rail.
Expected result: Loose debris is present, the rail looks straight and secure, or the rail is bent, loose, or damaged.
Next step: If the obstruction is loose and reachable, remove it with a soft brush or vacuum, wipe the accessible surface, and make one gentle retest. If the rail is damaged, stop and arrange professional repair.
Stop if: Do not bend the rail, pry under the panel, or loosen structural hardware just to make the door move.
Why this matters
Why: Loose debris can obstruct the roller path; a bent, loose, or damaged rail is a mechanical fault that cleaning will not correct.
-
Check 3
If the panel can open a small amount safely, compare the visible gap between the panel and frame at the top and bottom, and note whether the lower edge drags.
Expected result: The gap is fairly even and the panel does not drag, or the gap changes noticeably from top to bottom and the panel drags or rubs.
Next step: For an uneven reveal, identify the door brand and model and follow its roller-adjustment procedure; do not turn an unknown screw by trial and error.
Stop if: Stop if the panel leans, shifts in the opening, or requires force to hold it upright.
Why this matters
Why: An uneven reveal or dragging lower edge points toward roller height or panel alignment. A fairly even reveal makes a local obstruction or latch issue more likely, but does not prove the rollers are good.
-
Check 4
Look along the track and frame for bowing, a loose corner, a displaced weather seal, or a panel that sits visibly out of square; compare the reveal while the panel is at different positions if it moves without force.
Expected result: The reveal changes substantially along the travel or the frame and rail are visibly out of alignment, or the frame and rail look stable.
Next step: Have a qualified door technician assess a bent or out-of-square frame; do not compensate for structural movement by forcing the panel or drilling new adjustment points.
Stop if: Stop if the frame is loose, the wall opening appears damaged, or the panel cannot be supported safely.
Why this matters
Why: A changing reveal or visibly out-of-square frame can prevent the rollers from carrying the panel evenly. A stable frame shifts attention back to the latch, accessible track, or model-specific roller condition.
-
Check 5
After only an accessible obstruction has been cleared, test the panel from the handle with slow, even pressure and keep the travel path clear.
Expected result: The panel now travels smoothly and the latch can engage normally, or it still sticks, grinds, or will not secure.
Next step: If it still binds, leave the door in the safest position available and arrange service with the brand and model information ready.
Stop if: Stop at once for grinding, glass movement, a leaning panel, cracked glass, or inability to secure the opening.
Why this matters
Why: A smooth retest supports a simple obstruction; continued binding indicates unresolved roller, track, frame, or lock trouble and is not a reason to add force.
Use your observations
Decision map
Find the observation that best matches what you see, then follow the next safe action.
-
PATH 01Next step
What you see
The latch remains engaged or will not retract.
Do this next
Follow the correct lock-release instructions for the door model; if the latch or handle is broken, call a qualified door technician.
-
PATH 02Next step
What you see
Loose debris is visible in the accessible lower track and the rail is not damaged.
Do this next
Clear only the reachable debris with a soft brush or vacuum, wipe the surface, and make one gentle retest.
-
PATH 03Next step
What you see
The panel drags or the top-to-bottom reveal is uneven.
Do this next
Use the exact brand and model guide for roller adjustment, or have a technician adjust it; do not guess at adjustment screws.
-
PATH 04Next step
What you see
The rail or frame is bent, loose, or visibly out of square.
Do this next
Stop using force and arrange assessment by a qualified door technician.
-
PATH 05Next step
What you see
The panel is leaning, off its track, or the glass is cracked.
Do this next
Keep people clear, do not attempt to lift or realign the heavy panel alone, and call a qualified glazing or door professional.
-
PATH 06Next step
What you see
No visible cause is found or the door remains stuck after the accessible check.
Do this next
Stop repeated attempts and schedule service; provide the technician with the door brand, model, lock state, and where the panel binds.
Helpful context
Understand the symptom
What usually makes a sliding door stick
A sliding door can stop because the latch is still engaged, loose debris is obstructing the lower track, the panel is dragging, or the rollers and frame are out of alignment. Treat a generic sliding door as model-specific: the visible adjustment points and the safe way to access them differ by door. The first useful distinction is whether the panel is locked, binds at one location, drags along the sill, or moves only with excessive force.
Safety boundary
Keep fingers away from the glass edge and do not pry, jerk, or lift a heavy glass panel by yourself. Stop immediately if the panel is leaning, has cracked glass, appears off its track, or the frame or rail is bent. A door that cannot be secured, or that is a required exit, needs prompt attention from a qualified door or glazing technician.
When checks do not resolve it
Need a professional?
Stop and call a qualified door or glazing technician for a leaning or off-track panel, cracked glass, a bent or loose frame or rail, a latch that will not release, repeated grinding, or any door that still cannot move or secure safely after the accessible checks.
Common questions
FAQ
Why is my sliding door stuck even though the track looks clean?
A clean track does not rule out a latch that is still engaged, a roller-height problem, panel misalignment, or a frame that is out of square. Compare the panel reveal and note whether the lower edge drags before considering model-specific adjustment.
What does an uneven gap around a sliding patio door mean?
A noticeably uneven top-to-bottom gap is a reason to investigate operating-panel adjustment or alignment. Use the exact door instructions or a qualified technician rather than turning unknown screws by trial and error.
When should I stop trying to free a stuck sliding door?
Stop for cracked glass, a leaning or off-track panel, a bent or loose rail or frame, grinding, a latch that will not release, or any situation where the opening cannot be secured safely. Those conditions need a qualified door or glazing professional.
Read the exact guide
Official sources
- Checking Window or Patio Door Unit InstallationAndersen Windows and Doors · Manufacturer guidance on plumb, level, and square patio-door installation and alignment
- Gliding Patio Door Hardware Adjustment and Replacement GuideAndersen Windows and Doors · Manufacturer guidance on gliding-panel roller and hardware adjustment and replacement
- How to Adjust the Operating Panel's Rollers on an Andersen® Gliding Patio DoorAndersen Windows and Doors · Manufacturer guidance on checking a gliding patio-panel gap and roller adjustment
Community feedback
Share a repair observation
Share a plain-text repair observation. Accepted observations are published automatically; this page may take a moment to update.