
On this page
Start here
Quick answer
An old storm-window flashing does not need replacement solely because of its age. From inside and from safe ground, look for corrosion, open joints, staining, soft or swollen adjacent wood, condensation, and a window that no longer sits or operates securely. Do not remove the storm window, glass, trim, or flashing. Flashing is part of the opening's water-management system, and the right scope may be a compatible flashing repair, storm-window replacement, or a larger opening assessment. Record the opening dimensions, affected sides, photos, and moisture timing for a qualified window professional to prepare a replacement assessment.
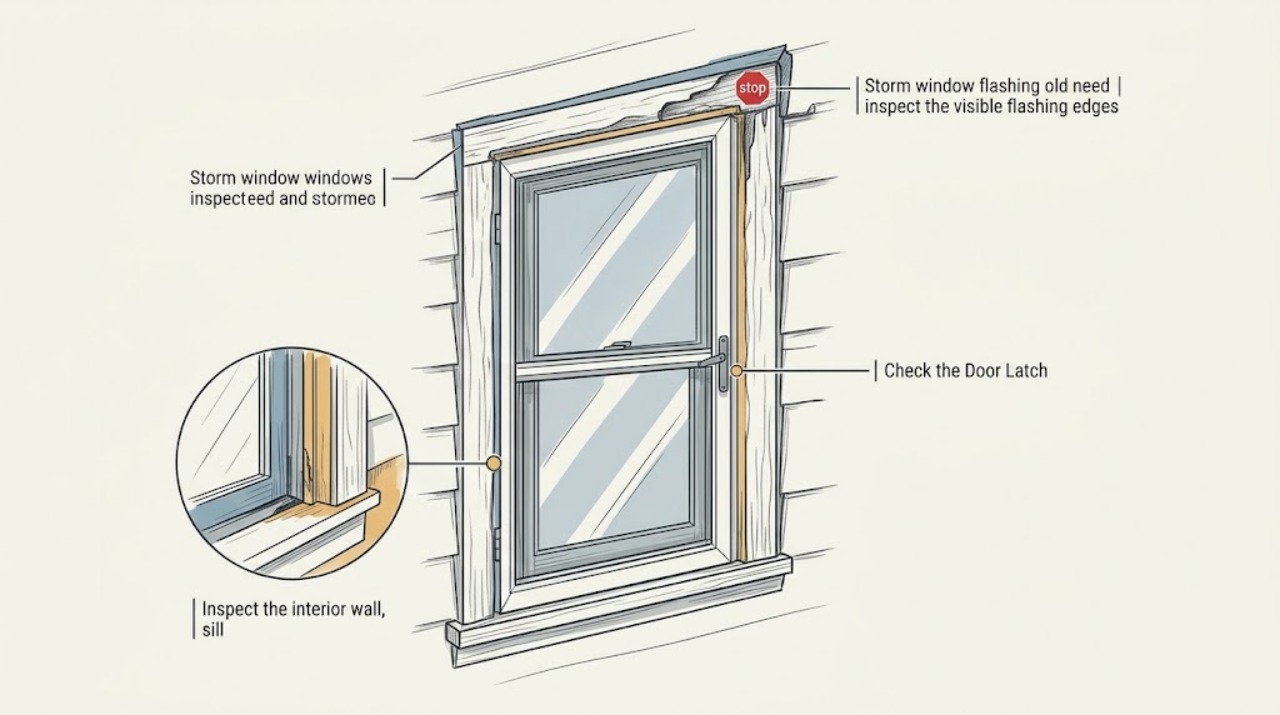
Work through in order
Diagnostic checks
Use only checks that match the exact appliance or system and its official guide.
-
Check 1
From inside the room and from a safe ground-level exterior view, inspect the visible flashing edges, sill area, and adjacent frame without opening the window assembly, removing trim, or using a ladder.
Expected result: Record visible corrosion, open seams, peeling finish, gaps, staining, bent metal, or no visible defect; note which side and approximate height show the condition.
Next step: Photograph the detail and mark its location on a simple sketch for a qualified window professional to evaluate before replacement scope is chosen.
Stop if: Stop if a piece is loose, sharp, falling, or would require elevated access, force, or contact with a damaged window.
Why this matters
Why: Corrosion or an open joint can reduce the opening's water management, while a clean visible edge does not rule out concealed flashing or wall damage.
-
Check 2
Inspect the interior wall, sill, trim, and nearby floor from a normal standing position, without probing, pressing soft finishes, or removing paint or frame trim.
Expected result: Record fresh or old staining, dampness, bubbling paint, soft-looking wood, swelling, musty odor, or no interior moisture sign and relate it to recent rain or window use.
Next step: Keep the area dry and clear, document the timing and extent, and request a window or building-envelope assessment rather than covering the sign with a sealant.
Stop if: Stop for active water entry, rapidly spreading staining, soft or collapsing material, suspected mold, or water near electrical equipment and request prompt professional help.
Why this matters
Why: Moisture or softened material suggests that the issue may extend behind the visible flashing; a dry interior does not prove that an exterior joint is sound.
-
Check 3
Use normal controls only to observe whether the storm window and primary window open, close, latch, and remain stable, without forcing the sash or loosening any fastener.
Expected result: Record smooth operation, binding, an incomplete latch, visible movement, a gap that changes during operation, or inability to operate the window; note whether an emergency escape path could be affected.
Next step: Keep the window in its safe normal position, record the result, and tell the professional whether the primary window and storm window are both functional.
Stop if: Stop operating the window if glass shifts, the frame separates, the sash falls, locking fails, or the window is part of an escape route that cannot be kept safe.
Why this matters
Why: Binding, instability, or failure to latch can make the assembly unsuitable for continued use or replacement as an attachment, while smooth operation does not clear the flashing.
-
Check 4
Observe the glazing and space around it from inside and ground level, without touching damaged glass or dismantling the storm-window layers.
Expected result: Record cracked or cloudy glazing, moisture or condensation between layers, blocked-looking drainage openings, or no visible glazing issue; note whether condensation appears at a repeatable time or weather condition.
Next step: Photograph the visible condition and tell the professional whether the problem is rain-related, temperature-related, or present continuously; do not clear openings or remove glass.
Stop if: Stop immediately for cracked, loose, or sharp glass, water entering near electrical equipment, or any need to handle the glazing.
Why this matters
Why: Interlayer moisture, damaged glazing, or blocked drainage may require a storm-window or frame assessment, but condensation alone does not identify a failed flashing joint.
-
Check 5
Prepare a replacement record using safe measurements from the interior side only if the opening can be measured without removing trim or leaning out: record approximate width and height, frame type, storm-window position, affected flashing sides, and visible surrounding damage.
Expected result: Separate approximate dimensions and visible facts from unknown rough-opening dimensions, concealed flashing layers, substrate condition, and code or egress requirements.
Next step: Send photos and the record to a qualified window professional and ask for an on-site assessment of fit, flashing, drainage, moisture, operation, and safety before ordering a replacement.
Stop if: Do not remove glass, storm panels, trim, flashing, screens, or exterior cladding to obtain a more exact measurement.
Why this matters
Why: A professional can use this record to decide whether the request concerns a storm-window attachment, flashing repair, primary-window replacement, or a larger wall-opening problem.
Use your observations
Decision map
Find the observation that best matches what you see, then follow the next safe action.
-
PATH 01Next step
What you see
The flashing looks aged but is closed, the window is stable and operable, and there are no moisture signs.
Do this next
Schedule a normal professional assessment and preserve the photos and approximate dimensions; age alone does not establish that replacement is required.
-
PATH 02Next step
What you see
Flashing is visibly corroded, open, bent, or separated, even though the interior is currently dry.
Do this next
Request a window or building-envelope assessment before applying sealant or choosing a replacement. The professional should check the flashing, drainage path, frame, and surrounding wall.
-
PATH 03Next step
What you see
There is interior staining, dampness, soft-looking wood, or condensation that repeats near the opening.
Do this next
Request prompt water-entry evaluation and provide the timing and photos. Do not remove the storm window or cover the sign before the source is assessed.
-
PATH 04Next step
What you see
The storm window or primary window binds, will not latch, shifts, or has damaged glazing.
Do this next
Stop using the affected operation if it is unsafe, protect the area from contact, and request qualified window service. Keep any required emergency-escape opening safe and unobstructed.
-
PATH 05Next step
What you see
The assembly is unstable, glass is loose or broken, material is falling, or water is near electrical equipment.
Do this next
Keep people away and seek prompt professional or emergency assistance as appropriate. Do not handle glass, flashing, or wet electrical equipment.
Helpful context
Understand the symptom
Age alone does not identify the scope
A storm window is an attachment to a primary window, and its condition, operation, drainage features, and relationship to the existing opening all matter. ENERGY STAR notes that storm windows work best over primary windows in good condition, while damaged or poorly operating primary windows may call for a different replacement decision. A professional should therefore separate an old but stable assembly from one with failed flashing, unsafe glazing, or water entry.
Why flashing and moisture signs belong together
Flashing is intended to direct water away from the wall opening, not simply hide a joint. The Building America Solution Center recommends evaluating hazards, water infiltration, and other building conditions before choosing between repair and full replacement. Observe the visible symptoms and leave the layers intact until the window professional can determine the source and safe scope.
When checks do not resolve it
Need a professional?
Request qualified window service for corroded, open, or separated flashing, recurring moisture, soft surrounding material, unstable operation, damaged glazing, or a storm-window assembly that no longer fits or drains safely. Treat active water entry, falling material, broken glass, or a compromised escape opening as urgent.
Have this ready
- Provide interior and ground-level photos, approximate opening dimensions, affected flashing sides, moisture and condensation timing, window and latch behavior, frame type, product records if available, prior repairs, and visible damage around the opening.
Common questions
FAQ
Does an old storm-window flashing always need replacement?
No. Age alone is not enough. Record corrosion, open joints, water signs, condensation, operation, stability, and the condition of the primary window so a professional can determine whether repair or replacement is appropriate.
Can I remove the storm window to inspect the flashing?
Do not remove the storm window, glass, trim, or flashing for this inspection. Use interior and safe ground-level views and have a qualified window professional handle any disassembly.
Is condensation proof that the flashing has failed?
No. Condensation can be related to temperature, humidity, glazing, drainage, or air leakage. Record where and when it appears and have the complete window and flashing assembly assessed.
What information should I collect for a replacement assessment?
Collect approximate interior dimensions, photos of each visible side, flashing corrosion or gaps, moisture timing, condensation, window operation and latch behavior, frame type, and any product or repair records. Do not open the wall or dismantle the window to collect it.
Read the exact guide
Official sources
- Storm WindowsENERGY STAR, U.S. Environmental Protection Agency · General residential storm-window guidance; actual window, climate, opening, and local requirements are site-specific.
- Windows and Doors are Fully FlashedBuilding America Solution Center, U.S. Department of Energy · General building-science guidance; it is not a removal or installation procedure for this storm-window assembly.
- Windows safetyBuilding and Construction Authority, Singapore · General window-safety guidance; local rules and the actual window assembly control the required service method.
Community feedback
Share a repair observation
Share a plain-text repair observation. Accepted observations are published automatically; this page may take a moment to update.