
On this page
Start here
Quick answer
When a window is leaking, first determine whether the water is rain entering from the outside, water trapped in the sill or track, condensation on the room side, or a failed seal around the sash, glass, or frame. Close and lock the window, inspect the weatherstrip or gasket for a crack, tear, gap, compression damage, or displacement, and check the exterior sealant for an obvious open joint without covering the manufacturer's drainage path. Clean only accessible weep holes and confirm that water in the track exits outside. A leak that returns after the seal is correctly closed, water that appears around the frame or wall, soft or stained materials, a failed glass seal, or a leak above a window needs a qualified window or building-envelope professional. Do not blindly caulk the bottom of a frame or its weep holes, remove glass, climb onto a roof, or open finished walls to chase water.
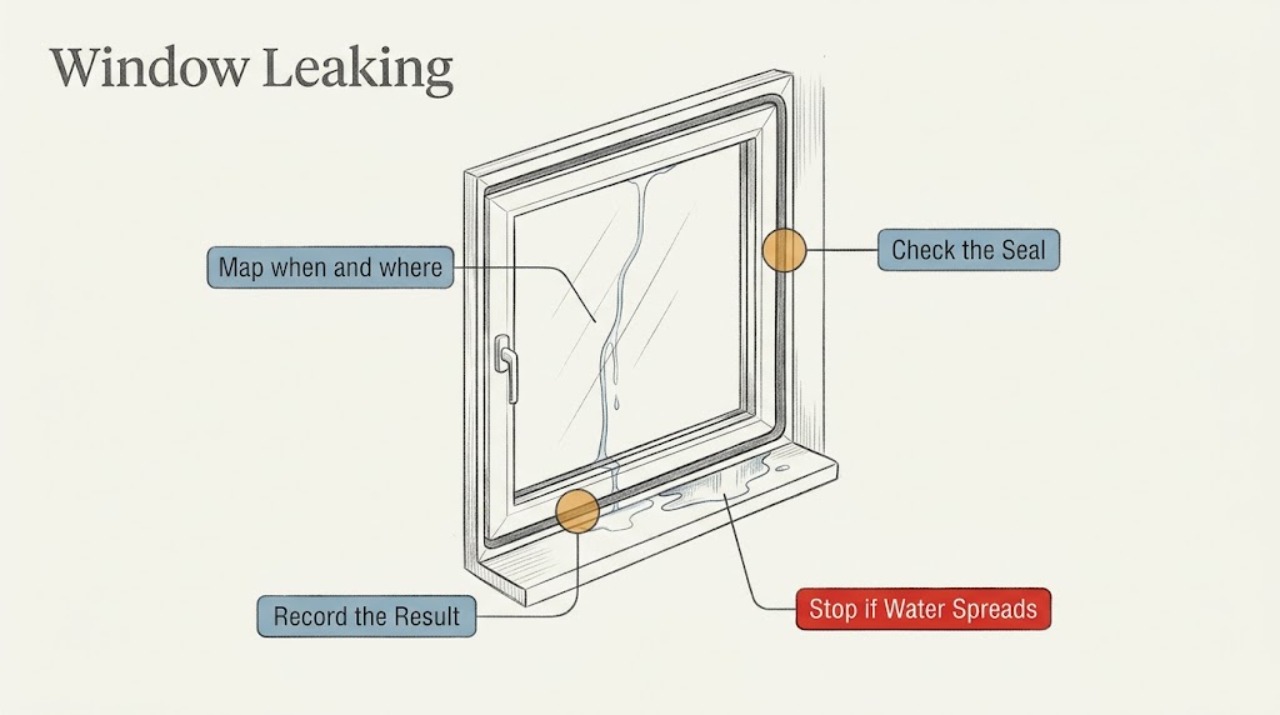
Work through in order
Diagnostic checks
Use only checks that match the exact appliance or system and its official guide.
-
Map when and where the water first appears
Dry the sill and nearby trim, then observe during the next safe rain event from indoors. Record whether water starts at the sash-to-frame seal, glass-to-sash edge, track, lower corners, head trim, side jamb, or wall above the window. If the glass is wet without rain, compare the room-side surface with the space between panes and note the indoor humidity or temperature conditions.
Expected result: Water begins at a visible seal gap; collects in the track but not on the wall; appears between glazing panes; appears above or beside the frame; or occurs only as room-side condensation.
Next step: Continue with the matching seal, weep, or opening check. If water reaches finished wall materials, stop repeated testing and arrange an envelope or window assessment before hidden damage spreads.
Stop if: Stop for water near electrical equipment, ceiling damage, sagging or bulging drywall, visible mold, unsafe exterior access, or a storm condition that makes observation hazardous.
Why this matters
Why: The first wet location changes the repair path. A sash or glazing seal points toward a gasket or glass-unit assessment; track water can be a normal drainage event or a blocked weep; water above or beside the frame suggests flashing, cladding, or installation; room-side moisture may be condensation rather than rain leakage.
-
Close and lock the window, then inspect the seal
Remove only a visible object from the sash or track and close the window normally. Check that the lock engages without force and inspect the weatherstrip or gasket around the sash and frame for cracks, tears, flattening, gaps, missing sections, or a section pulled out of its channel. Do not remove the seal or alter hardware as a generic test.
Expected result: The window will not close or lock evenly; the weatherstrip is cracked, torn, compressed, missing, or displaced; the seal contacts evenly; or the leak continues despite a secure closure.
Next step: Follow the exact product instructions for seating a displaced seal or adjusting a permitted user control. If the seal is damaged, order only after identifying the exact window system; if closure is distorted or the leak persists, arrange professional diagnosis.
Stop if: Stop if the sash binds, the glass or frame is cracked, the lock requires force, the seal cannot be reseated without dismantling, or the window is above a height that makes exterior access unsafe.
Why this matters
Why: A lock that does not draw the sash into its seal or a damaged weatherstrip can leave a direct water path. An intact, evenly compressed seal with a continuing leak shifts attention to drainage, glazing, flashing, or the wall opening rather than an immediate gasket replacement.
-
Inspect exterior sealant and the surrounding opening
From safe ground level, inspect the visible perimeter sealant, trim, flashing edges, siding, and head area for an open joint, cracked or deteriorated sealant, loose covering, or a path that lets water run behind the frame. Do not apply a new bead over a suspected drainage path, and do not seal the bottom of a frame or fill weep openings unless the exact product instructions expressly require it.
Expected result: The perimeter has a clear gap; sealant is cracked or detached; trim or cladding is loose; water starts above the window; or the exterior looks intact while the interior still gets wet.
Next step: Photograph the defect and follow the window manufacturer's repair guidance or call a qualified installer. Do not use caulk to hide a recurring leak or to block a drainage route; have the surrounding opening assessed when water travels behind trim.
Stop if: Stop for loose masonry or cladding, suspected structural movement, deteriorated framing, unsafe ladder or roof access, or any repair that requires removing trim or opening the wall.
Why this matters
Why: A gap can admit water, but the visible perimeter is not the whole waterproofing system. Andersen explains that flashing and drainage layers manage water around a window and that sealant alone can trap moisture. An intact exterior with a recurring interior leak may require access to the installation or wall assembly.
-
Check the sill and weep holes for drainage
Only when the window and surrounding area are dry and safe, locate the manufacturer's exterior weep openings at the lower frame and the corresponding track path. Remove loose visible debris with a soft brush or the product-approved tool; do not drill, enlarge, caulk, or push debris deeper. If the product guidance allows a small water check, add a modest amount to the track and watch from outside for drainage.
Expected result: Water exits through the exterior weep openings; water remains in the track; an opening is visibly blocked or caulked; there are no identifiable weeps; or water reaches the interior wall despite an open drainage path.
Next step: Clean only the accessible blockage and retest once. If drainage remains poor, the weeps are sealed, the frame must be dismantled, or water still reaches the wall, stop and arrange product or building-envelope service.
Stop if: Stop if cleaning requires removing the sash or track, if water could reach electrical equipment, if the opening is above unsafe height, or if the drainage design is unclear.
Why this matters
Why: A functioning weep path supports drainage from the track. No exterior discharge or visible blockage can leave water trapped in the frame, while an open path with continuing wall leakage points beyond the seal to flashing, frame joints, or the surrounding wall. Not every window uses the same weep layout.
-
Separate a seal failure from glazing or installation failure
After the safe external checks, compare the first wet location and recurrence pattern. If water appears at the glass-to-frame edge or between panes, inspect only for visible failed glazing seal symptoms; if it enters around the frame, head, or wall, document the opening and surrounding materials. Do not remove glass, inject sealant into a cavity, or open the wall to chase water yourself.
Expected result: The leak follows a damaged gasket; moisture is between panes; water appears around the frame or above it; the same wall area is repeatedly wet; or the window remains dry after closure and drainage are corrected.
Next step: For a confirmed seal or glazing symptom, provide the exact window identification to a qualified repair provider. For frame, wall, roof, or recurring moisture, arrange a building-envelope or original-installer assessment and protect the interior until it is resolved.
Stop if: Stop immediately for structural rot, mold or sewage-like contamination, damaged glass, an unsafe opening, water near electrical systems, or any need to remove glass or finished wall materials.
Why this matters
Why: A replaceable weatherstrip is only one possible seal. A failed insulating-glass edge seal, installation flashing, roof or cladding defect, or concealed wall path needs a different trade or repair method. A dry test after correcting a closure or weep issue supports that limited cause but does not prove the entire assembly is waterproof.
Use your observations
Decision map
Find the observation that best matches what you see, then follow the next safe action.
-
PATH 01Safety boundary
What you see
The window will not close or lock evenly, or its weatherstrip/gasket has a visible gap, tear, or missing section.
Do this next
Remove only an obvious obstruction and follow the exact product instructions for permitted seal seating or adjustment. A damaged seal or distorted frame needs a qualified repair assessment.
Why this path and its safety boundary
Safety stop: Continue with the drainage and surrounding-opening checks instead of replacing a seal based only on the presence of water.
-
PATH 02Safety boundary
What you see
Water collects in the track and does not exit through the manufacturer's exterior weep openings.
Do this next
Gently clear accessible debris with an approved soft tool and retest once; if the path remains blocked or is sealed with caulk, stop and arrange window service.
Why this path and its safety boundary
Safety stop: Keep the drainage path open and continue tracing the seal, glazing edge, flashing, or wall route.
-
PATH 03Safety boundary
What you see
Water begins above or beside the frame, reaches trim or wall materials, or recurs after the seal is closed and drainage is clear.
Do this next
Stop using caulk as a patch and arrange a qualified window, installer, or building-envelope assessment of flashing, cladding, frame joints, and concealed moisture.
Why this path and its safety boundary
Safety stop: True
-
PATH 04Safety boundary
What you see
Moisture appears on the room side without rain or appears between glazing panes rather than at the frame.
Do this next
Treat room-side moisture as a possible condensation condition and moisture between panes as a glazing-seal assessment; use the exact window guidance and arrange service if it persists.
Why this path and its safety boundary
Safety stop: Continue with the rain-entry and drainage branches.
-
PATH 05Safety boundary
What you see
There is unsafe access, damaged glass, structural rot, mold, water near electricity, or a need to remove glass, trim, panels, or finished walls.
Do this next
Stop the inspection, protect people and the interior from further water, and obtain qualified help; do not climb, dismantle, or create a new opening.
Why this path and its safety boundary
Safety stop: True
Helpful context
Understand the symptom
Find the entry point before replacing a seal
Water on the sill is not automatically proof that the perimeter seal has failed. Rain can enter a track and should drain through designed weep openings; interior condensation can look like a leak; and water can travel behind trim from a flashing or wall defect. Note when the water appears, where the first wet spot is, whether it follows wind-driven rain, and whether the glass is wet on the room side or between panes. That pattern determines whether to inspect the gasket, drainage, glazing, or the surrounding opening.
Inspect seals and closure without forcing the unit
A compressible weatherstrip or gasket must meet the frame evenly when the window is closed and locked. Look for a visible discontinuity, crushed section, gap, or seal pulled out of its channel. Andersen notes that weatherstripping can lose its sealing ability with exposure, wear, and compression, while its maintenance guidance also calls for checking locks and sealant. Use the product's own maintenance instructions for any adjustment; do not force a sash or remove a gasket as a generic test.
Keep drainage paths open and escalate structural leaks
Weep openings are part of a window's drainage design, not defects to fill with caulk. Clear only accessible debris gently and verify that water exits at the exterior. If water still enters the wall, appears above the head trim, recurs after the seal is closed, or has damaged wood, drywall, insulation, or flooring, a sealant bead alone is unlikely to solve the cause. Have the window, flashing, cladding, and surrounding wall assessed as one system.
Safety boundary
Stop conditions
- Stop for water near electrical equipment, damaged glass, structural movement, rot, mold, sagging or bulging wall materials, or a storm condition that makes inspection unsafe.
- Do not climb onto a roof or use unsafe ladder access to inspect or seal a window.
- Do not remove glass, trim, sash components, finished wall materials, or a factory gasket as a generic test.
- Do not caulk over weep holes or seal the bottom of a frame in a way that traps drainage water.
- Do not use sealant to hide a recurring leak whose entry path or flashing condition has not been diagnosed.
Only after diagnosis
Potential parts
- window weatherstrip or sash gasket
Consider this class only when the exact window's seal is visibly damaged or displaced and the sash-to-frame leak is confirmed after closure and drainage checks.
Identify the complete window manufacturer, series, and profile before ordering; generic foam or adhesive strips may not provide the intended seal. - glazing gasket or insulated glass unit
Consider this class only when moisture or leakage is confirmed at the glass-to-sash edge or between panes and a qualified provider identifies a glazing-seal failure.
Glass and glazing components require exact dimensions and system identification; do not remove or reseal glass as a generic DIY step. - window-compatible exterior sealant
Consider sealant only for a clearly identified, product-approved joint after the drainage and flashing path is understood; sealant is not a substitute for failed flashing or trapped-water drainage.
Follow the window and cladding manufacturer's installation instructions and keep designed weep paths open.
When checks do not resolve it
Need a professional?
Arrange qualified window or building-envelope service when the seal is damaged, the window will not close or lock, the glazing seal may have failed, weep drainage remains blocked, water reaches the wall or trim, the leak starts above the frame, the same area gets wet after an external correction, or the repair would require removing glass, trim, flashing, or finished walls. Stop immediately for unsafe exterior access, damaged glass, structural rot, mold, water near electrical systems, or a storm hazard. Do not blindly caulk the bottom of a frame or its weep holes.
Common questions
FAQ
How can I tell whether a window seal is causing a leak?
Close and lock the window, then inspect the gasket or weatherstrip for a crack, tear, gap, compression damage, missing section, or displacement. If the seal contacts evenly but water starts above the frame, in the wall, or in a track that will not drain, investigate drainage or installation rather than replacing the seal automatically.
Why is water collecting in my window track?
Some window tracks are designed to collect water temporarily and drain it through exterior weep holes. Check the manufacturer's drainage openings for visible blockage and confirm that water exits outside; do not fill the openings with caulk.
Should I caulk around a leaking window?
Do not caulk blindly. A visible approved joint may need compatible sealant, but sealant alone is not a complete waterproofing system and can trap water if it blocks drainage or hides failed flashing. Diagnose the entry path first.
Is water on the inside of a window always a rain leak?
No. Room-side condensation can occur when humid indoor air meets cool glass, while water between panes can indicate a glazing-seal problem. Compare the timing with rain and identify the first wet surface before choosing a repair.
When should I call a professional for a leaking window?
Call when the seal or glass is damaged, the window will not close or lock, weep drainage remains blocked, water reaches trim or walls, the leak starts above the frame, or it returns after a safe external check. Stop for damaged glass, rot, mold, unsafe access, water near electricity, or any need to remove glass, trim, flashing, or finished walls.
Read the exact guide
Official sources
- Window and Patio Door Maintenance TipsAndersen Windows · Manufacturer maintenance guidance for checking weatherstripping, closure and locks, and visible sealant condition; used here for general seal-inspection mechanics with model-specific caveats.
- What should I do when my windows appear to be leaking?VELUX · Manufacturer support guidance for checking full closure and locking, distinguishing condensation from water entry, inspecting obvious exterior damage, and escalating persistent leaks; roof-window-specific details are not generalized.
- The consequences of a failed window installationAndersen Windows · Manufacturer professional guidance explaining flashing, sealant, drainage planes, sill-pan details, and why sealant alone should not be used as waterproofing; used to distinguish opening leaks from a gasket issue.
- Clean Window Weep HolesPacific Northwest National Laboratory, U.S. Department of Energy Building America Solution Center · DOE-supported guidance describing the purpose, location, blockage check, gentle cleaning, and retest of window weep holes; product-specific designs still control.
Community feedback
Share a repair observation
Share a plain-text repair observation. Accepted observations are published automatically; this page may take a moment to update.